

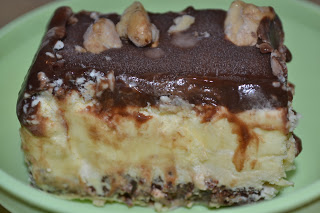
My MIL introduced me to buster bars years ago. I’m not sure where the name comes from…maybe if you eat too many you’ll bust your pants 😛 Whatever the case they are delicious. Chocolate, ice cream, nuts…yum.
I’ve made them several times. I made a peppermint stick version a couple years ago. Amazing!
After making our homemade Oreos Justin asked about buster bars…since the crust is made out of Oreos. So I made an updated real food version of buster bars. They take some work, but they are worth it!
I made the cookies for the crust ahead of time. Other than that I made everything and assembled it in about an hour. This is a great summer (or anytime) treat. You can experiment with flavors of the crust and the ice cream. Mint and chocolate work well. You could also do peanut butter and chocolate. Or even a fruity version. You can’t go wrong.
This post is linked to Fat Tuesday and Real Food Wednesday.
Buster Bars
Fudge Sauce:
1 cup pure cane sugar
1/3 cup cocoa
3 Tbsp. organic AP flour (you may also use cornstarch or arrowroot)
1/4 tsp. unrefined sea salt
1 cup boiling water
1 Tbsp. butter
3/4 tsp. vanilla
Chocolate Cookie:
3/4 cups whole wheat flour
1/4 cup cocoa powder
2 tsp. chocolate extract
1/4 cup organic cane sugar
1/2 tsp. baking soda
1/4 tsp. salt
1/4 cup butter, room temp (you can substitute coconut oil or palm shortening)
3 Tbsp. honey
water
Vanilla Ice Cream:
3 egg yolks
1/3 cup maple syrup
1/4 cup honey
1 tsp. vanilla extract
3 cups heavy cream (preferably raw, not ultra pasteurized)
Cream Filling:
1/4 cup organic palm shortening
5 – 6 Tbsp. organic all purpose flour (you can substitute corn starch or arrow root)
1/4 cup maple syrup
—————————————————————–
Fudge sauce can be made in advance. Do not pour on ice cream layer until the ice cream is firm and the sauce is completely cooled.
Blend sugar, cocoa, flour and salt in sauce pan. Turn on heat and add boiling water. Bring to a boil. Cook, stirring constantly, until thick, about 3-4 minutes. Remove from heat. Stir in butter and vanilla. Store in refrigerator.
——————————
Make the chocolate cookie at least an hour in advance. I do it a day ahead.
Cream butter and sugar in a large bowl. Add cocoa and chocolate extract. Blend well (a hand mixer works well). Taste. Add more chocolate extract until strong enough. Add flour, baking soda, salt and honey. Blend well. If dough is still crumbly slowly add water, 1 Tbsp. at a time until dough will hold together when squeezed with your hand.
Place dough on a parchment lined baking sheet. Roll until the dough is about 1/8 – 1/4″ thick. Bake at 350 for 13 minutes. Let cool completely.
When cookie is cooled break into chunks and process into crumbs in a food processor. This can all be done in advance.
——————————-
Cream shortening, flour and maple syrup in a small bowl. Add more flour for a stiffer cream (note that it will firm up/become solid when chilled). Add more maple syrup for a sweeter cream.
——————————-
Blend ice cream ingredients in a blender. Taste. Make sure it is a little overly sweet. The sweetness will go away once the ice cream is churned. Process in ice cream maker (mine takes about 15 minutes in a Kitchen Aid ice cream attachment).
———————————
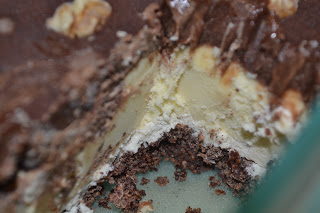
Assemble the Buster Bars:
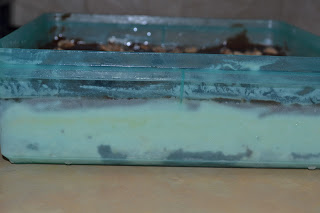
Mix chocolate cookie crumbs with 1/4 cup melted butter. Press into the bottom of a 9×9 or 9×13 pan (preferably one with a lid) (a smaller pan will give you thicker bars). Place in the freezer.
Prepare the cream filling. Spread over cookie crust. Return to freezer.
Make ice cream. Immediately spread over cream filling. At this point you can add some toppings. I added a handful of chocolate chips. You could also do any kind of nut. Return to freezer and let set completely.
When ice cream is solid spread fudge sauce over top. You may add more toppings here. I did some chopped nuts. You could add more crushed cookie. Return to freezer until fudge is solid.
Remove from freezer about 5 minutes before serving to make cutting easier.
Gosh!
We really love the way you shot Buster Bars
You are really not just a food blogger, we think that you are a professional food photographer.
As a food photography site, we’re always looking for best food pictures to feature on our site http://www.foodporn.net/
Why don’t you submit yours and make other people hungry.
You know it’s fun to make others hungry. Especially when they are so hungry they finally want to create your recipe. 🙂
It is worth the try. 🙂
Thanks!