
In June of 2009 I came across a recipe on 101 Cookbooks for homemade thin mints. I printed the recipe…and put it in a pile somewhere. And there it sat. Now three years later, I finally got around to making them yesterday.
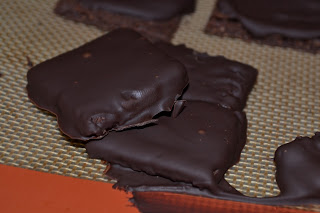
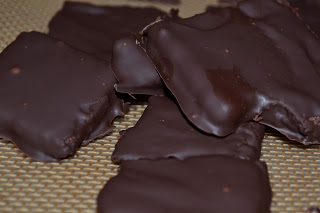
The recipe is very simple. It’s a chocolate wafer that you dip in melted chocolate. It tastes very good. But I had some issues with the wafer dough. It was kind of crumbly. When I took the cookies out of the oven they would fall apart if I touched them. After they cooled I could handle them ok. But when I started dipping them in the chocolate they sort of melted and crumbled (maybe I made them too thin?). So I only dipped a few of the cookies. For the rest I just spread the mint chocolate over the top. Not quite as good as a fully coated cookie, but they still taste fine. I was pressed for time so I went simple with the shape. I made squares (using a pizza cutter) instead of cutting out individual circles and trying to re-roll the dough.
Overall this is a really good cookie. It does taste like a thin minty chocolaty cookie. I can’t really compare it to the Girl Scout version since it’s been at least 15 years since I tasted one. If I make these again I’ll try to get the dough a bit more moist and see if that helps. I didn’t have pastry flour, so maybe that made a difference as well. Maybe I’ll try adding an egg next time. And adding a little heavy cream to the chocolate might make it thinner and easier to dip such a delicate cookie. It was pretty thick. I guess I’ll just have to make more soon to try. 🙂
Homemade Thin Mints
Chocolate Wafers:
8 ounces organic butter, room temperature
1 cup organic powdered sugar
1 tsp. natural vanilla extract
1 cup cocoa powder
3/4 tsp. fine grain sea salt
1 1/2 cups whole wheat pastry flour
Chocolate Peppermint Coating:
1 pound good quality semi-sweet chocolate, chopped
natural peppermint oil to taste
Preheat your oven to 350. Racks in the middle zone.
Make the cookie dough: In a mixer cream the butter until it is light and fluffy. Add the powdered sugar and cream some more, scraping the sides of the bowl a couple times if necessary. (Add egg??) Stir in the vanilla extract and then the salt and cocoa powder. Mix until the cocoa powder is integrated and the batter is smooth and creamy, sort of like a thick frosting. Add the whole wheat pastry flour and mix just until the batter is no longer dusty looking, it might still be a bit crumbly, and that’s o.k. You don’t want to over mix and end up with tough cookies.
Turn the dough out onto a counter, gather it into a ball, and kneed it just once or twice to bring it together into once nice, smooth mass. Place the ball of dough into a large plastic bag and flatten it into a disk roughly 3/4-inch thick. Place the dough in the freezer for 20 minutes to chill. (Might be easier to roll it in a log, freeze it and then just slice thin rounds…I’ll probably try that next time.)
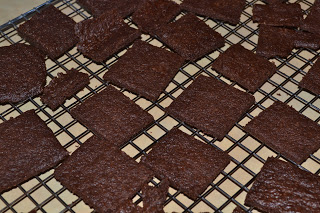
Roll out and bake: Remove the dough from the freezer and roll it out really thin, remember how thin Thin Mints are? That’s how thin you need your dough, about 1/8-inch. You can either roll it out between two sheets of plastic, or dust your counter and rolling pin with a bit of flour and do it that way. Stamp out cookies using a 1 1/2-inch cutter (this time I used one with a fluted edge, I’ve done hearts and other shapes in the past). (I used a pizza cutter to cut them into squares…much easier and no waste) Place cookies on a parchment-lined baking sheet and bake for 10 minutes. Remove the cookies from the oven and allow them to cool completely on a baking rack if you’ve got one.
Make the peppermint coating:
While the cookies are in the oven you can get the coating ready. Slowly melt the chocolate in a double boiler (or glass bowl over a pot of simmering water), stirring occasionally until it is glossy and smooth (add heavy cream to thin if necessary). Stir in the peppermint extract. If you think the chocolate needs a bit more peppermint kick, add more extract a drop or two at a time – but don’t go overboard (I used 4 or 5 drops for a half recipe).
Finishing the cookies: You are going to coat the cookies one at a time and then gently set them on a parchment-lined baking sheet to set. Drop one cookie into the chocolate and (using a fork) carefully make sure it gets fully coated. Lift the cookie out of the chocolate with the fork and bang the fork on the side of the pan to drain any extra chocolate off the cookie. You are after a thin, even coating of chocolate. Place on the aforementioned prepared baking sheet, and repeat for the rest of the cookies. Place the cookies in the refrigerator or freezer to set. They will set at room temperature, it just takes much longer, and I prefer them straight out of the freezer anyways 😉
Make 3 or 4 dozen cookies.