Home ยป canning

Tag: canning

An easy solution for preserving pears without spending hours in the kitchen - how to make and can pear sauce. A great no-sugar-added alternative to applesauce. #canning #realfood #healthykids #pearsauce

How to Make & Can Pear Sauce | A No Sugar Added Alternative to Applesauce

Fall is a busy time of canning applesauce and freezing pumpkin. But don’t forget about preserving pears! With a short season and a busy schedule use this guide to stock your pantry with pear sauce before the pears are gone.

An easy solution for preserving pears without spending hours in the kitchen - how to make and can pear sauce. A great no-sugar-added alternative to applesauce. #canning #realfood #healthykids #pearsauce

I’m a big fan of hardy produce. You know, the kind that can sit on the counter or in the fridge for weeks and still be OK? Like carrots, potatoes, apples, rutabaga, parsnips, cauliflower, and cabbage.

I love all kinds of fruits and veggies. But some of them are a bit demanding.

One day an avocado is not quite ripe. The next day it’s mushy.

The same goes for pears. You check and check for ripeness. Then all of a sudden you’ve missed the window and they over ripe.

Personally, I like to be in control instead of my produce. But it just doesn’t work that way for everything.

So I always get anxious when it’s pear season. I want to preserve them. But I just don’t have time any old day. Will I time it just right? Will I be stuck peeling hard pears? Or will I let them go too far because we were busy with soccer and band?

It’s a gamble.

I try to do a fair amount of canning each fall. How much I do depends on my kids’ ages and how I’m feeling.

Regardless, I don’t like to spend hours on end in the kitchen each day to keep up with produce preservation.An easy solution for preserving pears without spending hours in the kitchen - how to make and can pear sauce. A great no-sugar-added alternative to applesauce. #canning #realfood #healthykids #pearsauce

How to Can Pears

I already take the easy route when it comes to canning peaches. That is a life saver!

Then I get to pears. There is really no way around it.

Canning pears takes a lot of time.

Lots of peeling and slicing (especially if the pears are small). It can take up to sixty pears just to do one round of canning! That is a lot of peeling.

So I stopped doing it years ago. Much to my husband’s disappointment. I just don’t have time.

But I still want to preserve this amazing fruit to enjoy it all winter.

How to make and can pear sauce - an easy alternative to applesauce

How to Can Pears Without Sugar

Enter pear sauce.

It is just like applesauce but with pears. Honestly, I would take pear sauce any day over applesauce. It is that good.

There is no need to add any sweetener as pears are plenty sweet on their own.

The other thing you don’t have to do – peel them!

Preserving pears is quite easy when you can just wash, quarter, cook and puree. Then either can or freeze the pear sauce.An easy solution for preserving pears without spending hours in the kitchen - how to make and can pear sauce. A great no-sugar-added alternative to applesauce. #canning #realfood #healthykids #pearsauce

Pear Sauce for Baby

One of the reasons I love having pearsauce on hand is that it makes a super easy first food for little ones six months and up. You can serve it plain or turn it into a nutrient dense baby porridge. Warm the pear sauce slightly and mix in coconut oil and an egg yolk. Stir and serve!

My big kids love pear sauce too! Sometimes I even make it extra special by adding strawberries, raspberries or blueberries from our freezer stash. As they melt and let off juice it colors the pearsauce and adds an extra burst of flavor.

Serve it cold. Serve it warm with a pinch of cinnamon. Add it to oatmeal. Mix it in yogurt.

You really can’t go wrong. You also don’t need to spend days on end making pear sauce.

Pear Sauce Canning

Here is my busy mom’s solution to preserving pears. I am able to work through a half bushel in one day (with four young kids, including a nursing little one) and still manage to do our school work, go to activities, and get healthy meals on the table.

It only takes about twenty minutes to wash and slice one batch of pears. Then you can let it cook for a bit while you tend to something else. Being able to make pear sauce in steps is so handy!

A full batch (seven quarts) takes about 30 – 35 medium to large pears. So figure out how many jars you’d like to can and then figure out how many pears you need. I usually get one bushel of pears. It makes three rounds of pear sauce with some pears left over for eating fresh.

Pear sauce makes a great alternative to applesauce. Variety is key to any diet, especially if you are implementing a rotation diet for food allergies. So this is a nice change of pace! My kids actually prefer it over applesauce.

Have you ever tried preserving pears? I encourage you to try pearsauce!

Are you new to canning? Check out my step-by-step tutorial to get you going.An easy solution for preserving pears without spending hours in the kitchen - how to make and can pear sauce. A great no-sugar-added alternative to applesauce. #canning #realfood #healthykids #pearsauce

What to do With Extra Pears

Depending on the size of the pears and the quantity you buy, sometimes you end up with a pile of extra pears. And like I said before, they can go from almost ripe to mush pretty quickly. So what do you do with those extra pears?

Of course you can eat them fresh! Pears are a sweet treat on their own. But you can only eat so many. Here are a few other options for using up extra ripe pears.

Homemade Pear Sauce Recipe

Homemade Canned Pear Sauce

Prep Time 30 minutes
Cook Time 45 minutes
Servings 7 quarts
Author Mary | Just Take A Bite

Ingredients

  • 30 - 40 medium ripe pears
  • 1 cup water

Instructions

Making Pear Sauce

  1. Wash pears (this can be done in a clean sink full of water).

  2. Add 1 cup water to a large stockpot and turn on high heat.

  3. Quarter and core pears, placing them in the stockpot as you go.

  4. Adjust heat to simmer and cook the pears until soft, stirring periodically, about 15 minutes.

  5. In batches puree the cooked pears and their juice in a high-powered blender until smooth.

Freezing Pear Sauce

  1. Chill the pear sauce.

  2. Put the pear sauce in freezer-safe containers.

  3. Label and freeze for up to a year.
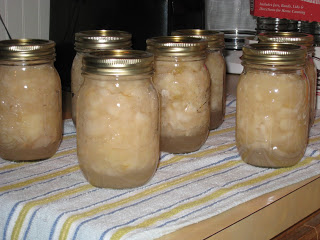
Canning Pear Sauce

  1. Return the pureed pear sauce to the stockpot and keep warm.

  2. Prepare the water bath canner (filled with water and jars and get the jars hot).

  3. Ladle the hot pear sauce into hot jars, leaving 1/2" headspace.

  4. Wipe the rims of jars and place the lids and bands on.

  5. Can in hot water bath for 30 minutes (quarts) or 25 minutes (pints).

  6. Remove the canner lid and let the jars sit for 5 minutes.

  7. Remove jars from the canner and place on a towel to cool, untouched for 8 hours.

Recipe Notes

  • One batch of pear sauce makes 6-7 quarts or 12-14 pints.
  • A half-bushel of pears will make 2 rounds of pear sauce, with a few pears left for eating fresh.

This post is linked to Savoring Saturdays.

Looking for a delicious jelly that is naturally free of pectin? This is it! Red plum raspberry jelly is the perfect fruit combination for your morning toast, mixed into yogurt or spread on your pancakes.

Red Plum Raspberry Jelly {No Added Pectin!}

Looking for a delicious jelly that is naturally free of pectin? This is it! Red plum raspberry jelly is the perfect fruit combination for your morning toast, mixed into yogurt or spread on your pancakes.

Looking for a delicious jelly that is naturally free of pectin? This is it! Red plum raspberry jelly is the perfect fruit combination for your morning toast, mixed into yogurt or spread on your pancakes.I’ve said it before and I’ll say it again…I’m not very good at making jams and jellies. Even when I use the packs of pectin!

I have switched over to using gelatin to create my strawberry freezer jam, cherry jam, grape jelly and five minute peach jam. They turned out beautifully!

But I recently teamed up with Ball Brand to try one of their recipes. I had the great pleasure of perusing The All New Ball Book Of Canning And Preserving. It’s like a canner’s dream.

The pictures are gorgeous. And the recipes all sound so delicious. I wish I had time to try them all!

But I had to just pick one to try and share with you.

Looking for a delicious jelly that is naturally free of pectin? This is it! Red plum raspberry jelly is the perfect fruit combination for your morning toast, mixed into yogurt or spread on your pancakes.

Trying My Hand At Jelly Again

With our allergies I don’t use pectin. Since I can’t be certain of the source it’s too risky. I know a lot of pectin is made from apples. And my two youngest are allergic to apples.

So instead of modifying a recipe I went for one that didn’t even need pectin. Red plum raspberry jelly sounded like the perfect combination of fruit flavors. And it is!

Neither fruit over powers the other.

There is no doubt that red plum raspberry jelly tastes good. You can use it for your  morning eggs and toast or mixed into some plain yogurt. We like it on pancakes.

Looking for a delicious jelly that is naturally free of pectin? This is it! Red plum raspberry jelly is the perfect fruit combination for your morning toast, mixed into yogurt or spread on your pancakes.

The Outcome

The real question, though, is did I manage to make good jelly without using gelatin?

Ummmm, no.

I read the instructions on how to look for the gelling point. I used a thermometer to monitor the temperature (got it to 220 just like it said).

But the timing worked out that it was right around the gelling point when I was trying to get my toddler down for a nap. And of course this was the one day where she was fighting sleep. In fact, instead of taking 3-10 minutes to get her to sleep it took over an hour and a half (including a dirty diaper change)! Maybe it was all those raspberries she ate!

Looking for a delicious jelly that is naturally free of pectin? This is it! Red plum raspberry jelly is the perfect fruit combination for your morning toast, mixed into yogurt or spread on your pancakes.

So I kept bouncing back and forth between checking the jelly and checking the toddler. And at one point I just said I have to get it done and said a prayer. Well, it wasn’t gelled.

My Big Mistake

And now that I am re-reading the directions I see that it says to stir constantly…oops. Not easy when trying to get a toddler to nap. I think all of the pectin came to the top when I wasn’t stirring…there was a sticky, pink foam. Oops.

Note – keep stirring while it boils!!

All is not lost, though. We now have sweet red plum raspberry syrup! I can’t wait to use it on our pancakes this week (every Friday we have breakfast for dinner…pancakes is on the menu).

I might also try cooking it down a bit or adding a little gelatin when I open a jar. Just to see what happens.

It’s Your Turn

In spite of my inability to make jams and jellies I am sharing this delicious recipe with you today. I bet you’ll have better luck. Maybe you can teach me a thing or two about gel! My motto moving forward is going to be “Follow the directions and keep stirring.”

I hope to try this recipe again and actually cook it the right way. I REALLY want to try red plum raspberry jelly on bread (freshly baked sourdough would heavenly).

How about you? Are you a pro at making jams and jellies? Or are you jelly challenged like me?

I’d love to hear how it goes if you try red plum raspberry jelly.

But there’s more! Keep reading.
Looking for a delicious jelly that is naturally free of pectin? This is it! Red plum raspberry jelly is the perfect fruit combination for your morning toast, mixed into yogurt or spread on your pancakes.

Red Plum Raspberry Jelly
Yields 4
Write a review
Print
Ingredients
  1. 2 lbs. firm, ripe red plums, halved
  2. 1 cup water
  3. 4 cups raspberries
  4. 3 cups cane sugar
  5. cheesecloth
Instructions
  1. Pit plums, reserving pits. Chop plums and place in a 6 qt. stainless steel or enameled Dutch oven. Lightly crush the plum with a potato masher.
  2. Stir in the water and reserved pits. Bring to a boil, reduce heat, cover and simmer 10 minutes.
  3. Add raspberries, crushing with a potato masher. Return to a boil, cover, reduce heat and simmer 10 minutes.
  4. Line a large, fine wire mesh strainer with 3 layers of dampened cheesecloth. Place the strainer over a large bowl.
  5. Pour the plum mixture into the strainer (do not press down). Cover and let stand 3 hours or until collected juice measures 3 1/2 cups and mixture no longer drips.
  6. Wash and dry Dutch oven.
  7. Pour the juice into the Dutch oven. Stir in the sugar and bring to a boil over high heat. Boil, stirring constantly, to gelling point.
  8. Ladle hot jelly into a hot jar, leaving 1/4-inch headspace.
  9. Wipe jar rim. Center lid on jar. Apply band and adjust to fingertip tight.
  10. Place jar in boiling water canner. Repeat until all jars are filled.
  11. Process jars 10 minutes, adjusting for altitude. Turn off heat, remove lid and let jars stand 5 minutes.
  12. Remove jars from canner and cool.
Notes
  1. Tip - plum pits are super high in pectin, so simmering them with the fruit really helps give this jelly its velvety smooth set.
Just Take A Bite https://justtakeabite.com/

Looking for a delicious jelly that is naturally free of pectin? This is it! Red plum raspberry jelly is the perfect fruit combination for your morning toast, mixed into yogurt or spread on your pancakes.Can It Forward

Don’t forget to “Can It Forward” with Ball Brand. On July 22, 2016 they are hosting a Can-It-Forward day live on Facebook. You’ll see demos (I think I need to tune in for one on jelly). Plus Ball Brand will be donating to a local charity. The more engagement they receive the more they donate!

Here’s how you can participate.

  • Pledge to can-it-forward by signing up via the pledge page and share with friends.
  • Tune in on July 22nd to watch canning demonstrations via Facebook Live from 10:00AM โ€“ 3:30PM ET. Each hour, viewers will have the chance to win a giveaway prize!
  • If you engage with any of the Facebook Live recipe videos, a donation will be made to charity.
  • You can ask Jarden Home Brands canning experts any preserving or home canning questions via Twitter with the hashtag #canitforward from 10AM โ€“ 5PM ET on July 22nd. Consumers can also share their own #canitforward creations with the brand on Pinterest and Instagram.

More For You

Ball Brand would also like to give one of my lucky readers coupons for canning supplies and a copy of The All New Ball Book Of Canning And Preserving! Enter below for your chance to win.
a Rafflecopter giveaway

Does red plum raspberry jelly sound like a delicious combination? What is your favorite jelly flavor?

The Easiest Way to Can Peaches | Homemade Dutch Apple Pie

The Easiest Way to Can Peaches: A Step-by-step Tutorial

Want to know the easiest way to can peaches? It’s all about one key step. Follow this simple step-by-step tutorial to preserve one of summer’s gems so you can enjoy peaches year round.

The Easiest Way to Can Peaches | Homemade Dutch Apple Pie

The first time I canned peaches I was overwhelmed. There was so much work involved.

I was not new to canning. I didn’t have three kids yet. No big deal.

I had purchased a half bushel of peaches assuming that would be a good starting point. I ended up doing one round of canned peaches and freezing the rest. After peeling, pitting, chopping and canning one batch I gave up and just figured canned peaches would not be on my list of to-dos again for many…many years.

Then my mother-in-law told me a trick that changed everything.

Do NOT peel your peaches!

Of course this makes canning peaches about ten times easier. But it also preserves the sweetness and flavor of the peaches.

There is no need to worry about having to eat the skin either. It comes right off when you are ready to eat the peaches.

I have now successfully canned many…many quarts of peaches! Instead of being the hardest canning task it is about the easiest one I do all year.

I try to buy a half bushel every summer and can twenty one quarts of peaches, with a few left over for baking and eating.

Have you ever wanted to try canning peaches but it seems like a daunting task? I promise you it is not.

Grab a few peaches before they are gone for the summer and preserve them to enjoy all winter.

No more spending hours in the kitchen. This is the easiest way to can peaches. This summer I canned twenty one quarts in ONE day! With three young children, one nursing frequently. If I can do it anyone can!

The Easiest Way to Can Peaches | Homemade Dutch Apple Pie

One round of canning:

One half bushel of peaches = 3 rounds of canning (21 quarts) plus a few extra peaches for eating fresh

The Easiest Way to Can Peaches

The Easiest Way to Can Peaches | Homemade Dutch Apple Pie

  1. Let the peaches sit in a single layer until they are ripe but still slightly firm.The Easiest Way to Can Peaches | Homemade Dutch Apple Pie
  2. Prepare the simple syrup: Heat water and sugar in a large pot until sugar is dissolved. The syrup needs to be warm/hot when ready to can. You can prepare the syrup up to a few days in advance and just warm it before canning.
  3. Fill the canner with water and place the clean, quart jars inside. Put the lid on. Turn on the stove to high heat and let the water heat up until small bubbles appear. Maintain this low simmer and allow the jars to heat for ten minutes.The Easiest Way to Can Peaches | Homemade Dutch Apple Pie
  4. Wash the peaches well. This is important since you are keeping the skins on.The Easiest Way to Can Peaches | Homemade Dutch Apple Pie
  5. Fill a large bowl 2/3 full of water. Add 1/4 cup of lemon juice.
  6. Cut the peaches in half. Twist. Remove the pit. Quarter the peaches and place in the bowl of lemon water. Continue until all of the peaches are quartered.The Easiest Way to Can Peaches | Homemade Dutch Apple Pie
  7. Remove the jars from the hot water.
  8. Fill the hot jars with the peaches, skin side up if possible.The Easiest Way to Can Peaches | Homemade Dutch Apple Pie
  9. When all of the jars are full ladel the hot syrup into the jars, leaving 1 – 1 1/2 inches of space at the top of the jar.The Easiest Way to Can Peaches | Homemade Dutch Apple Pie
  10. Wipe the jar rims. Place a lid on and secure a band around the lid.
  11. Place all of the jars back in the canner. Put the lid on. Return to a boil.The Easiest Way to Can Peaches | Homemade Dutch Apple Pie
  12. Let the jars process for 30 minutes (25 minutes if doing pints).
  13. Turn off the heat. Remove the canner lid. Let sit for 5 minutes.The Easiest Way to Can Peaches | Homemade Dutch Apple Pie
  14. Remove the jars from the canner and place on a towel. Let the jars sit, untouched for at least 6 hours.
  15. When the jars are completely cool you can remove the bands, label the lids and store in your pantry.

In order for me to support my blogging activities, I may receive monetary compensation or other types of remuneration for my endorsement, recommendation, testimonial and/or link to any products or services from this blog.

Canned Chili Sauce

 This homemade canned chili sauce goes perfectly with roast beef and tastes so good you’ll want to eat it plain!

This is a recipe from my mother-in-law for canned chili sauce. It is a great way to use late August produce – tomatoes, peppers and onions.

The chili sauce can be served alongside roast beef or any cut of meat you like. My kids even like to eat it plain or use it as a salsa substitute.

The great thing about this chili sauce is that it is a bit sweet instead of spicy. So my daughter that can’t handle spicy foods loves it.

I like to always have some in the pantry.

How about you? Do you like chili sauce? What do you use it for?

Canned Chili Sauce

4 qts. tomatoes, peeled, chopped
5 medium or 2 large onions, diced
2 green peppers, diced
1/2 bunch celery, diced
(1 medium zucchini, diced…my add in, optional)
1 1/2 Tbsp. salt
3/4 cup sugar
1 cup vinegar

Simmer all together for 3 hours. Process in boiling water for 10 min. Makes 5 – 6 pints.

Canned Applesauce

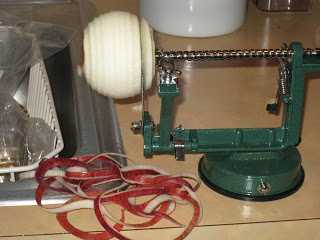
I canned my first batch of applesauce of the season last night. I finally got to try out my apple peeler. All I can say is WOW! What a time saver. If you want to do any significant amount of canning and/or baking with apples I highly recommend getting one. It only takes a few minutes to peel, core and slice enough apples for a whole batch of sauce (15-17 LARGE apples) instead of like a half hour doing it by hand. I wish I had gotten one years ago.

Since I didn’t have a ton of time last night I did a batch of chunky applesauce. I added sugar to this batch…it will be for Justin and me (or Rebecca when she’s older). I cooked another batch this morning before breakfast (that’s how fast it goes with the peeler:). I’ll run that through the food mill and can it later today. I didn’t add sugar to this batch. Hopefully it’s sweet enough. Some of the apples are kind of tart this year.

I’ve still got lots of apples, so I’m hoping to do several more batches of sauce…especially since it’s so fast now. I want to freeze some sliced apples. And I’m hoping to try apple butter tomorrow. I got Justin’s mom’s recipe. Looks like it takes a while, but it’s soooo good (I’ve had hers). So we’ll see how it goes. I’ll post that recipe after I make it. Here is the basic applesauce recipe…also from Justin’s mom

.

Canned Applesauce
4 1/2 qts. apples, peeled, cored and roughly chopped into big chunks
1 qt. water
1 cups sugar (optional)
 
Boil water with sugar.
Add apples. Bring to a boil.
Boil 5 min.
Can in boiling water for 20 min. Makes 7 pts. (Can in boiling water for 25 min. if using quarts).
 
*This is the original recipe. From experience here is what I’ve come up with that works for me:
30 med – large apples
3 cups water
 
*After cooking the apples for a few minutes I mash them with a potato masher to break them up a bit more.

** I puree the apples in my Vitamix for smooth applesauce. When using this method you don’t have to peel the apples. The peels blend right in.