Home » Kid-friendly Recipes » lunch » Page 3

Category: lunch

No more boring fruit. This simple creamy orange poppy seed salad dressing transforms any combination of fruit into a special side dish.

Creamy Orange Poppy Seed Salad Dressing

Nothing says spring like a fresh fruit salad. Top it with this creamy orange poppy seed salad dressing for a treat the whole family will love.

No more boring fruit. This simple creamy orange poppy seed salad dressing transforms any combination of fruit into a special side dish.

It’s no secret. I LOVE salad. I could (and sometimes do) eat it every day (I’ll be sharing my secret super food dressing soon!).

But my family…not so much. For my husband a “big” salad is about ten pieces of lettuce. So when I was challenged by Stonyfield and The Cookful to create a new salad dressing it took some real thinking. What could I make that my family would actually like?

No more boring fruit. This simple creamy orange poppy seed salad dressing transforms any combination of fruit into a special side dish.

Skip the lettuce.

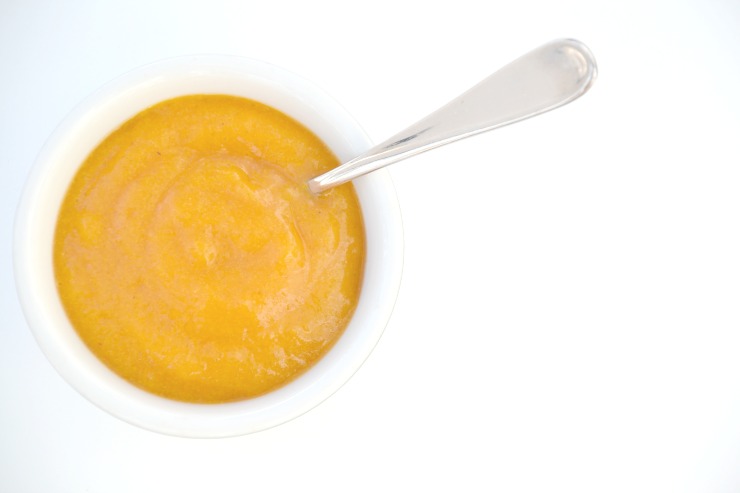
Instead of going the traditional lettuce salad route I opted to create a fun fruit salad! Use any fresh fruit you have on hand (especially what’s in season!). Add a burst of flavor with Stonyfield vanilla Greek yogurt (now available in full fat!!), freshly squeezed orange juice and poppy seeds.

I used what we had on hand in the house – Fat Free Vanilla Greek Yogurt. You could also use whole milk yogurt combined with a little maple syrup. But the Greek yogurt really adds a nice thickness.

This creamy orange poppy seed salad dressing is so easy to make. My big kids can make it by themselves (they are learning to do so much from The Kids Cook Real Food eCourse!!).

No more boring fruit. This simple creamy orange poppy seed salad dressing transforms any combination of fruit into a special side dish.

Great for oral sensitivities.

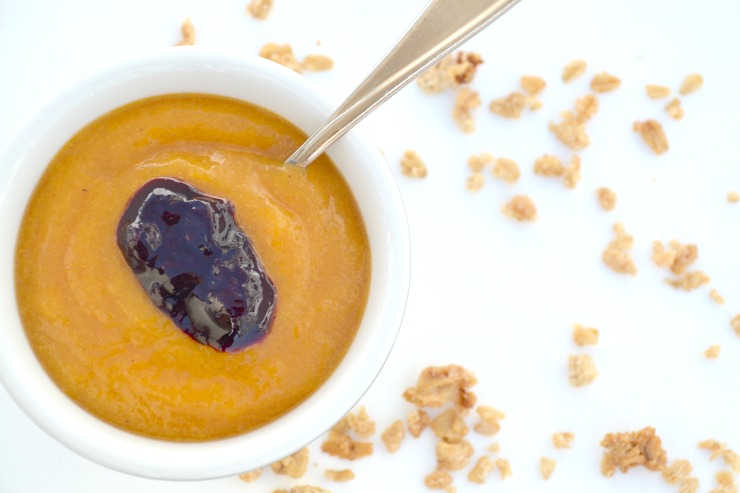
My oldest has a very sensitive mouth. Any hint of tartness or tough skin in her fruit and she won’t eat it. One fruit she usually does not like is grapes. She makes some pretty good pucker faces when she tries them.

But the other day all I had in the house was a bowl of grapes. I gave her a dish topped with creamy orange poppy seed salad dressing. Not a single complaint! She licked the bowl clean. It’s that good.

No more boring fruit. This simple creamy orange poppy seed salad dressing transforms any combination of fruit into a special side dish.

Spruce up your salad.

If you like sweet salad dressings (like me!) you could even use this on a lettuce salad. Add some crispy pecans, dried cherries and feta cheese. Delicious!

Looking for some other great salad dressing recipes? The Cookful has plenty to choose from . I think the No Egg Caesar Dressing would be great.

Ready to add some extra flavor to your fruit salad?

Try this super easy creamy orange poppy seed salad dressing. No more boring fruit.

No more boring fruit. This simple creamy orange poppy seed salad dressing transforms any combination of fruit into a special side dish.

Creamy Orange Poppy Seed Salad Dressing
A creamy fruit salad dressing with a pop of orange flavor.
Write a review
Print
Ingredients
  1. 1/2 cup Stonyfield vanilla Greek yogurt (fat free or full fat)
  2. juice of 1/2 - 1 orange (depends how strong you want the orange flavor)
  3. 1/2 tsp. poppy seeds
  4. pinch unrefined sea salt
Instructions
  1. Mix all of the ingredients.
  2. Chill for 10 minutes.
  3. Serve over fruit as a salad, on the side as a dip or on a lettuce salad.
  4. Store in the refrigerator for up to 10 days.
Notes
  1. This makes enough for a large fruit salad.
  2. You can replace the vanilla yogurt with plain yogurt and 1 Tbsp. honey or maple syrup.
Just Take A Bite https://justtakeabite.com/

Have you heard of The Cookful?

It’s a great new site that really digs deep into specific food topics. They came up with some great salad dressing recipes!

I am working with Stonyfield and The Cookful on this post. I have been compensated for my time commitment, but I have not been paid to post positive reviews. Opinions are my own.

Real fruit combined with grass-fed gelatin create the perfect snack - strawberry kiwi gummies.

Strawberry Kiwi Gummies

Just because your gummies are homemade doesn’t mean the flavor has to be boring. These strawberry kiwi gummies are bursting with flavor and made from real fruit.

Real fruit combined with grass-fed gelatin create the perfect snack - strawberry kiwi gummies.

Fruit snacks are a go-to snack for many kids these days. They are easy, sweet and chewy. Kids love them. They don’t require any work on mom’s part. Just grab a bag and go.

But have you ever actually looked at the ingredients? Many contain artificial flavors and colors. Even if you get natural or organic fruit snacks they contain things like caranuba wax and “natural” flavor.

Natural flavor is actually not that different from artificial flavor and can have the same impact on your child’s health and behavior. Not to mention it’s important to avoid it if your child has allergies since it can contain anywhere from 50 to 100 unknown to you ingredients. So it could contain a hidden allergen.

Real fruit combined with grass-fed gelatin create the perfect snack - strawberry kiwi gummies.

What’s the solution? Make your own!

Homemade gummies are so easy to make. The flavor combinations are endless. And you can make all sorts of fun shapes with candy molds.

These strawberry kiwi gummies are both fun and fruity. The juice of real strawberries and kiwis is combined with grass-fed gelatin for a protein-packed, nourishing snack.

Want to learn how to make them?

Click here to head over to Super Healthy Kids where I’m sharing this simple recipe.

Allergen Free No Cook Pumpkin Yogurt | Just Take A Bite

Allergen Free No Cook Pumpkin Yogurt

No need to give up yogurt just because you have allergies! This pumpkin yogurt only takes five minutes to prep and still packs a nutritional punch with protein and probiotics.

Allergen Free No Cook Pumpkin Yogurt | Just Take A Bite

I’ve been dairy free for 18 months now, ever since my youngest was about a month old. This is not the first time I’ve had to go dairy free. But no matter how many times and no matter how long it lasts it’s never easy.

I LOVE dairy. Love it.

One of the things I miss most is yogurt. I used it eat it almost daily for breakfast or lunch. Add some granola…my happy place.

For most people there are some decent options to replace dairy yogurt – coconut, almond, etc. But those are all out for me too. We have that many allergies. So I’ve just gone without yogurt.

Until now.

Allergen Free No Cook Pumpkin Yogurt | Just Take A Bite

Problem solved.

My youngest it starting to notice when her siblings have yogurt and she keeps asking for it. Oh, how I’d love to give it to her!! It breaks my heart to have to say no. I feel so mean since she doesn’t understand why.

Why Won't My Child Eat Banner Image 400x335


So I came up with a solution.

I created pumpkin yogurt. It is creamy and slightly sweet. It has lots of protein from both grass-fed collagen and gelatin plus a healthy dose of probiotics (this is the one we use). Just like the real thing.

An added bonus is you also get a big helping of vegetables!

Allergen Free No Cook Pumpkin Yogurt | Just Take A Bite

The first time I made pumpkin yogurt I added fruit and some crumbled homemade graham crackers. I was instantly taken back to my happy place. Finally! I can have yogurt again!

My little one loves it too. I gave her a small dish. Her response: “mrrrr” (more). That is all I needed to hear.

To my surprise even my four year old loves it. When I first told him I made pumpkin yogurt he made the “don’t come near me with that stuff” face. But after he tried it he had to have a second dish! Maybe me calling it pumpkin PIE yogurt helped a little.

Allergen Free No Cook Pumpkin Yogurt | Just Take A Bite

More than just great taste.

Not only is pumpkin yogurt a nutritious breakfast it is also so easy to make!

  1. Mix all of the ingredients in a blender.
  2. Pour the mixture in a jar.
  3. Let it culture for about eight hours.

That’s it.

Pumpkin yogurt makes a great breakfast, lunch or snack. Eat it plain or add your favorite fruit and crunchy topping. It is perfect for school lunches too.

Have you had to say goodbye to yogurt due to allergies?

Even if you can’t have dairy…or coconut…or nuts…or rice…you don’t have to give up yogurt. Pumpkin yogurt is allergen friendy, easy to make and oh so delicious!

why won't my child eat 728x90

Want to learn more about feeding children with allergies?

Check out my book Why Won’t My Child Eat?! It’s packed with feeding strategies, tips on pinpointing reactions and allergen friendly recipes.

Allergen Free No Cook Pumpkin Yogurt | Just Take A Bite

Allergen Free No Cook Pumpkin Yogurt
Serves 3
A creamy pumpkin yogurt that is free of common allergens.
Write a review
Print
Ingredients
  1. 3/4 cup cooked pumpkin (canned or fresh)
  2. 1 cup water
  3. 1 Tbsp. grass-fed collagen
  4. 1 Tbsp. sweetener (honey, maple syrup, cane sugar)
  5. 1/4 tsp. unrefined sea salt
  6. 1/4 tsp. cinnamon (optional)
  7. 1 1/2 tsp. grass-fed gelatin
  8. 1 capsule powdered probiotic
Instructions
  1. Combine the pumpkin, water, collagen, sweetener, salt and cinnamon in a blender.
  2. Blend on high until smooth.
  3. Add the gelatin and probiotic.
  4. Blend for about 10 seconds.
  5. Pour the mixture into a glass jar with a lid.
  6. Put the jar in a warm place for 8-10 hours.
  7. Put in the refrigerator for at least an hour before serving.
  8. Store in the refrigerator for up to one week or in the freezer for up to 6 months.
Notes
  1. Setting the mixture on a counter that gets sunlight or on a stovetop with the oven on or in an unheated oven with the light on works well for culturing the yogurt.
Just Take A Bite https://justtakeabite.com/
  In order for me to support my blogging activities, I may receive monetary compensation or other types of remuneration for my endorsement, recommendation, testimonial and/or link to any products or services from this blog. It will not change the cost of any products or services for you.

This post is linked to Savoring Saturdays.

Ten Mason Jar Lunches Kids Can Make | Just Take A Bite

Ten Mason Jar Lunches Kids Can Make

Start the year off with less stress by delegating some kitchen work. Today I’m at Kitchen Stewardship sharing ten mason jar lunches your kids can make by themselves.

Ten Mason Jar Lunches Kids Can Make | Just Take A Bite

No hiding from it now. The new year is here.

That means it’s time to get back on track with healthy eating! One very important part of that is teaching your children what real, nourishing food is and why it is important.

In my experience the best way to teach your kids about good food is by letting them help prepare it!

Start teaching them at a young age and by the time they are in school they can practically pack their own lunches. What parent doesn’t want a little help with lunches?!


Ready to start delegating that task? Here are ten lunch components kids can make by themselves. As an added bonus you won’t hear any complaining about boring or gross lunches. Kids can’t complain if they choose and pack their own lunch!

Take one more item off your to-do list with these fun, healthy and simple mason jar lunches that kids can make (using glass or plastic containers).

Ten Mason Jar Lunches Kids Can Make | Just Take A Bite

VEGGIES WITH DIP

Add sour cream and your choice of seasoning to a jar (we like sea salt, garlic powder and dill weed). Put the chopped vegetables on top. No need for separate containers. The veggies are already in the dip and ready to go.

Fun and easy finger food. Perfect for a school lunch.

Want more ideas?

Click here to head over to Kitchen Stewardship where I’ll show you just how much fun your kids can having making mason jar lunches.

Don’t think they’re ready to tackle this project yet? Check out the Kids Cook Real Food course to get them started!

In order for me to support my blogging activities, I may receive monetary compensation or other types of remuneration for my endorsement, recommendation, testimonial and/or link to any products or services from this blog. It will not change the cost of any products or services for you.

This post is linked to Savoring Saturdays.

Nachos In A Jar | Just Take A Bite

On The Go Nachos In A Jar

Don’t resort to fast food and packaged foods just because you aren’t home for lunch. Stonyfield and Ball brand jars are teaming up for a New Year on the go! Try these on the go nachos in a jar for a filling meal that is easy to prepare and packed with nutrition.

Nachos In A Jar | Just Take A Bite

I am working with Stonyfield and Ball Canning for this post. I have been compensated for my time commitment. But the opinions and ideas are my own. I have not been paid to post positive reviews.

When the New Year arrives just about everyone is ready to hit the ground running. That includes both our schedules and our healthier food choices.

Just because you are busy does not mean you have to resort to junk food. Create your own “to go” meals using Ball brand jars.

Nachos In A Jar | Just Take A Bite

Canning jars everywhere.

Me? I use glass jars for everything.

I mean everything.

At any given time I have five to twenty-five jars in my fridge containing things like milk, broth, salsa, salad dressing, leftovers, olives, beans, bacon grease. Just about anything you can think of.

I also use them in my cupboard to store homemade graham crackers, Wheat Thins® and kettle corn granola.

Nachos In A Jar | Just Take A Bite

Glass jars are just right.

Basically my house is packed with canning jars. I’ll even share a post tomorrow about mason jar lunches kids can make! Ball brand jars are safe for food, safe for the dishwasher and come in all shapes and sizes to meet any needs.

My favorite size is the wide mouth pint. The wide mouth makes it easy to get your hands in. Even an immersion blender fits to make things like homemade Miracle Whip®!

Nachos In A Jar | Just Take A Bite

My nachos in a jar fit perfectly in the wide mouth pint! Layers of your favorite nacho toppings all packed neatly into a jar.

You can use chips (I love the Garden of Eatin’ blue corn chips) to dip right out of the jar or dump the nachos into a bowl when you are ready to eat.

Better yet, crumble chips into some of the layers and eat it with a fork. That is a delicious lunch on the go!

Nachos In A Jar | Just Take A Bite

Keep it simple.

I kept my nacho preparation simple with whole cherry tomatoes, olives, beans and chunks of avocado. You can add refried beans, salsa and guacamole if you like.

The add some tang with Stonyfield Greek yogurt or whole milk yogurt in place of sour cream.

I gave this to my husband for lunch. It got his seal of approval (and that means a lot!).

Are you starting the year with a busy schedule? In need of some easy lunches?

Don’t let the hustle and bustle of the New Year stand in the way of keeping yourself healthy. Create fun Ball brand jar meals on the go like these nachos in a jar.

Nachos In A Jar | Just Take A Bite

On The Go Nachos In A Jar
Serves 1
Simple layered nachos you can take on the go.
Write a review
Print
Choose any of the following
  1. 1/4 avocado, cut up
  2. 1/4 cup chopped lettuce
  3. 2 Tbsp. grated cheese
  4. 3 Tbsp. plain Greek or whole milk yogurt
  5. 1/4 cup cherry tomatoes (whole or chopped)
  6. 2 Tbsp. salsa
  7. 1/4 cup pinto beans, black beans, refried beans or chickpeas
  8. 1/4 cup olives (whole or chopped)
  9. 1/4 cup guacamole
  10. Tortilla chips
Instructions
  1. Layer the chosen ingredients into a Ball canning jar (wide mouth pint works well).
  2. Optional: Add layers of crumbled chips.
  3. Serve straight from the jar with chips for dipping or with a fork. Or dump the contents into a bowl and serve with chips for dipping.
Notes
  1. I like to use Garden of Eatin' organic blue corn chips. Use whatever chips you tolerate.
  2. You can leave out the chips for a grain free nacho or replace corn chips with a root chip (potato, beet, etc.).
Just Take A Bite https://justtakeabite.com/
In order for me to support my blogging activities, I may receive monetary compensation or other types of remuneration for my endorsement, recommendation, testimonial and/or link to any products or services from this blog. It will not change the cost of any products or services for you.

This post is linked to Savoring Saturdays.

Candy Corn Finger Jello | Just Take A Bite

Candy Corn Finger Jello: KS Post

Candy corn finger jello is the perfect Halloween treat. It has bright colors and fruit flavor without anything artificial.

Candy Corn Finger Jello | Just Take A Bite

I’ve never been that crazy about  Halloween.

Don’t get me wrong, getting dressed up is fun. Spending time with friends is great.

Of course as a kid the candy is the real star of the show.

An adult perspective.

But on the whole it’s more of a hassle than anything, especially as a parent. Scrambling to find a costume (I’m cheap and just get creative with what we have on hand…anybody with me?). Spending half the week’s grocery budget on junk food for the neighborhood. Not my cup of tea.

But there is one part of Halloween and fall in general that I have always loved.

Candy corn.

I liked the taste. But more than that it reminded me of my grandparents. They lived on a farm and always kept a chicken feeder on the kitchen table to feed their little chicks – their grandchildren!

For some reason I was more into this tradition than any of my siblings or cousins. If my grandparents knew I was coming they were sure to stock it with candy corn for me. I ran to it first thing when I entered the house to check and have a little chicken feed.

My days of visiting the farm are coming to an end as my grandmother passed away earlier this year and my grandfather is in hospice. But when I do get there the chicken feeder is still sitting there on the table as soon as I walk in the door.

Candy Corn Finger Jello | Just Take A Bite || Candy corn finger jello is the perfect Halloween treat. It has bright colors and fruit flavor without anything artificial.

A new tradition.

I am honored that it will soon be the centerpiece of my own table! I can carry on the tradition of feeding my kids and someday grandkids just like little chicks.

But in a different way.

My candy corn will not come out of a bag. It will not have artificial flavors and food coloring.

Instead it will be full of nourishing gelatin!

Want to see how I made this fun treat? Head over to Kitchen Stewardship! I’ll show you just how easy and healthy candy corn finger jello is.

If you’re looking for more holiday treats check out these great real food dessert books:

Naturally Sweetened Sweets - A Community Cookbook

Smart Sweets

This post is linked to Savoring Saturdays.

Honey Sweetened Pumpkin Butter Three Ways | | Homemade Dutch Apple Pie

Honey Sweetened Pumpkin Butter Three Ways: SHK Post

Now that fall is here it’s time for pumpkin everything! Use this nutrient packed vegetable to create three variations on pumpkin butter. It is so easy and delicious. Your kids will love it.

Honey Sweetened Pumpkin Butter Three Ways | | Homemade Dutch Apple Pie

Coming up with healthy snacks can be a challenge. Kids want sweet and tasty. You want quick and nutritious.

Honey sweetened pumpkin butter is the perfect solution!

Pumpkin is not a vegetable most people eat very often. But it really is packed with nutrients. Pumpkin contains vitamin A (a lot of it!), vitamin C, potassium, copper and iron in addition to lots of phyto-nutrients. So it makes the perfect component to a healthy snack like pumpkin butter.

There are three variations of pumpkin butter – original, chocolate and sunflower. They each have a unique flavor that your kids are sure to love. And with only three or four ingredients they are all easy to make.

Honey Sweetened Pumpkin Butter Three Ways | | Homemade Dutch Apple Pie

It only takes about ten minutes to make all three pumpkin butters! It is that easy. After a few minutes in the refrigerator they are ready to eat. I like to prepare them in advance. Then snack time is easy. The pumpkin butter will last up to a week in the refrigerator.

Are you ready to whip up one or all three of these tasty fall treats? Head on over to Super Healthy Kids where I show you just how easy it is. Then surprise your kids with a delicious after school treat.

Don’t forget to really add to the fun by making a batch of pumpkin spice graham crackers to go along with the pumpkin butter. Maybe homework time will go a bit smoother with a fun snack. At the very least your kids will have their mouths and bellies full of good stuff.

In order for me to support my blogging activities, I may receive monetary compensation or other types of remuneration for my endorsement, recommendation, testimonial and/or link to any products or services from this blog. It will not change the cost of any products or services for you.

This post is linked to Savoring Saturdays.

Gluten Free Squash Cookies | Homemade Dutch Apple Pie

Gluten Free Squash Cookies: KS Post

If you are in need of a healthy breakfast, lunch or dessert gluten free squash cookies are just the thing. Easy to make. Properly prepared grains. And vegetables!

Gluten Free Squash Cookies | Homemade Dutch Apple Pie

All summer long you are in control of what your kids eat and when they eat.

There is an abundance of fresh fruit to serve IF they need a little snack (not when snack time is a mandatory part of their day). Breakfasts don’t have to be made AND consumed in ten minutes in order to catch the bus. Lunches can be cooked and served warm.

Then school starts.

Mornings are chaotic getting everyone dressed and fed and out the door.

Lunches have to be simplified and packed.

It is a challenge to maintain the nutrient dense status of your kids’ food. Not to mention they are bombarded with special treats for everything from birthdays to good behavior as soon as they step foot in the door.

So as the new school year gets under way why not combine the need for nourishment with the desire for something sweet? Did I mention it is also easy?

These super simple gluten free squash cookies are portable and work for breakfast or lunch. Vegetables in your breakfast and dessert? Yes, please!

Head over to Kitchen Stewardship to find out how I make these easy and delicious cookies.

Gluten Free Squash Cookies | Homemade Dutch Apple Pie

Grain Free Sunbutter and Jelly Bars | Homemade Dutch Apple Pie

Grain Free Sunbutter and Jelly Bars

No time to make a sandwich? No problem. Grab some grain free sunbutter and jelly bars from the freezer and an allergen friendly lunch is ready in no time.

Grain Free Sunbutter and Jelly Bars | Homemade Dutch Apple Pie

We’ve been back to school for exactly one week. And I’m already sick of packing lunches. Anybody else?

In all honesty I don’t mind it *too* much. But it sure is nice when I have some easy things to pack that are filling and nutritious.

Skip the nuts.

Of course I’m always conscious of allergies too. So while peanut butter and jelly sandwiches are about the easiest thing to make I don’t pack them in my daughter’s lunch (even though she is not allergic to nuts).

Recently I started using sunbutter in place of nut butters. My kids love it! I love that I don’t have to worry about them getting nuts on their baby sister when they eat it. Plus I can send it to school without potentially causing another child harm.

That means my daughter does get sunbutter sandwiches once in a while. They are easy and delicious.

Grain Free Sunbutter and Jelly Bars | Homemade Dutch Apple Pie

Skip the bread.

But there is something even easier!

Grain free sunbutter and jelly bars are easy to make, easy to pack and easy to eat. You get the added bonus that you don’t have to worry about making or finding decent bread! This is especially key if you are gluten, grain or anything else free.

To make the dough simply dump all of the ingredients in a bowl and mix. The “jelly” filling is just three ingredients pureed in the blender for thirty seconds.

Then pour, bake and eat.

Grain Free Sunbutter and Jelly Bars | Homemade Dutch Apple Pie

Skip the long lunch prep.

I like to make a big batch so I can keep a bunch in the freezer. Then packing lunch is easy and has virtually no preparation. In fact kids can pack it themselves!

A sunbutter and jelly bar paired with veggies and dip and some fresh fruit is a great lunch. Or you can really boost the nutrition factor by pairing it with a thermos of your favorite soup. My daughter loves split pea!

Grain Free Sunbutter and Jelly Bars | Homemade Dutch Apple Pie

Change the flavor.

Let your kids pick the jelly flavor. Strawberry is a favorite here. But raspberry, cherry and blueberry all work well.

If your kids don’t like jelly then you can make the bars without the filling. It will be like a sunbutter and honey sandwich.

Are you in need of another easy lunch component to add to your rotation? Skip the sandwich. Go for grain free sunbutter and jelly bars. They are sure to be a hit!

Don’t need to pack a lunch? Serve them for breakfast. Kids love them any time of day.

Grain Free Sunbutter and Jelly Bars | Homemade Dutch Apple Pie

Grain Free Sunbutter and Jelly Bars
Serves 12
A nut free bar that is easy to pack and takes the place of a sandwich.
Write a review
Print
Bar
  1. 1/2 cup sunbutter
  2. 1/2 cup tapioca flour
  3. 2 eggs (or flax or gelatin eggs)
  4. 1/4 cup honey
  5. 1/4 cane sugar
  6. 1/2 tsp. unrefined sea salt
  7. 1/4 tsp. baking soda
Filling
  1. 1 cup fruit (strawberry, blueberry, cherry, raspberry), thawed and drained if using frozen
  2. 1 1/2 tsp. grass-fed gelatin
  3. 1 Tbsp. honey
Bar
  1. Heat oven to 350*F. Grease a 7x11 baking pan.
  2. In a large bowl combine all of the bar ingredients. Beat until well mixed.
  3. Spread half of the dough into the greased pan.
  4. Blend the filling ingredients in a blender until pureed. Pour the filling over the dough in the pan. Spread.
  5. Pour the remaining half of the dough on top of the filling.
  6. Bake for 40 minutes.
  7. Allow to cool. Cut into bars.
  8. Store in the refrigerator for up to two weeks or in the freezer for up to one year.
Notes
  1. White rice flour can be substituted for tapioca. It will no longer be grain free.
  2. The eggs can be replaced with ground flax seeds.
  3. You can also assemble the bars by pouring all of the batter into the pan and pouring the filling on top.
  4. Any nut or seed butter will work in place of the sunbutter.
Just Take A Bite https://justtakeabite.com/
This post is linked to Savoring Saturdays.

Crockpot Sprouted Orca Bean and Squash Chili | Homemade Dutch Apple Pie

Crockpot Sprouted Orca Bean and Squash Chili

Put a new spin on your usual chili by adding Bob’s Red Mill orca beans to create sprouted orca bean and squash chili. Pair it with freshly baked corn bread for a hearty week night dinner.

Crockpot Sprouted Orca Bean and Squash Chili | Homemade Dutch Apple Pie

I am partnering with Bob’s Red Mill and Stonyfield for this post. I have been compensated for my time commitment to use these products. However, my opinions are entirely my own and I have not been paid to publish positive comments.

There is nothing quite like a bowl of hot chili on a cool fall day. You can add lots of vegetables, make it extra meaty, spice it up or keep it mild.

I’ve made chili many ways. The possibilities are endless.

Try something new.

But one thing I have never added to my chili is orca beans! In fact I had never heard of them until recently.

Bob’s Red Mill orca beans are so fun. They look like mini orca whales with the black and white exterior. What kid wouldn’t love to have whales swimming around in her chili?!

Crockpot Sprouted Orca Bean and Squash Chili | Homemade Dutch Apple Pie

A lot to love about beans.

One of the things about orca beans that stood out to me right away was the nutrition content. They have lots of fiber, protein, folate, magnesium, potassium, phosphorus, iron and zinc. Talk about packing a punch!

Just be sure to sprout your beans first to make them easier to digest and to make the vitamins and minerals available. That means thinking ahead to start the beans the day before you make chili. But it only takes about thirty seconds to get them sprouting.

The other unique thing about this chili is the pureed squash. It adds thickness and a hint of sweetness. Combine that with tomatoes, onions, peppers, zucchini, broth and your choice of beef or chicken. Dinner is served!

Crockpot Sprouted Orca Bean and Squash Chili | Homemade Dutch Apple Pie

Top it. Pair it.

Sprouted orca bean and squash chili can be eaten as is or you can add a variety of toppings. We like to add grated cheese and avocado. Another delicious addition is Stonyfield plain yogurt. It cools down the spice and adds a creaminess to the chili.

Of course you can’t just have a bowl of chili. Sprouted orca bean and squash chili is great served on noodles or rice.

But our favorite way to eat it is paired with cornbread! You can make traditional cornbread. Or if you have corn allergies like we do try my corn free cornbread. You’ll never know the difference.

Crockpot Sprouted Orca Bean and Squash Chili | Homemade Dutch Apple Pie

Eat it now, eat it later.

Load up the crockpot with a big batch of chili. Serve it for dinner and pack up the leftovers for school lunches. Simply heat it in the morning, and it will stay warm in a thermos. Spread a generous helping of butter on leftover cornbread. It doesn’t get much easier or tastier!

Chili also freezes well. So you can keep some on hand in the freezer for an easy lunch or dinner.

My kids love orca beans. They are great in chili or cooked and eaten plain. Give them a try and see what your kids think. Then add them to sprouted orca bean and squash chili. They won’t be able to pass up killer whales in their soup!

Looking for a new, easy dinner this fall? Crockpot sprouted orca bean and squash chili is perfect any night of the week.

Crockpot Sprouted Orca Bean and Squash Chili | Homemade Dutch Apple Pie


Crockpot Sprouted Orca Bean and Squash Chili
Serves 6
A new twist on chili with orca beans and squash.
Write a review
Print
Ingredients
  1. 1/2 cup Bob's Red Mill orca beans
  2. warm water
  3. 2 cups chicken or beef broth
  4. 1 lb. ground beef or chicken
  5. 1 cup pureed squash
  6. 1 cup diced tomatoes
  7. optional: 1/2 cup diced onion
  8. optional: 1/2 cup green peppers, diced
  9. optional: 1/2 cup zucchini, diced
  10. 2 tsp. unrefined sea salt
  11. 1 tsp. garlic powder
  12. 1/2 tsp. chili powder
  13. 1/4 tsp. cumin
  14. optional toppings: shredded cheese, avocado, Stonyfield plain full fat yogurt
Instructions
  1. The day before making the chili, place the beans in a bowl and fill it with warm water. Let it sit 8 hours. Drain the water. Let the bowl sit in a warm area or in the oven (turned off) with the light on for 8 hours.
  2. When ready to prepare, cook the meat. Add it to the crockpot.
  3. Saute the onion, peppers and zucchini (if using). Add them to the crockpot.
  4. Add the sprouted beans, broth, squash, tomatoes and seasoning.
  5. Cover and cook on HIGH 6-8 hours or on LOW 8-12 hours, until beans are fully cooked.
  6. Add toppings to individual bowls if desired.
Notes
  1. This chili freezes and reheats well.
  2. You can replace the squash with pumpkin.
Just Take A Bite https://justtakeabite.com/

This post is linked to Savoring Saturdays.