Home » Kid-friendly Recipes » main dish

Category: main dish

Candy Corn Potatoes And Carrots | Just Take A Bite

Crockpot Candy Corn Potatoes and Carrots

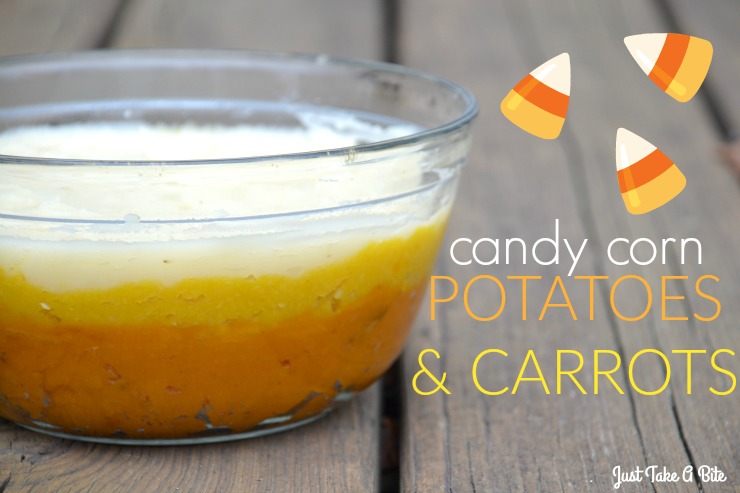
Holidays aren’t just about the sweets. Candy corn potatoes and carrots is festive and healthy! You won’t have any problem getting your kids to eat vegetables when they look like dessert.

Candy Corn Potatoes And Carrots | Just Take A Bite

I love fall.

I wish it could last longer. Mild temperatures. Beautiful colors. All things pumpkin.

Fun, Fall Food

I recently shared my candy corn finger jello recipe as a nod to fall and a tribute to my grandparents. In that same spirit I have another fun play on candy corn today. But this time it is savory!

Candy corn potatoes and carrots is a fun and healthy side dish. You can modify it to meet your dietary needs too.

Fall Vegetables

The base recipe uses white potatoes, sweet potatoes and carrots. But if you don’t want to use roots or don’t like quite that much starch (or have a crazy sensitivity/allergy to them like my daughter) then you can use pumpkin or squash (yellow/orange) and cauliflower (white)!

Candy Corn Potatoes And Carrots | Just Take A Bite

Quick Crockpot Side Dish

The preparation for candy corn potatoes and carrots is so simple because the crockpot does most of the work for you. Toss all of the veggies in the crockpot. Once they are cooked you simply puree and layer them.

The entire dish can be prepared in advance and just warmed before you eat. The warming can even be done in the crockpot!

Naturally Sweetened Sweets - A Community Cookbook

Sweet and Savory Fall Vegetables

I love how versatile candy corn potatoes are. You can add any seasoning, spices or even sweeteners you like.

My kids love a little sweetnes on their carrots and sweet potatoes. So I add just a touch of maple syrup or honey to the bottom layersy . But if you like things really savory adding salt, pepper and herbs would be just as delicious. Or you can find a happy medium by adding a pinch of cinnamon.

Candy Corn Potatoes And Carrots | Just Take A Bite

Go ahead and choose which color to put in which layer. I like the dark to light effect. But you can go with the traditional candy corn yellow, orange, and white scheme too.

Kid-Friendly Holiday Side Dish

Are you wondering what to serve for a holiday dinner that kids will actually eat? How about roast beef paired with candy corn vegetables and candy corn finger jello?! Your kids will love it. Plus they’ll fill up on nourishing foods and won’t crave a bunch of sweets later (can I get an Amen?!).

You could even turn this into a one pot meal by adding seasoned ground beef, lamb, chicken, or turkey between each layer. Candy corn casserole!

Surprise the kids with this delicious treat. Candy corn potatoes and carrots (or squash and cauliflower) is a healthy way to enjoy the holiday.

Do you have any creative holiday traditions or treats?

If not, start one with a festive dinner your kids will request year after year that includes candy corn potatoes and carrots.

Candy Corn Potatoes And Carrots | Just Take A Bite

Crockpot Candy Corn Potatoes and Carrots
Serves 6
A fun, fall side dish filled with vegetables.
Write a review
Print
Ingredients
  1. Orange layer: 3-5 sweet potatoes OR 1 orange flesh squash (pumpkin, butternut, kabocha)
  2. Yellow layer: 6-8 large yellow carrots OR 1 yellow flesh squash (acorn, spaghetti)
  3. White layer: 3-4 white potatoes OR 1 head cauliflower
  4. unrefined sea salt to taste
  5. water, broth or milk (enough to puree)
  6. optional: brown cane sugar, maple syrup, honey, herbs, cinnamon, spices
Instructions
  1. Peel and cut vegetables into large chunks.
  2. Place the vegetables in glass containers with a small amount of water or broth. Place the containers directly into the crockpot.
  3. Add about 1/2 inch of water to the bottom of the crockpot.
  4. Cook on high about 3 hours, until vegetables are tender.
  5. Remove containers from the crockpot.
  6. Add salt and any sweetener, herbs or spices and puree with an immersion blender (or in a blender). Add water, broth or milk if needed.
  7. Layer the vegetables in desired order in a see-through oven safe dish.
  8. Serve immediately or place in the crockpot on warm or cover and store in the refrigerator until ready to heat (in a 350*F oven for about 20 minutes).
Notes
  1. If using squash it can be roasted whole in the crockpot or oven, then cut open and the flesh scooped out. You can keep it as is or puree it at this point.
Just Take A Bite https://justtakeabite.com/
 In order for me to support my blogging activities, I may receive monetary compensation or other types of remuneration for my endorsement, recommendation, testimonial and/or link to any products or services from this blog. It will not change the cost of any products or services for you.

This post is linked to Savoring Saturdays.

How To Turn A Pork Roast Into Ham | Just Take A Bite

How To Turn A Pork Roast Into Ham

Are you looking for a way to serve ham without worrying about nitrates, nitrites and fillers? Make your own! You can easily turn a pork roast into ham in your crockpot.

How To Turn A Pork Roast Into Ham | Just Take A Bite

I love ham. I mean love it.

You can imagine my sadness when my daughter had a reaction to ham while she was still breastfeeding. That meant no ham for her…or me.

How To Turn A Pork Roast Into Ham | Just Take A Bite

Why You Should Avoid Ham

Pork was not the problem.

The problem is whatever is used for smoking/curing. Even something simple like beet sugar caused a reaction.

But aside from allergens, there are the added nitrates and nitrites. This is not a cut and dry issue either. Some say avoid it all. Some say just be careful of quantities, whether naturally-derived or not.

Whatever your reason, sometimes it’s a good idea to avoid cured meats, including ham.

How to Turn Pork into Ham

I avoided my beloved ham for a long time – until I decided to make my own! You can turn a pork roast into ham right in your crockpot (this is my favorite one).

No fancy tools. No strange ingredients.

Really all you need is pork, salt and a sweetener.

I used a rolled pork roast. But any cut will work.

Homemade Ham in the Crockpot

Cut some slits in the pork, put it in the crockpot and add the salt and sugar. Turn the crockpot on and you’re pretty much done.

How To Turn A Pork Roast Into Ham | Just Take A Bite

Your holiday ham really can be that simple. And you don’t have to worry about nitrates or nitrites or whether or not celery powder is better or worse.

To turn a pork roast into ham the important step is using lots of quality unrefined sea salt. Then adjust the sweetness to your liking.

If you want your ham really smokey you can also add a little liquid smoke (be sure to find one without coloring added).

Pork Loin Ham Recipe

As I write this I’m thinking about how tasty our homemade ham was. I might have eaten all of the leftovers myself. Though now I wish some had made it to the freezer so I could enjoy it again.

I guess that means I just need to make another!

Are you thinking about making a Christmas ham?

Save time and money by making it yourself this year! Just put it in the crockpot in the morning and spend your time focusing on delicious side dishes and desserts.

No crockpot? Or you’ve already filled it with something else? You can make ham in the oven too.

How To Turn A Pork Roast Into Ham | Just Take A Bite

Homemade Ham
Turn a pork roast into a delicious ham with a few simple ingredients and a crockpot.
Write a review
Print
Ingredients
  1. 1 pork roast (cut and size of choice)
  2. 2 - 4 tsp. unrefined sea salt (adjust based on size of roast)
  3. 2 Tbsp. - 1/2 cup any combination of sweeteners (honey, maple syrup, organic cane sugar, organic brown cane sugar, molasses; adjust to taste)
Instructions
  1. Using a sharp knife cut slits in the pork roast all over.
  2. Place the pork in the crockpot.
  3. Add salt and flip the roast to make sure there is salt on all sides.
  4. Add the sweetener (start with a smaller amount and add more later if you want it sweeter).
  5. Cover and cook on HIGH for 4 hours, then turn to LOW for 5+ hours.
  6. Flip the roast 2 or 3 times during cooking to make sure all sides get coated with flavoring. You can also baste the roast with the juice in the crockpot, trying to get it into the slits in the meat.
  7. An hour before serving cut the roast into large chunks and coat with the juice in the crockpot.
Notes
  1. You can use a single sweetener like honey or cane sugar. Using a combination of liquid and dry sweeteners gives a good balance of flavor and creates a good "sauce."
  2. To make ham in the oven follow the same directions, baking the pork in a covered dish at 375*F for 2 hours, then turning the heat down to 325*F for 2 hours.
Just Take A Bite https://justtakeabite.com/
This post is linked to Savoring Saturdays.

Easy Allergen-Free Sweet and Sour Meatballs | GAPS, Grain-free

Easy, Allergen-Free Sweet and Sour Meatballs | GAPS-Legal

Looking for a quick, nutrient-dense meal that your kids will actually eat? These sweet and sour meatballs are free of all major allergens and GAPS-legal. Not to mention they are loaded with broth! They are sure to be a family favorite to add to your weekly meal plans.
 
Easy Allergen-Free Sweet and Sour Meatballs | GAPS, Grain-free
 

When I embarked on the GAPS diet years ago there weren’t that many resources available. Which meant I had to come up with most of my own recipes.

Although I came off the GAPS diet a long time ago, it taught me how to be really creative in the kitchen.

That is how I came up with this easy sweet and sour meatball recipe that has been both a family favorite and reader favorite for years!

Allergen-Free Meatballs

Most meatball recipes include egg. Sometimes they also have bread or breadcrumbs and some type of milk.

Those ingredients do make a delicious meatball. But when you are dealing with allergies, it’s hard to substitute.

So I created meatballs that are not only allergen-free, but can also be nightshade free!Easy Allergen-Free Sweet and Sour Meatballs | GAPS, Grain-free

Easy Gluten-Free Sweet and Sour Sauce 

The real secret about these meatballs is not actually the meatball at all. Instead it’s the sauce!

A combination of broth and honey cook down to a rich and gooey sauce that kids love.

Depending on dietary needs I add ketchup, dijon mustard, and/or a bit of pumpkin to bring it all together.

Healthy Dinner in Less Than 30 Minutes

Taste aside, I love that I can make these meatballs in under 30 minutes. Simply brown, add the sauce ingredients, and simmer until thick.

My kids love sweet and sour meatballs served with buttered gluten-free noodles. Any time I ask my five-year-old what she wants for dinner I get the same answer – meatballs and noodles! Sweet and sour meatballs are also great with rice, mashed potatoes, mashed sweet potatoes, or squash.

If you are in need of an easy, nourishing weeknight dinner that the kids will gobble up, this is it! They’ll get lots of broth without even knowing it. Plus grassfed beef for loads of protein and vitamins. A win all around!

Do you have a go-to easy button dinner? Give these allergen-free sweet and sour meatballs a try.

This post is linked to Fat Tuesday at Real Food Forager.

Easy Allergen-Free Sweet and Sour Meatballs | GAPS, Grain-free

Easy Allergen-Free Sweet and Sour Meatballs

A quick and easy meatball recipe kids will love.

Prep Time 5 minutes
Cook Time 18 minutes
Servings 4

Ingredients

  • 1 lb. grassfed ground beef, pastured ground chicken, or ground pork
  • 1 tsp. salt
  • 1 tsp. onion powder
  • 1/2 tsp. garlic powder
  • 1/2 tsp. turmeric
  • 1 Tbsp. avocado oil, tallow, lard, or coconut oil
  • 1-2 cups chicken or beef broth
  • 1/4 cup ketchup optional
  • 1/4 cup honey
  • 1/2 tsp. salt

Instructions

  1. Combine the meat, salt, garlic powder, onion powder, and turmeric. Mix well.

  2. Form into meatballs.

  3. Heat a large skillet over medium-high heat. When hot add 1 Tbsp. fat.

  4. Brown the meatballs on all sides.

  5. Add the broth, ketchup, honey, and salt. Simmer until thick, about 10 minutes, stirring periodically to coat the meatballs.

  6. Add extra broth and continue to simmer for more sauce.

Recipe Notes

For a nightshade-free version, replace the ketchup with 1/4 cup dijon mustard or 1/4 cup pureed pumpkin.


Looking for an easy weeknight dinner that the kids will love and can meet any dietary needs? My nourishing sloppy joes are very kid-friendly and can be on the table in less than 20 minutes!

Easy Nutrient Dense Sloppy Joes: Ready in Less Than 20 Minutes!

Looking for an easy weeknight dinner that the kids will love and can meet any dietary needs? My nourishing sloppy joes are very kid-friendly and can be on the table in less than 20 minutes! Serve it on homemade gluten-free bread for a truly tasty meal.Looking for an easy weeknight dinner that the kids will love and can meet any dietary needs? My nourishing sloppy joes are very kid-friendly and can be on the table in less than 20 minutes! We all need a few go-to meals that take very little time to make, include nourishing ingredients, and the whole family enjoys. This is one of our family favorites that fits the bill perfectly!

We call it sloppy joes. Others call it barbecue. What do you call it?

Easy Gluten-Free Sloppy Joes Recipe

This sloppy joes recipe really could not be any easier. Brown the meat. Add a few  ingredients. Simmer 5 minutes and you’re done. That’s it.

I love that you can serve it in many ways to meet a lot of dietary needs.  For those that can have bread I serve it on gluten-free buns or open face on homemade gluten-free bread. For those that can’t I serve it with tortilla chips or potato chips. My kids also like to eat it plain. My personal favorite way to eat sloppy joe meat is on top of pureed veggies (like parsnips).Looking for an easy weeknight dinner that the kids will love and can meet any dietary needs? My nourishing sloppy joes are very kid-friendly and can be on the table in less than 20 minutes!

Sloppy Joes with Nutrition

Want to know the best part about my version of sloppy joes? It includes both broth and vegetables! Yes, my kids still love it! Dinner win!

I actually make this recipe FOUR different ways depending on our current dietary needs. You can choose which one works best for your family.

  1. Original recipe – beef, ketchup, mustard, broth
  2. Added nutrition – beef, ketchup, mustard, broth, squash or pumpkin
  3. Nightshade free – beef, mustard, broth, squash or pumpkin, honey
  4. Vitamin A Detox Diet – beef, mustard, broth, honey, rice flour

Easy Prep Ahead Dinner and Lunch

Sloppy Joes work very well for a freezer meal. Make a big batch and freeze it in dinner size portions. Then all you have to do is heat and serve.

Not sure what to put in your kids’ lunch box? Sloppy joes to the rescue! You can heat the meat in the morning or leave it cold. Whether it’s on a bun or plain with something to dip kids love it, and it’s easy to eat. 

Growing up I did NOT like sloppy joes at all. I never tasted any I liked until I made my own. Honestly, now it is one of my favorite meals!! I could eat it every week.

Now I’m sharing this simple version with you. I hope you enjoy it too.

Easy Nourishing Sloppy Joes

My nourishing sloppy joes are very kid-friendly and can be on the table in less than 20 minutes!

Cook Time 20 minutes
Servings 6 people

Ingredients

  • 1 Tbsp. refined coconut oil or tallow or avocado oil
  • 2 lbs. grass-fed ground beef
  • 3/4 cup ketchup
  • 5 Tbsp. mustard
  • 1 tsp. salt
  • 1/2 tsp. garlic powder
  • 1/2 cup pureed squash or pumpkin optional
  • 1 cup chicken or beef broth

Instructions

  1. Heat a large skillet over medium high heat with the coconut oil.

  2. Add the ground beef and cook until browned.

  3. Add the ketchup, mustard, salt, garlic powder, squash, and broth. Stir.

  4. Simmer until thickened, about 5 minutes.

  5. Serve on a bun, over a bed of pureed vegetables or with tortilla chips

Recipe Notes

  • You can substitute ground turkey, pork or chicken for the beef.
  • You can make a double or triple batch and freeze some for a future meal. It reheats very well.
  • To make this nightshade free replace the ketchup with 1/2 cup squash/pumpkin and 2 Tbsp. honey.

Easy Nutrient Dense Sloppy Joes (VAD Diet)

These nourishing sloppy joes are very kid-friendly and can be on the table in less than 20 minutes!

Cook Time 20 minutes
Total Time 20 minutes
Servings 6 people
Author Mary | Just Take A Bite

Ingredients

  • 1 Tbsp. refined coconut oil or avocado oil or tallow
  • 2 lb. grass-fed ground beef
  • 4 Tbsp. mustard
  • 1 tsp. sea salt
  • 1 cup chicken or beef broth
  • 1/4 cup honey
  • 3 Tbsp. white rice flour

Instructions

  1. Heat a large skillet over medium high heat with the coconut oil.

  2. Add the ground beef and cook until browned.
  3. Add the mustard, salt, honey, rice flour, and broth. Stir.

  4. Simmer until thickened, about 5 minutes.
  5. Serve on a bun, over a bed of pureed parsnips or with tortilla chips.

Recipe Notes

  • You can substitute ground turkey or chicken for the beef.
  • You can make a double or triple batch and freeze some for a future meal. It reheats very well.


Picky Eater Approved Grain-Free Meatloaf Sliders

Make meal time or snack time fun for kids with these picky eater approved grain-free meatloaf sliders.Make meal time or snack time fun for kids with these picky eater approved grain-free meatloaf sliders.

I’m a big fan of meatloaf. It’s so easy to make. And all of my kids will eat it. That’s pretty much the equivalent of a gold medal meal.

I usually cook mine in the crockpot (I like this style). I put it in before we leave for church on Sunday and it’s ready when we get home.

A New Way to Make Meatloaf

Recently I got to review the Paleo Cooking with your Air Fryer cookbook by Karen S. Lee (grab your copy here). When I saw her little meatloaf sliders I knew I had to try them! A family staple in a mini size for little hands? Perfect!

Since my kids have done the Kids Cook Real Food eCourse I actually let them help me make these fun meatloaf sliders. Everything goes in one bowl. My kind of prep work!

Make meal time or snack time fun for kids with these picky eater approved grain-free meatloaf sliders.

My kids are used to eating their burgers without a bun. So that’s what we did. But it would also be fun to make some mini buns or use a lettuce wrap. Or if your kids are like mine they love anything served on a stick. I like mine on a big salad! Top it with some avocado. YUM.

I love that these meatloaf sliders are free of grains/gluten and dairy. If you can’t have eggs I bet they would work fine without. We are nut free, so I swapped a little more coconut flour for the almond flour.

I served our meatloaf sliders with cauli-bites, also from Karen’s book. I skipped the buffalo seasoning since my kids are not big on spice. But I bet it would be delicious!

Do You Need an Air Fryer?

Now you may be thinking, “These look good…but I don’t have an air fryer.” Well, I don’t either! Though I may have to put one on my Christmas list now. All of the recipes can be adapted for the oven by using a wire rack on a baking sheet. Simple.

If you do have an air fryer I’d love to hear what you think of it!Make meal time or snack time fun for kids with these picky eater approved grain-free meatloaf sliders.

Even if you don’t have an air fryer I highly recommend Karen’s book. The pictures are gorgeous (my favorite thing about any cookbook). And the recipes all sound delicious. PLUS they are all paleo recipes and easy to adapt to your dietary needs.

I had to steal the cookbook back from my ten year old. She was drooling over every page.

Divided into eleven chapters, Paleo Cooking with your Air Fryer includes crispy and flavorful dishes for every meal and snack,  including desserts. Karen’s nutritious and delicious air fryer recipes will turn her family favorites into your family’s favorites, including Healthy Korean Chicken Wings, Filet Mignon with Herbs and Roasted Garlic, Not Your Gramma’s Fried Chicken, Fish Tostadas, Fancy Pants French Fries, Simple Chocolate Mud Cake and Pumpkin Coconut Crème Brûlée.

Dr. Karen S. Lee is a retired Doctor of Chiropractic and Acupuncture Fellow, who helped thousands of patients with emphasis on holistic therapy, ergonomics, nutrition therapy, and mind-body medicine. She is the founder of www.drkarenslee.com, a blog dedicated to holistic health, real food recipes, and lives in Westchester County, New York with her family.Make meal time or snack time fun for kids with these picky eater approved grain-free meatloaf sliders.

Grain Free Meatloaf Sliders

Karen has graciously allowed me to share the meatloaf slider recipe with my readers! It’s great for little hands. And it’s definitely picky eater approved! Especially if you let them help cook. Something about helping prepare the food makes it so much more appealing.

Enjoy this super fast, super delicious, super kid friendly recipe. We eat it for breakfast, lunch or dinner!Make meal time or snack time fun for kids with these picky eater approved grain-free meatloaf sliders.

Recipe reprinted with permission from Paleo Cooking With Your Air Fryer by Dr. Karen S. Lee, Page Street Publishing Co. 2018. Photo Credit: Donna Crous.

Grain Free Meatloaf Sliders

Grain and dairy free mini meatloaves.

Cook Time 10 minutes
Servings 8
Author Karen S. Lee

Ingredients

  • 1 lb. grass-fed ground beef
  • 2 eggs large
  • 1/4 cup onion finely chopped
  • 1 clove garlic minced
  • 1/2 cup almond flour extra fine blanched
  • 1/4 cup coconut flour
  • 1/4 cup ketchup
  • 1/2 tsp. unrefined sea salt
  • 1/2 tsp. black pepper
  • 1 Tbsp. gluten free Worcestershire sauce
  • 1 tsp. Italian seasoning
  • 1/2 tsp. dried tarragon

Instructions

  1. In a large mixing bowl, combine all of the ingredients and mix well.

  2. Make patties that are about 2 inches in diameter and about 1 inch thick. If you want to make thicker or thinner patties, make sure all of them are similar size, so they cook properly at the same time.

  3. Place the patties on a platter and refrigerate for 10 minutes for the flour to absorb the wet ingredients and the patties to become firm.

  4. Preheat the air fryer to 360*F or the oven to 400*F.

  5. Place as many patties as you can fit in the basket and close. Set the timer for 10 minutes. Check the patties halfway through. When the timer goes off, take them out, place on a serving platter and cover until all the patties are cooked.

  6. If using the oven, place patties on a wire rack on top of a baking sheet. Bake for 20 minutes, until cooked through.

Looking for a kid-friendly breakfast that utilizes summer's bounty of zucchini? These creamy zucchini egg muffins are perfect. Find out the two secret ingredients that make them so good.

Creamy Zucchini Egg Muffins

Looking for a kid-friendly breakfast that includes plenty of protein, healthy fat AND vegetables? Creamy zucchini egg muffins combine nutrient dense eggs with creamy whole milk yogurt and fresh summer veggies to create a simple and delicious start to the day.

Looking for a kid-friendly breakfast that utilizes summer's bounty of zucchini? These creamy zucchini egg muffins are perfect. Find out the two secret ingredients that make them so good.

I am working with Stonyfield, Le Creuset and Kitchen IQ on this post. I have been compensated for my time commitment. All opinions expressed are my own, and I have not been paid to provide positive feedback.

Is your zucchini starting to pile up in the fridge like mine? I’m always looking for new ways to use it.

I love making chocolate zucchini cupcakes, zucchini crackers, soaked gluten free zucchini bread and especially zucchini cake! Our whole family enjoys it grilled, roasted and sauteed. I try to freeze some as well.

Yet no matter how diligent you are it seems there is still more. I’ve got a fun, kid-friendly recipe that will get your kids to eat zucchini for breakfast!

Looking for a kid-friendly breakfast that utilizes summer's bounty of zucchini? These creamy zucchini egg muffins are perfect. Find out the two secret ingredients that make them so good.

Eat Your Veggies…I Mean Eggs!

In my house the zucchini is not the hard part…it’s the eggs. Three of us can’t even eat eggs. My oldest can (lucky girl!). But she has always struggled eating eggs. She picks at them, holds them in her mouth, complains about the texture.

But I did not hear a single complaint about these creamy zucchini egg muffins. In fact, she told me she really liked them!

There are two secret ingredients.

  1. Whole milk plain yogurt – it really adds a rich creaminess to the eggs.
  2. Cane sugar – I know what you’re thinking. Add sugar to eggs? Don’t worry, it’s only 1/2 tsp. But it really does something to the flavor.

A little back story on the sugar in eggs. When I was little and had the chicken pox I didn’t have much of an appetite. The only thing I would eat was the scrambled eggs my big sister made (multiple times a day for me). There was something different about them. We called them “oops eggs” because she didn’t make them right. But I loved them. We figured out later that she added a touch of sugar to them!

She was probably only about twelve years old. So she did a great job taking care of her little sis!

Looking for a kid-friendly breakfast that utilizes summer's bounty of zucchini? These creamy zucchini egg muffins are perfect. Find out the two secret ingredients that make them so good.

The final component of these eggs is the vegetable. Sauteed zucchini and onion really boost the flavor of the egg muffins. When you put the yogurt, sugar, sauteed veggies and eggs together you create a flavorful, healthy breakfast (or lunch or dinner) any kid will love.

New Kitchen Tools Are Fun!

One thing I loved about making creamy zucchini egg muffins was using my new cutting boards and measuring spoons from Kitchen IQ. The cutting boards come in four colors. Can I just say that as a mom of kids with different allergies that is so cool?! Everyone has a color. No cross contamination. It’s great!

I love the bright colors…and so does my toddler. She frequently grabs the cutting boards off the shelf just to play with them.

Looking for a kid-friendly breakfast that utilizes summer's bounty of zucchini? These creamy zucchini egg muffins are perfect. Find out the two secret ingredients that make them so good.

Even more than the cutting boards I love the measuring spoons. It is so easy to level them. And they nest together for easy storage. Who knew that measuring spoons could make such a great toddler toy too? My one year old loves trying to stack them over and over. She also loves to help me cook and bake with them.

Is your zucchini still going strong?

Give creamy zucchini egg muffins a try. You just might be adding sugar to your eggs more often.

Looking for a kid-friendly breakfast that utilizes summer's bounty of zucchini? These creamy zucchini egg muffins are perfect. Find out the two secret ingredients that make them so good.

Creamy Zucchini Egg Muffins
Yields 6
A high protein, veggie-packed egg muffin perfect for busy mornings.
Write a review
Print
Ingredients
  1. 3 pastured eggs
  2. 4 Tbsp. Stonyfield plain whole milk yogurt
  3. 1/2 tsp. unrefined sea salt
  4. 1/2 tsp. organic cane sugar
  5. optional: any additional herbs and spices
  6. 1 cup diced zucchini
  7. 1/4 cup diced onion
  8. 1 Tbsp. butter, olive oil, tallow or coconut oil
  9. 1/4 tsp. unrefined sea salt
Instructions
  1. Sautee the zucchini and onion in 1 Tbsp. fat of choice (about 10 minutes). Season with salt. Set aside to cool.
  2. Heat the oven to 400*F. Grease a muffin pan.
  3. In a medium size bowl combine the eggs, yogurt, salt, sugar and seasonings. Mix well.
  4. Stir in the cooled vegetables.
  5. Divide the egg mixture into 6 greased muffin cups.
  6. Bake for 45 minutes.
  7. Allow to cool 3 minutes before serving.
Notes
  1. You can bake these in advance and eat cold, room temperature or warmed.
  2. You can freeze these muffins for up to a year. Thaw and heat to serve.
Just Take A Bite https://justtakeabite.com/
Pistachio Pea Pesto | Just Take A Bite

Pistachio Pea Pesto

With the return of spring comes color and new life. Add some of both to your meal with this bright and flavorful pistachio pea pesto.

Pistachio Pea Pesto | Just Take A Bite

If there is an easy way to get your kids to eat vegetables it is in a sauce. Put the sauce on pasta or pizza. Instant hit!

This pistachio pea pesto is no exception. Parents love the loads of vegetables and healthy fat from nuts. Kids love the taste and color.

Easy “peasy.”

The really great thing about this pesto is how easy it is to make. Only six ingredients (and the cheese is even optional). Toss them all in the blender and it’s done. No cooking. Just puree and serve. It is easy enough for kids to make themselves!

Mix pistachio pea pesto with your favorite variety of noodles for an easy weeknight meal that can even be made gluten or grain free. Add some extra peas and nuts into the pasta for texture and nutrition. Leftover cooked chicken also makes a great addition for a complete meal.

But the possibilities don’t end there. Make pizza night a little more special with pesto pizza. Make or buy your favorite pizza crust. Top it with pistachio pea pesto and some fresh mozzarella. Bake and serve.

Pistachio Pea Pesto | Just Take A Bite

Whether you are vegetarian or just looking to save a little money on your grocery bill either of these would make a great meatless meal.

The possibilities are endless! Head over to Super Healthy Kids where I’m sharing this easy pistachio pea pesto recipe and more fun ways to use it.

Rainbow Egg Muffins | Just Take A Bite

Rainbow Egg Muffins

Winter is almost over! Get ready to think spring with these rainbow egg muffins. Lots of color, flavor and nutrition packed into the perfect little bite.

Rainbow Egg Muffins | Just Take A Bite

Spring is coming. I can almost taste it. After the snow and cold I am more than ready to think about new life and color returning.

And after all of the illness we’ve had I am looking forward to spending a lot of time outside in the fresh air. The end to illness can start any time now. Any time.

If you look out your window and still see everything covered in white you can at least bring spring back to your breakfast with these colorful rainbow egg muffins.

Start the day with a healthy dose of protein, vitamins and vegetables all in one. Add a slice of toast with homemade grape jelly or peach jam to make it a complete meal.


Rainbow Egg Muffins | Just Take A Bite

Rainbow egg muffins are even great for toddlers. Cut one into bite size pieces so your toddler can practice picking up food and self feeding.

What a fun Easter breakfast for the whole family!

How do they taste?

Will kids really eat them? I let my four year old be my taste tester. I put one on his plate and stepped back into the kitchen to grab something. When I got back his muffin was already half gone. The other half went down about ten seconds later.

Want the recipe? Head over to Super Healthy Kids! I’ve got this simple recipe for rainbow egg muffins plus some tips on how to cut your prep time in half.

This post is linked to Savoring Saturdays.

Muffin Tin Mini Pumpkin Pot Pies | Just Take A Bite

Muffin Tin Mini Pumpkin Pot Pies

Turn Thanksgiving leftovers into a fun and delicious breakfast, lunch or dinner. Muffin tin mini pumpkin pot pies are perfect for the whole family.

Muffin Tin Mini Pumpkin Pot Pies | Just Take A Bite

The Thanksgiving feast is over. You’re left with a little bit of this and a little bit of that.

There isn’t enough for a full meal. Or is there?

Combine those leftovers to create muffin tin mini pumpkin pot pies that the whole family will love. What kid doesn’t like pie for dinner?!

It only takes a half cup of pumpkin (or squash) to create a fun post-Thanksgiving brunch or lunch. The pumpkin replaces the traditional pot pie cream sauce.

Start with a simple crust (only 4 ingredients!) that you can quickly mix by hand. This is a great project for kids. They love to work with their hands and press the dough into the muffin cups.

Muffin Tin Mini Pumpkin Pot Pies | Just Take A Bite

The filling is made with pumpkin or squash, vegetables and turkey. Don’t forget the real star of the show – turkey broth!! It is packed with vitamins, minerals and gelatin.

Prepare them all at once or in steps as you have time.

Muffin tin mini pumpkin pot pies are simple, versatile and delicious! Plus they are a great way to use Thanksgiving leftovers or to enjoy a taste of Thanksgiving any time of year.

Head over to Super Healthy kids where I show you how to make this fun dish that can be served for breakfast, lunch or dinner!

In order for me to support my blogging activities, I may receive monetary compensation or other types of remuneration for my endorsement, recommendation, testimonial and/or link to any products or services from this blog. It will not change the cost of any products or services for you.

Crockpot Sprouted Orca Bean and Squash Chili | Homemade Dutch Apple Pie

Crockpot Sprouted Orca Bean and Squash Chili

Put a new spin on your usual chili by adding Bob’s Red Mill orca beans to create sprouted orca bean and squash chili. Pair it with freshly baked corn bread for a hearty week night dinner.

Crockpot Sprouted Orca Bean and Squash Chili | Homemade Dutch Apple Pie

I am partnering with Bob’s Red Mill and Stonyfield for this post. I have been compensated for my time commitment to use these products. However, my opinions are entirely my own and I have not been paid to publish positive comments.

There is nothing quite like a bowl of hot chili on a cool fall day. You can add lots of vegetables, make it extra meaty, spice it up or keep it mild.

I’ve made chili many ways. The possibilities are endless.

Try something new.

But one thing I have never added to my chili is orca beans! In fact I had never heard of them until recently.

Bob’s Red Mill orca beans are so fun. They look like mini orca whales with the black and white exterior. What kid wouldn’t love to have whales swimming around in her chili?!

Crockpot Sprouted Orca Bean and Squash Chili | Homemade Dutch Apple Pie

A lot to love about beans.

One of the things about orca beans that stood out to me right away was the nutrition content. They have lots of fiber, protein, folate, magnesium, potassium, phosphorus, iron and zinc. Talk about packing a punch!

Just be sure to sprout your beans first to make them easier to digest and to make the vitamins and minerals available. That means thinking ahead to start the beans the day before you make chili. But it only takes about thirty seconds to get them sprouting.

The other unique thing about this chili is the pureed squash. It adds thickness and a hint of sweetness. Combine that with tomatoes, onions, peppers, zucchini, broth and your choice of beef or chicken. Dinner is served!

Crockpot Sprouted Orca Bean and Squash Chili | Homemade Dutch Apple Pie

Top it. Pair it.

Sprouted orca bean and squash chili can be eaten as is or you can add a variety of toppings. We like to add grated cheese and avocado. Another delicious addition is Stonyfield plain yogurt. It cools down the spice and adds a creaminess to the chili.

Of course you can’t just have a bowl of chili. Sprouted orca bean and squash chili is great served on noodles or rice.

But our favorite way to eat it is paired with cornbread! You can make traditional cornbread. Or if you have corn allergies like we do try my corn free cornbread. You’ll never know the difference.

Crockpot Sprouted Orca Bean and Squash Chili | Homemade Dutch Apple Pie

Eat it now, eat it later.

Load up the crockpot with a big batch of chili. Serve it for dinner and pack up the leftovers for school lunches. Simply heat it in the morning, and it will stay warm in a thermos. Spread a generous helping of butter on leftover cornbread. It doesn’t get much easier or tastier!

Chili also freezes well. So you can keep some on hand in the freezer for an easy lunch or dinner.

My kids love orca beans. They are great in chili or cooked and eaten plain. Give them a try and see what your kids think. Then add them to sprouted orca bean and squash chili. They won’t be able to pass up killer whales in their soup!

Looking for a new, easy dinner this fall? Crockpot sprouted orca bean and squash chili is perfect any night of the week.

Crockpot Sprouted Orca Bean and Squash Chili | Homemade Dutch Apple Pie


Crockpot Sprouted Orca Bean and Squash Chili
Serves 6
A new twist on chili with orca beans and squash.
Write a review
Print
Ingredients
  1. 1/2 cup Bob's Red Mill orca beans
  2. warm water
  3. 2 cups chicken or beef broth
  4. 1 lb. ground beef or chicken
  5. 1 cup pureed squash
  6. 1 cup diced tomatoes
  7. optional: 1/2 cup diced onion
  8. optional: 1/2 cup green peppers, diced
  9. optional: 1/2 cup zucchini, diced
  10. 2 tsp. unrefined sea salt
  11. 1 tsp. garlic powder
  12. 1/2 tsp. chili powder
  13. 1/4 tsp. cumin
  14. optional toppings: shredded cheese, avocado, Stonyfield plain full fat yogurt
Instructions
  1. The day before making the chili, place the beans in a bowl and fill it with warm water. Let it sit 8 hours. Drain the water. Let the bowl sit in a warm area or in the oven (turned off) with the light on for 8 hours.
  2. When ready to prepare, cook the meat. Add it to the crockpot.
  3. Saute the onion, peppers and zucchini (if using). Add them to the crockpot.
  4. Add the sprouted beans, broth, squash, tomatoes and seasoning.
  5. Cover and cook on HIGH 6-8 hours or on LOW 8-12 hours, until beans are fully cooked.
  6. Add toppings to individual bowls if desired.
Notes
  1. This chili freezes and reheats well.
  2. You can replace the squash with pumpkin.
Just Take A Bite https://justtakeabite.com/

This post is linked to Savoring Saturdays.