Home » Kid-friendly Recipes » gluten free » Page 20

Category: gluten free

Dairy Free “Thin Mint” Cookie Ice Cream

Dairy Free Thin Mint Cookie Ice Cream || Homemade Dutch Apple PieBoth of my children LOVE mint ice cream.  We make it quite often. Recently when making a batch I wanted to spruce it up a bit.

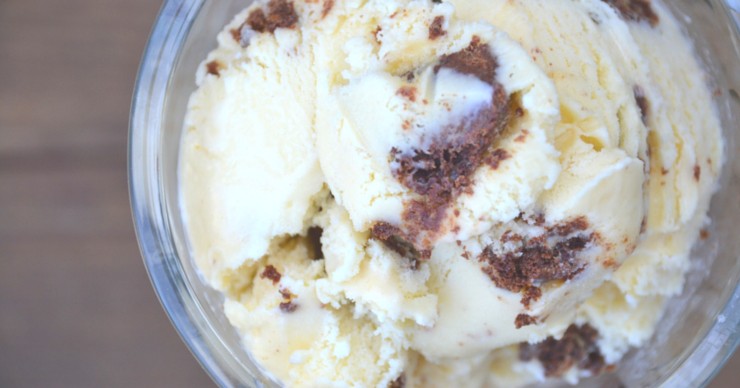
I thought about adding some cocoa (who doesn’t love mint and chocolate together?). That reminded me of Thin Mint Girl Scout cookies. Inspired by this classic cookie I came up with my dairy free” Thin Mint” Cookie ice cream.

This ice cream is filled with mint and chocolate flavor. Plus you get the crunchy chocolate cookie taste as well.

“Thin Mint” Cookie ice cream is a treat just about anyone can enjoy. You can replace the coconut milk with cream if you tolerate dairy.

Scoop yourself a big bowl of “Thin Mint” Cookie ice cream, add a little chocolate sauce and enjoy. What a great way to celebrate the start of the school year. Remember, summer isn’t over quite yet!

Get the chocolate cookie recipe here!

This post is linked to Allergy free Wednesdays.

Dairy Free "Thin Mint" Cookie Ice Cream -||Homemade Dutch Apple Pie

Dairy Free Thin Mint Cookie Ice Cream
Dairy free ice cream filled with the flavor of Thin Mint cookies.
Write a review
Print
Ingredients
  1. 2 1/2 cups coconut milk (can be replaced with cream if you tolerate dairy)
  2. 1/2 cup any combination of sweetener (cane sugar, coconut sugar, honey, maple syrup)
  3. 1/4 cup organic cocoa powder
  4. 1 Tbsp. vanilla
  5. 1/2 tsp. peppermint extract
  6. 1/4 tsp. sea salt
  7. 1 Tbsp. tapioca flour (optional)
  8. 1 - 3 egg yolks (optional)
  9. 1/2 cup chocolate cookie pieces (see post for recipe link)
  10. 1/3 cup mini chocolate chips (optional)
Instructions
  1. In a blender combine the coconut milk, sweetener, cocoa powder, vanilla, peppermint, sea salt, flour and egg yolks. Blend until smooth.
  2. Process in an ice cream mixer according to manufacturer's directions.
  3. Transfer the ice cream to a freezer-safe container.
  4. Mix in the cookie pieces and chocolate chips.
  5. Freeze until firm.
Just Take A Bite https://justtakeabite.com/

In order for me to support my blogging activities, I may receive monetary compensation or other types of remuneration for my endorsement, recommendation, testimonial and/or link to any products or services from this blog.

Cookies and Cream Ice Cream is the perfect summer treat. Creamy traditionally made ice cream with gluten free chocolate cookie pieces.

Cookies and Cream Ice Cream {Guest Post}

Cookies and Cream Ice Cream is the perfect summer treat. Creamy traditionally made ice cream with gluten free chocolate cookie pieces.Summer is coming to an end (sad to see summer go…happy to see fall come). How about one more ice cream flavor?

Cookies and cream is another classic flavor that can be made from scratch using nutrient-dense foods. Start with a sweet vanilla ice cream, and add homemade chocolate cookies. The end result is an amazing frozen treat.

Want the recipe? Head over to Mommypotamus where I’m sharing my cookies and cream ice cream!!

Cookies and Cream Ice Cream is the perfect summer treat. Creamy traditionally made ice cream with gluten free chocolate cookie pieces.

Gluten Free Brownie Mix

Gluten Free Brownie Mix - Homemade Dutch Apple Pie

I love to bake. But I don’t always have time to do all of the measuring and mixing…especially when it comes to gluten free baking. It takes extra time to measure four types of flour instead of one.

You could solve that problem by buying a mix. But that means you’re going to get extra ingredients in your baked goods  that you don’t want.

My solution? A homemade mix. Brownies are one of my favorite baked goods. So I made a brownie mix for days when I have very little time in the kitchen.

Find a day when you have some time and mix up all of the dry ingredients for your brownies. You can make a double, triple or quadruple batch so making brownies is easy any time.

Store the mix in the freezer. It will stay fresh, and you can use it straight out of the freezer.

A homemade brownie mix is also a wonderful gift for Christmas or for a new mom.

Even if you are busy you can have homemade brownies. This gluten free brownie mix is simple to assemble. Then getting a pan of brownies in the oven only takes minutes. 

These brownies can also be made dairy and egg free. It’s a great treat for just about anyone. And now you can have it just about any time.

Gluten Free Brownie Mix - Homemade Dutch Apple Pie 2

Gluten Free Brownie Mix
Yields 16
A simple mix to have on hand for quick gluten free brownies any time.
Write a review
Print
Dry Mix
  1. 2 cups any combination of gluten free flours (a 1:1 ratio of whole grain to white works best)
  2. 1/4 cup organic cocoa powder (or carob powder)
  3. 1 tsp. baking soda
  4. 1/2 tsp. sea salt
Brownies
  1. Dry mix
  2. 1/4 cup water
  3. 3 eggs
  4. 1/3 cup coconut oil or butter, melted
  5. 1/2 cup honey
  6. 1/4 cup chocolate chips (optional)
Dry Mix
  1. In a medium bowl combine all of the dry mix ingredients.
  2. Pour the mix into a storage container and seal (I like to use glass jars).
  3. Store the mix in the cupboard, refrigerator or freezer (depending on how long you want to store it).
Brownies
  1. When ready to bake, heat the oven to 350*F. Grease an 8" or 9" baking pan.
  2. Combine the brownie mix with the wet ingredients. Mix well.
  3. Pour the batter into the prepared pan.
  4. Bake for 25 - 30 minutes, until baked through.
  5. Allow to cool. Cut into squares.
  6. Store at room temperature or freeze for long term storage.
Notes
  1. Sorghum, amaranth, brown rice and teff work well as whole grain flours.
  2. White rice and tapioca work well as white flours.
  3. To make these brownies egg free omit the eggs and add an extra 1/4 cup honey and 2 Tbsp. coconut oil or butter.
Just Take A Bite https://justtakeabite.com/

In order for me to support my blogging activities, I may receive monetary compensation or other types of remuneration for my endorsement, recommendation, testimonial and/or link to any products or services from this blog.

Zucchini Cake With Two Frostings (gluten free, dairy free)

Zucchini Cake With Two Frostings: gluten free dairy free || Homemade Dutch Apple PieSchool is starting. Fall is coming. But don’t think it’s too late for another zucchini treat!

We get quite a bit of zucchini from our garden every summer. So I’m always trying to find new ways to use it.

This year I created a gluten free dairy free zucchini cake. To make it extra special I came up with two kinds of frosting. One is a cream cheese icing. The other is a dairy free cinnamon sugar buttercream.

Both frostings are equally delicious. I like the tang and lightness of the cream cheese icing. My kids really liked the cinnamon sugar frosting.

One of the best parts about this cake is that it’s packed with two cups of zucchini. It’s also very allergen-friendly and refined sugar free.

Zucchini cake works well as a breakfast (like coffee cake) or as a dessert. We even ate some for dinner with soup. It’s good no matter how you serve it.

Kick off the school year with a special treat that is also very healthy.  Zucchini cake is the perfect fit.

Zucchini Cake With Two Frostings: gluten free dairy free || Homemade Dutch Apple Pie

Zucchini Cake With Two Frostings
Serves 12
A light zucchini cake that is gluten, dairy and nut free - with two frosting options.
Write a review
Print
Cake
  1. 2 cups any combination gluten free flours (rice, tapioca, sorghum, amaranth, teff)
  2. 2 cups grated zucchini
  3. 1 cup cane sugar or coconut sugar
  4. 2 tsp. aluminum-free baking powder
  5. 1 tsp. baking soda
  6. 1/2 tsp. sea salt
  7. 1/2 tsp. cinnamon
  8. 1/2 cup butter, coconut, lard or palm shortening - soft/room temp
  9. 2 eggs
  10. 1 tsp. vanilla
Cream Cheese Frosting
  1. 1/2 cup whole milk yogurt or coconut milk yogurt
  2. 2 Tbsp. maple syrup
  3. 1/2 cup tapioca flour
  4. 1/2 tsp. vanilla
Dairy Free Cinnamon Sugar Frosting
  1. 1/2 cup organic palm shortening (can be replaced with butter if you tolerate dairy)
  2. 1/2 cup coconut sugar
  3. 3 Tbsp. maple syrup
  4. 1 tsp. vanilla
  5. 3/4 tsp. cinnamon
Zucchini Cake
  1. Heat the oven to 350*F. Grease an 8x11" baking pan.
  2. In a large bowl combine all of the cake ingredients. Mix well.
  3. Pour the batter into the prepared pan.
  4. Bake for 45 minutes. Allow to cool before frosting.
Cream Cheese Frosting
  1. Combine all of the frosting ingredients. Mix well.
  2. Let sit in the refrigerator at least 15 minutes before using.
Dairy Free Cinnamon Sugar Frosting
  1. Combine all of the frosting ingredients. Mix well.
  2. Use immediately or cover for use later.
Just Take A Bite https://justtakeabite.com/

In order for me to support my blogging activities, I may receive monetary compensation or other types of remuneration for my endorsement, recommendation, testimonial and/or link to any products or services from this blog.

Zucchini Pizza Bites

Zucchini Pizza Bites || Homemade Dutch Apple Pie

Is your refrigerator still overflowing with zucchini? Are you wondering what to do with it besides baking with it or grilling it? Why not make pizza!

Zucchini pizza bites make a great snack, lunch or appetizer. They are very kid-friendly. They are naturally grain free and can be made dairy free as well.

We had them recently and made them a variety of ways. I made some with pureed squash or tomato sauce and toppings to be dairy free. I added cheese to some as well. They all had great flavor.

I actually had a little bit of leftover spaghetti meat sauce to use up. So there was practically no prep work involved. It was perfect for our Sunday evening simple dinner.

I love how the smaller ones are the perfect size for little hands and little mouths.  Plus most kids will eat just about anything that you call pizza. So they are getting lots of vegetables and enjoying pizza without you having to make pizza crust!

I have a picky vegetable eater. So he was hesitant when he saw the zucchini. But once it was in his mouth he was all smiles. If your child is not a fan of zucchini, try peeling the zucchini first. Then once the pizza bites are topped you can’t even tell it’s a vegetable on the bottom.

The zucchini rounds are first baked to make sure they are cooked through and have good flavor. Then you add the toppings and bake them again for a few minutes.

Zucchini pizza bites make a fun, easy, allergen-friendly meal.  Have you ever made pizza with your zucchini? If not, you should!

Zucchini Pizza Bites || Homemade Dutch Apple Pie

Zucchini Pizza Bites
A fun finger food pizza that is free of allergens.
Write a review
Print
Ingredients
  1. Zucchini, sliced in 1/2 - 3/4" thick rounds
  2. Extra virgin olive oil for brushing
  3. Sea salt
  4. Preferred pizza toppings
Instructions
  1. Slice the zucchini and place the round on a parchment lined baking sheet.
  2. Brush the zucchini with olive oil and sprinkle with salt.
  3. Bake at 450*F for about 30 minutes.
  4. Allow the rounds to cool for about 10 minutes.
  5. Transfer the rounds to a clean piece of parchment paper on a baking sheet.
  6. Add desired pizza toppings to each round (don't overfill them or they will be hard to pick up).
  7. Bake at 400*F for about 15 minutes.
  8. Allow the pizza bites to cool for about 5 minutes before serving.
Notes
  1. Pureed squash makes a great substitute for cheese and/or pizza sauce.
  2. Do not slice the zucchini too thinly or it will be difficult to pick up.
Just Take A Bite https://justtakeabite.com/

Gluten Free Dairy Free Zucchini Crackers

Zucchini crackers are crispy, allergen-friendly and full of zucchini. They make the perfect snack at home or on the go.Gluten Free Dairy Free Zucchini Crackers || Homemade Dutch Apple PieAre you in need of a healthy snack or lunch box addition for school? Zucchini crackers are just the thing!

They are very allergen-friendly. Plus they add vegetables to your diet.

Even if your child is picky about vegetables this is a great option. You can’t tell there is zucchini in them! The flecks look like seasoning. If your child can’t handle the sight of green…use golden zucchini or summer squash! Still not convinced? Simply peel the zucchini before grating it.

The dough for these crackers comes together in minutes. You just dump all of the ingredients in a bowl and stir. It’s that simple.

My kids love munching on crackers, and I can feel good about it when the crackers are homemade and made with vegetables. No vegetable oils. No strange ingredients. Just the good stuff.

I also love that I can control the seasoning. The crackers can be very mild with just sea salt (for my oral sensory child). Or I can make them with various herbs and seasoning for lots of flavor.

The next time you need a healthy snack for your kids try some zucchini crackers. You’ll love them!Gluten Free Dairy Free Zucchini Crackers || Homemade Dutch Apple Pie

Gluten Free Dairy Free Zucchini Crackers
A crispy, allergen-friendly cracker filled with zucchini.
Write a review
Print
Ingredients
  1. 1 cup any combination of gluten free flour
  2. 1/2 cup grated zucchini (may be peeled)
  3. 1/2 tsp. sea salt
  4. 1/2 tsp. cane sugar
  5. 3 Tbsp. coconut oil or palm shortening, melted
  6. 3 Tbsp. water
  7. seasoning/extra salt to taste
Instructions
  1. Heat oven to 350*F. Cut two pieces of parchment paper the size of a baking sheet.
  2. Combine all of the ingredients in a bowl.
  3. Mix until well combined.
  4. Adjust seasoning to taste.
  5. Roll the dough between the pieces of parchment paper until 1/8" - 1/4" thin. Remove the top piece of parchment paper.
  6. Sprinkle salt and/or seasoning over the top of the dough.
  7. Cut the dough into squares.
  8. Transfer the dough (on the paper) to a baking sheet.
  9. Bake for 25 minutes.
  10. Turn off the oven. Leave the crackers in the oven for an additional 15 minutes.
  11. Remove from the oven and allow to cool/crisp.
  12. Store in an airtight container.
Notes
  1. It works best to use at least half white gluten free flour (white rice or tapioca).
  2. The crackers keep well in the freezer.
  3. One batch makes about 2 cups of crackers. You can double or triple the recipe for a larger batch.
Just Take A Bite https://justtakeabite.com/

In order for me to support my blogging activities, I may receive monetary compensation or other types of remuneration for my endorsement, recommendation, testimonial and/or link to any products or services from this blog. If you order by clicking on any of my Tropical Traditions links and have never ordered from Tropical Traditions in the past, you will receive a free book on Virgin Coconut Oil, and I will receive a discount coupon for referring you.

This post is linked to From The Archives Friday.

Gluten Free Dairy Free Blueberry Scones

Gluten Free Dairy Free Blueberry Scones || Homemade Dutch Apple Pie

If you haven’t noticed yet, I love scones! They are like a cross between a muffin and a cookie.

Scones are great for breakfast, brunch, a snack or even dessert. I enjoy serving them with soup. A sweet scone is a great contrast to salty soup.  Plus it helps fill you up and get a good balance of carbohydrates, protein and fat in your meal.

The nice thing about these blueberry scones is that they are gluten, dairy and nut free. They can also be made egg free.

My daughter raved about these scones. She said they are like blueberry cookies.

This is another great way to use up some of your fresh blueberries. Or you can make them in the winter with your frozen stash.

Don’t think you have time to make scones for breakfast? Prepare the dough the night before and chill it over night. In the morning simply put the scones in the oven. By the time you get yourself ready you’ll have fresh scones. You can even freeze the dough for later.

Another option is to bake the scones when you have time and then freeze them for later.  Scones from the freezer make an easy breakfast on a school morning.

Serve a batch of blueberry scones with scrambled eggs, bacon, soup or cheese (that’s what I usually do for breakfast). You really can’t go wrong.

Do you like scones? You’ll love these gluten and dairy free blueberry scones.

Gluten Free Dairy Free Blueberry Scones || Homemade Dutch Apple Pie

Gluten Free Dairy Free Blueberry Scones
Yields 10
A light and sweet scone filled with fresh blueberries.
Write a review
Print
Ingredients
  1. 1 cup white gluten free flour (tapioca, white rice)
  2. 1 cup whole grain gluten free flour (amaranth, sorghum, brown rice, teff)
  3. 1/2 cup cane sugar or coconut sugar
  4. 1 tsp. baking powder
  5. 1/2 tsp. baking soda
  6. 1/2 tsp. sea salt
  7. 1/2 cup room temperature fat - palm shortening, lard or butter
  8. 1/4 cup milk or milk substitute
  9. 2 egg yolks OR 1 tsp. flax seed + 1 Tbsp. milk or water
  10. 1 tsp. organic vanilla
  11. 1/2 cup blueberries (fresh or frozen, thawed)
Instructions
  1. Heat oven to 375*F. Line a baking sheet with parchment paper.
  2. In a food processor combine the flour, sugar, powder, soda, salt and fat. Pulse until mixture is crumbly.
  3. Add the milk, eggs and vanilla. Mix until well combined/a dough forms.
  4. Transfer the dough to a bowl. Stir in the blueberries.
  5. Drop by large mounds onto the baking sheet.
  6. Bake immediately or cover and chill until ready to bake.
  7. Bake 35 minutes. Allow to cool for 15 minutes before serving.
  8. Store in an airtight container.
  9. Warm in a 350*F oven for 5-10 minutes to re-crisp if serving again.
Notes
  1. I used a combination of tapioca and sorghum flour.
  2. The scones will get soft in a container. Warm in the oven to re-crisp.
  3. The dough can be chilled or frozen if you are not baking the scones right away.
  4. Baked scones can be frozen for long term storage.
Just Take A Bite https://justtakeabite.com/

In order for me to support my blogging activities, I may receive monetary compensation or other types of remuneration for my endorsement, recommendation, testimonial and/or link to any products or services from this blog.

Gluten Free Dairy Free Chocolate Graham Crackers

Give your graham crackers a little flavor boost by making chocolate graham crackers. These are allergen friendly and so easy to make!Gluten Free Dairy Free Chocolate Graham Crackers || Homemade Dutch Apple PieI make graham crackers all the time. They make a great grab ‘n’ go snack. Plus I love that I control what goes in them so they are safe for my family.

Kick it up a notch.

Once in a while I make a real treat – chocolate graham crackers! I get asked about the recipe quite often. It’s finally time to post it.

This is a great treat to prepare before school starts. Then you’ve got something easy on hand to put in lunch boxes. You can even make a double batch and freeze half of it.

A great snack.

Chocolate graham crackers are great plain or spruced up a bit. Try spreading peanut butter on top for a fun snack. I love to eat them with a slice of cheese on top! Salty, sweet and chocolaty – that is the perfect combination.

why won't my child eat 728x90

Both kids and adults will love chocolate graham crackers. This is a variety that just about everyone can enjoy since they are gluten, dairy, nut and egg free.

Need a chocolate fix? Try a chocolate graham cracker.

Gluten Free Dairy Free Chocolate Graham Crackers || Homemade Dutch Apple Pie

Gluten Free Dairy Free Chocolate Graham Crackers
A gluten and dairy free cookie that is big on chocolate flavor.
Write a review
Print
Ingredients
  1. 1 1/2 cups any combination of gluten free flours (i.e. amaranth, sorghum, rice, tapioca)
  2. 1/2 cup organic cocoa powder
  3. 1/2 cup organic cane sugar
  4. 1/2 tsp. baking soda
  5. 1/2 tsp. sea salt
  6. 1/2 cup organic palm shortening and/or coconut oil (using at least some shortening works best)
  7. 6 Tbsp. honey
Instructions
  1. Heat the oven to 350*F. Cut three pieces of parchment paper the size of baking sheets.
  2. In a large bowl, cream the shortening/oil and sugar.
  3. Add the cocoa powder. Blend well (a hand mixer works well).
  4. Add the flour, baking soda, salt and honey. Blend well.
  5. Using a spoon or your hands, check if the dough is moist enough/holds together well. If the dough is still crumbly slowly add water, 1 Tbsp. at a time until dough will hold together when squeezed with your hand.
  6. Place 1/2 of the dough onto one of the pieces of parchment paper. Place another layer of parchment paper over top
  7. Roll the dough between the parchment paper until it is 1/4″ thick. Remove top paper.
  8. Using a pizza cutter or a knife, cut the dough into squares.
  9. Place the cookies (still on the parchment paper) onto a baking sheet.
  10. Repeat this process for the second half of the dough.
  11. Bake the cookies at 350 for about 15 minutes.
  12. After removing the cookies from the oven, run the pizza cutter/knife along the cut lines again.
  13. Allow the cookies to cool completely. They will crisp as they cool.
  14. Store in an air tight container in the cupboard or in the freezer for long term storage.
Just Take A Bite https://justtakeabite.com/

In order for me to support my blogging activities, I may receive monetary compensation or other types of remuneration for my endorsement, recommendation, testimonial and/or link to any products or services from this blog.
If you order by clicking on any of my Tropical Traditions links and have never ordered from Tropical Traditions in the past, you will receive a free book on Virgin Coconut Oil, and I will receive a discount coupon for referring you.

Zucchini Pesto Pasta

Zucchini Pesto Pasta || Homemade Dutch Apple PieZucchini is a wonderful summer vegetable that can be used in so many ways. One delicious (and sneaky) way to add zucchini to your meal is to mix it with your pasta.

Zucchini pesto pasta incorporates zucchini in two ways. First it is blended in the pesto. Then grated zucchini is sauteed until it the liquid is released and the zucchini becomes soft and creamy. It can then be mixed right in with the pasta.

Even my picky vegetable eater didn’t notice it was there!  But it added big flavor and lots of nutrition. As an added bonus this dish uses chicken broth. So it is very nutrient dense.

The pesto and the sauteed zucchini can be prepared in advance. Then when dinner rolls around all you have to do is cook noodles, add the remaining ingredients and let it simmer for about 10 minutes.

You can keep the pasta simple or add cooked chicken and/or grated cheese for a well-balanced meal.

I love dishes that have lots of vegetables mixed right in. And zucchini pesto pasta definitely does just that!Zucchini Pesto Pasta || Homemade Dutch Apple Pie

Zucchini Pesto Pasta
Serves 4
A nutrient-dense easy pasta dish filled with zucchini.
Write a review
Print
Pesto
  1. 1 cup frozen peas (thawed)
  2. 1/2 zucchini, grated or cut in chunks
  3. 1/4 cup extra virgin olive oil
  4. 1/4 cup water
  5. sea salt and garlic powder to taste
Pasta
  1. 2 cups grated zucchini
  2. 1 Tbsp. coconut oil or butter
  3. 1 tsp. sea salt
  4. 2 cups dry noodles (any variety - wheat, rice, corn)
  5. 1 cup chicken broth
  6. 1 cup cooked chicken (optional)
  7. 1/2 cup grated cheese (optional)
  8. seasoning to taste (salt, pepper, garlic powder)
Pesto
  1. Combine the pesto ingredients in a blender.
  2. Blend until smooth. Add extra water or olive oil if the pesto is too thick.
  3. Adjust seasoning to taste.
Pasta
  1. Saute the zucchini in the oil/butter with salt until creamy and soft, about 15 minutes.
  2. Cook the pasta until almost done. Drain.
  3. Add the broth, sauteed zucchini, 1 cup pesto, chicken and seasoning to the cooked pasta.
  4. Simmer and stir occasionally until the broth reduces and the sauce thickens, about 10 minutes.
  5. Add cheese if desired.
Notes
  1. Extra pesto can be served on the side or reserved for use as a salad dressing or dip.
  2. The pesto, sauteed zucchini and cooked chicken can all be prepared in advance.
Just Take A Bite https://justtakeabite.com/

In order for me to support my blogging activities, I may receive monetary compensation or other types of remuneration for my endorsement, recommendation, testimonial and/or link to any products or services from this blog. If you order by clicking on any of my Tropical Traditions links and have never ordered from Tropical Traditions in the past, you will receive a free book on Virgin Coconut Oil, and I will receive a discount coupon for referring you.

Gluten Free Dairy Free Blueberry Zucchini Muffins

Gluten Free Dairy Free Blueberry Zucchini Muffins || Homemade Dutch Apple Pie

 When blueberries and zucchini are in season that means it’s time for muffins! This is a great breakfast packed with fruits and vegetables.

The best part…you can’t even tell there is zucchini in them.  Seriously. They are just like blueberry muffins. Plus they are gluten, dairy and nut free.

Make a big batch. Eat some now and freeze some for later. Paired with a little protein, these blueberry zucchini muffins make an excellent quick breakfast for school mornings.

Do you need a delicious breakfast that is allergen-friendly but tastes moist and delicious? Blueberry zucchini muffins are just the thing. The zucchini keeps them moist while the blueberries add a burst of flavor.

My kids love these. I feel good knowing they are starting their day with quality carbohydrates and even vegetables.

No more dense, crumbly gluten free muffins. Blueberry zucchini muffins are the perfect breakfast for the whole family.  They are easy to make and can be prepared in advance. Breakfast just got a lot tastier, healthier and easier. 

Gluten Free Dairy Free Blueberry Zucchini Muffins || Homemade Dutch Apple Pie

Gluten Free Dairy Free Blueberry Zucchini Muffins
Yields 16
An allergen-friendly muffin combining fresh summer produce.
Write a review
Print
Ingredients
  1. 1 1/4 cups whole grain gluten free flour (amaranth, sorghum, teff, brown rice)
  2. 1 cup white gluten free flour (white rice, tapioca)
  3. 1 cup cane sugar or coconut sugar
  4. 1 tsp. baking powder
  5. 1 tsp. baking soda
  6. 1/2 tsp. sea salt
  7. 1/2 tsp. cinnamon
  8. 1 cup grated zucchini
  9. 1/3 cup coconut oil or palm shortening, melted (butter can also be used if you are not dairy free)
  10. 2 Tbsp. water
  11. 2 eggs
  12. 1 cup fresh or frozen blueberries
Instructions
  1. Heat the oven to 375*F. Grease a muffin pan or line with muffin cups.
  2. In a large bowl combine all of the ingredients, except the blueberries. Beat until well mixed.
  3. Stir in the blueberries.
  4. Fill muffin cups 3/4 full.
  5. Bake 25 - 30 minutes, until golden brown and baked through.
  6. Allow to cool for at least 10 minutes before serving.
  7. Store at room temperature for a few days or in the freezer for long term storage.
Just Take A Bite https://justtakeabite.com/

In order for me to support my blogging activities, I may receive monetary compensation or other types of remuneration for my endorsement, recommendation, testimonial and/or link to any products or services from this blog.