Home » Kid-friendly Recipes » egg free » Page 20

Category: egg free

Sweet Potato Lentil Soup

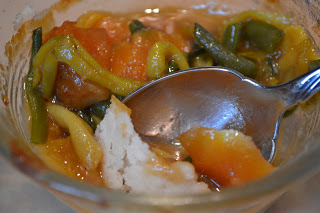
I continue to push myself a bit and try new foods that have been on my avoid list for a while. This week I tried sweet potatoes. And I tried them in a very delicious way…sweet potato and lentil soup! I found the recipe on Food.com.

It was really easy to make. I actually prepped it first thing in the morning. Then at dinner time all I had to do was warm it. We all really enjoyed it. You’d never know it has lentils. So it’s a great way to sneak them into a meal since they are so healthy.

I used regular green lentils instead of red…mostly because I started soaking the lentils before I read the recipe thoroughly 😛  I’ll have to try it with the red sometime. I also just used what spices/herbs I had on hand. So ours tasted a bit different than the original, but it was still good.

I did learn that sweet potatoes are still on my avoid list 😛  But at least I got to enjoy this tasty soup.

I did not make a full recipe. I’ll post it as I made it. There was enough for two adults, one child and enough leftover for a couple more bowls.

I garnished the soup with crispy chickpeas (sauteed in evoo until crisp). They added nice texture to the soup.

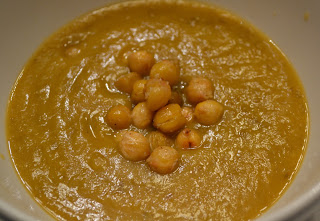
Sweet Potato and Lentil Soup
~ 4 – 5 servings

3 cups chicken or turkey broth (or water)
3/4 cups lentils (red or green), soaked
3 cups sweet potatoes, cut in large chunks
2 tsp. garlic powder
1 tsp. cumin
3 tsp. sea salt
1 tsp. thyme

Combine all ingredients. Cover and bring to a boil. Simmer until the potatoes and lentils are cooked, about 30 minutes.

Use an immersion blender to puree the soup (or puree it in a blender and pour it back into the pan). Adjust seasoning to taste.

White Rice Pancakes (egg free, nut free, dairy free, gluten free)

I continue to experiment with my allergy-free foods. Last night for dinner I made pancakes. I made our usual buttermilk pancakes for the family…whole wheat, dairy and eggs. Doesn’t quite cut it for me.

It was a rice day for me, so I tried rice pancakes. I didn’t really have a recipe. I just kind of poured and mixed what I thought might work. I ended up with a thick white batter that I really thought would just turn into a messy glob in the pan. But to my great surprise (and to my growling tummy’s delight) they turned out quite well!

My biggest concern was not being able to use eggs. But it wasn’t a problem. I compensated with a little extra baking soda and some oil.

These weren’t as light and fluffy like the other pancakes I made. They were a little thicker. I’m sure I’ll keep experimenting with the recipe. But honestly I really liked them. I found myself sneaking another bite and another bite and another bite as we sat at the dinner table (after I was “done” with my dinner :P). And then I started snacking on them later in the evening 🙂  The combination of white rice, coconut milk and lard gave them a unique, addicting flavor.

When I search for gluten free recipes I get the usual combo of about five different flours and gums to bind them all. I can’t do that with a rotational diet. I have one or two grains allowed each day. And I can’t do gums. So my goal is to make simple allergy-free recipes that don’t require twenty ingredients.

Eating allergy-free foods doesn’t mean you have to give up your favorite meals or buy a ton of specialty food. Do you have a go-to pancake recipe? Do you have a favorite allergy-free breakfast? Give these pancakes a try. Even if you don’t have to eat allergy-free. It’s a nice change from the usual wheat pancakes.

White Rice Pancakes (egg free, nut free, dairy free, gluten free)
makes ~ 6 pancakes

1 cup white rice flour (you could substitute another gluten free flour…you may have to adjust the liquid ratios)
1 cup coconut milk (I used mostly the liquidy part but also a little of the cream)
1/3 cup water
1 1/2 Tbsp. EVOO
1 tsp. baking soda
3/4 tsp. salt
2 Tbsp. cane sugar

lard, tallow, coconut oil or palm shortening for frying (you can use butter if you are not dairy free)

Directions:

Mix all  ingredients (except frying oil). Adjust to desired thickness by adding more coconut milk or water.

Fry in lard over medium heat on griddle until golden, 3-5 minutes per side.

Serve with honey, maple syrup or fruit topping.

These can also be used as bread/buns.

Candy Bar Ice Cream (gluten free, egg free, nut free, dairy free option)

I had some raw cream to use up this week. Of course that means ice cream 🙂  So the kids and I made a fresh batch yesterday.

With all of my food restrictions I was wondering what flavor to make, besides plain old vanilla again. I had just made some crunchy crumble the day before. And we like ice creams that are fruit pie/cobbler/crumble flavors. So I thought we’d try a crumble ice cream…without the fruit.

I made a larger batch of the white rice crumble, using white rice flour, palm shortening and maple syrup. I added it to a batch of egg free vanilla ice cream. It was really good!

As I was scooping it out of the ice cream maker we all tasted it…and instead of tasting like a cobbler it tasted like a crunchy/nutty candy bar. So I added a few mini dairy free, egg free, gluten free chocolate chips to make candy bar ice cream! Amazing!!

I can only eat it once in a while (every four days at most). But what a treat!!

Do you like candy bars but have a lot of food restrictions? Give this candy bar ice cream a try. You can swap the cream for coconut milk to make it dairy free. You could even try making the crumble with coconut flour or almond flour to make it grain free. There is a version for almost everyone.

Candy Bar Ice Cream

Ingredients:

3 cups raw cream (or coconut milk)
1/3 – 1/2 cup maple syrup (or honey or a combination)
1 tsp. organic vanilla (optional)

1/2 cup white rice flour
2 Tbsp. palm shortening, lard or butter
2 Tbsp. maple syrup or honey

1/4 cup dairy free, egg free, gluten free mini chocolate chips (optional)

Directions:

Heat oven to 400 degrees F.

Combine the flour, shortening and syrup until crumbly. Spread on a baking sheet. Bake 10-15 minutes, until golden. Let cool completely.

Combine cream, syrup and vanilla in a blender. Adjust sweetness to taste (make it a little sweeter than seems right since the sweetness goes down as it processes).

Process ice cream in an ice cream maker according to directions (mine takes 15 – 20 minutes in a Kitchen Aid attachment). Add the crumble during the last minute or two of processing.

Transfer the ice cream to a freezer safe container. Stir in chocolate chips. Freeze until firm.

Let ice cream set at room temperature for 5 – 10 minutes before serving.

Crunchy Crumble (gluten free, dairy free, egg free, nut free, corn free)

I made it through a full day on my rotational diet (yay!!), eating three meals that weren’t exactly the same 🙂  Then evening rolled around. And I wondered what in the world I was going to eat?

I have to have a snack before bed. If I don’t my stomach will growl all night, and I can’t sleep well. So I needed something.

I have not had time to make any snacks/baked goods with new grains. I didn’t have any fruits on my list for the day actually in the house. I had already eaten beets and green beans for every meal…and didn’t want more for bedtime snack. There was no leftover pork or rice. I was pretty much out of food for the day.

So I came up with a quick, easy, crunchy snack that was just what I needed. And it was so good!!! I’m actually bummed now that I can’t have it again for four days.

It’s like the topping for a crumble/crisp. But you can eat it plain 🙂  The best part? It took 3 minutes to prepare. And you can actually eat it without baking it if you’re looking for something really quick. It won’t be crunchy that way, but it still tastes great.

This crumble is the perfect crunchy treat at the end of the day. You can eat it plain, sprinkle it on fresh fruit or make a little crumble with it by baking it on fruit. Lots of options. This is a single serving.

Now the wheels are turning. I foresee some dessert baking coming soon 🙂

Crunchy Crumble
serves 1

1/4 cup white rice flour
2 tsp. lard (or palm shortening or butter)
2 tsp. maple syrup (or honey)

Heat oven to 400 degrees F.

Mix flour, lard and syrup. Break into crumbles in an oven safe dish or on a baking sheet. Bake for 12 – 20 minutes, until golden brown. Allow to cool for a few minutes to fully crisp.

Single Serving Simple Pot Pie (gluten free, egg free, dairy free, nut free)

I’ve just started my rotational diet. And I have a trial four day rotation that I’ve laid out. It’s still a work in progress, but it’s a start.

So today I’m allowed rice as my starch/grain, lard as my fat and beans and beets as my vegetables. How do I make that appealing all day long? I had rice cooked in chicken broth with beets and beet greens for breakfast. But I didn’t really want the exact same thing for lunch.

I came up with this easy single serving pot pie. Lots of nourishing broth and fat. Plus it’s super delicious! It really hit the spot for a comforting lunch as I’m adjusting to having my options so limited/so different from what they were just a week ago.

I was also trying to feed two grumpy kids, so it’s a bit lacking in visual appeal. But you get the idea.

My protein for today is pork. I don’t have any cooked yet (I’ll be making it for dinner). But it would be a great addition to this dish. Chicken or turkey would be great too. And any kind of vegetable will work.

I didn’t measure anything as I was cooking. I’ll give a rough idea of quantities. But feel free to adjust as needed. And you can multiply this to make a larger dish to feed more than one person.

Single Serving Pot Pie

1/4 cup white rice flour
1 Tbsp. lard (or palm shortening or butter)
2 tsp. water
1/4 tsp. sea salt

1 cup chicken broth
1/2 cup vegetables (I used roasted golden beets and frozen green/yellow beans)
1 Tbsp. white rice flour
sea salt to taste
2 tsp. lard (or butter)
1/8 cup cooked pork, turkey or chicken (optional)

Heat oven (I used the toaster oven) to 400 degrees F.

Combine flour, salt and lard. Add enough water for the dough to stick together. Mix until combined. Press into bottom and up the sides of a small oven safe bowl (I used a small pyrex dish). Bake for 15 – 20 minutes.

While the crust is baking, in a small cast iron or stainless steel pan bring chicken broth to a boil. Add vegetables, lard and seasoning. Simmer until broth begins to reduce (about 10 minutes). Add meat. Sprinkle on flour and stir. Continue to simmer until thick. Adjust seasoning to taste.

Pour the filling into the baked crust. Return to the oven. Bake 5 more minutes. Serve warm.

Chocolate Chip Scones (dairy free, egg free, gluten free, nut free)

I got all of my food allergy results a few days ago. So what does that mean? Let the experimentation begin!

I made two batches of chocolate chip scones this week. Both are egg free. One is also dairy and gluten free. Both are delicious! And very easy to make. Honestly, the dairy and gluten free version tasted just like chocolate chip cookies to me. What a treat as I embark on this journey.

As someone that is passionate about baking…and loves to taste what I make, it’s good to know I don’t have to completely give up what I love. Having some allergen friendly treats here and there will definitely make this process easier.

These scones are great for breakfast, brunch or a snack any time of day. They pair well with soup too. Give them a try. Which version do you like best?


Chocolate Chip Scones (egg free, nut free)

1 cup whole wheat flour*
1 cup white rice flour
1/3 cup sucanat/rapadura or cane sugar
1 tsp. baking soda
1/2 tsp. sea salt
1/3 cup chocolate chips (dairy, egg, soy free)
1/2 cup butter (cold)
1/2 cup milk
3 Tbsp. sour cream

Heat oven to 400 degrees. Line a baking sheet with parchment paper.

Mix flour, sugar, baking soda and salt (in a bowl or food processor).

Cut in butter until the dough is crumbly (I do this with my hands or food processor).

Mix in chocolate chips.

Add milk and sour cream. Mix until a ball of dough forms. Shape dough into a round disk, 1/2 – 3/4″ thick. Cut into 8 – 10 scones.

Place scones on prepared baking sheet. Bake about 25 minutes. Allow to cool for about 5 minutes.

*You can use all wheat flour or all white rice flour (to make them gluten free).

Chocolate Chip Scones (egg free, dairy free, gluten free, nut free)

2 cups white rice flour
1/3 – 1/2 cup sucanat/rapadura or cane sugar
1 tsp. baking soda
1/2 tsp. sea salt
1/3 – 1/2 cup chocolate chips (dairy, egg, soy free)
1/2 cup palm shortening
1/4 cup squash or pumpkin (pureed)
1/2 cup water

Heat oven to 400 degrees. Line a baking sheet with parchment paper.

Mix flour, sugar, baking soda and salt (in a bowl or food processor).

Mix in the shortening until the dough is crumbly (I do this with my hands or food processor).

Mix in chocolate chips.

Add the water and squash. Mix until a ball of dough forms. Shape dough into a round disk, 1/2 – 3/4″ thick. Cut into 8 – 10 scones.

Place scones on prepared baking sheet. Bake about 25 minutes. Allow to cool for about 5 minutes.

Homemade Frosted Mini Wheats

After making Oat Squares last week I had the idea to try Mini Wheats. Similar, but something I can tolerate 🙂  And always a personal favorite cereal.

I woke up about 45 minutes late today, so I had to throw this experiment together in about 10 minutes.

To my great surprise they turned out quite well. I’m sure I could make them look a bit prettier and be more uniform if I actually had the time. But on the whole they are good. They have the flavor of Frosted Mini Wheats. They are crunchy, but they aren’t too hard.

To help create these I looked at the actual ingredients in the cereal. There is no liquid. So I don’t know how they make them. I do know that whatever process they use makes the cereal not good for you.

I chose to use water to  hold the dough together. I also decided against adding synthetic vitamins to mine 😛

I only made a small batch to experiment. When I make them again I’ll do a larger quantity (and maybe take the time to take better pictures). And I want to try making them with part rice flour sometime.

Homemade Frosted Mini Wheats
makes 1 pint

1 cup whole wheat flour
1/4 cup organic cane sugar
1/3 cup water

1 Tbsp. organic palm shortening
2 tsp. organic cane sugar

Heat oven to 350 degrees F. Line a baking sheet with parchment paper.

Mix the shortening and sugar to form a paste (“frosting”).

Mix flour and sugar. Gradually add water until the mixture is barely wet enough to hold together. Use your hands to squeeze the dough/see if it will hold. You want it just past the crumbly stage.

Take a small handful of dough at a time and shape it into a log.

Spread some of the “frosting” on the log. Cut into squares. Place them on the baking sheet.

Repeat this process until the dough is used.

Bake at 350 for about 15 minutes. Turn off oven. Leave the cereal in the oven another 10 minutes to crisp. Allow to cool completely.

Store in an airtight container.

Quinoa Mac ‘n’ Cheese

We tried yet another new recipe for dinner last night. Quinoa Mac ‘n’ Cheese. This recipe comes from Tasty Kitchen.

The original recipe has spinach in it. I just used the concept of replacing noodles with quinoa and then made it the way I normally make macaroni and cheese.

This was quite good. It was a unique way to get my family to eat quinoa. So far they are not big fans (I really enjoy it myself…but the rest not so much). But Justin and Rebecca both finished their helpings. Since they normally only tolerate a few bites of quinoa I consider it a success :).

You could easily add any chopped, cooked vegetables to this dish. Or even add bacon or ham. That would make it even better!

I’ll post the recipe the way I made it. Very simple. And a nice change from the traditional macaroni and cheese. It’s also a great way to make a gluten free version of a classic dish. If you like your mac ‘n’ cheese to really hold together well you can mix in a couple of beaten eggs before pouring it into the pan.

This can be prepared in advance and then simply baked right before dinner. Or you can skip the topping/baking and serve it right out of the pan. This would also make a great, warming breakfast!

Quinoa “Macaroni” and Cheese
serves 3 – 4

1/2 cup dry quinoa (makes about 1 1/2 cups cooked quinoa)
1 cup water
1 tsp. evoo
1/2 tsp. sea salt

2 Tbsp. butter
2 Tbsp. flour
1 1/2 cups milk
1 – 2 cups grated cheese (depends how cheesy you like it. Any varieties will do. I used mozzarella, cheddar and parmesan.)
salt and garlic powder to taste

1/2 cup seasoned bread crumbs (optional – use gluten free or omit to keep it gluten free)
1/4 cup grated cheese (I used the same cheese mix as was in the casserole)

Rinse quinoa in a small mesh strainer for 1-2 minutes to remove bitter coating.

Toast quinoa in hot oil in a small saucepan for 1-2 minutes. Add water. Bring to a boil. Add salt. Cover. Reduce heat and simmer 15 minutes. Remove from heat. Let set covered 5 minutes. Pour quinoa into a bowl.

In the mean time melt butter in a saucepan. Add flour and mix. Cook for 1-2 minutes, stirring constantly.

Add milk very gradually, a couple Tbsp. at a time at first. Stir after each addition to incorporate into the butter/flour mixture. Add remaining milk. Bring to a boil. Reduce heat and add cheese. Stir until the cheese is melted. Season to taste.

Pour cheese sauce over quinoa and mix. Add extra seasoning if necessary. Add eggs if desired.

Pour into a greased casserole dish.

Sprinkle breadcrumbs and cheese over top.

Bake at 400 degrees for 25 – 30 minutes, until cheese on top is melted and golden. Let set for 5 minutes before serving.

Roasted Cauliflower Cheddar Soup

I’ve been in a recipe rut lately. So a couple weeks ago I did some recipe browsing. I found this recipe for roasted cauliflower cheddar soup on two peas and their pod. It was very easy to make and tasted great.

I modified it so that I could eat it. So it was basically roasted cauliflower, broth and cheddar cheese. That’s it.

Simple and healthy. It reminded me of potato soup…which is nice treat for someone that can’t eat potatoes 🙂

It isn’t exactly the most photogenic soup. But what it lacks in appearance it makes up for in taste. I added a little diced avocado for some texture. I also offered diced chicken and beef to mix in for a heartier soup.

Check out the link for the original recipe with things like onions and celery. Here is how I made it.

Roasted Cauliflower and Cheddar Soup
serves 3 – 4

1 head cauliflower
1 -2 Tbsp. EVOO
2 tsp. sea salt

2 – 3 cups chicken broth (or vegetable broth to make it vegetarian)
salt and garlic powder to taste
1/2 – 3/4 cup grated cheddar cheese

Wash and chop cauliflower. Mix cauliflower with EVOO and salt. Roast the coated cauliflower on a parchment lined baking sheet at 400 degrees for 35 minutes.

Simmer roasted cauliflower in the broth for about 15 minutes.

Remove from heat and puree with an immersion blender until smooth and creamy. Add seasoning to taste.

Return the pan to the stove over low heat. Add extra broth if the soup is too thick. Add the cheese and heat until it has melted.

Homemade Oat Squares

Earlier this week we had a long snowy day with nothing to do. And as usual Abram was begging to bake. So I brainstormed what new recipe we could try.

I was thinking a new cereal. I looked up the ingredients for Cheerios. There really isn’t much to them. So we tried to make something similar – taste and texture. I have no idea how you’d copy the shape 😛

It took about 3 minutes to mix the dough. And it tasted really good. Abram actually ate a bunch of it…and he NEVER eats the stuff we bake (either the dough or after it’s baked). He just doesn’t have a sweet tooth.

The end result? NOT Cheerios 😛  But to my surprise they taste and look a lot like Quaker Oat Squares. This used to be one of my favorite cereals. They are very easy to make.

They did end up a bit harder than I’d like. Maybe next time I’ll add some baking soda to help soften them just a bit. Otherwise these are actually really good. And they make a great portable snack.

Three ingredients is all you need to recreate a delicious cereal. Simple. As an added bonus they are dairy, gluten (if you tolerate oats), egg, nut, soy and corn free.

Homemade Oat Squares
makes about 2 cups

2 cups rolled oats
1/2 cup organic cane sugar
1/2 cup water
——————————————————————————————————–
1/2 tsp. baking soda
1/4 tsp. salt
(I have not tried it with these added yet, but I think it would improve the texture a bit.)
——————————————————————————————————–

Create oat flour by processing oats in a blender.

Mix oat flour, sugar and water until dough forms.

Using a scoop at a time, roll the dough into a small log. Cut into “squares.”

Place on a parchment lined baking sheet.

Bake at 350 for 15 minutes. Turn off oven. Leave the cereal in the oven to crisp for another 5-10 minutes.

Remove from oven. Let cool completely. Store in an airtight container.