Home » Kid-friendly Recipes » gluten free » Page 30

Category: gluten free

Homemade Oat Squares

Earlier this week we had a long snowy day with nothing to do. And as usual Abram was begging to bake. So I brainstormed what new recipe we could try.

I was thinking a new cereal. I looked up the ingredients for Cheerios. There really isn’t much to them. So we tried to make something similar – taste and texture. I have no idea how you’d copy the shape 😛

It took about 3 minutes to mix the dough. And it tasted really good. Abram actually ate a bunch of it…and he NEVER eats the stuff we bake (either the dough or after it’s baked). He just doesn’t have a sweet tooth.

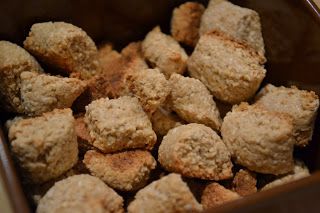
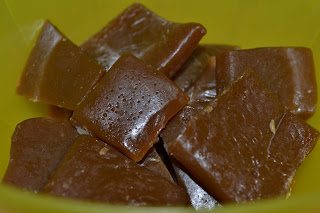
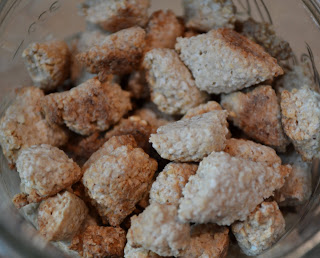
The end result? NOT Cheerios 😛  But to my surprise they taste and look a lot like Quaker Oat Squares. This used to be one of my favorite cereals. They are very easy to make.

They did end up a bit harder than I’d like. Maybe next time I’ll add some baking soda to help soften them just a bit. Otherwise these are actually really good. And they make a great portable snack.

Three ingredients is all you need to recreate a delicious cereal. Simple. As an added bonus they are dairy, gluten (if you tolerate oats), egg, nut, soy and corn free.

Homemade Oat Squares
makes about 2 cups

2 cups rolled oats
1/2 cup organic cane sugar
1/2 cup water
——————————————————————————————————–
1/2 tsp. baking soda
1/4 tsp. salt
(I have not tried it with these added yet, but I think it would improve the texture a bit.)
——————————————————————————————————–

Create oat flour by processing oats in a blender.

Mix oat flour, sugar and water until dough forms.

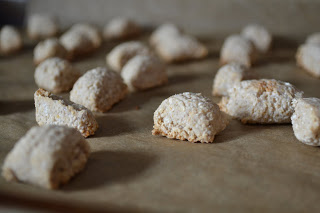
Using a scoop at a time, roll the dough into a small log. Cut into “squares.”

Place on a parchment lined baking sheet.

Bake at 350 for 15 minutes. Turn off oven. Leave the cereal in the oven to crisp for another 5-10 minutes.

Remove from oven. Let cool completely. Store in an airtight container.

One Handed Honey Herb Chicken

My son and I stayed home from church on Sunday because he was sick. I still wanted to make a decent “Sunday dinner.” But he wanted to be held constantly.

I knew I was going to bake some chicken, but had no idea what kind. I knew it had to be simple…so simple that you can prepare it with one hand.

This is what I came up with. And it’s delicious!!

Put the chicken in the pan. Sprinkle a few things on top. And put it in the oven. In an hour you have moist, flavorful chicken. Perfect.

It’s a little sweet and a little savory. Just what I like.

One Handed Honey Herb Chicken

2 boneless skinless chicken breasts
1/2 tsp. sea salt
1/2 tsp. garlic powder
2 Tbsp. honey
1/4 – 1/2 cup seasoned bread crumbs of choice (can be gluten free or substitute with seasoned almond or coconut flour for grain free)

Heat oven to 350. Butter/grease a small baking dish.

Place chicken in baking dish. Sprinkle with salt and garlic powder. Drizzle eat breast with honey. Rub slightly to cover. Sprinkle bread crumbs on top.

Cover dish and bake for 40 minutes. Remove cover and turn heat up to 400. Bake another 20 minutes, until topping is crisp and chicken is cooked through.

Homemade Caramels

Last week I made an overnight french toast casserole. I’ve made it quite a few times now. The best part? The syrup you make to go in it. As I was making the syrup I thought it seemed a lot like caramel. Maybe I could use that same recipe (slightly tweaked) to just make caramel?

This week I gave it a try…success!! It really could not be any easier. No candy thermometer. No standing around with bubbling sugar and heavy cream. No artificial ingredients.

This caramel comes together in minutes and is so good. You can add extra salt to make it salted caramel. Or go with the traditional flavor. Either way you can’t go wrong.

Do you like caramels? Give this simple recipe a try. I promise, you’ll be glad you did.

Need an easy Christmas present? Wrap these individually in parchment paper or wax paper and bag them. Perfect.

Homemade Caramels

3 Tbsp. honey
1/4 cup butter
1/2 cup brown cane sugar or sucanat
1/4 – 1 tsp. sea salt (to taste)
In a pan on the stovetop, combine the honey, butter, salt and brown sugar. Simmer until all of the sugar is dissolved and the ingredients are well combined, about 5 minutes. Adjust salt to taste.

Pour into a parchment lined 8″ or 9″ pan. Allow caramel to cool in the refrigerator about 30 minutes.

Cut or break into small pieces. Return to the refrigerator to cool/harden completely (do not put pieces on top of each other or they will stick).

Store in a bag or glass jar in the refrigerator.

Caramelized Brussels Sprouts

After asking on facebook for some vegetable ideas I tried a new recipe for brussels sprouts from Eat, Live, Run. It’s so simple and so delicious! We all loved it.

Basically you saute brussels sprouts and add a little brown sugar at the end. Who knew that could make them taste so amazing? We already love brussels sprouts. This was a great way to change it up a bit.

I did not use the garlic or the nuts. But that would be good too. I will definitely be making these again. I might even turn them into a one dish meal by adding a starch and protein (quinoa and nuts?, rice and chicken?, couscous and salmon?). My mind is whirling with variations already 🙂

I’ll be trying this method of vegetable preparation with other vegetables as well. I already did broccoli and kohlrabi last week. Yum!! Cauliflower would be a great addition as well.

Do you like brussels sprouts? If not would a little brown sugar make you change your mind?

Caramelized Brussels Sprouts

12-14 large brussels sprouts
1 Tbsp olive oil (I used about 2 Tbsp. of butter and coconut oil)
1 clove garlic, minced (I just used a sprinkle of garlic powder)
pinch sea salt (or a lot if you’re like me:)
2 Tbsp brown cane sugar (or honey or maple syrup)
1/4 cup roughly chopped pecans or walnuts, toasted (I’d use crispy nuts)

Slice each brussels sprout very thin until you have a mound of feathery brussels sprout ribbons. Heat the olive oil/butter/coconut oil over medium high in a large skillet and saute the garlic for 30 seconds. Add the brussels sprouts and continue sauteing for another 4-5 minutes, until bright green and tender (I saute them a bit longer…my family likes them plenty soft). Add the sea salt and brown sugar and toss together. Finish by adding the toasted nuts.

Corn Free "Cornbread"

I never had cornbread growing up (so sad). The first time I tried it was probably when I was in college. And I’ve loved it ever since!

Corn has been out of my diet for over a year now. And I miss cornbread. It’s my go-to accompaniment for chili. Corn muffins are great with just about any kind of soup. It’s easy and delicious.

So recently I decided to try a corn free version. I know it sounds crazy. But it can be done.

I used my usual cornbread recipe and made some modifications to remove the corn (including removing the baking powder…yes, that has cornstarch!). I also made it egg white free so that it’s better for me.

The result is a lightly sweetened cake that tastes almost just like cornbread. It even looks like cornbread…the egg yolks give it a nice golden color. All the picky eaters in my family loved it just as much as the original version.

It’s also very easy to make. Add the ingredients to a bowl, mix with a spoon, pour it in the pan and bake. My 18 month old helped me make it last night (he did some pouring, mixing and egg cracking…while I held him…the whole time…yes, it’s easy enough to make one handed while keeping a little one from spilling everything).

It makes a great pairing with chili. Or it’s a delicious breakfast topped with butter and honey or maple syrup. My personal favorite way to eat it is with lots of butter and a little sprinkle of sea salt. I love anything with a salty/sweet combo.

I have also added a soaked gluten free version. It is just as good as the original and easy on the tummy.

Can’t have corn? Try this corn free version of cornbread. You don’t have to go without anymore 🙂

This post is linked to Fat Tuesday and Real Food Wednesday.

Corn Free “Cornbread”

1/2 cup organic all purpose flour (or 1/2 cup white rice or tapioca flour)
1/2 cup organic whole wheat flour (or 1/2 cup amaranth flour)
1/3 – 1/2 cup organic cane sugar (depends how sweet you like it)
4 Tbsp. melted butter (you can also used coconut oil. It will give a little different texture)
1/2 cup milk or milk substitute
1 1/2 tsp. baking soda
1/2 tsp. sea salt
4-5 egg yolks (more yolks will make it more moist and more yellow)

Heat oven to 400 degrees F. Grease a 9″ round pie pan.

Add the dry ingredients to the bowl. Mix. Add the butter and milk. Mix. Add the egg yolks. Mix.

Pour into the prepared pan. Bake for 25 – 30 minutes, until golden and baked through.


Soaked Gluten Free Corn Free Cornbread

1/2 cup tapioca or white rice flour
1/2 cup amaranth flour
1/2 cup milk or coconut milk
1 Tbsp. lemon juice, yogurt, whey or kefir
1/3 cup organic cane sugar
3 Tbsp. melted butter or coconut oil
2 egg yolks
1 egg
1/2 tsp. sea salt
1 tsp. baking soda
1 tsp. cream of tartar

In a medium bowl combine the flour, milk and lemon juice. Cover and let sit for 24 hours.

Heat the oven to 400*F. Grease a 9″ round pie pan.

Add the sugar and oil to the flour mixture. Beat well.
Add the eggs and sea salt. Beat well.
Add the baking soda and cream of tartar. Mix until just combined.
Immediately pour into the prepared pan.
Bake for 30 – 35 minutes.
Let cool for 10 minutes before serving.

Simple Chicken Nuggets

I’ve made chicken nuggets countless times. I’ve made them in a variety of ways. But I have always used chicken breast or roasted chicken.

Last week I put chicken nuggets on my menu…then went to the freezer to get chicken…and found I had no chicken breast. Hmmm.

I did have some ground chicken, so I figured I’d go with that. I had no recipe and not a lot of time to prepare dinner. And I had my usual little “helper” in the kitchen (Abram thinks he must be held whenever I’m cooking so he can watch and try to get his hands on whatever I’ll let him).

I came up with an easy, delicious chicken nugget recipe that we all loved.

This is a great recipe if you’re trying to get your kids to eat homemade chicken nuggets instead of a fast food version. By using ground chicken you can make them round…or whatever shape you want really 🙂  They look like the typical nugget, but they only have good stuff in them.

I used a combination of bread crumbs and freshly grated parmesan cheese for the breading. You can skip the cheese if you want. And you can sub wheat flour, coconut flour or almond flour for the bread crumbs.

I also used egg yolks for a binder. If you can’t eat eggs you can leave them out. They will still hold together.

One other bonus about this recipe – they are baked. Don’t get me wrong, I love to fry things in healthy fat like coconut oil, butter and lard. But it can be messy and you have to monitor the stove. I like it when I can prepare dinner, stick it in the oven and forget about it until it’s time to eat.

You can prepare a large batch and freeze them for quick lunches any time. They didn’t last long enough here to freeze any 🙂  Serve them with homemade ketchup, honey mustard or barbecue sauce.

This post is linked to Real Food Wednesday and Fat Tuesday.

Simple Chicken Nuggets
dairy free, nut free, grain free, gluten free, egg free options

1 lb. ground chicken (or turkey or pork)
2 egg yolks (optional)
seasoning (I used sea salt, garlic powder and seasoning salt)
1/4 cup grated parmesan cheese (optional)

3/4 cup bread crumbs, wheat flour, coconut flour or almond flour
1/3 cup grated parmesan cheese (optional)

Heat oven to 375 degrees F. Grease a large baking sheet.

Mix the chicken, eggs, seasoning and cheese. In a separate bowl mix the breadcrumbs or flour and cheese.

Take a small scoop of the chicken mixture. Drop it into the breadcrumb mixture. Roll it around until it is coated. Place it on the baking sheet and press down until desired thickness. Repeat until all of the chicken mixture is used.

Bake the chicken nuggets for 30-35 minutes, flipping them over after 20 minutes.

Crockpot Pumpkin Custard (GAPS-legal, nut free, egg white free)

Over the weekend I tried a new fall recipe for pumpkin custard. Another delicious recipe from Cara at Health, Home and Happiness. We all enjoyed it. Plus it’s grain and nut free.

I did modify it a bit. I only used egg yolks so I could eat it. I also used raw cream instead of coconut milk. And I mixed it by hand instead of in a blender. I also added more honey…and it still wasn’t very sweet. I had to drizzle extra honey over top for Rebecca to eat it. Else it almost tasted more savory (the pumpkin flavor was very strong). I didn’t make a full batch either.

Overall it was a great recipe. And I love that it cooks in the crockpot. I prepped it when I got up. Then it was ready for the family when they got up.

I’ll post the recipe the way I made it. Check out Cara’s site for the original.

Crockpot Pumpkin Custard
makes 4 1/2pt. jars

2 cups cooked pumpkin or butternut squash
5 egg yolks (or 3 whole eggs)
1/4 cup raw cream or coconut milk
1/3 – 1/2 cup maple syrup or honey
1/4 tsp. nutmeg
1/2 tsp. cinnamon
pinch of sea salt

Fill the crock pot with 1 inch of water and turn on high. Allow it to preheat for 30-45 minutes.

In a blender, puree all ingredients or simply mix by hand if your pumpkin is already pureed. Taste and adjust sweetness if needed.

Pour the mixture into oven/heat proof ramekins or mason jars, filling 2/3 full. Gently set the jars into the water. Cover. Allow to steam for 4-6 hours.

Turn the crock pot off, and it will continue to stay warm for another hour or so. Serve warm or cover with plastic wrap and store in the fridge to serve chilled.

Baked Apples

I’m always looking for new breakfast ideas. This week I came across Cara’s recipe for slow cooker baked apples.  It was just what I needed – grain and nut free and easy prep.

I was going to make them in the crockpot, but then I changed my  mind. Since I was only making a few I didn’t want to get my big crockpot dirty. So I just prepped them this morning and baked them in the oven.

So easy and so delicious! Justin said they were great. He had his topped with homemade vanilla yogurt.

I will definitely be making these again. Such a great idea for a healthy breakfast. I didn’t follow the recipe exactly since I was going from memory when I made it. It still turned out great.

The next time I make it I might modify things and just do a pan of sliced baked apples**. Then you don’t have to worry about the apples opening/the toppings falling out. And you can serve up as much or as little as you want. Plus I don’t have to worry about a picky eater complaining about apple peels 😛

Baked Apples

6 medium apples
¼ cup raisins
¼ cup honey (I also added a little organic cane sugar)
1 tsp. cinnamon
6 Tbsp. coconut oil, butter, or ghee (I forgot this…oops)
 
Core apples. To core, using an apple corer or paring knife, cut around the core (about ¼ inch from the stem all the way around) but leave about half an inch at the bottom. Use the knife to ‘drill out’ the core.
 
Divide raisins, honey, cinnamon, and coconut oil between the apples.
 
Place apples in a crock pot and add ½ inch of water. Cook on low overnight and enjoy a hot breakfast in the morning!
 
Alternatively, bake covered at 350 degrees in a glass dish for 45 minutes-1 hour in the morning.
 
**Next time I will try peeling and slicing the apples. Place them in a buttered baking dish. Sprinkle with cinnamon, honey and raisins. Cover and bake at 350 for 25 minutes.

Top with with cream, yogurt, coconut milk, or just eat plain.

Scalloped Sweet Potatoes and Apples

Earlier this week I made another recipe from my Old Pennsylvania Dutch Recipes book. It is called Scalloped Sweet Potatoes and Apples. Perfect for fall in Michigan!

It was quite easy to make and turned out really well. I cooked the sweet potatoes first thing in the morning. Then did the peeling and slicing when it was time to make dinner.

This got two thumbs up from the family. I used sweet potatoes from our garden and apples from my in-laws’ farm. It would be a great recipe for a large crowd, a holiday or a potluck. I only made a half recipe and we had plenty of leftovers.

This post is linked to Fight Back Friday and Fresh Bites Friday.

Scalloped Sweet Potatoes and Apples

6 medium sweet potatoes
1 1/2 cups apple slices
1/2 cup rapadura (or organic cane brown sugar)
1/2 tsp. salt
1 tsp. ground mace (I don’t even know what mace is…I just used cinnamon)
1/4 cup butter

Wash and cook sweet potatoes in boiling water to cover until just tender. Peel and cut into crosswise slices 1/4 in. thick.

Butter a 2 qt. casserole and arrange one half of the sweet potatoes in the bottom. Then later one half of the apple slices. Sprinkle with one half of a mixture of the brown sugar, salt and mace. Dot with 2 Tbsp. butter. Repeat layering, ending with apples, seasoning and butter.

Bake at 350 degrees for 50 minutes.

Grain Free Pesto Topped Quiche…Or Egg Pizza

Eggs and pesto go very well together. I’ve made a pesto quiche before…one version that had pesto on the bottom and one that had it mixed in.

The problem is that the pesto usually kind of gets lost in the eggs. Sometimes you can’t even tell it’s there. So last night I decided to top our quiche with pesto.

I made a simple egg and cheese quiche. I let it bake until the top was just set. Then I topped it with pesto and extra cheese.

It worked very well. The pesto stayed on top and added great flavor.

Are you grain free and looking for a pizza substitute? Make the quiche thinner and this is like pesto pizza! You could even add extra toppings. Mushrooms, onions, peppers,…I may need to try this very soon.

The next time you make quiche, instead of mixing all of the meat and vegetables inside consider topping it. The possibilities are endless. (Plus picky eaters can pick off what they don’t like that way 🙂

This makes a great breakfast, brunch, lunch or dinner! And the leftovers are good warm or cold. Perfect for a quick weekday breakfast.

What is your favorite way to make quiche? What toppings would you add?

Pesto Topped Quiche

1/2 – 1 cup pesto (I blend peas, olive oil, salt and garlic powder for a simple allergen free pesto. You can add nuts and cheese and use basil or spinach for a more traditional pesto)
4 eggs + 5 egg yolks
1 cup milk or dairy kefir
salt, pepper and garlic powder to taste
1 cup shredded cheese (I used a combo of marble and parmesan)
1/4 cup shredded parmesan cheese

Grease a 9″ pie plate. Mix eggs, milk, seasoning and  1 cup shredded cheese. Pour into prepared pan.

Bake at 375 for 20 – 30 minutes, until top is set.

Spread pesto on quiche. Sprinkle parmesan cheese over top.

Bake another 25 – 35 minutes, until eggs are fully set.

Let set for 5 minutes before serving.