Home » Kid-friendly Recipes » nut free » Page 29

Category: nut free

Caramelized Brussels Sprouts

After asking on facebook for some vegetable ideas I tried a new recipe for brussels sprouts from Eat, Live, Run. It’s so simple and so delicious! We all loved it.

Basically you saute brussels sprouts and add a little brown sugar at the end. Who knew that could make them taste so amazing? We already love brussels sprouts. This was a great way to change it up a bit.

I did not use the garlic or the nuts. But that would be good too. I will definitely be making these again. I might even turn them into a one dish meal by adding a starch and protein (quinoa and nuts?, rice and chicken?, couscous and salmon?). My mind is whirling with variations already 🙂

I’ll be trying this method of vegetable preparation with other vegetables as well. I already did broccoli and kohlrabi last week. Yum!! Cauliflower would be a great addition as well.

Do you like brussels sprouts? If not would a little brown sugar make you change your mind?

Caramelized Brussels Sprouts

12-14 large brussels sprouts
1 Tbsp olive oil (I used about 2 Tbsp. of butter and coconut oil)
1 clove garlic, minced (I just used a sprinkle of garlic powder)
pinch sea salt (or a lot if you’re like me:)
2 Tbsp brown cane sugar (or honey or maple syrup)
1/4 cup roughly chopped pecans or walnuts, toasted (I’d use crispy nuts)

Slice each brussels sprout very thin until you have a mound of feathery brussels sprout ribbons. Heat the olive oil/butter/coconut oil over medium high in a large skillet and saute the garlic for 30 seconds. Add the brussels sprouts and continue sauteing for another 4-5 minutes, until bright green and tender (I saute them a bit longer…my family likes them plenty soft). Add the sea salt and brown sugar and toss together. Finish by adding the toasted nuts.

Real Pumpkin Pie


I don’t make many pies. Why? I just don’t like them that much.

Well, I should rephrase that. I used to not like pie. I would basically only eat blueberry pie.

Now that I make all of our food from scratch, I know what REAL pie tastes like. Let me tell you – it’s good!

The Best Pumpkin Pie

The first time I made pumpkin pie I figured I’d just follow a standard recipe. But they all have sweetened condensed milk.

So I just made my own modifications to create a truly REAL pumpkin pie.

It was delicious!!  I, Mary, ate and enjoyed pumpkin pie!  For the first time in my life. Even crazier…I enjoyed it with whipped cream on top…I don’t like whipped cream. Or so I thought. I guess I actually like REAL whipped cream as well.

How to Make Real Pumpkin Pie

A combination of my personal tastes changing over the years and using quality, real ingredients means a delicious nutritious dessert that I could finally enjoy. 

But to be honest, my favorite way to eat pumpkin pie is for breakfast! Eggs and veggies are a great way to start the day. Just be sure to eat protein with it and limit sweets the rest of the day to avoid a blood sugar roller coaster.

Do you enjoy pumpkin pie? How do you make yours?

Real Pumpkin Pie

2 cups cooked, pureed pumpkin
1 cup heavy cream or whole milk (can be replaced with coconut milk)
2 eggs OR 1 egg + 2 yolks OR 4 yolks
3/4 cups organic cane sugar (you can substitute maple syrup for some of this)
1 tsp. pumpkin pie spice
1/2 tsp. cinnamon
1/2 tsp. salt

Single pie crust (wheat)**

1 1/4 cups organic whole wheat or all purpose flour

1/2 tsp. salt
1/3 cup + 1 Tbsp. palm shortening or cold butter or lard
1/8 cup + 2 Tbsp. water w/ 1/2 tsp. vinegar

Pie Crust:
Sift flour and salt. Cut in 1/2 shortening until it resembles corn meal. Cut in other 1/2 until it looks like small peas. Add water + vinegar and mix well. (You can do this all in a food processor for a very quick dough). Roll out and place in 9″ pie plate.
 
**You can make this gluten free using a soaked gf pie crust or a regular gf pie crust.

Pumpkin Pie:

Preheat oven to 425.

Combine all ingredients in a bowl. Beat with mixer until smooth.

Pour into unbaked pie shell.

Bake for 15 minutes at 425, reduce temperature to 350 and bake for an additional 40 to 50 or until knife comes out clean.

RR – Macaroni and Quiche

The other day I was playing play-doh with my kids. Which means Rebecca was getting creative 🙂  She made “egg noodle casserole.” And asked if we could actually make it. Her ingredient list: noodles, eggs and cheese.

It sounded simple, so we gave it a try. We used egg noodles and a mix of cheeses. I also added ham since we had some to use up.

In the end it was a cross between macaroni and cheese and a ham and cheese quiche. And it was delicious!

Rebecca doesn’t usually like eggs. But she ate this no problem. Let your kids help plan and make meals…and they will eat them 🙂  Rebecca came up with the recipe. Abram helped me make it.

I made a small batch since I didn’t have many egg noodles in the house. But it was still plenty for us.

Macaroni and Quiche (or Egg Noodle Casserole)

2 cups dry egg noodles (or any noodle of choice), cooked
3/4 cup shredded cheese (we used marble and cheddar)
2 whole eggs
2 egg yolks
1/2 cup diced cooked ham (nitrate/nitrite free) (optional)
salt and garlic powder to taste

Heat oven to 375. Grease an 8″ square baking pan.

Mix the noodles, cheese, eggs, ham and seasoning. Pour into prepared pan.

Bake for 35 – 45 minutes, until eggs are set.

Chicken Cordon Bleu Grilled Cheese

On Sunday nights we eat fun, simple foods. We’ve got some ham lunch meat (locally made) that needs to be used up. So last night I figured we’d do grilled ham and cheese. Always delicious.

Then I remembered that recently Justin asked me to make chicken cordon bleu (I haven’t made it yet by the way). And we had roasted chicken for lunch…with leftovers. So I combined the two and made a chicken cordon bleu grilled cheese.

I didn’t taste it myself, but Justin said it was good 🙂  It sure looked good to me! Plus it’s always fun to have another variation of grilled cheese.

This post is linked to Fat Tuesday and Real Food Wednesday.

Chicken Cordon Bleu Grilled Cheese
serves one

2 slices bread of choice
2 slices ham lunch meat (nitrite/nitrate/HFCS/MSG free)
3 slices swiss cheese
1/4 cup shredded cooked chicken
1 – 2 Tbsp. homemade mayo (ours is sweeter like miracle whip)

Spread mayo on both slices of bread. On one slice layer cheese, ham, chicken, cheese, ham, cheese. Top with the other slice of bread.

Butter the bread and cook on a buttered griddle until both sides are golden and the cheese is melted.

Holiday Oreos®

A while back I made a homemade version of Oreos®. They were delicious!! These holiday Oroes® are a spin on the classic that is perfect for parties and family gatherings.

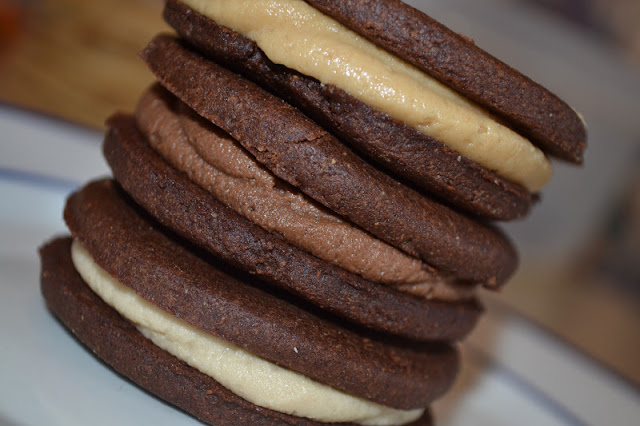
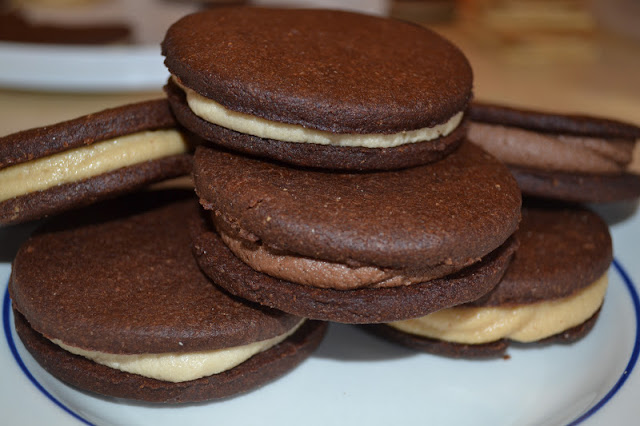
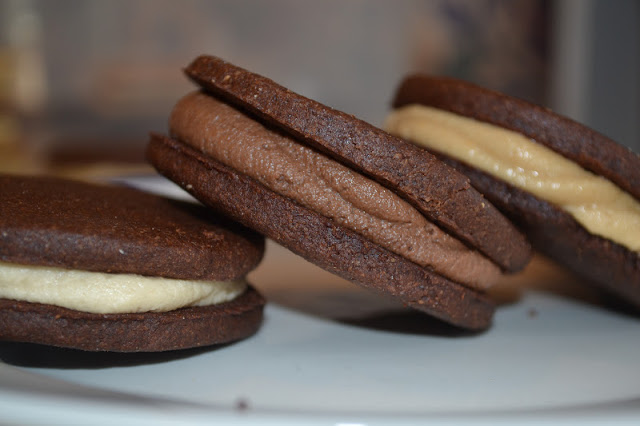
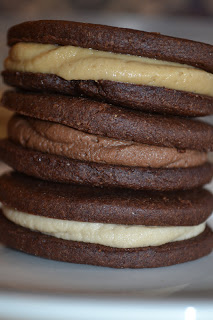
This week for our baking project Rebecca wanted to make a new batch with a twist. She came up with three filling flavors to try for a special holiday treat – mint, peanut butter and chocolate.

Wow!! The original was good. These are even better. Plus we had extra filling so we made mint, peanut butter and chocolate filled graham cracker sandwiches. Also very good.

If you want to really impress your guests this year try homemade holiday Oreos® with a special filling. They are sure to be a hit.
Rebecca is already planning our next batch. She said we need to make more the day after Thanksgiving to be ready for Christmas 🙂  We’re thinking chocolate mint, chocolate peanut butter and caramel next time.

And maybe we’ll go all out and dip them in chocolate. A chocolate covered caramel filled oreo made with all real ingredients? Yes, please!

The possibilities are endless…pumpkin, gingerbread, butterscotch, raspberry, orange…We’ll have to work on the inside out version sometime too. I’ll update this post each time we try a new flavor.

What is your favorite holiday Oreos® flavor?

This post is linked to Fat Tuesday and Real Food Wednesday and From the Archives Friday.

Holiday Oreos®

makes 17 – 20 cookie sandwiches (depending on the size of your cookie cutter and the thickness of your dough)

1 1/2 cups whole wheat flour
1/2 cup cocoa powder
3-4 tsp. chocolate extract
1/2 cup organic cane sugar
1 tsp. baking soda
1/2 tsp. salt
1/2 cup butter, room temp (you can substitute coconut oil or palm shortening)
6 – 8 Tbsp. honey

To make the cookies:
Heat oven to 350 degrees F.

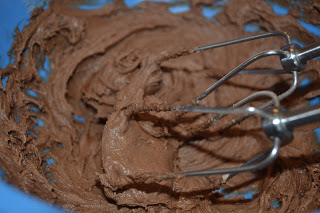
Cream butter and sugar in a large bowl. Add cocoa and chocolate extract. Blend well (a hand mixer works well). Taste. Add more chocolate extract until strong enough. Add flour, baking soda, salt and honey. Blend well. If dough is still crumbly slowly add extra honey until dough will hold together when squeezed with your hand.

Place 1/3 of the dough onto parchment paper. Place another layer of parchment paper over top. Roll the dough between the parchment paper until it is 1/8 – 1/4″ thick. Remove top paper. Cut circles and place onto a parchment lined baking sheet. Repeat this process until you have used all of the dough.
Bake the cookies for about 13 minutes. Allow to cool completely.
________________________________________________________________

Mint Filling:
1/4 cup organic palm shortening
5 – 6 Tbsp. organic all purpose flour (you can substitute corn starch or arrow root)
1/4 cup maple syrup
1 – 2 tsp. peppermint extract
Peanut Butter Filling (you can make this a stiffer or softer filling):
1/4 cup organic palm shortening (reduce this to 3 Tbsp. for a stiffer filling)
5 – 6 Tbsp. organic all purpose flour (you can substitute corn starch or arrow root)
1/4 cup maple syrup
3 – 4 Tbsp. natural creamy peanut butter
Chocolate Filling:
1/4 cup organic palm shortening
2 Tbsp. organic cocoa powder
4 Tbsp. organic all purpose flour (you can substitute corn starch or arrow root)
1/4 – 1/3 cup maple syrup
1 – 2 tsp. chocolate extract

To make the fillings*:

Cream the shortening, flour, maple syrup and cocoa/peanut butter/extracts in a small bowl. Add more flour for a stiffer cream (note that it will firm up/become solid when chilled). Add more maple syrup for a sweeter cream. You can prep the filling ahead and store it in the refrigerator. Let it come to room temperature before filling cookies.

*Note that if you make the full recipe of all of the fillings with one batch of cookies you will have leftover filling. You can use it on graham crackers or as frosting for cupcakes. One batch of filling is enough for 7 – 12 sandwich cookies depending on how big your cookies are and full you like them.

To assemble the cookies:

Place the cream filling in a small plastic bag. Cut off one of the corners of the bag for a pastry bag. Pipe some cream onto the center of one cookie, leaving space at the edge . Top with another cookie. Press together just until the cream reaches the edge. Repeat this process until all of the cookies are filled. Store in an airtight container in the refrigerator. You can also freeze the cookies

Corn Free "Cornbread"

I never had cornbread growing up (so sad). The first time I tried it was probably when I was in college. And I’ve loved it ever since!

Corn has been out of my diet for over a year now. And I miss cornbread. It’s my go-to accompaniment for chili. Corn muffins are great with just about any kind of soup. It’s easy and delicious.

So recently I decided to try a corn free version. I know it sounds crazy. But it can be done.

I used my usual cornbread recipe and made some modifications to remove the corn (including removing the baking powder…yes, that has cornstarch!). I also made it egg white free so that it’s better for me.

The result is a lightly sweetened cake that tastes almost just like cornbread. It even looks like cornbread…the egg yolks give it a nice golden color. All the picky eaters in my family loved it just as much as the original version.

It’s also very easy to make. Add the ingredients to a bowl, mix with a spoon, pour it in the pan and bake. My 18 month old helped me make it last night (he did some pouring, mixing and egg cracking…while I held him…the whole time…yes, it’s easy enough to make one handed while keeping a little one from spilling everything).

It makes a great pairing with chili. Or it’s a delicious breakfast topped with butter and honey or maple syrup. My personal favorite way to eat it is with lots of butter and a little sprinkle of sea salt. I love anything with a salty/sweet combo.

I have also added a soaked gluten free version. It is just as good as the original and easy on the tummy.

Can’t have corn? Try this corn free version of cornbread. You don’t have to go without anymore 🙂

This post is linked to Fat Tuesday and Real Food Wednesday.

Corn Free “Cornbread”

1/2 cup organic all purpose flour (or 1/2 cup white rice or tapioca flour)
1/2 cup organic whole wheat flour (or 1/2 cup amaranth flour)
1/3 – 1/2 cup organic cane sugar (depends how sweet you like it)
4 Tbsp. melted butter (you can also used coconut oil. It will give a little different texture)
1/2 cup milk or milk substitute
1 1/2 tsp. baking soda
1/2 tsp. sea salt
4-5 egg yolks (more yolks will make it more moist and more yellow)

Heat oven to 400 degrees F. Grease a 9″ round pie pan.

Add the dry ingredients to the bowl. Mix. Add the butter and milk. Mix. Add the egg yolks. Mix.

Pour into the prepared pan. Bake for 25 – 30 minutes, until golden and baked through.


Soaked Gluten Free Corn Free Cornbread

1/2 cup tapioca or white rice flour
1/2 cup amaranth flour
1/2 cup milk or coconut milk
1 Tbsp. lemon juice, yogurt, whey or kefir
1/3 cup organic cane sugar
3 Tbsp. melted butter or coconut oil
2 egg yolks
1 egg
1/2 tsp. sea salt
1 tsp. baking soda
1 tsp. cream of tartar

In a medium bowl combine the flour, milk and lemon juice. Cover and let sit for 24 hours.

Heat the oven to 400*F. Grease a 9″ round pie pan.

Add the sugar and oil to the flour mixture. Beat well.
Add the eggs and sea salt. Beat well.
Add the baking soda and cream of tartar. Mix until just combined.
Immediately pour into the prepared pan.
Bake for 30 – 35 minutes.
Let cool for 10 minutes before serving.

Simple Chicken Nuggets

I’ve made chicken nuggets countless times. I’ve made them in a variety of ways. But I have always used chicken breast or roasted chicken.

Last week I put chicken nuggets on my menu…then went to the freezer to get chicken…and found I had no chicken breast. Hmmm.

I did have some ground chicken, so I figured I’d go with that. I had no recipe and not a lot of time to prepare dinner. And I had my usual little “helper” in the kitchen (Abram thinks he must be held whenever I’m cooking so he can watch and try to get his hands on whatever I’ll let him).

I came up with an easy, delicious chicken nugget recipe that we all loved.

This is a great recipe if you’re trying to get your kids to eat homemade chicken nuggets instead of a fast food version. By using ground chicken you can make them round…or whatever shape you want really 🙂  They look like the typical nugget, but they only have good stuff in them.

I used a combination of bread crumbs and freshly grated parmesan cheese for the breading. You can skip the cheese if you want. And you can sub wheat flour, coconut flour or almond flour for the bread crumbs.

I also used egg yolks for a binder. If you can’t eat eggs you can leave them out. They will still hold together.

One other bonus about this recipe – they are baked. Don’t get me wrong, I love to fry things in healthy fat like coconut oil, butter and lard. But it can be messy and you have to monitor the stove. I like it when I can prepare dinner, stick it in the oven and forget about it until it’s time to eat.

You can prepare a large batch and freeze them for quick lunches any time. They didn’t last long enough here to freeze any 🙂  Serve them with homemade ketchup, honey mustard or barbecue sauce.

This post is linked to Real Food Wednesday and Fat Tuesday.

Simple Chicken Nuggets
dairy free, nut free, grain free, gluten free, egg free options

1 lb. ground chicken (or turkey or pork)
2 egg yolks (optional)
seasoning (I used sea salt, garlic powder and seasoning salt)
1/4 cup grated parmesan cheese (optional)

3/4 cup bread crumbs, wheat flour, coconut flour or almond flour
1/3 cup grated parmesan cheese (optional)

Heat oven to 375 degrees F. Grease a large baking sheet.

Mix the chicken, eggs, seasoning and cheese. In a separate bowl mix the breadcrumbs or flour and cheese.

Take a small scoop of the chicken mixture. Drop it into the breadcrumb mixture. Roll it around until it is coated. Place it on the baking sheet and press down until desired thickness. Repeat until all of the chicken mixture is used.

Bake the chicken nuggets for 30-35 minutes, flipping them over after 20 minutes.

Crockpot Pumpkin Custard (GAPS-legal, nut free, egg white free)

Over the weekend I tried a new fall recipe for pumpkin custard. Another delicious recipe from Cara at Health, Home and Happiness. We all enjoyed it. Plus it’s grain and nut free.

I did modify it a bit. I only used egg yolks so I could eat it. I also used raw cream instead of coconut milk. And I mixed it by hand instead of in a blender. I also added more honey…and it still wasn’t very sweet. I had to drizzle extra honey over top for Rebecca to eat it. Else it almost tasted more savory (the pumpkin flavor was very strong). I didn’t make a full batch either.

Overall it was a great recipe. And I love that it cooks in the crockpot. I prepped it when I got up. Then it was ready for the family when they got up.

I’ll post the recipe the way I made it. Check out Cara’s site for the original.

Crockpot Pumpkin Custard
makes 4 1/2pt. jars

2 cups cooked pumpkin or butternut squash
5 egg yolks (or 3 whole eggs)
1/4 cup raw cream or coconut milk
1/3 – 1/2 cup maple syrup or honey
1/4 tsp. nutmeg
1/2 tsp. cinnamon
pinch of sea salt

Fill the crock pot with 1 inch of water and turn on high. Allow it to preheat for 30-45 minutes.

In a blender, puree all ingredients or simply mix by hand if your pumpkin is already pureed. Taste and adjust sweetness if needed.

Pour the mixture into oven/heat proof ramekins or mason jars, filling 2/3 full. Gently set the jars into the water. Cover. Allow to steam for 4-6 hours.

Turn the crock pot off, and it will continue to stay warm for another hour or so. Serve warm or cover with plastic wrap and store in the fridge to serve chilled.

Baked Apples

I’m always looking for new breakfast ideas. This week I came across Cara’s recipe for slow cooker baked apples.  It was just what I needed – grain and nut free and easy prep.

I was going to make them in the crockpot, but then I changed my  mind. Since I was only making a few I didn’t want to get my big crockpot dirty. So I just prepped them this morning and baked them in the oven.

So easy and so delicious! Justin said they were great. He had his topped with homemade vanilla yogurt.

I will definitely be making these again. Such a great idea for a healthy breakfast. I didn’t follow the recipe exactly since I was going from memory when I made it. It still turned out great.

The next time I make it I might modify things and just do a pan of sliced baked apples**. Then you don’t have to worry about the apples opening/the toppings falling out. And you can serve up as much or as little as you want. Plus I don’t have to worry about a picky eater complaining about apple peels 😛

Baked Apples

6 medium apples
¼ cup raisins
¼ cup honey (I also added a little organic cane sugar)
1 tsp. cinnamon
6 Tbsp. coconut oil, butter, or ghee (I forgot this…oops)
 
Core apples. To core, using an apple corer or paring knife, cut around the core (about ¼ inch from the stem all the way around) but leave about half an inch at the bottom. Use the knife to ‘drill out’ the core.
 
Divide raisins, honey, cinnamon, and coconut oil between the apples.
 
Place apples in a crock pot and add ½ inch of water. Cook on low overnight and enjoy a hot breakfast in the morning!
 
Alternatively, bake covered at 350 degrees in a glass dish for 45 minutes-1 hour in the morning.
 
**Next time I will try peeling and slicing the apples. Place them in a buttered baking dish. Sprinkle with cinnamon, honey and raisins. Cover and bake at 350 for 25 minutes.

Top with with cream, yogurt, coconut milk, or just eat plain.

Scalloped Sweet Potatoes and Apples

Earlier this week I made another recipe from my Old Pennsylvania Dutch Recipes book. It is called Scalloped Sweet Potatoes and Apples. Perfect for fall in Michigan!

It was quite easy to make and turned out really well. I cooked the sweet potatoes first thing in the morning. Then did the peeling and slicing when it was time to make dinner.

This got two thumbs up from the family. I used sweet potatoes from our garden and apples from my in-laws’ farm. It would be a great recipe for a large crowd, a holiday or a potluck. I only made a half recipe and we had plenty of leftovers.

This post is linked to Fight Back Friday and Fresh Bites Friday.

Scalloped Sweet Potatoes and Apples

6 medium sweet potatoes
1 1/2 cups apple slices
1/2 cup rapadura (or organic cane brown sugar)
1/2 tsp. salt
1 tsp. ground mace (I don’t even know what mace is…I just used cinnamon)
1/4 cup butter

Wash and cook sweet potatoes in boiling water to cover until just tender. Peel and cut into crosswise slices 1/4 in. thick.

Butter a 2 qt. casserole and arrange one half of the sweet potatoes in the bottom. Then later one half of the apple slices. Sprinkle with one half of a mixture of the brown sugar, salt and mace. Dot with 2 Tbsp. butter. Repeat layering, ending with apples, seasoning and butter.

Bake at 350 degrees for 50 minutes.