Home » Kid-friendly Recipes » nut free » Page 28

Category: nut free

Roasted Cauliflower Cheddar Soup

I’ve been in a recipe rut lately. So a couple weeks ago I did some recipe browsing. I found this recipe for roasted cauliflower cheddar soup on two peas and their pod. It was very easy to make and tasted great.

I modified it so that I could eat it. So it was basically roasted cauliflower, broth and cheddar cheese. That’s it.

Simple and healthy. It reminded me of potato soup…which is nice treat for someone that can’t eat potatoes 🙂

It isn’t exactly the most photogenic soup. But what it lacks in appearance it makes up for in taste. I added a little diced avocado for some texture. I also offered diced chicken and beef to mix in for a heartier soup.

Check out the link for the original recipe with things like onions and celery. Here is how I made it.

Roasted Cauliflower and Cheddar Soup
serves 3 – 4

1 head cauliflower
1 -2 Tbsp. EVOO
2 tsp. sea salt

2 – 3 cups chicken broth (or vegetable broth to make it vegetarian)
salt and garlic powder to taste
1/2 – 3/4 cup grated cheddar cheese

Wash and chop cauliflower. Mix cauliflower with EVOO and salt. Roast the coated cauliflower on a parchment lined baking sheet at 400 degrees for 35 minutes.

Simmer roasted cauliflower in the broth for about 15 minutes.

Remove from heat and puree with an immersion blender until smooth and creamy. Add seasoning to taste.

Return the pan to the stove over low heat. Add extra broth if the soup is too thick. Add the cheese and heat until it has melted.

Homemade Oat Squares

Earlier this week we had a long snowy day with nothing to do. And as usual Abram was begging to bake. So I brainstormed what new recipe we could try.

I was thinking a new cereal. I looked up the ingredients for Cheerios. There really isn’t much to them. So we tried to make something similar – taste and texture. I have no idea how you’d copy the shape 😛

It took about 3 minutes to mix the dough. And it tasted really good. Abram actually ate a bunch of it…and he NEVER eats the stuff we bake (either the dough or after it’s baked). He just doesn’t have a sweet tooth.

The end result? NOT Cheerios 😛  But to my surprise they taste and look a lot like Quaker Oat Squares. This used to be one of my favorite cereals. They are very easy to make.

They did end up a bit harder than I’d like. Maybe next time I’ll add some baking soda to help soften them just a bit. Otherwise these are actually really good. And they make a great portable snack.

Three ingredients is all you need to recreate a delicious cereal. Simple. As an added bonus they are dairy, gluten (if you tolerate oats), egg, nut, soy and corn free.

Homemade Oat Squares
makes about 2 cups

2 cups rolled oats
1/2 cup organic cane sugar
1/2 cup water
——————————————————————————————————–
1/2 tsp. baking soda
1/4 tsp. salt
(I have not tried it with these added yet, but I think it would improve the texture a bit.)
——————————————————————————————————–

Create oat flour by processing oats in a blender.

Mix oat flour, sugar and water until dough forms.

Using a scoop at a time, roll the dough into a small log. Cut into “squares.”

Place on a parchment lined baking sheet.

Bake at 350 for 15 minutes. Turn off oven. Leave the cereal in the oven to crisp for another 5-10 minutes.

Remove from oven. Let cool completely. Store in an airtight container.

Salsa Bread

Now that we’re mostly over the flu we’re getting back in the kitchen. And we finally got to try making Rebecca’s salsa bread.

She came up with the idea last week when we were playing with the toy food/dishes.

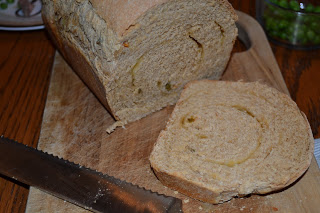
I used a basic whole wheat bread recipe and adapted it to have salsa and cheese. Rebecca and Abram both helped make it.

I sometimes hesitate to post bread recipes since baking good yeast bread comes with experience. You have to adjust the flour/liquid ratio to get a good, elasticy dough. So I’ll give an approximate amount for each ingredient. But use your judgement to adjust if the dough doesn’t look right. I always err on the side of making the dough a little wetter. In my experience dry dough does not work.

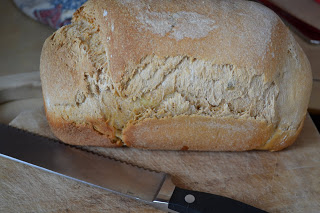
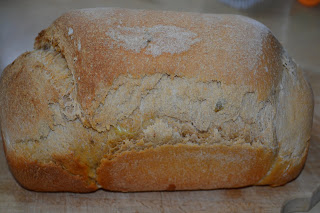
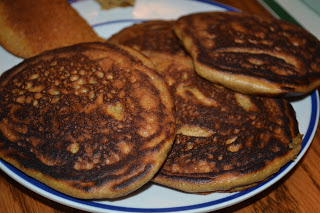
This was seriously sooooo good. Soft and light. It smelled like pizza when it was in the oven. We all really enjoyed it.

Thanks, Rebecca, for such a wonderful recipe idea!! She was so proud of her bread. She talked about it all day. And was so happy to serve it with dinner. She kept asking Justin if he liked it.

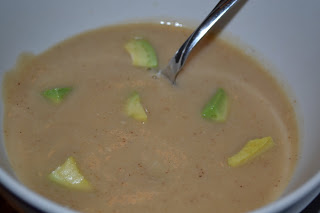
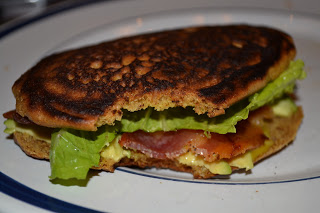
This is great plain or with butter. It pairs well with most soups. And it would also work very well for grilled cheese and paninis. So versatile.

And now we’ve already got the creative juices flowing about what other bread flavors to try. Stay tuned 🙂

This bread does take time (as does any yeast bread). But there is very little hands on time. Most of the time is kneading the dough in a mixer or letting it rise. Just be sure to plan ahead if you want it with a meal.

Salsa Bread
makes 1 loaf 
prep time: 65 minutes   rise time: 2 – 2 1/2 hours   total time: 3 1/2 – 4 hours

3 cups organic whole wheat and/or all purpose flour, divided (I used a combination)
3/4 + 1/8 cup warm water
1/4 cup honey
1 1/4 tsp. active dry yeast, room temperature
1 tsp. sea salt
1/2 tsp. garlic powder
1/3 – 1/2 cup salsa with liquid
1 1/2 Tbsp. melted butter (or coconut oil or palm shortening)
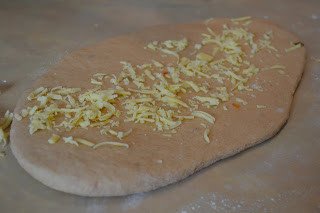
1/3 – 2/3 cup shredded cheddar cheese (or any cheese you like) (this is optional but it does add great flavor)

Mix 1 1/2 cups of flour with 3/4 cups of warm water in a stand mixer bowl. Allow this to sit for about 30 minutes. This will break down the gluten and help the bread to rise better.

In a small bowl mix together 1/8 cup water, yeast and honey. Allow this to sit for about 10 minutes, or until the yeast is activated and mixture becomes bubbly (I let it sit until the flour/water was done resting).

In the meantime, melt the butter in a small sauce pan. Remove from heat and allow to cool. You don’t want the hot butter to kill the yeast.

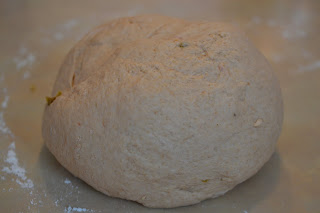
When the 30 minutes are up, add salt, melted butter, salsa and yeast mixture to the flour and water mixture. Add the remaining flour. Mix with a dough hook. Knead in the mixer for about 13 minutes. Add more flour if the dough is too wet. Add more salsa liquid if the dough is too try.

Once you’ve kneaded your dough, cover it with a cloth and let it rise for at least one hour or until it has risen to twice it’s starting size (be sure it’s in a warm place. I turn my oven to warm and place the bowl on top of the oven. Mine took about 1 1/2 hours to rise.).

While you’re waiting for your dough to rise, get your bread pan greased.
When the dough has doubled in size, give it a nice punch. Using a floured hand, pull the dough out of the bowl onto the counter. Knead for three or four minutes until the air bubbles are all gone.

 
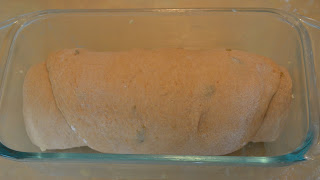
Roll out the dough about the width of your bread pan and as long as you like. Sprinkle the cheese all over the dough. Roll it up, tuck the ends under and place in the prepared bread pan. Cover and allow 30 minutes to one hour to rise again. The dough will continue to rise when it bakes, so don’t be alarmed if it doesn’t totally fill the pan after this rising.
 
Bake the bread uncovered in a 350 degree oven for 50 minutes, or until the bread sounds hollow when you thump the top of it.
Allow the bread to cool in the pan for 5 minutes, then remove it to finish cooling on a wire rack.

One Handed Honey Herb Chicken

My son and I stayed home from church on Sunday because he was sick. I still wanted to make a decent “Sunday dinner.” But he wanted to be held constantly.

I knew I was going to bake some chicken, but had no idea what kind. I knew it had to be simple…so simple that you can prepare it with one hand.

This is what I came up with. And it’s delicious!!

Put the chicken in the pan. Sprinkle a few things on top. And put it in the oven. In an hour you have moist, flavorful chicken. Perfect.

It’s a little sweet and a little savory. Just what I like.

One Handed Honey Herb Chicken

2 boneless skinless chicken breasts
1/2 tsp. sea salt
1/2 tsp. garlic powder
2 Tbsp. honey
1/4 – 1/2 cup seasoned bread crumbs of choice (can be gluten free or substitute with seasoned almond or coconut flour for grain free)

Heat oven to 350. Butter/grease a small baking dish.

Place chicken in baking dish. Sprinkle with salt and garlic powder. Drizzle eat breast with honey. Rub slightly to cover. Sprinkle bread crumbs on top.

Cover dish and bake for 40 minutes. Remove cover and turn heat up to 400. Bake another 20 minutes, until topping is crisp and chicken is cooked through.

Homemade Cocoa Puffs

Cereal. It’s one of the foods we gave up when we switched to a Real food diet. But I think it’s one of the foods my husband misses the most. And once in a while I do too. I used to be a cereal junky (seriously…I HAD to have it for breakfast every single day for about 10 years).

I’ve made soaked cereal (which I think tastes like Wheaties), granola and homemade golden grahams/cinnamon toast crunch. Yesterday I decided to try cocoa puffs.

I never liked cocoa puffs. So it’s not something I was missing. But my husband liked them. Especially for a bedtime snack.

The kids and I made a batch yesterday. They turned out pretty well. Little crunchy chocolaty bites. They aren’t little balls, but you still get the same effect. The butter gives some crunch, while the coconut oil gives the light/crispy texture.

I like to use them to make cookies and cream yogurt. Simply mix a handful into plain or slightly sweetened whole milk yogurt. A real treat.

**You can make this gluten free as well!!!

Do you still eat cereal? Did you give up cereal but miss it? What’s your favorite kind? Are there any real food versions of cereals you’d like to see?

Homemade Cocoa Puffs
makes about 4 cups

1 3/4 cups flour (organic whole wheat, all purpose or a combination)
1/3 cup organic cocoa powder
1/2 cup organic white and/or brown cane sugar or sucanat
1 tsp. baking soda
1/2 tsp. sea salt
2-3 Tbsp. honey
1 – 2 tsp. organic chocolate extract
1 tsp. organic vanilla
1/4 cup butter, melted (you can replace this with coconut oil or palm shortening to make it dairy free)
1/4 cup coconut oil, melted

Heat oven to 350. Melt butter and coconut oil in sauce pan. Set aside. In a mixing bowl, stir together flour, cocoa, sugar, baking soda and salt. Add the liquids: honey, chocolate extract, vanilla, butter/oil. Stir well. Taste dough and adjust honey and chocolate extract to your liking. Mix until a nice ball of dough is formed.  The dough should not be crumbly.  If it is gradually a couple Tbsp. of water.  If it is still crumbly gradually add more honey.

Split dough into 2 equal parts. Cut 3 pieces of parchment paper the size of a cookie sheet. Lay one piece on table. Put 1/2 of dough on the paper. Lay a 2nd piece of parchment on top of dough. Squish the dough down a little with your hand. Use a rolling pin to roll the dough between the parchment paper. Roll until the dough is about 1/8″ – 1/4″ thick. Remove the top piece of parchment paper. Cut into very small squares (with pizza cutter). Place on a baking sheet (on the parchment paper…just move the whole thing onto the baking sheet). Repeat for other half of dough.

Bake for 11-12 minutes. Turn off oven, but leave cereal in to get crisp. Remove after about 10 minutes (if some of the puffs are burning remove the pan). Let cool completely. Separate squares. Store in an airtight container at room temperature or in the freezer.

Soaked Chocolate Covered Donuts

About a year ago I was experimenting with all kinds of soaked recipes. I tried making Adrienne’s soaked whole wheat donuts. They were really good.

But then I forgot about them.

Last week I was playing with my kids with their pretend food/dishes. Rebecca had a donut on her plate, and we were brainstorming baking projects (real ones). So we thought it might it might be fun to make real chocolate covered donuts.

So I did.

And they turned out great!!

These donuts reminded me of my childhood. When we got donuts (which was a rare thing) I always got chocolate covered…and so did my siblings 🙂  One bite brought me back to my youth.

I used the same base recipe and adjusted it a bit so I can tolerate them. Then I made my own chocolate topping.

This is a delicious, warming breakfast treat. You can make them as large or as small as you like. You can make full donuts or donut holes. You can glaze the top or cover them entirely in chocolatey goodness.

You can make other flavors as well. Coat them in chopped crispy nuts. Mix in mini chocolate chips. Or go for the original cinnamon sugar.

Do you like having a donut for breakfast sometimes?  Just because you want to eat Real food does not mean you have to give them up. Just go for a healthier, easier to digest, homemade version.

What is your favorite donut flavor?

Soaked Chocolate Covered Donuts
dairy free options

4 1/2 cups whole wheat flour
4 tsp. baking soda
1/2 tsp. salt
1/2 tsp. nutmeg
1 tsp. cinnamon
3 egg yolks
2 Tbsp. milk or water
1 cup organic cane sugar or sucanat
5 Tbsp. butter or coconut oil, melted
1 cup sour milk, buttermilk, kefir or sour milk substitute. (combine 1 Tbsp. vineager or lemon juice + milk to equal 1 cup to make sour milk)

Donuts:

Combine the flour, sugar, fat and cultured/soured liquid. Let the dough rest for 12-24 hours. Add the remaining ingredients and mix well.

Roll out dough to approximately 1/2″ thickness. Cut out donuts with cutter, ring or shape into desired shapes.

Bake on an ungreased baking sheet  at 425 degrees for 8-10 minutes. Allow to cool.

Topping:

1 cup chocolate chips (I used soy free, dairy free, nut free, egg free)
1/4 cup milk or milk substitute
3 Tbsp. organic all purpose flour (or arrowroot or cornstarch)

Melt chocolate chips in a double boiler (glass bowl on top of a pot of simmering water). When all of the chocolate is melted slowly stir in the milk and flour. Mix until smooth. Remove from heat.

Dip the cooled donuts in the warm chocolate.

Store donuts in an airtight container at room temperature for short term storage. Store in a freezer for long term storage.

Sticks and Stones Ice Cream (Chocolate Chip Pretzel)

Lately we are going through our weekly milk so quickly. We get 3 gallons every Monday. By Sunday we are just getting by. And that is without using it for anything extra, like ice cream and yogurt. So I haven’t been making much of either lately.

Last week we were gone half of the week. So I could finally use some of our yummy raw cream for ice cream. Rebecca and I brainstormed flavors. We decided to do a play on chocolate covered pretzels. We used pretzel pieces and mini chocolate chips. Plus a little swirl of homemade fudge.

We also brainstormed fun names and came up with sticks (pretzels) and stones (mini chips). It’s a fun ice cream name. And a delicious ice cream!! I love my salty/sweet combos. Some runner up names were mud puddle (because of the fudge swirl) and sky tree (Rebecca’s name :).

I debated about posting the recipe since it’s not really much new. But it was too fun not to. We love creating new flavors of ice cream and coming up with fun names.

Sticks and Stones Ice Cream

3 cups cream (preferably raw)
4 egg yolks (you can make it with as many as you like or leave them out)
1/4 cup honey
1/3 cup maple syrup
2 tsp. organic vanilla

1/3 cup pretzel pieces (as big or as small as you like)
1/3 cup mini chocolate chips (I use soy free, dairy free, egg free chips)
1/3 cup fudge sauce (optional)

Combine cream, egg yolks, honey, syrup and vanilla in a blender until well mixed. Check sweetness. Add more honey or syrup if necessary. It should be a little overly sweet since the sweetness goes down after the ice cream is processed.

Process in ice cream maker according to directions (mine took 10 – 15 min.). Transfer ice cream to a freezer safe container. Mix in the pretzels and chocolate chips until evenly distributed. Gently swirl in dollops of fudge sauce (don’t mix it in thoroughly or it will turn into chocolate ice cream). Store in the freezer.

Homemade Caramels

Last week I made an overnight french toast casserole. I’ve made it quite a few times now. The best part? The syrup you make to go in it. As I was making the syrup I thought it seemed a lot like caramel. Maybe I could use that same recipe (slightly tweaked) to just make caramel?

This week I gave it a try…success!! It really could not be any easier. No candy thermometer. No standing around with bubbling sugar and heavy cream. No artificial ingredients.

This caramel comes together in minutes and is so good. You can add extra salt to make it salted caramel. Or go with the traditional flavor. Either way you can’t go wrong.

Do you like caramels? Give this simple recipe a try. I promise, you’ll be glad you did.

Need an easy Christmas present? Wrap these individually in parchment paper or wax paper and bag them. Perfect.

Homemade Caramels

3 Tbsp. honey
1/4 cup butter
1/2 cup brown cane sugar or sucanat
1/4 – 1 tsp. sea salt (to taste)
In a pan on the stovetop, combine the honey, butter, salt and brown sugar. Simmer until all of the sugar is dissolved and the ingredients are well combined, about 5 minutes. Adjust salt to taste.

Pour into a parchment lined 8″ or 9″ pan. Allow caramel to cool in the refrigerator about 30 minutes.

Cut or break into small pieces. Return to the refrigerator to cool/harden completely (do not put pieces on top of each other or they will stick).

Store in a bag or glass jar in the refrigerator.

Easy Yeast Free Bread

In order to help with my gut issues I’ve been experimenting with avoiding food with yeast lately. Not to mention making food with yeast is a longer process.

Last week I needed a quick bread to go with our soup. I did a little searching and found a few recipes for yeast free bread. They were all very similar. So I kind of combined them to make my own.

The result was just what I wanted. Very slightly sweet. Not overly dense. No need to wait for rising. This was my kind of bread. It’s like a cross between a sweet bread and a yeast bread.

I mostly ate it spread with lots of butter and sprinkled with sea salt. I also used some of it to make croutons for my salad. A perfect grab and go snack when I need some carbohydrates.

Yeast Free Bread

3 cups whole wheat flour
1 3/4 cups liquid (water, milk, kefir or buttermilk…I used a combination)
2 tsp. baking soda
1/2 tsp. sea salt
1/4 cup maple syrup

Heat oven to 350 degress F.

Mix all ingredients.

Pour into a greased 9″ loaf pan.

Bake 45 – 55 minutes. Let cool for 30 minutes before removing from pan.

Graham Griddle Cakes

Last weekend I decided to make pancakes for breakfast. I flipped through all of my usual recipes and came across one that I haven’t made in years. They are called graham griddle cakes. You replace some flour with crushed graham crackers. Brilliant! Perfect for this graham cracker lover 🙂

You can use store bought organic grahams or homemade. Let the food processor do all the crushing and mixing for you.

I adjusted the recipe so that it doesn’t contain baking powder (cornstarch) or egg whites.

Slightly sweeter than your typical pancake, these are a real treat. Cover them with lots of real butter and pure maple syrup…yum!

I’m a big fan of salty/sweet combinations. And I’ve been sticking to yeast-free “breads” lately. So these were just what I needed. I used one as bread for a bacon avocado sandwich. I also ate some like bread – warmed, topped with butter and a little sea salt. Delicious!!

Tired of your usual pancake recipes? Try adding a touch of sweetness with graham crackers.

Graham Griddle Cakes (or yeast free sweet bread)
makes 6-8 pancakes

3/4 cups whole wheat flour
3/4 cups graham cracker crumbs
2 Tbsp. sucanat or organic brown cane sugar
1 tsp. baking soda
1/4 tsp. salt
1 cup milk
2 Tbsp. butter, melted
2 egg yolks (or one whole egg)

1/2 cup chopped crispy nuts and/or soy free chocolate chips (optional)

Process graham crackers in food processor until turned into crumbs. Add flour, sugar, soda and salt. Pulse to mix. Pour mixture into a bowl.

Add milk, butter and eggs. Stir well. Add nuts or chocolate chips if desired.

Scoop 1/4 – 1/3 cup batter onto a hot buttered griddle per pancake. Cook until bubbly. Flip and cook for another 60 seconds.

Serve warm with butter and maple syrup or honey.