Home » Kid-friendly Recipes » gluten free » Page 41

Category: gluten free

Sweet Potaote (Veggie) Chips

I’ve been wanting to make some healthier non-sweet snacks. And continue to increase my veggie intake. So I decided to start experimenting with veggie chips. So far I’ve only tried making them in my dehydrator. I made zucchini chips earlier this week (which I forgot to take a picture of). They turned out well. Yesterday I made sweet potato chips. Those are really good too! And both are raw, so they still have most of their nutrients. I’m still experimenting and want to try other veggies too. I had some boughten carrot chips recently that I love, so I want to try that for sure. For the zucchini chips I didn’t add anything besides sea salt. For the sweet potato chips I added a little olive oil. I think that worked well. My only issue is figuring out how to keep them crisp. They are crisp right out of the dehydrator, but then they get a little soft. So I’ll have to keep experimenting. And try other ways of making them. I want to try cooking them in coconut oil or palm shortening. I’m excited to have these to take on our trip. A tastey, healthy treat!

Sweet Potato (Veggie*) Chips

Sweet potato, peeled, sliced very thinly (I used my mandolin/food slicer on its lowest setting)
Olive oil
Sea salt

Toss potato slices with oil and salt. Place in single layers on dehydrator trays. Cook until completly dry and crisp.

*The thickness of the veggie depends on the moisture content. So you’ll have to experiment. For sweet potatoes very thin slices work well (low moisture content veggie). For zucchini you need much thicker slices – 1/4 – 1/2″ (high moisture content veggie).

Sloppy Lentils

A couple weeks ago my SIL posted a recipe for sloppy lentils. It sounded so good. And it was a perfect meal for us since I’m trying to add more lentils into our diet (so healthy and great for fertility). I tried it last night. Yum!!! All 3 of us loved it. My original plan was to serve it over corn bread…but it’s just too hot to bake right now. I do want to try that sometime, but not this week. I debated about a few ways to serve this and ultimately decided to serve it over grilled yellow zucchini (since I had some fresh from the farmer’s market). Much healthier and much easier on my tummy. It was really good! I served it with shredded cheese and avocado. Justin and Rebecca also used some tortilla chips for scooping. This is a great recipe. Very easy. Very quick prep (as long as you plan ahead). It makes quite a bit, so there are lots of leftovers for lunches or another dinner. And it’s so versatile. You can serve it on buns, over cornbread, in tortillas, with chips, over veggies. So many options. I’m glad I tried this. Loved it.

Sloppy Lentils

3 cups water
1 cup lentils, rinsed (I used green)
salt to taste (optional)
1 cup chopped onion (I used about 1/3 cup)
3 tablespoons olive oil
15 oz can diced tomatoes
1/2-1 (6 ounce) can tomato paste (I used the full can)
2 cloves garlic, minced
1/2 cup ketchup
1 teaspoon mustard powder (I just used regular mustard)
1 tablespoon chili powder (I didn’t add quite this much…Rebecca doesn’t like spicy food)
3-5 tablespoons rapadura, molasses, or honey (I used about 4 Tbsp. brown cane sugar)
1 Tbsp white vinegar
salt and ground black pepper to taste
4 hamburger buns, split (or corn bread, tortillas, chips, veggies)

Soaking Step, optional (I did this): Allow lentils to soak overnight in warm filtered water with 2 Tablespoons acid medium (I used the liquid part of my kefir). Rinse and cook as described below.

Combine water and lentils in a saucepan. Season with salt and pepper, if desired. Bring to a boil over high heat, then reduce heat to medium-low, cover, and simmer until tender, about 30 minutes, stirring occasionally. The cook time may depend on the type of lentil you use, too… so keep that in mind so that you don’t overcook them. (I soaked my lentils the night before and then cooked them in the morning. I proceeded with the recipe at dinner time with a bowl full of already cooked lentils 🙂

Meanwhile, cook the onions in olive oil in a large skillet over medium heat until the onions have softened and are translucent. Add tomatoes, garlic, tomato paste, ketchup, mustard powder, chili powder, sweetener, vinegar, salt and pepper. Simmer 5 to 10 minutes until thickened.

Drain lentils and reserve cooking liquid. Stir lentils into sauce mixture, adding cooking liquid or water as needed to obtain the desired “sloppy joe” consistency. Serve on buns (or other bread or veggie).

Carob Sauce

I made my 2nd carob recipe yesterday…carob sauce. With all of this good homemade ice cream and some good cream to use up it was the perfect fit. Plus it was something simple for Rebecca to help with. This was very easy to make. And tastes so good!!! We all had some on ice cream last night for a special 4th of July dessert. Yum! This is another Nourishing Traditions recipe. And a great way to swap carob for cocoa in your diet. A healthy, tastey treat.

Carob Sauce
Makes 2 1/2 cups

2/3 cup carob powder
1/2 cup butter
1/3 cup maple syrup
1 Tbsp. vanilla extract
1 Tbsp. chocolate extract (optional) (I didn’t add this…still tastes plenty chocolatey)
pinch of salt
1 cup cream, not ultrapasteurized

Place all ingredients in the top half of a double boiler.

Cook gently, stirring occasionally with a wooden spoon, until well amalgamated (all blended well :).

Real Fruit Popsicles

This isn’t much of a recipe, but I thought I’d share it anyway. Just a fun, healthy summer treat. I cut up a whole watermelon the other day. And realized we could never eat that much watermelon before it goes bad. Sometimes when I have a lot I freeze it. I love to eat it frozen. And Rebecca and I will both eat it when it has thawed. But we already have some in the freezer. So I thought about what else I could do with extra watermelon. And I decided to try making popsicles with it. And it worked! All I did was puree some watermelon and freeze it. That’s it. Nothing added, no extra sugar. Just pure watermelon. And they are so good! Rebecca devoured one last night. I wish I had more strawberries now. They would be even better with strawberry puree mixed in. I have a little more watermelon to use up. I think I’ll make a few more popsicles. And I might see if I can make some watermelon fruit leather too. Just thought I’d pass along this simple idea for a healthy summer treat. It’s especially good for kids or for anyone trying to cut down on added sugar. I think this would work for a lot of fruits. And you can mix them too. I’ll have to try different flavors. Excuse the picture…Rebecca had already taken a couple bites 🙂

Watermelon (Fruit) Popsicles

watermelon

Puree watermelon in a blender. Pour into popsicle molds or cups w/ popsicle sticks. Freeze. Enjoy 🙂

Fermented Pickled Cucumbers

My latest experiment in fermentation is pickled cucumbers. These sound pretty safe 🙂  I assume they’ll just taste like dill pickles. They are very easy to make. I got 6 pickling cucumbers at the farmer’s market this week. 4 whole cucmbers fit in a quart jar. I sliced the other 2 and put them in a pint jar. I’ll update in a few days with the verdict. This is another Nourishing Traditions recipe.

*Edited 7-6-10: I tried one of the pickle slices on Sunday. Pretty good. Definitely tastes like a dill pickle! I still have to try the whole pickle…when I’m in the mood for a lot more pickle 😛
Pickled Cucumbers

4-5 pickling cucumbers or 15-20 gherkins
1 Tbsp. mustard seeds
2 Tbsp. fresh dill, snipped (I used dried dill since that what I have)
1 Tbsp. sea salt
4 Tbsp. whey (use an additional 1 Tbsp. salt if you don’t have any whey)
1 cup filtered water

Wash cucumbers well and place in a quart-sized, wide-mouth mason jar. Combine remaining ingredients and pour over cucumbers, adding more water if necessary to cover the cucumbers. The top of the liquid should be at least 1″ below the top of the jar. Cover tightly and keep at room temp for about 3 days before transferring to cold storage.

Variation: Pickled Cucmber Slices
Wash cucumbers well and slice at 1/4″ intervals. Proceed with recipe. Pickles will be ready for cold storage after about 2 days at room temp.

Strawberry Ice Cream

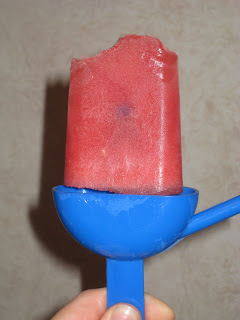
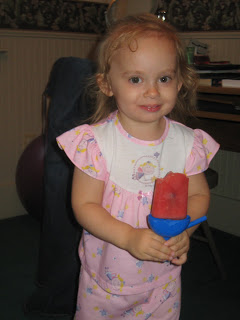
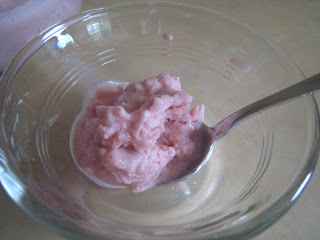
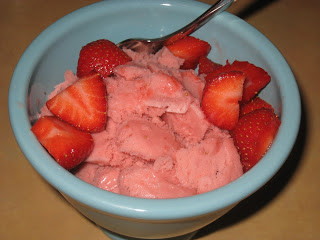
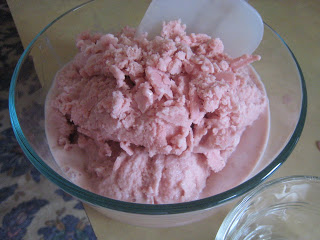
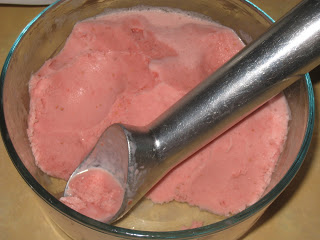
I have a bunch of fresh strawberries in my fridge. And I’ve been debating about what to do with them. For some reason on Wed. strawberry ice cream sounded good. I don’t normally like fruity ice creams. And if I did pick one strawberry would not be my first choice. I am a chocolate girl all the way. But I figured it was worth a try with all of these strawberries. I wanted to make something with what I have in the house. And to make something easy/qiuck. I checked my Nourishing Traditions cookbook. It has several ice cream recipes…that you don’t have to cook!! Love that. If you’re afraid of raw eggs, then the recipes are not for you. I trust the eggs we buy, so I don’t worry about it. Plus, if they are good eggs, raw eggs (the yolks at least…not sure about the whites) are actually good for you. I also wanted to make ice cream using just whole milk, no cream…since I don’t have any cream on hand. So I used the NT recipe as my base and modified it a bit. Turned out pretty good. Not quite as creamy as some ice cream…but I didn’t use cream, remember? 🙂  And I didn’t add any chemicals to make it taste creamy when it’s not 😛  But still good. It’s kind of like a sorbet. It’s a treat that I’ll feel good about eating. Only a few ingredients and all good ones. I did have to use a couple tsp. of corn starch since I don’t have any arrowroot. But it’s such a small amount I’m not worried about that. I’ll have to get arrowroot the next time I grocery shop. I only made a half recipe since I didn’t know if this would work or not. If I make it again maybe I’ll double the recipe to get a decent amount. And I’d like to try it with other berries. Blueberry ice cream sounds great! That’ll be on my list in July. And I want to try making this using the NT vanilla recipe and then adding chopped strawberries at the end too. Justin had some last night with fresh strawberries on top. He thought it was ok…but not really like ice cream. It is for sure a healthy, cool summer treat. But it’s not my final attempt at making a quicky, easy, healthy homemade ice cream. NT calls this berry ice cream and suggests raspberries, boysenberries or blackberries.

And just to give you a little nudge to make homemade ice cream or at least think twice about which kind you buy, here is what NT has to say about some of the ingredients many ice cream manufacturers use. They are not required by law to list the additives used in manufacturing. So most ice cream is synthetic from start to finish. And I personally don’t consider a mixture of antifreeze, oil paint, mitrate solvent and lice killer much of a treat 😛

DIETHYLGLYCOL: A cheap chemical used as an emulsifier instead of eggs is the same chemical used in antifreeze and paint removers.

PIPERONAL: Used in place of vanilla. This chemical is used to kill lice.

ALDEHYDE C-17: Used to flavor cherry ice cream. It is inflammable liquid also used in aniline dyes, plastic and rubber.

ETHYL ACETATE: Used to give ice cream a pineapple flavor – and as a cleaner for leather and textiles; its vapors have been known to cause chronic lung, liver and heart damage.

BUTYRALDEHYDE: Used in nut flavored ice cream. It is one of the ingredients of rubber cement.

AMYL ACETATE: Used for its banana flavor. It is also used as an oil paint solvent.

BENZYL ACETATE: Used for its strawberry flavor. It is a nitrate solvent.

Strawberry Ice Cream/Sorbet

2 cups fresh berries or 10 oz. frozen berries, partially thawed (I used fresh strawberries)
2 egg yolks
1 Tbsp. arrowroot (I substitued corn starch)
2 cups heavy cream, not ultrapasteurized (I used whole milk)
1/2 – 3/4 cup maple syrup

Process berries in food processor (I used a blender) for several minutes. Add egg yolks, cream and arrowroot. Process until well blended. Gradually add maple syrup until desired sweetness is obtained. Pour into an ice cream maker and process according to instructions. Transfer to storage container and store in freezer.

Crockpot Meatloaf

This isn’t really a new recipe. I always use my mom’s recipe for meatloaf. And I posted it a long time ago. It’s definitely a family favorite here. But in the summer I don’t like to use the oven if I don’t have to at dinner time…especially for over an hour. So I wanted to find a new way to make it. And this week in particular I had to…at dinner time on Monday our oven wouldn’t turn on. It happened once a few weeks ago too. Justin is working on fixing it. In the mean time, I remembered seeing a post about crockpot meatloaf on A Year of Crockpotting a long time ago. So I thought I’d give that method a try. I made the meatloaf just like always. Then just stuck the pan right in my crockpot! Pretty neat. And it works. One more way to cook good food in the summer without heating up the house with the oven (we don’t have AC) and without using a microwave. It’s also nice if you need to prep dinner ahead of time. So, this is my usual meatloaf recipe…in the crockpot.

Crockpot Meatloaf

1 1/2 lb. ground beef
3/4 cup oatmeal (I soaked mine the night before)
1 1/2 tsp. salt
1/2 tsp. pepper
1 tsp. garlic powder
1 egg, slightly beaten
3/4 cup milk
1/4 cup diced onion
1/3 cup ketchup
2 Tbsp. brown sugar
1 Tbsp. mustard

Mix beef, oatmeal, salt, pepper, garlic powder, egg, milk and onion. Put in large loaf pan (that will fit in your crockpot). Mix ketchup, brown sugar and mustard. Put on top of meatloaf. Place pan in crockpot. Cook on high 4-5 hours or low 6-8 hours. You can drain some of the grease just by tipping the pan a bit in the crockpot and letting it run out (then you just have to clean the crockpot later).

Crispy Cashews

I also made a batch of crispy cashews this week. The method for soaking/drying cashews is slightly different than most nuts  They shouldn’t be soaked for more than 6 hours, and they can be dried at a higher temp. I still did mine in a dehydrator. But I think I’ll try to do them in the oven next time. It took a while for them to dry, and some of them ended up developing a gross taste since they stayed moist too long. I did both whole cashews and cashew pieces. The pieces are cheaper, so I got those to use for cashew butter (I’ll be grinding them anyway, might as well save some money :). The whole cashews will be great for snacks or in salads.

Crispy Cashews

4 cups raw cashews (cashews don’t come truly raw)
1 Tbsp. unrefined sea salt
filtered water

Soak cashews in salt and filtered water for 6 hours (no longer). Drain in a colander. Spread on a baking pan and place in a warm oven (200 – 250 degrees) for 12 – 24 hours, turning occasionally, until completely dry and crisp. Store in an airtight container.

Crispy Almonds

I just finished making my first batch of crispy almonds. It’s pretty much the same recipe for making crispy walnuts, cripsy peanuts and crispy pecans. Yum!!! These are great to eat plain, and I can’t wait to use some to make almond butter. I used almonds with the skins on since that’s what I found at the store. Skinless almonds are easier to digest, though. I’ll have to try them sometime.

Crispy Almonds

4 cups almonds
1 Tbsp. unrefined sea salt
filtered water

Mix almonds, salt and water and leave in a warm place for at least 7 hours (I did about 24 hours). Drain in a colander. Spread on a baking pan and place in warm oven (150 degrees) for 12 – 24 hours, stirring occasionally, until completely dry and crisp. Or you can dry them in a dehydrator. Store in an airtight container.

Kishk Granola

This morning I made a new batch of granola. Last week I made a batch of soaked granola. I made it the same way I always make granola. But it got a bit overdone. Today I decided to try a “raw” granola…meaning unbaked. I got this recipe from Nourishing Traditions. The main ingredient is kishk (a fermented dish made with cracked wheat that is soaked and dried). I substituted my soaked and dried oats. I also added some flax seed and a few sunflower seeds. It’s kind of strange to just have it all mixed together unbaked, kind of loose. We’ll see how it works. I’ll try some later today. I only made a small batch to try it out. I think my next experiment will be somwhere inbetween…only bake it for 5 or 10 minutes. Maybe that will be the perfect balance. It will hold together, but not be overdone.


Kishk Granola
Makes 6 cups

4 cups kishk (I used soaked oats) (this can be gluten free if you use gf oats)
1 cup crispy pecans, almonds or cashews, chopped (I used pecans and walnuts…if using walnuts be sure to store the granola in the refrigerator since walnuts can easily get rancid)
1 cup dried sweetened coconut meat (I just used some organic, unsweetened coconut flakes and added a little extra sugar to compensate)
1 cup dried fruit (I used raisins)
1/2 cup Rapadura (I used organic cane sugar)

Mix all ingredients together. Store in zip-lock bags or airtight containers in refrigerator. Eat like granola with milk or cream.

This cereal will actually keep well for several weeks at room temp and is a good provision to take when one is traveling and wants to avoid hotel breakfasts.