After asking on facebook for some vegetable ideas I tried a new recipe for brussels sprouts from Eat, Live, Run. It’s so simple and so delicious! We all loved it.
Basically you saute brussels sprouts and add a little brown sugar at the end. Who knew that could make them taste so amazing? We already love brussels sprouts. This was a great way to change it up a bit.
I did not use the garlic or the nuts. But that would be good too. I will definitely be making these again. I might even turn them into a one dish meal by adding a starch and protein (quinoa and nuts?, rice and chicken?, couscous and salmon?). My mind is whirling with variations already 🙂
I’ll be trying this method of vegetable preparation with other vegetables as well. I already did broccoli and kohlrabi last week. Yum!! Cauliflower would be a great addition as well.
Do you like brussels sprouts? If not would a little brown sugar make you change your mind?
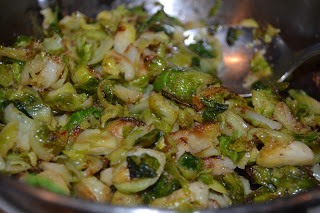
Caramelized Brussels Sprouts
12-14 large brussels sprouts
1 Tbsp olive oil (I used about 2 Tbsp. of butter and coconut oil)
1 clove garlic, minced (I just used a sprinkle of garlic powder)
pinch sea salt (or a lot if you’re like me:)
2 Tbsp brown cane sugar (or honey or maple syrup)
1/4 cup roughly chopped pecans or walnuts, toasted (I’d use crispy nuts)
Slice each brussels sprout very thin until you have a mound of feathery brussels sprout ribbons. Heat the olive oil/butter/coconut oil over medium high in a large skillet and saute the garlic for 30 seconds. Add the brussels sprouts and continue sauteing for another 4-5 minutes, until bright green and tender (I saute them a bit longer…my family likes them plenty soft). Add the sea salt and brown sugar and toss together. Finish by adding the toasted nuts.