Home » Kid-friendly Recipes » grain free » Page 11

Category: grain free

Dairy Free Egg Free Egg Nog

Dairy Free Egg Free Egg Nog || Homemade Dutch Apple PieChristmas will be here before we know it. That means time for presents, family gatherings and of course egg nog!

I’ll be honest – I hated egg nog when I was younger.  It wasn’t until just a few years ago that I could even handle more than a sip or two.

But in the last few years it has really grown on me once we started buying good quality, locally made egg nog.  It figures that now that I really enjoy egg nog I can’t have it.  My little one is sensitive to both dairy and eggs.

Instead of resigning myself to the fact that I’ll have to skip the egg nog this year I decided to create a dairy and egg free version.  It’s not easy to recreate that thick, rich texture and flavor without the eggs.

But I have come up with a version that even those that can have dairy will enjoy.Dairy Free Egg Free Egg Nog || Homemade Dutch Apple Pie

I’m not going to lie – this stuff is rich!  There is lot of sweetener to overpower the coconut flavor and to mimic the richness of the eggs. The combination of cane sugar and honey really works well.

You only need a small glass of this egg nog at a time. But it is a wonderful treat for the holiday season that everyone can enjoy. Even my three year old loves it.

The other key component to this egg nog is sea salt.  It creates the perfect balance with the sweet and the spice.

If you’re not a fan of drinking your dessert you can simply double the recipe and turn it into delicious egg nog ice cream.

Are you not totally convinced that a white egg nog can taste good? Add a couple tablespoons of pureed pumpkin or squash for color. You’ll have your yellow egg nog without the eggs.

No dairy? No egg? No problem. Now you can enjoy egg nog this Christmas too.Dairy Free Egg Free Egg Nog || Homemade Dutch Apple Pie

Dairy Free Egg Free Egg Nog
Serves 5
A rich holiday drink that is both dairy and egg free.
Write a review
Print
Ingredients
  1. 1 can full fat coconut milk
  2. 1/2 cup organic cane sugar
  3. 1/4 cup honey
  4. 3/4 tsp. nutmeg (or to taste)
  5. 1 Tbsp. tapioca flour
  6. 2 tsp. organic vanilla
  7. 1/2 tsp. unrefined sea salt
Instructions
  1. Combine all of the ingredients in a blender.
  2. Blend until smooth.
  3. Adjust spice to taste.
  4. Serve immediately or chill.
Notes
  1. The egg nog will thicken as it chills.
  2. To make egg nog ice cream simply double the recipe and process in an ice cream maker.
  3. Add 2 Tbsp. pureed pumpkin or squash to create the yellow color of egg nog.
Just Take A Bite https://justtakeabite.com/
If you are not dairy/egg free please check out Raising Generation Nourished’s amazing egg nog recipe!

In order for me to support my blogging activities, I may receive monetary compensation or other types of remuneration for my endorsement, recommendation, testimonial and/or link to any products or services from this blog.

Simple Soup Series: Beef Stew

Simple Soup Series Beef Stew || Homemade Dutch Apple Pie

 Last on the list in this simple soup series is beef stew. Normally when I think of stew I think of simmering something all day long.

But not here. This stew comes together in under thirty minutes. It’s packed with flavor and nutrition. And it’s very filling.

It starts with a few fresh vegetables. Add them to rich beef broth for the base.

Then add the beef and seasoning. Finally a little thickening and you’ve got a delicious dinner. 

Simple Soup Series Beef Stew || Homemade Dutch Apple Pie

Don’t forget to have an adorable assistant to help clean up vegetable peelings. That makes the preparation even more fun.

Making a simple soup is definitely something even young kids can help with. They can chop some vegetables (while being supervised of course) and then help add everything to the pot. This is a great way to get your children to eat nourishing soups. Let them help.

All of my kids love to help in the kitchen. Then when dinner is served they are so proud that they contributed. 

Simple Soup Series Beef Stew || Homemade Dutch Apple Pie

Beef stew is another great lunch box addition. It will keep your child’s belly full and give them plenty of energy.

This is also a soup that freezes well for easy weeknight meals.

Do you have more time in the morning to make food? You can either prepare the stew in a pan and put in the fridge to warm at dinner time. Or you can toss the ingredients in the crockpot and let it simmer for a few hours.

Beef stew is a simple soup that will satisfy your appetite and give your body the nourishment it needs. 

Simple Soup Series Beef Stew || Homemade Dutch Apple Pie

Simple Soup Series: Beef Stew
Serves 5
Write a review
Print
Ingredients
  1. 4 cups beef broth
  2. 4 Tbsp. cornstarch, arrowroot or tapioca flour
  3. 3 large carrots, cut in small chunks
  4. 1 large potato, cut in small chunks (optional)
  5. 1/2 onion, diced
  6. 1-2 cups any other vegetables (peas, broccoli, cauliflower, beans) (optional)
  7. 1 cup cooked, cut up beef roast
  8. sea salt, garlic powder, parsley and basil to taste
Instructions
  1. In a large saucepan combine the cold broth and cornstarch until dissolved.
  2. Add the remaining ingredients.
  3. Bring to a boil. Turn down heat and simmer 20 - 30 minutes, until the vegetables are tender and the stew is thickened.
Notes
  1. You can use 1/2 lb. cooked ground beef in place of the roast beef.
  2. You can use all frozen vegetables. If so the cook time will only be about 15 minutes.
  3. An easy way to have two delicious meals in one week is to cook a bone-in beef roast in the crockpot one day, then use the bone to make broth over night. The next day use the broth and the leftover meat to make stew.
  4. If you like the stew thicker, add more cornstarch to a small amount of cold water or broth and stir it into the stew. If you like it thinner cut down on the cornstarch or omit it completely.
Just Take A Bite https://justtakeabite.com/

Simple Soup Series: Split Pea Soup

Simple Soup Series Split Pea Soup || Homemade Dutch Apple PieHands down my favorite kind of soup is split pea!  Growing up it was such a treat when my mom would make a pot of split pea soup with big chunks of ring sausage. You could smell it simmering on the stove for hours in anticipation of dinner.

So of course I make it for my family now. But I generally do not have time to monitor a pot of soup for hours.

I make my split pea soup in the crockpot. It really doesn’t get any easier. Add peas. Add broth. Add meat. Add seasoning. Dinner is ready. It only takes about five minutes to get it going. It’s so easy my three year old can pretty much prepare it for me!Simple Soup Series Split Pea Soup || Homemade Dutch Apple Pie

What we add to the pea soup just depends what we have on hand. Sometimes I make it pure pea soup – peas, broth, salt. Sometimes I add diced ham, ring bologna or diced carrots. It would even be good with cooked sausage or leftover roasted chicken.

For the batch I photographed I used large chunks of ring bologna as a nod to how my mom made it growing up. I would eat the soup and save the sausage for the end. It was fun. But if you have small children it is easier to cut up the meat into smaller pieces.

You can make split pea soup as thin or as thick as you like. I prefer mine thicker.

One of the best parts about this soup is how much my kids love it.  I was going to take a picture of my son eating it, but he finished his bowl before I could get the camera. He just shoveled it in barely taking a breath between bites.Simple Soup Series Split Pea Soup || Homemade Dutch Apple Pie

This is even an easy soup for very young children to eat. You can thin it out with extra broth and leave out the meat chunks for little ones.

Split pea soup is very allergen-friendly. So it’s great for people with all types of dietary needs. It also freezes well.

I believe split pea soup is a Dutch soup. Maybe that’s why my grandma and my mom always made it. And maybe that’s why my family and I love it so much!

This is also a very budget friendly soup.  Make broth from chicken bones and add some dried split peas. You’ll feed the whole family for a few dollars.Simple Soup Series Split Pea Soup || Homemade Dutch Apple Pie

Note that split peas are similar to beans. They are not like sweet peas. So if you don’t tolerate beans you should only try a small amount of split pea soup to see if you can handle it. It can be gassy like beans. I learned that quickly as a nursing mom. My little one doesn’t appreciate me eating too much pea soup.

This really is the most delicious and easiest to prepare soup I make. The whole family loves it, and it’s full of vegetables and broth. It doesn’t get much better.  I even love to eat the leftovers for breakfast. Leftovers never last long here. My daughter loves it in her lunch too.

As with other soups that I make I like to add a little coconut oil or butter to individual bowls to balance it with healthy fat. Then I pair it with muffins or bread. Dinner has never been easier or tastier.

Simple Soup Series Split Pea Soup || Homemade Dutch Apple Pie


Simple Soup Series: Split Pea Soup
Serves 6
A simple, nourishing split pea soup.
Write a review
Print
Ingredients
  1. 1 lb. dried split peas (green or yellow)
  2. 6 cups chicken broth (you can substitute water if you don't have broth)
  3. 2 cups any meat of choice (cubed ham, sliced ring bologna, cooked sausage, cooked chicken)
  4. 2 tsp. sea salt (to taste)
  5. 2 tsp. garlic powder (to taste)
Instructions
  1. Rinse the split peas in a strainer.
  2. Put the split peas in the crockpot.
  3. Add the broth, meat and seasoning.
  4. Cover and cook on high 6-8 hours or low 7-12 hours, until the peas are fully cooked and the soup reaches desired thickness.
  5. Stir the soup every 3-4 hours if possible to make sure there is enough liquid. Add mor if necessary.
Notes
  1. You can make the soup thinner by adding extra broth or water.
  2. This soup freezes well.
  3. It is helpful to add a little water or broth when reheating pea soup.
  4. You can make this soup in a pot. Simmer 2-4 hours, until peas are cooked and soup thickens. Stir it periodically.
Just Take A Bite https://justtakeabite.com/
Simple Squash Soup

Simple Soup Series: Squash Soup

 This simple squash soup is full of homemade chicken broth and comes together in minutes. Pair it with some soaked teff crackers for a complete meal! Simple Soup Series Squash Soup || Homemade Dutch Apple Pie

 Today I am kicking off my Simple Soup Series. I make soup all the time. But I always forget to post the recipes. So I’m starting by sharing some of my simplest soups.

They take very little time to prepare. They can be prepared in advance. They can be made in a soup pot or the crockpot. Best of all they are so nutritious and very allergen friendly.

Homemade Squash Soup

I have two absolute favorite soups – squash and split pea. I could eat one or the other every single day. I especially love having them for breakfast.

So today I’m sharing my simple recipe for squash soup. It’s very versatile. You can keep it pure squash. Or you can add meat and vegetables for texture.

Simple Soup Series Squash Soup || Homemade Dutch Apple Pie

 The first two things you need for good squash soup are bone broth and a cute helper to write your recipe. One is more critical than the other, but they both help.

How to Easily Roast Squash

Then you need cooked and pureed squash. I like to roast three or four squash at a time. Simply wash them, place them on a large baking sheet, add water to the bottom and bake at 400*F for about two hours. Then you can easily cut them open, remove the seeds, scoop the flesh into a bowl and puree it with an immersion blender or a regular blender.

Put your squash in storage containers. Use some fresh and freeze the rest. Then you can quickly make squash soup any time.

You can also buy pureed squash at the store. It is in the frozen section. 

Simple Soup Series Squash Soup || Homemade Dutch Apple Pie

Nourishing Soup with Squash

Once you have your broth and your squash this soup comes together in minutes.  Add any seasoning you like. Add any meat or vegetables you like. Simmer for about ten minutes. Dinner is served.

Squash soup makes a great school lunch. It is a thick soup, so it won’t spill very easily. It’s also easy for young kids to eat without making a mess.  Squash soup also tastes great cold. That is always a bonus when packing lunches.

I like to add coconut oil or butter to squash soup for some added healthy fat. If you are going to serve some of the leftovers cold then it is best to only add coconut oil to individual bowls when it’s warm. Else it will solidify in the cold soup.

How to Serve Squash Soup to Kids

I usually pair soup with muffins or scones. Crackers and cheese are an easy accompaniment as well.

Squash soup can be ready in about fifteen minutes. It is very nutrient dense with vegetables and broth. And the leftovers make a great breakfast or lunch.

You can also make a double or triple batch of soup and freeze some of it. Then all you have to do for dinner is warm and serve. It’s so simple.

Do you enjoy squash soup? What do you like to add to yours?

Simple Soup Series Squash Soup || Homemade Dutch Apple Pie

Simple Soup Series: Squash Soup
Serves 5
A simple squash soup that is ready in 20 minutes.
Write a review
Print
Ingredients
  1. 4 cups chicken broth (homemade)
  2. 4 cups pureed squash
  3. 1 tsp. sea salt (to taste)
  4. 1/2 tsp. garlic powder (to taste)
  5. 2 Tbsp. coconut oil (optional)
  6. 1 cup cooked, cut up chicken or cooked sausage (optional)
  7. 1 cup cooked white beans (optional)
  8. 1 Tbsp. collagen (optional)
Instructions
  1. In a large saucepan combine the broth, squash, salt, garlic powder, coconut oil (if adding, see note), collagen (if adding), meat and beans.
  2. Bring to a boil, reduce heat and simmer for 10 minutes.
  3. When the soup reaches the desired thickness adjust the seasoning to taste.
Notes
  1. If the soup is thinner than you'd like continue to simmer until it thickens.
  2. If you will be eating leftovers cold do not add coconut oil to the soup. It will harden. You can add coconut oil to individual bowls when the warm soup is served.
  3. You can replace the beans with peas, corn or tomatoes.
  4. You can also make this soup in the crockpot. Add all of the ingredients to the crockpot and cook on low for 3-4 hours.
Just Take A Bite https://justtakeabite.com/
This post is linked to From The Archives Friday.

Creamy Broccoli Noodle Soup {Gluten Free, Dairy Free}

Creamy Broccoli Noodle Soup {Gluten Free Dairy Free} || Homemade Dutch Apple Pie
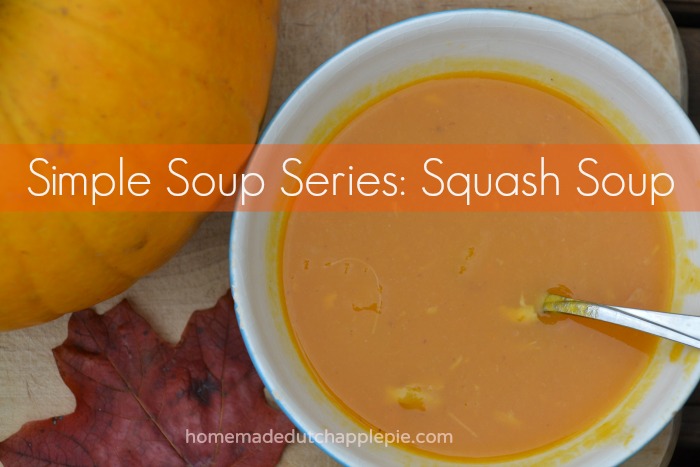
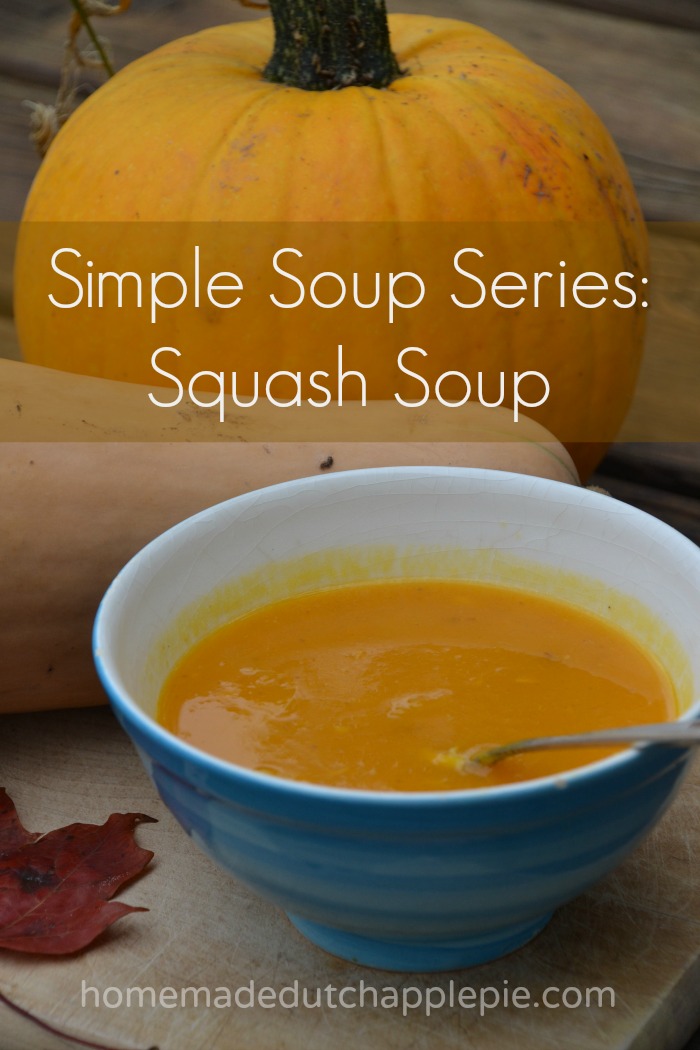
During the winter I serve soup for dinner a lot. It’s about the easiest way to make sure my family is consuming a good amount of nourishing bone broth. In fact, every Wednesday is soup night so I make sure we’re getting a healthy dose at least once a week. Then leftovers go in lunches for more nourishment.

But it wasn’t until recently that I realized I rarely post soup recipes! So I need to start posting more of the soups we eat. Today I’m starting with this creamy broccoli noodle soup…that is gluten and dairy free!

The broccoli gets pureed into the soup, so even picky vegetable eaters will enjoy it. And it has a rich, creamy taste without using dairy. The whole family will love it.

If you’re not a fan of broccoli you can swap it for another vegetable like spinach, zucchini, squash or carrots. The soup is also great without the noodles if you want it grain free.

I like to serve a warm bowl of salty soup with a sweet baked good like chocolate zucchini scones, pumpkin muffins or cornbread. Add salad or some raw veggies and you’ve got a great meal.

You can add cooked chicken to the soup to make it meatier and give it texture. But there is plenty of protein in the soup from the broth without added meat.

Broccoli noodle soup is sure to be a family favorite and it’s great for those with allergies. It is also very easy to make and can feed a whole family at a very low cost.

Do you eat much soup in the winter? What is your favorite kind?

Are you looking for more soup recipes? Stay tuned. I’ve got a soup series coming up soon!!
 Creamy Broccoli Noodle Soup {Gluten Free Dairy Free} || Homemade Dutch Apple Pie 2

Creamy Broccoli Noodle Soup {gluten free, dairy free}
Serves 4
A creamy, nourishing soup filled with broccoli and noodles.
Write a review
Print
Ingredients
  1. 2 cups chicken broth
  2. 1 cup milk or milk substitute
  3. 2 cups broccoli florets (fresh or frozen)
  4. 1 cup gluten free noodles (corn, rice, etc.)
  5. seasoning to taste - sea salt, garlic powder, celery salt, parsley
  6. optional - 1 cup cooked chicken or sausage
Instructions
  1. In a large saucepan combine the chicken broth, milk, broccoli and seasoning.
  2. Bring to a boil, reduce heat and simmer until the broccoli is cooked, about 10 minutes.
  3. Roughly puree the soup with an immersion blender or in a blender.
  4. Bring the soup back to a boil. Add the noodles, reduce heat and simmer until the noodles are cooked, about 10 minutes.
  5. Add meat if desired and simmer until warmed.
  6. Adjust seasoning to taste.
Notes
  1. I used oat milk. Any milk substitute will work, but coconut milk might give a strong flavor. A milder milk like oat, rice or almond is best.
Just Take A Bite https://justtakeabite.com/

Honey Mustard Four Ways

Honey Mustard Four Ways || Homemade Dutch Apple Pie

Hands down my favorite dip/dressing is honey mustard.  It has been my favorite for many, many years. I think I got hooked in college when I started eating salads more frequently.

Now if I make a salad for myself, 95% of the time I use honey mustard dressing. It’s just such a great flavor.

My kids love honey mustard for dipping when we make chicken nuggets.

Over the years I’ve made it countless times. It seems like I make it a little different each time. There really are many ways to make delicious honey mustard.

Honey Mustard Four Ways || Homemade Dutch Apple Pie

Today I’m sharing my top four ways to make honey mustard.  They are all very easy, and they all taste great! Three of the varieties take about one minute to make, each.

The fourth version of honey mustard uses homemade mayonnaise. I always have some on hand, so it doesn’t add any prep time for me. But if you don’t have it, making the mayonnaise will add about three minutes to the preparation.

Try any of them as a salad dressing, a dip or a condiment on sandwiches and burgers. Honey mustard goes with just about anything.

Honey mustard can be prepared in advance so it’s ready when you need it. All of these varieties will last for several weeks (at a minimum) in the refrigerator. Double or triple the recipe to have a full bottle of dressing on hand for lots of salads year round.

How about you? Do you like honey mustard? What do you use it for?

Honey Mustard Four Ways || Homemade Dutch Apple Pie

Honey Mustard I
A simple honey mustard dressing or dip.
Write a review
Print
Ingredients
  1. 1/3 cup honey
  2. 1/3 cup mustard
Instructions
  1. Mix the honey and the mustard until well combined.
  2. Serve immediately or refrigerate until ready to use.
Just Take A Bite https://justtakeabite.com/
Honey Mustard II
A simple honey mustard dressing or dip.
Write a review
Print
Ingredients
  1. 1/3 cup honey
  2. 1/3 cup mustard
  3. 1/4 cup extra virgin olive oil
Instructions
  1. Combine the honey and the mustard. Mix well.
  2. Gradually pour in the oil as you mix/whisk. Mix until well combined.
  3. Serve immediately or refrigerate until ready to use.
Notes
  1. You can add 1-2 tsp. apple cider vinegar to this recipe if you are using it as a salad dressing.
Just Take A Bite https://justtakeabite.com/
Honey Mustard III
A simple honey mustard dressing or dip.
Write a review
Print
Ingredients
  1. 1/3 cup honey
  2. 1/3 cup mustard
  3. 1 egg yolk
  4. 3 Tbsp. extra virgin olive oil
Instructions
  1. Combine the honey and mustard. Mix well.
  2. Add the egg yolk. Mix until well combined.
  3. Gradually add the oil while mixing/whisking. Mix until well combined.
  4. Serve immediately or refrigerate.
Notes
  1. The honey mustard will get thicker if it is chilled.
Just Take A Bite https://justtakeabite.com/
Honey Mustard IIII
A simple honey mustard dressing or dip.
Write a review
Print
Ingredients
  1. 1/3 cup homemade mayonnaise (see post for recipe link)
  2. 1/3 cup honey
  3. 1/3 cup mustard
Instructions
  1. Combine all three ingredients. Mix until well combined.
  2. Serve immediately or refrigerate until ready to serve.
Notes
  1. The honey mustard will thicken as it chills.
  2. This honey mustard works well as a dip since it is a little thicker.
Just Take A Bite https://justtakeabite.com/

Zucchini Pizza Bites

Zucchini Pizza Bites || Homemade Dutch Apple Pie

Is your refrigerator still overflowing with zucchini? Are you wondering what to do with it besides baking with it or grilling it? Why not make pizza!

Zucchini pizza bites make a great snack, lunch or appetizer. They are very kid-friendly. They are naturally grain free and can be made dairy free as well.

We had them recently and made them a variety of ways. I made some with pureed squash or tomato sauce and toppings to be dairy free. I added cheese to some as well. They all had great flavor.

I actually had a little bit of leftover spaghetti meat sauce to use up. So there was practically no prep work involved. It was perfect for our Sunday evening simple dinner.

I love how the smaller ones are the perfect size for little hands and little mouths.  Plus most kids will eat just about anything that you call pizza. So they are getting lots of vegetables and enjoying pizza without you having to make pizza crust!

I have a picky vegetable eater. So he was hesitant when he saw the zucchini. But once it was in his mouth he was all smiles. If your child is not a fan of zucchini, try peeling the zucchini first. Then once the pizza bites are topped you can’t even tell it’s a vegetable on the bottom.

The zucchini rounds are first baked to make sure they are cooked through and have good flavor. Then you add the toppings and bake them again for a few minutes.

Zucchini pizza bites make a fun, easy, allergen-friendly meal.  Have you ever made pizza with your zucchini? If not, you should!

Zucchini Pizza Bites || Homemade Dutch Apple Pie

Zucchini Pizza Bites
A fun finger food pizza that is free of allergens.
Write a review
Print
Ingredients
  1. Zucchini, sliced in 1/2 - 3/4" thick rounds
  2. Extra virgin olive oil for brushing
  3. Sea salt
  4. Preferred pizza toppings
Instructions
  1. Slice the zucchini and place the round on a parchment lined baking sheet.
  2. Brush the zucchini with olive oil and sprinkle with salt.
  3. Bake at 450*F for about 30 minutes.
  4. Allow the rounds to cool for about 10 minutes.
  5. Transfer the rounds to a clean piece of parchment paper on a baking sheet.
  6. Add desired pizza toppings to each round (don't overfill them or they will be hard to pick up).
  7. Bake at 400*F for about 15 minutes.
  8. Allow the pizza bites to cool for about 5 minutes before serving.
Notes
  1. Pureed squash makes a great substitute for cheese and/or pizza sauce.
  2. Do not slice the zucchini too thinly or it will be difficult to pick up.
Just Take A Bite https://justtakeabite.com/

Cherry Jam

Cherry Jam -  Homemade Dutch Apple PieSweet cherries are abundant in the summer here in Michigan. We love to go picking and then freeze a ton to use all year long (we got almost forty pounds this year!).

We also use a lot of them fresh. Sweet cherries are great for making desserts and smoothies.

But another way to enjoy them is in jam. Nothing beats fresh cherry jam!

This jam recipe is very easy to make. Plus it’s free of pectin. You can make a big batch and freeze most of it to use throughout the year.

One recipe makes about four 1/2-pint jars. You can easily double the recipe so you have a lot to freeze.

Not sure you love cherries as much as I do? Swap some of the cherries for another fruit for a combination jam. Cherries and raspberries work very well together.

Cherries offer a perfect natural sweetness so you don’t need to add much to the jam.

Are you ready to start your day with a plate of scrambled eggs and toast with fresh cherry jam? I sure am! I think I could even eat the jam straight out of the jar. It’s that good.

Cherry Jam - Homemade Dutch Apple Pie

Cherry Jam
Yields 4
A simple and sweet homemade cherry jam that is free of pectin and fillers.
Write a review
Print
Ingredients
  1. 2 Tbsp. lemon juice
  2. 2 Tbsp. pure cherry juice (can be replaced with more lemon juice)
  3. 3 tsp. grass-fed gelatin
  4. 4 cups sweet cherries, pitted and chopped (keep any juice that comes out from chopping with the cherries)
  5. 1/2 cup organic cane sugar, sucanat or coconut sugar
Instructions
  1. In a medium saucepan combine the lemon juice, cherry juice and gelatin. Let the gelatin dissolve for 3-4 minutes.
  2. Add the cherries and sugar to the pan.
  3. Cook and slightly mash cherries with a potato masher over medium heat until it comes to a boil.
  4. Turn down heat and allow jam to simmer for 2 minutes.
  5. Remove from heat and pour the jam into clean jars.
  6. Place lids on the jars and refrigerate until fully gelled.
  7. Store in the refrigerator or freezer.
Notes
  1. This recipe makes about 4 - 1/2 pint jars.
Just Take A Bite https://justtakeabite.com/

In order for me to support my blogging activities, I may receive monetary compensation or other types of remuneration for my endorsement, recommendation, testimonial and/or link to any products or services from this blog.

Zucchini Salmon Cakes (grain free, dairy free, nut free)

Zucchini Salmon Cakes - Homemade Dutch Apple Pie

One meal that I know my kids will always devour is salmon cakes. It’s kind of an odd meal for small children to love. But they do. And it makes me so happy.

Recently I decided to change things up a bit and make zucchini salmon cakes since zucchini is in season. I wondered if my kids (one with texture issues and one that is very picky with vegetables) would still enjoy them.

To my great surprise and delight they did!! Both kids loved them!

These zucchini salmon cakes still have the flavor of a salmon cake. But there is actually way more zucchini than salmon in them. So you get the benefits of salmon combined with vegetables. And even if your kids won’t eat another vegetable with the meal you know they are at least getting some. That is my kind of meal!

Zucchini salmon cakes are very easy to make. They also work well for a lot of special diets since they are grain, dairy and nut free.

We had these as our main dish for dinner. But they were also great cold the next day for lunch. I honestly think my kids liked them better that way. I even love them cold for breakfast. It’s a great way to start my day with fish, eggs and vegetables. Plus it’s already prepared, so breakfast is easy.

I serve them with homemade mayonnaise. They would also be good with pesto. These zucchini salmon cakes are even meaty enough to be used as burgers! Put one on a bun with your favorite toppings for a change of pace.

 If you’re looking for a delicious and nourishing summer meal this is it. There is no need to turn on the oven. Just fry up some zucchini salmon cakes. They are great for the whole family. 

Zucchini Salmon Cakes - Homemade Dutch Apple Pie 2 

Zucchini Salmon Cakes
Yields 8
A salmon cake packed with zucchini and lots of flavor.
Write a review
Print
Ingredients
  1. 2 cups finely grated zucchini, drained (about 3 medium zucchinis)
  2. 1 6 oz. can of boneless skinless salmon
  3. 3 eggs
  4. 1/3 cup coconut flour
  5. seasoning to taste (salt, pepper, garlic powder)
  6. Lard, coconut oil or palm shortening for frying
Instructions
  1. Grate the zucchini. Place in a strainer to drain for about one hour. Squeeze out excess liquid.
  2. Combine the zucchini, salmon, eggs, flour and seasoning.
  3. Cover the bottom of a large pan with fat. Heat over medium heat.
  4. Scoop balls of zucchini mixture and form into patties. Place in hot pan.
  5. Cook until browned on bottom, about 7 minutes. Flip. Cook until the other side is browned.
  6. Serve warm.
Notes
  1. If you like the cakes to be really firm add 1/2 cup coconut flour instead of 1/3 cup.
  2. The zucchini salmon cakes can be used as burgers and served on buns.
  3. The zucchini salmon cakes can be served warm or cold, as breakfast. lunch or dinner.
  4. Homemade mayonnaise or pesto make great dipping sauces for the zucchini salmon cakes.
  5. The salmon can be replaced with tuna.
Just Take A Bite https://justtakeabite.com/

In order for me to support my blogging activities, I may receive monetary compensation or other types of remuneration for my endorsement, recommendation, testimonial and/or link to any products or services from this blog.

Simple Strawberry Slush (egg free, dairy free, nut free, gluten free)

This simple strawberry slush is a fun, fruity, allergen-friendly drink for kids and adults. It contains no eggs, dairy, nuts, grains, soy or coconut.Simple Strawberry SlushDo you want to treat your kids to a really fun drink? Try a simple strawberry slush!  It is a perfect way to cool down in the summer and consume fresh, nutritious produce.

I grew up drinking Slushies® all the time. We would bike to the local drug store all summer to get them. Of course they were made of food coloring, high fructose corn syrup and artificial flavor.

This simple strawberry slush is a much-improved version. It only uses a few simple ingredients. It is also very allergen-friendly.

My kids LOVE these. I’ll be honest – my husband and I do too!

As always, the best part for me is that it only takes about 60 seconds to make a simple strawberry slush. Plus I can add collagen for a nutrition boost.

Strawberries work very well in this drink – even frozen! But if you don’t have any or want a different flavor you can try blueberries, raspberries or even cherries. You really can’t go wrong.

This summer the whole family can cool down with a nourishing simple strawberry slush.

Simple Strawberry Slush 2

Simple Strawberry Slush
Serves 2
A fun, refreshing and healthy summer drink that is free of allergens.
Write a review
Print
Ingredients
  1. 6 ice cubes
  2. 3/4 cups strawberries (fresh or frozen) (or other fruit)
  3. 1 - 2 Tbsp. sweetener (honey, syrup, sucanat) (depending on the sweetness of the fruit)
  4. 1/4 tsp. sea salt (optional)
  5. 1/2 tsp. collagen (optional)
Instructions
  1. Combine all of the ingredients in a high powered blender.
  2. Blend until desired consistency.
  3. Serve immediately.
Notes
  1. This makes enough for two children or one adult.
  2. You can blend it completely smooth (for small children) or leave a bit of slushiness from the ice.
  3. Blueberries, raspberries and cherries can be combined with or substituted for the strawberries.
Just Take A Bite https://justtakeabite.com/
 
In order for me to support my blogging activities, I may receive monetary compensation or other types of remuneration for my endorsement, recommendation, testimonial and/or link to any products or services from this blog.