Home » Kid-friendly Recipes » grain free » Page 14

Category: grain free

Baked Apples

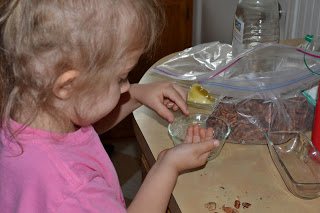
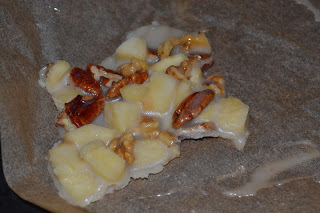
I’m always looking for new breakfast ideas. This week I came across Cara’s recipe for slow cooker baked apples.  It was just what I needed – grain and nut free and easy prep.

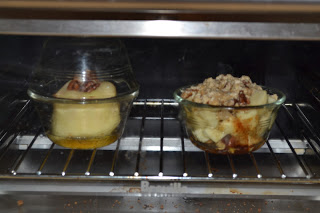
I was going to make them in the crockpot, but then I changed my  mind. Since I was only making a few I didn’t want to get my big crockpot dirty. So I just prepped them this morning and baked them in the oven.

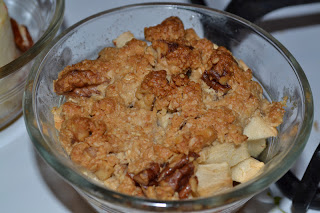
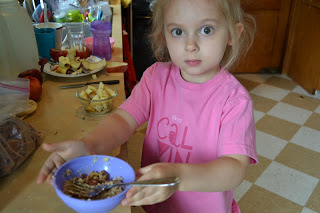
So easy and so delicious! Justin said they were great. He had his topped with homemade vanilla yogurt.

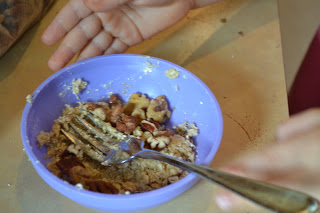
I will definitely be making these again. Such a great idea for a healthy breakfast. I didn’t follow the recipe exactly since I was going from memory when I made it. It still turned out great.

The next time I make it I might modify things and just do a pan of sliced baked apples**. Then you don’t have to worry about the apples opening/the toppings falling out. And you can serve up as much or as little as you want. Plus I don’t have to worry about a picky eater complaining about apple peels 😛
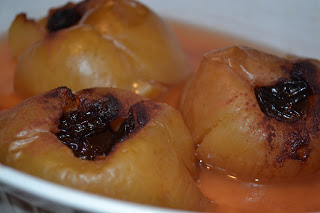
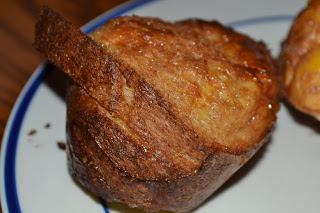
Baked Apples

6 medium apples
¼ cup raisins
¼ cup honey (I also added a little organic cane sugar)
1 tsp. cinnamon
6 Tbsp. coconut oil, butter, or ghee (I forgot this…oops)
 
Core apples. To core, using an apple corer or paring knife, cut around the core (about ¼ inch from the stem all the way around) but leave about half an inch at the bottom. Use the knife to ‘drill out’ the core.
 
Divide raisins, honey, cinnamon, and coconut oil between the apples.
 
Place apples in a crock pot and add ½ inch of water. Cook on low overnight and enjoy a hot breakfast in the morning!
 
Alternatively, bake covered at 350 degrees in a glass dish for 45 minutes-1 hour in the morning.
 
**Next time I will try peeling and slicing the apples. Place them in a buttered baking dish. Sprinkle with cinnamon, honey and raisins. Cover and bake at 350 for 25 minutes.

Top with with cream, yogurt, coconut milk, or just eat plain.

Grain Free Pesto Topped Quiche…Or Egg Pizza

Eggs and pesto go very well together. I’ve made a pesto quiche before…one version that had pesto on the bottom and one that had it mixed in.

The problem is that the pesto usually kind of gets lost in the eggs. Sometimes you can’t even tell it’s there. So last night I decided to top our quiche with pesto.

I made a simple egg and cheese quiche. I let it bake until the top was just set. Then I topped it with pesto and extra cheese.

It worked very well. The pesto stayed on top and added great flavor.

Are you grain free and looking for a pizza substitute? Make the quiche thinner and this is like pesto pizza! You could even add extra toppings. Mushrooms, onions, peppers,…I may need to try this very soon.

The next time you make quiche, instead of mixing all of the meat and vegetables inside consider topping it. The possibilities are endless. (Plus picky eaters can pick off what they don’t like that way 🙂

This makes a great breakfast, brunch, lunch or dinner! And the leftovers are good warm or cold. Perfect for a quick weekday breakfast.

What is your favorite way to make quiche? What toppings would you add?

Pesto Topped Quiche

1/2 – 1 cup pesto (I blend peas, olive oil, salt and garlic powder for a simple allergen free pesto. You can add nuts and cheese and use basil or spinach for a more traditional pesto)
4 eggs + 5 egg yolks
1 cup milk or dairy kefir
salt, pepper and garlic powder to taste
1 cup shredded cheese (I used a combo of marble and parmesan)
1/4 cup shredded parmesan cheese

Grease a 9″ pie plate. Mix eggs, milk, seasoning and  1 cup shredded cheese. Pour into prepared pan.

Bake at 375 for 20 – 30 minutes, until top is set.

Spread pesto on quiche. Sprinkle parmesan cheese over top.

Bake another 25 – 35 minutes, until eggs are fully set.

Let set for 5 minutes before serving.

Chili Cheesecake

A couple weeks ago I was watching the show The Best Thing I Ever Ate. One of the dishes featured was a savory cheesecake. It looked pretty good, although I can’t remember at all now what was in it. It got me thinking…maybe I should try making a savory cheesecake.

I had some leftover chili I didn’t know what to do with. So I turned it into chili cheesecake.

I honestly had about 5 minutes to prepare this dish after running in the door from a visit to the the doctor and running errands. I thought it might be a huge failure. I didn’t have a recipe. I didn’t measure. I just dumped, mixed and stuck it in the oven. Praying it would have enough time to bake and that it wouldn’t be a pan of slop when it came out.

To my great surprise it actually turned out really well. Both of the kids even loved it.

This is a great way to use up leftovers and come up with any kind of savory cheesecake you can imagine. You can eat it as is or use it as a dip.

It’s been almost a week now since I made it so I’ll do my best to remember what I did 😛  I just made a small dish. You can scale it up to make it in a pie dish or spring form pan.

Chili Cheesecake

1/2 cup crushed tortilla chips (for a “crust”…this is optional…the chips get soft when baked)
1 cup chili (you could use taco meat, cooked ground meat, shredded chicken, or any vegetables you like)
1 cup homemade cream cheese
3/4 cup homemade sour cream
1 egg
2 egg yolks
seasoning to taste

Place tortilla chips in the bottom of a small baking dish (I used a 4 cup pyrex dish). Top the chips with half of the chili.

Mix the rest of the chili, the cream cheese, the sour cream and the eggs. Adjust seasoning to taste.

Pour the mixture over the layer of chili.

Bake at 400 degrees for about an hour (until set all the way through). Let set 5 minutes before serving.

Breakfast Cups

A couple weeks ago I made a simple breakfast for dinner. I made egg cups and french toast cups. They came together very quickly, and we all enjoyed them. I even got them prepped mostly one handed since that’s about the only way to make dinner without running into the other room every five seconds to get Abram down from something he’s climbed on.

The basis of the recipe is putting bread in muffin cups. Then add whatever to it you want. I did eggs and cheese in some. I did eggs and maple syrup in some.

You could also use the bread in a muffin cup idea with things like sloppy joes or cheeseburger cups or pot pie. The bread is kind of the crust. Then be creative and go from there.

It’s fun to have individual servings, especially for kids. And it’s much faster than making a crust 🙂

These are great for a brunch or for a party. They are also a great prep ahead breakfast. Make them the night before or freeze a bunch and warm them when you need them.

Breakfast Cups

Mini quiche breakfast cups

3 slices whole wheat bread (or whatever bread you tolerate…gluten free, grain free, etc.)
5 eggs
1/2 cup milk
1/2 cup shredded cheese
salt and pepper to taste

Grease 6 cups of a muffin tin. Mix eggs, milk and seasoning. Place 1/4 slice of bread* in each muffin cup. Top with a little cheese. Evenly distrbute the eggs among the cups. Add another 1/4 slice of bread to each cup and push down so it absorbs the eggs. Top with extra cheese if desired. Bake at 350 for 25 – 30 minutes.

Mini french toast cups

3 slices whole wheat bread (or whatever bread you tolerate…gluten free, grain free, etc.)
6 eggs
1/2 cup milk
1/3 cup pure maple syrup
cinnamon (optional)

Grease 6 cups of a muffin tin. Mix eggs, milk and cinnamon. Place 1/4 slice of bread* in each muffin cup. Pour a little maple syrup on top. Repeat with another 1/4 slice of bread and syrup. Evenly distribute the eggs among the cups. Push bread down to be sure it all gets saturated with the eggs. Bake at 350 for 25 – 30 minutes.

*You can also do it with bread torn into chunks instead of keeping it as slices. This works espically well for french toast.

Zucchini Soup | Homemade Dutch Apple Pie

Zucchini Soup

Zucchini soup is a great way to use up some of your larger zucchini and get kids to eat it! Pair it with zucchini crackers and cheese…lunch is served.

Zucchini Soup | Homemade Dutch Apple Pie

Zucchini just keeps coming.

I’m still working on using up the last of the zucchini from our garden. Sound familiar? You can only make so much zucchini bread!

One nourishing way to use that extra zucchini is in zucchini soup. It is so good! And so simple. Just cook and puree some vegetables in broth. It turns into a creamy, flavorful nourishing soup.

Zucchini is the base. But you can add any vegetables to complement the zucchini.

I like to use the zucchini that gets a little too big for soup. You can’t tell the difference.

Getting ready for fall.

As fall approaches and I think about school…I also think about sickness. Once all of those kids are together the germs start spreading.

Eating zucchini soup during the summer is a great way to build up the immune system ahead of time. Getting your family to consume broth year round is a great idea.

Soup for breakfast.

I eat soup for breakfast most days. I love it when I have leftover soup that I can just grab out of the fridge and eat cold. Zucchini soup is perfect for an easy breakfast or lunch that you don’t have to cook.

It also makes a great dip for raw vegetables or crackers.

Are you struggling to come up with more ways to use your zucchini? Try zucchini soup!

Zucchini Soup

3 medium zucchinis, chopped
1 small carrot, chopped
1 small red onion, chopped
2 cups chicken broth
salt, pepper, garlic powder to taste
1 cup diced, cooked chicken (optional)

  1. Cook vegetables in broth until very tender, about 30 minutes.
  2. Add seasoning.
  3. Puree with an immersion blender or regular blender.
  4. Return soup to pot, taste and adjust seasoning.
  5. Add diced, cooked chicken and simmer for 10 minutes.

Here are a few more zucchini recipes you may enjoy:

Zucchini cake with two frostings

Zucchini crackers

Zucchini pizza bites

Chocolate zucchini scones

Zucchini salmon cakes

Chocolate zucchini cupcakes

Apple Honey Crunch – Three Ways

Rebecca has been helping me in the kitchen since before she was one. Now that she is four she is becoming quite a little chef! Rebecca often plays cooking and will come up with all kinds of meals/recipes/goodies. She actually has some really good ideas! When she does we try to make them. This week while she was playing she was making “apple honey crunch.” We brainstormed about how to make it…and gave it a try. We came up with three versions. They were all very simple to make and tasted great. One is kind of like a baked apple/apple dumpling. One is like apple cobbler. And one is like a brittle. They each only use a few ingredients and are very kid friendly. We just did small versions of each. They are great for individual servings. Or you can make them in larger quantities. Want to have some fun in the kitchen with your kids? Try Rebecca’s apple honey crunch recipes 🙂  Two of them are even grain free/gluten free/GAPS legal.

This post is linked to Fat Tuesday at Real Food Forager.

Apple Honey Crunch (dumpling style)
1 apple
1/8 cup chopped crispy nuts (we used pecans and walnuts)
1 Tbsp. honey

Peel and core apple. Place the apple in a small, buttered glass/oven safe dish (I used my small pyrex dishes). Sprinkle half of the nuts into the center of the apple. Pour honey into hole. Top with remaining nuts. You can add an extra little drizzle of honey over the apple if you like. Place another bowl over the apple (inverted) as a lid. Bake at 375 for 40 minutes (until the apple is soft). Let cool. Enjoy!

Apple Honey Crunch (cobbler style)

1 apple
1/8 cup chopped crispy nuts (we used pecans and walnuts)
2 Tbsp. honey
1/4 cup ground oats (or whole oats or whole wheat flour)
2 Tbsp. softened butter
1/2 tsp. cinnamon

Peel and chop apple. Sprinkle a few of the nuts in the bottom of a small, buttered glass/oven safe dish (I used my small pyrex dishes). Put apple chunks on top. Sprinkle on cinnamon.

Mix oats, butter and honey. Sprinkle over apples. (lick bowl 🙂

Bake at 375 for 35 minutes – until the top is golden and crunchy.

Apple Honey Crunch (brittle or ice cream topping)
*This didn’t get quite as solid as I would have liked. Some parts stayed a bit soft. But it was still very good. We will experiment with it to get it just right. As is it would make an awesome topping for ice cream (if you just chill it instead of freeze it).

1 apple
1/4 cup crispy nuts (broken into large pieces) (we used pecans and walnuts)
1/4 cup coconut oil
1/4 cup honey

Peel and chop apple. Cook the apple in coconut oil in small pan. When apple is tender stir in honey. Cook about 2 minutes. Remove from heat. Stir in nuts.*  Pour onto a parchment lined baking sheet. Place in freezer until solid. Break into chunks. Store in the freezer to remain solid.

*You can also pour this into a glass container and allow to cool (on the counter or in the fridge) and use it as a topping for ice cream, pancakes or waffles or as a mix in for yogurt.

Pesto Sausage Cakes (GAPS legal, grain free, dairy free, nut free)

Last night for dinner I was going to make zucchini sausage muffins. But it was a HOT day. So I didn’t really want to turn on the oven. So I figured I’d make zucchini sausage cakes instead. I already had zucchini and sausage thawed. But the zucchini was not cooperating and was super stringy…which I knew Rebecca would not touch. So I came up with a new recipe for pesto sausage cakes. I happened to make a fresh batch of pesto yesterday morning. I also happened to make a fresh batch of mayo in the morning…which worked out well…I served these with pesto mayo. These cakes turned out very well! And they were really easy to throw together. I used ground pork. Ground chicken or turkey would work well too. I don’t measure ingredients when I make this kind of food, but I’ll try to give a rough estimate of quantities. If you want to make this grain free you can use coconut flour in place of the bread crumbs. I made 6 cakes with a bread crumb coating and 3 without. It works well either way. I like the crunchy coating, but it’s easier for the kids to eat without it.

I’m happy with how well these turned out. Even Abram kept saying “mmmm” as he was eating his. I liked them so much I had another one for bedtime snack and another one for breakfast today 🙂

This post is linked to Fat Tuesday at Real Food Forager.

Pesto Sausage Cakes

1 lb. ground pork, chicken or turkey
1/2 cup pesto (My pesto is nut and dairy free. It is just peas, evoo, salt and garlic blended together. Use whatever kind you like.)
1 egg
1 egg yolk
1/4 cup bread crumbs or coconut flour (optional, but it helps bind things together)
salt, garlic powder, cumin to taste

bread crumbs or coconut flour to coat (optional)
fat for cooking (palm shortening, coconut oil, lard, butter)

Mix meat, pesto, eggs, bread crumbs and seasoning. Form into 8-10 patties. Coat patties in bread crumbs or coconut flour. Heat fat in skillet over medium heat. Cook patties in fat until cooked through, about 8 minutes per side.

Serve with extra pesto or pesto mayo (mix equal parts pesto and mayo).

Rustic Chicken Stew

For Sunday dinner this week I made rustic chicken stew. It’s not a new recipe to me, but I haven’t made it in a long time. I used to make it all the time, when I was first learning how to cook and how to use my crockpot. It’s from a cookbook called The Ultimate Slow Cooker Cookbook. It’s a super easy chunky chicken stew. I like that it doesn’t require much chopping since it’s supposed to be “rustic.” The recipe calls for cut up blsl chicken. I just tossed in a couple chicken legs since that’s what I had on hand. Then we took whatever meat off the bone we wanted for our individual bowls. I’m not sure why I haven’t made this for so long. It’s so easy and so good. I’ll have to put it back on the menu more often. I’ve never added the mushrooms since Justin doesn’t like them. But I’m sure it would be very good (I LOVE mushrooms). This can easily be made GAPS legal by omitting the potatoes.

This post is lined to Fat Tuesday at Real Food Forager.

Rustic Chicken Stew

2 lbs. chicken – breasts, thighs, etc – on or off the bone, whole or cut up
3 medium onions, quartered
2 carrots cut into 1″ thick slices
2 potatoes cut into 1″ cubes
4 cups chicken broth
1 tsp. celery seed
1 tsp. dried thyme
1/2 tsp. pepper
8 ounces mushrooms, halved
1 cup frozen corn
1 cup frozen peas
salt and garlic powder to taste

Combine all ingredients in the crockpot. Cook on high 4 to 9 hours or low 7 to 12 hours. If you like your peas and corn less well done you can wait and add them in the last 15-30 minutes of cooking.

Baked Spinach (grain free, egg free, nut free, GAPS-legal)

I made quite a spread for our Christmas brunch this week. But I did take one item off the menu because I just didn’t have time to prepare it. So I made it for dinner last night – baked spinach. I found the recipe on Breakfast and Brunch Recipes. It is super easy. I really liked it. I think I ate half the pan last night 😛  Justin thought it would be better as a dip than as a side dish, but still thought it was good. This can be GAPS legal if you use homemade raw sour cream. It’s a great way to get more veggies in your diet. As expected Rebecca didn’t eat much…too stringy. But she did really like the flavor. Preparing this was even easier for me last night. I had a bunch of leftover ranch veggie dip (just a mix of sour cream and homemade ranch mix). So I just mixed that into the spinach instead of sour cream and separate seasoning. For cheese I used a mix of parmesan, sharp cheddar and mont. jack. I only made a half recipe.

This post is linked to Fat Tuesday at Real Food Forager.

Baked Spinach

3 packages, frozen, chopped spinach (10-ounce package size)
2 cups sour cream
1 package dried onion soup mix (I used homemade ranch dressing mix)
1/4 cup Parmesan cheese, or more (I used more than this. Any kind of cheese will work)

Take the spinach out of the freezer the night before. When it has been thawed, place it between layers of paper towels and squeeze the water out of it until dry.

Mix together the spinach, sour cream and soup mix. Add the grated Parmesan cheese and stir until well combined.

Grease a 9″ x 9″ square baking dish. Press the spinach mixture flat with a spoon or spatula.

Bake for 45 minutes at 350 degrees.

Serves 6.

Crockpot Pork and Beans (grain free, dairy free, nut free, egg free, GAPS-legal)

For lunch yesterday we had another new recipe for pork and beans from Cheeseslave. This is a very easy crockpot meal. And it is so good!! All three of us loved it. Although Abram wasn’t too happy about me eating so many beans. He’s not a happy camper right now. I guess I won’t be eating this again for a while. Aside from that it’s a great recipe. I didn’t follow the directions completely. I simplified it a bit and made less. For meat I used cut up bacon and cut pieces of leftover pork chops. I’ll post it the way I made it. This is a great, healthy recipe for baked beans. You could use just the bacon or probably even leave the meat out. I love that you use broth to add extra nutrition. I also stirred some coconut oil into my dish for more healthy fat. This would be great served with corn bread or over rice. You could even add in other vegetables for a more complete meal.

Crockpot Pork and Beans

2 cups dried navy beans
1/2 small onion, diced
1 Tbsp. butter
1 Tbsp. coconut oil
2 cups chicken broth or stock
meat – ham hock, diced bacon, cut up pork, grass-fed hot dogs (whatever you have on hand)
1/4 cup ketchup (I used homemade fermented ketchup…GAPS legal)
2 Tbsp. mustard
2 Tbsp. apple cider vinegar
1/3 cup total sweetener (honey, maple syrup, molasses…any combo…I used honey…GAPS-legal)
sea salt to taste

Soak beans in water and whey for 7-24 hours. Drain. Rinse. Cook beans in water for about 30 minutes, until just starting to soften (skim foam from water when it comes to a boil). Drain.

Add butter, coconut oil and onion to crockpot. Turn to high. Let fat melt. Add beans and remaining ingredients (except hot dogs). Cook on high 6-10 hours. Add more stock if it gets too dry. Add sliced hot dogs (if using) about an hour before serving. Remove ham hock if using.