Home ยป main dish ยป Page 3

Tag: main dish

Zucchini Salmon Cakes (grain free, dairy free, nut free)

Zucchini Salmon Cakes - Homemade Dutch Apple Pie

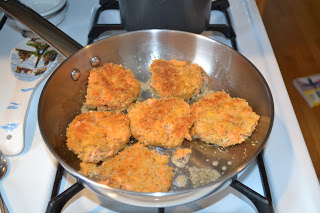
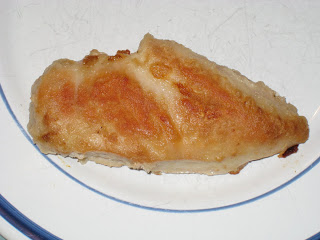
One meal that I know my kids will always devour is salmon cakes. It’s kind of an odd meal for small children to love. But they do. And it makes me so happy.

Recently I decided to change things up a bit and make zucchini salmon cakes since zucchini is in season. I wondered if my kids (one with texture issues and one that is very picky with vegetables) would still enjoy them.

To my great surprise and delight they did!! Both kids loved them!

These zucchini salmon cakes still have the flavor of a salmon cake. But there is actually way more zucchini than salmon in them. So you get the benefits of salmon combined with vegetables. And even if your kids won’t eat another vegetable with the meal you know they are at least getting some. That is my kind of meal!

Zucchini salmon cakes are very easy to make. They also work well for a lot of special diets since they are grain, dairy and nut free.

We had these as our main dish for dinner. But they were also great cold the next day for lunch. I honestly think my kids liked them better that way. I even love them cold for breakfast. It’s a great way to start my day with fish, eggs and vegetables. Plus it’s already prepared, so breakfast is easy.

I serve them with homemade mayonnaise. They would also be good with pesto. These zucchini salmon cakes are even meaty enough to be used as burgers! Put one on a bun with your favorite toppings for a change of pace.

 If you’re looking for a delicious and nourishing summer meal this is it. There is no need to turn on the oven. Just fry up some zucchini salmon cakes. They are great for the whole family. 

Zucchini Salmon Cakes - Homemade Dutch Apple Pie 2 

Zucchini Salmon Cakes
Yields 8
A salmon cake packed with zucchini and lots of flavor.
Write a review
Print
Ingredients
  1. 2 cups finely grated zucchini, drained (about 3 medium zucchinis)
  2. 1 6 oz. can of boneless skinless salmon
  3. 3 eggs
  4. 1/3 cup coconut flour
  5. seasoning to taste (salt, pepper, garlic powder)
  6. Lard, coconut oil or palm shortening for frying
Instructions
  1. Grate the zucchini. Place in a strainer to drain for about one hour. Squeeze out excess liquid.
  2. Combine the zucchini, salmon, eggs, flour and seasoning.
  3. Cover the bottom of a large pan with fat. Heat over medium heat.
  4. Scoop balls of zucchini mixture and form into patties. Place in hot pan.
  5. Cook until browned on bottom, about 7 minutes. Flip. Cook until the other side is browned.
  6. Serve warm.
Notes
  1. If you like the cakes to be really firm add 1/2 cup coconut flour instead of 1/3 cup.
  2. The zucchini salmon cakes can be used as burgers and served on buns.
  3. The zucchini salmon cakes can be served warm or cold, as breakfast. lunch or dinner.
  4. Homemade mayonnaise or pesto make great dipping sauces for the zucchini salmon cakes.
  5. The salmon can be replaced with tuna.
Just Take A Bite https://justtakeabite.com/

In order for me to support my blogging activities, I may receive monetary compensation or other types of remuneration for my endorsement, recommendation, testimonial and/or link to any products or services from this blog.

Easy Beef and Bean Enchilada Bake (gluten, egg, dairy, nut, rice free)

beef and bean enchilada bakeSometimes it is very tough to cook for my family. I have to work around food allergies and intolerances. Of course they are different for everyone in the family. So normally I end up cooking a lot of separate items so everyone can feel good and eat well. But it is a lot of work!

It’s pretty rare that I make casseroles. It’s hard to make one that we can all eat. But last week I came up with a super easy casserole that we all enjoyed! I actually did make it three different ways to meet our needs. The big difference was that making different versions didn’t require any extra work.

The main recipe uses tortilla chips, ground beef, tomato sauce, beans and cheese. I left the cheese out for my son’s dairy free version. My version was simply ground beef, cheese and beans so that it was corn and tomato free.

This casserole is naturally gluten, egg, rice and nut free. You can make it dairy free by leaving out the cheese. There is still plenty of flavor. If you don’t tolerate corn you can substitute another starch like cooked rice or quinoa.

I loved that I found a way to use up the bits of tortilla chips at the bottom of the bag instead of throwing them away. If you’re looking for a super easy, allergen-friendly dinner this is it.

Easy Beef and Bean Enchilada Bake
A quick prep casserole that is allergen-friendly and has big enchilada flavor.
Write a review
Print
Ingredients
  1. 1 lb. ground beef (or turkey or chicken)
  2. 15 oz. tomato sauce
  3. 1 Tbsp. tapioca flour, arrowroot or cornstarch
  4. 2 cups pinto beans (cooked)
  5. 2 cups crushed tortilla chips
  6. 2 cups shredded cheese (optional)
  7. salt and garlic powder to taste
Instructions
  1. Brown the meat. Season with salt and garlic powder.
  2. With the heat still on, sprinkle the flour over the meat and mix.
  3. Add the tomato sauce.
  4. Simmer for 5 minutes. Season to taste. Remove from heat.
  5. Heat the oven to 350*F.
  6. In a 2 qt. casserole layer 1/3 of the crushed chips, 1/3 of the meat mixture and 1/3 of the cheese. Repeat layering two times.
  7. Bake, covered, for 35 minutes.
  8. Remove cover and bake another 5 minutes.
Notes
  1. The tortilla chips can be replaced with another starch like cooked rice or quinoa.
  2. This can be turned into a skillet meal by sprinkling the cheese and chips into the pan of meat after simmering the sauce.
Just Take A Bite https://justtakeabite.com/

Gluten Free Pizza Crust

My daughter wants pizza for her birthday party. Pizza for 20 people…from scratch…and gluten free. Ummmm…ok??

I’m still fairly new to gluten free baking. But I’m always up for a challenge. And this was a big challenge. I don’t mind experimenting with my family. But I do mind when I have 20 guests. I am passionate about my food and like to make things people enjoy (yes, I am and always have been a people pleaser…if you come to my house and hate the food please don’t tell me :P).

So I used my little knowledge I’ve gained from previous baking experiments and gave it a go. And I think I came up with a pretty decent crust. Everyone in our house ate it without complaints.

This recipe is great for people with all kinds of allergies. The main recipe does use egg whites. But since I can’t have eggs right now I made some without the whites. It was a little thinner/crispier, but it still tasted great. I actually got to eat pizza!!!! Pizza that didn’t make me sick!!! A true  miracle.

It is also dairy free. So as long as you don’t pile cheese on top you can have a dairy free pizza. You can use a cheese alternative. Or you can do what I do and make a pesto pizza. The pesto gives so much flavor you don’t even need cheese. I also like to add some dollops of pureed pumpkin or winter squash here and there to give some extra depth to cheese free pizza.

So using this crust you can make a gluten free, egg free, nut free, corn free, dairy free, soy free pizza.

Do you like pizza but thought you had to give it up because of allergies? Think again. Try this great tasting, easy to prepare pizza crust for your next pizza party. Everyone can enjoy it. It’s allergen friendly and has no gums or starches.

One of the best things about this recipe is that you can make/bake the crust in advance and freeze it. Then you can have a quick pizza any night of the week. Just add your favorite toppings and bake for about 15 minutes. So easy.

I must point out that I used a small amount of flax seed in this recipe. I don’t normally use or advocate the use of flax seeds. But they help bind the dough when using gluten free flours and prevents having to use any gums. I figure one teaspoon for an entire pizza isn’t going to do much harm. You could substitute chia seeds for the flax seeds.

Gluten Free Pizza Crust
makes one 12-14″ pizza or 3-5 individual pizzas

3/4 cup white rice flour
1/4 cup tapioca flour
1/4 cup brown rice flour
1/4 amaranth flour or more brown rice flour
1 tsp. salt
1/2 tsp. baking soda
1 tsp. flax seed
1 tsp. cane sugar
1 Tbsp. evoo
1/2 cup water
2 egg whites
1/2 tsp. cream of tartar

Heat oven to 400 degrees F. Grease a pizza pan or baking pans for individual pizzas.

To make this a soaked crust combine the flour, water and 2 Tbsp. lemon juice. Cover and let set for 7-24 hours. Then proceed with the recipe.

Beat the egg whites with the cream of tartar until still peaks form. Set aside.

Combine the remaining ingredients. Fold in the egg whites. Spread onto the prepared pan(s).

Bake for 10 – 15 minutes (smaller crusts will need less time, whole pizzas will need more time), until firm.

Use crust immediately or allow to cool, remove from pan and refrigerate or freezer. Thaw frozen crust in the refrigerator when ready to use.

When ready to make the pizza, add your favorite sauce and toppings. Bake at 400 degrees for 10 – 15 minutes, until cheese is melted and pizza is hot.

Crockpot Stuffed Peppers (Grain Free, Dairy Free, Nut Free, GAPS-legal)

Yesterday I had a doctor appt. in the afternoon, so I needed a prep ahead dinner. I decided to try making stuffed peppers in the crockpot. I didn’t really use a recipe. I just made a simple meat mixture and stuffed it into a couple peppers. 

It cooked all day in the crockp0t. What a super easy, super tasty dinner! I just ate the meat since peppers bother my little one. But it was still good. Even my daughter ate all of hers.

The peppers get super tender. You can peel the skins right off (a big bonus for kids). You can mix just about anything into the meat…rice, veggies, beans, cheese. I kept it very simple so that I could eat it. I used one pound of meat for 2 large peppers…that could easily serve 4 people.

Crockpot Stuffed Peppers

2 large bell peppers, top cut off, seeds/insides removed
1 lb. ground beef
1 egg
1/3 cup ketchup
2 Tbsp. mustard
salt and garlic powder to taste
(any other fillings you like)

Prepare the peppers.

Mix the meat with the remaining ingredients. Stuff the meat mixture into the peppers.

Put the tops on the peppers.

Put a small amount of water in the bottom of the crockpot. Place the peppers inside (I found it worked well to have them against the sides since they get soft and can tip while cooking).

Cover and cook on high 4-8 hours or low 6-12 hours (I think I had mine on high for a few hours then switched it to low for the rest of the day…about 9 hours total).

Grain Free Salmon Cakes

Yesterday I wanted something light for lunch since I knew we’d have a bigger, snacky dinner. And I’m trying to get more seafood into my diet right now. So I decided to make salmon cakes. I’ve made them before…but a recipe that takes some extra work and prep ahead. I wanted something easy. So I threw these together using what I had on hand. Simple, quick, healthy. And delicious!! All 3 of us liked them. And I’m excited to eat the leftovers. I cooked a couple salmon filets to use in these. You could used canned salmon. I didn’t measure anything. But I’ll try to give rough estimates of what I added.

My daughter LOVES these (and she can be picky about fish). So if you are trying to get your kids to eat more healthy seafood give these a try.

Salmon Cakes
makes ~ 7 cakes

2 (6 oz.) salmon filets, cooked OR 1 (14 oz.) can salmon
1 egg (optional)
1/4 cup mayo (preferably homemade)
1/2 – 1 tsp. Old Bay seasoning
1/2 – 1 tsp. sea salt

1/4 cup – 1/2 cup almond flour and/or coconut flour

Crumble salmon in a bowl. Add egg, mayo and seasoning. Mix well. Form into balls. Roll in flour and flatten slightly. At this point you can cover and refrigerate them (helps to firm them up/hold them together before cooking. and allows you to prep them ahead) or cook them immediately.

To cook, heat a large skillet and add butter, coconut oil, palm shortening and/or lard. Cook salmon cakes in oil/butter for about 5-7 min. per side.

Serve plain or with tartar sauce (homemade mayo mixed with a little sweet pickle relish).

Hamburger Pie ("Favorite Casserole")

Last night I made an old classic casserole that Justin grew up eating. His family called it favorite casserole, but it’s really hamburger pie. It’s a lot like shepherd’s pie…beef, potatoes and veggies. We haven’t had it in a long time, but Justin requested it. And it kind of sounded good to me ๐Ÿ˜›  As long as you have mashed potatoes it’s very easy to make.

I made mashed potatoes in the morning so that prep was easy at dinner time. As far as casseroles go this one is pretty good. I wouldn’t call it my “favorite” ๐Ÿ˜›  But maybe that’s because I didn’t grow up eating it.

Hamburger Pie

1 lb. ground beef
1/4 cup chopped onion
2 cups mashed potatoes (as much as you like, at least enough for a thin layer on top)
1 cup shredded cheese (leave out the cheese to make it dairy free. You can add a thin layer of pureed squash in place of the cheese to add flavor)
salt and peper to taste (I also added garlic powder)
1 cup tomato soup
2 cups cooked green beans (cut or french style)

Heat oven to 350.

Brown the meat with onion. Season. Stir in the beans and soup. Pour into ungreased 11×7 pan (you could use 9×13 if you want a thinner layer…just be sure to have enough potatoes to cover it).

Spread the potatoes over top. Top with cheese. Bake until hot and top is slightly brown (30-40 min.).

Fried Chicken

This chicken recipe is from my mother-in-law. It’s not really fried, bit it tastes like it is.

“Fried” chicken is very easy to make and tastes very good. I’ve been making it since before we got married!

I love that it requires very little hands on time. You just brown the chicken, cover and let it cook for an hour.

My whole family really enjoys this chicken. It can be made with just about any kind of flour. And it pairs well with just about any sides and sauces. Perfect.

Fried Chicken
 
boneless, skinless chicken breasts (as many as you need)
~ 1/4 cup flour per chicken breast (I just put some in a bowl…however much looks right)
salt and pepper to taste
~1 Tbsp. olive oil
 
Trim any fat off chicken. Mix salt and pepper into flour. Coat each chicken breast in flour. Heat oil in pan. Place chicken in pan top side down. Cook about 5 min. – until browned. Flip chicken. Cook another 2 min. Reduce heat to very low. Cover and cook for 1 hour. About 5 min. before serving take lid off pan and flip chicken to re-crisp the top side.
 
Serve as is, with dipping sauce (sweet ‘n’ sour, bbq, etc.) or topped with sauce (pesto, etc.).