Home » snack » Page 7

Tag: snack

Peaches and Cream Overnight Oats | Homemade Dutch Apple Pie

Peaches and Cream Overnight Oats

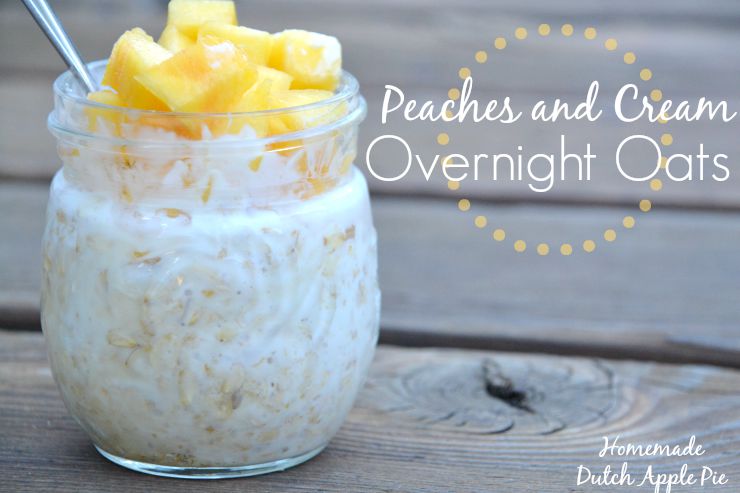
Peaches and cream overnight oats make a satisfying breakfast. Prepared in advance, they are a grab ‘n’ go breakfast everyone will love. Use fresh peaches in the summer and frozen or canned peaches in the winter.

Peaches and Cream Overnight Oats | Homemade Dutch Apple Pie

I try my best to do breakfast preparation in advance. In the morning I want everything ready to go.

When my husband is getting ready for work…breakfast is ready.

When one kid wakes up early and is instantly begging for food…breakfast is ready.

When the baby needs to nurse and everyone else is hungry…breakfast is ready.

Since we don’t eat store-bought cereal I need other quick and easy breakfasts that are ready for the family even if I’m busy.

Peaches and cream overnight oats are the perfect solution.

Peaches and Cream Overnight Oats | Homemade Dutch Apple Pie

Simple, simple, simple.

It only takes about five minutes to prepare overnight oats. I line up jars for however many servings I’m going to make. Then just add the ingredients to each jar and mix.

Peaches and cream overnight oats only contain five ingredients. All of them except for the peaches are pantry and refrigerator staples. So you can whip up a batch just about any time.

Give them a boost.

In addition the five base ingredients you can add collagen for protein and egg yolk for vitamins. This will make peaches and cream overnight oats a very balanced breakfast. That includes three components:

  1. Proteinyogurt, collagen, egg yolk
  2. Carbohydrates – oats, peaches, maple syrup
  3. Fat – whole milk yogurt or coconut yogurt

One other thing I love is that the overnight soaking makes the oats much better for you!

Peaches and Cream Overnight Oats | Homemade Dutch Apple Pie

Get ready to host.

These overnight oats are great for the whole family on a school day morning. But that’s not all.

Peaches and cream overnight oats are fancy enough for hosting overnight guests or a brunch. Mix up a bunch of small jars of the oats and leave the peaches on top. They look so elegant. Plus you can just pull them out of the fridge in the morning and have time to visit with your guests. No cooking necessary.

Change it up.

If you aren’t a fan of peaches in your yogurt or you just don’t have any on hand you can swap another fruit. Stone fruits like plums, apricots and nectarines work very well.

Or you can use berries and cherries. They can be fresh or go right from the freezer to the oat mixture. By morning they will be thawed and ready to go!

No matter what flavor you choose overnight oats are a perfect prep ahead breakfast. You can make them for a busy weekday morning or even make a batch while you enjoy some end of summer travel. All of the ingredients are available wherever you go.

On the go.

Peaches and cream overnight oats are also great for school lunches and snacks. Just mix it up the night before. Put a lid on and pack it in the lunch box. It is ready to go when your child is ready to eat.

By using gluten free oats this breakfast is not only delicious but also gluten, egg, nut, corn, soy and rice free. If you use coconut yogurt it is also dairy free. There is a version for just about everyone!

In need of an easy breakfast? Peaches and cream overnight oats are the way to go!

Peaches and Cream Overnight Oats | Homemade Dutch Apple Pie

Peaches and Cream Overnight Oats
Serves 2
Peaches and cream overnight oats make a satisfying breakfast. Prepared in advance with fresh peaches, they are a grab 'n' go breakfast everyone will love.
Write a review
Print
Ingredients
  1. 1 cup old fashioned oats (be sure to get gluten free oats if you are gluten free)
  2. 1 cup plain whole milk yogurt or coconut yogurt
  3. 4 Tbsp. maple syrup (adjust to your liking)
  4. 1/4 tsp. unrefined sea salt
  5. 1 large peach, peeled and cut up (over oats)
  6. optional - 2 tsp. collagen, 1 egg yolk
Instructions
  1. Divide the oats, yogurt, maple syrup and salt (and collagen and egg yolk if desired) between two small jars or dishes. Mix well.
  2. Cut up the peaches over the jars so the juice drips into the jars.
  3. Cover and refrigerate 7-24 hours.
  4. Stir in peaches when ready to eat.
Just Take A Bite https://justtakeabite.com/

In order for me to support my blogging activities, I may receive monetary compensation or other types of remuneration for my endorsement, recommendation, testimonial and/or link to any products or services from this blog.

Grain-free peach cobbler creamsicle

Grain-Free Peach Cobbler Creamsicles

Nothing says summer like fresh peaches! Enjoy them in a frozen treat with these simple grain-free peach cobbler creamsicles. Just a few whole-food ingredients and no refined sweeteners! Your kids will go crazy for this special summer dessert.

Looking for a delicious way to cool down in August? These grain-free peach cobbler creamsicles are made with just a few simple ingredients and kids love them! Put your extra peaches to good use with this fun summer treat. #peaches #summer #frozentreat #popsicle

If you want to know what summer tastes like all you have to do is bite into a fresh, juicy peach. There is nothing quite like it.

Peach cobbler creamsicles transform that summer flavor into a frozen treat you can’t resist.

Start with a simple grain free crumble that only has three ingredients! A quick mix by hand and it’s in the oven.

While the cobbler is baking you can mix up the rest of the creamsicle. Whole milk yogurt and raw milk are combined with pure maple syrup for a sweet, creamy base.

Then cut up fresh peaches right over the bowl so you don’t miss a drop of the juice. Stir them in to create peach cream.

Once the cobbler is done you can mix it into the creamy mixture, pour it into molds and freeze.

Looking for a delicious way to cool down in August? These grain-free peach cobbler creamsicles are made with just a few simple ingredients and kids love them! Put your extra peaches to good use with this fun summer treat. #peaches #frozentreat #summerfood #kidfood

How to Use up Extra Peaches

My kids went crazy for these peach cobbler creamsicles! In fact my husband did too.

I happened to make them when it as about 90 degrees here. Talk about a refreshing treat when it’s hot!

Peach cobbler creamsicles are very allergen friendly. You can swap coconut milk and yogurt for the dairy. They are naturally free of grains, gluten, eggs, nut, corn and soy.

If you can’t have or don’t have tapioca you can substitute for it with cassava or rice. Note that it will not be grain free if you use rice. But it will still be gluten free.

How to Feed Kids that Don’t Like Chunks

If your child doesn’t like food with chunks simply puree all of the ingredients before filling the molds. You’ll still get the peach cobbler flavor in a smooth form. Go with whatever texture works!

When I think of summer I envision sitting on the porch, soaking up the sunshine with peach juice dribbling down my chin (because there is no other way to eat a fresh peach!). Now that summer vision is kicked up a notch with peach cobbler creamsicles (you can let them dribble down your chin too).

Looking for a delicious way to cool down in August? These grain-free peach cobbler creamsicles are made with just a few simple ingredients and kids love them! Put your extra peaches to good use with this fun summer treat. #peaches #frozentreat #summerfood #kidfood

What is the Best Popsicle Shape

When it comes to popsicles I’m kind of old fashioned. I like to use cups and popsicles sticks instead of fancy molds (though these certainly would be a great gift!!!). It reminds me of how I made them as a child. These creamsicles work with whatever you’ve got.

You can use a traditional mold or even these silicon molds to make them more like push pops.

Peach cobbler creamsicles are so refreshing and bursting with flavor, yet full of healthy ingredients. That is an essential part of a great summer.

If you are celebrating a summer birthday these would also make a great birthday treat.

Are you a peach fan? What is your favorite peach treat?

Looking for a delicious way to cool down in August? These grain-free peach cobbler creamsicles are made with just a few simple ingredients and kids love them! Put your extra peaches to good use with this fun summer treat. #peaches #frozentreat #summerfood #kidfood

Grain Free Peach Cobbler Creamsicles
Yields 4
Nothing says summer like fresh peaches! Enjoy them in a frozen treat with these simple grain free peach cobbler creamsicles.
Write a review
Print
Cobbler
  1. 1/4 cup tapioca flour (or cassava or white rice)
  2. 2 tsp. butter (or lard or coconut oil)
  3. 2 tsp. pure maple syrup (or honey)
Creamsicle
  1. 3/4 cup plain whole milk yogurt or coconut yogurt
  2. 1/4 cup whole milk (raw if possible) or coconut milk
  3. 3-4 Tbsp. pure maple syrup (adjust to your liking)
  4. 1/8 tsp. unrefined sea salt
  5. 1 large peach, cut into small chunks, juice reserved
Instructions
  1. Heat the oven to 350*F. Line a baking sheet with parchment paper.
  2. In a bowl combine the flour, butter and syrup until crumbly.
  3. Spread on the parchment paper. Bake for 20 minutes.
  4. Allow to cool and crumble into small chunks.
  5. In a bowl combine the yogurt, milk, syrup and salt.
  6. Cut the peach over the bowl so the juice drips into the yogurt.
  7. Stir in the peaches.
  8. Stir in the cooled cobbler.
  9. Pour into popsicle molds and freeze until solid.
Just Take A Bite https://justtakeabite.com/

In order for me to support my blogging activities, I may receive monetary compensation or other types of remuneration for my endorsement, recommendation, testimonial and/or link to any products or services from this blog.

This post is linked to Savoring Saturdays.

Ice Cream Flavored Yogurt Gummies | Homemade Dutch Apple Pie

Ice Cream Flavored Yogurt Gummies: Super Healthy Kids Post

These fruit and yogurt gummies come in five ice cream flavors and make a perfect snack or cake decoration without any artificial ingredients.

Ice Cream Flavored  Yogurt Gummies | Homemade Dutch Apple Pie

A birthday is a time for celebration, fun and a few treats. Cake and ice cream is a classic birthday dessert that encompasses all of these.

But making a fun, colorful cake often involves lots of food coloring.

Food dyes should not be a part of any child’s diet.

They can cause hyperactivity and symptoms of ADD. Not to mention they are chemicals the human body is not meant to consume and can impair the immune system. This also puts a big strain on the liver.

That does not sound like much of a birthday treat in my opinion.

So what is the solution for making a healthy cake that is still colorful and fun? Yogurt gummies!

Ice Cream Flavored  Yogurt Gummies | Homemade Dutch Apple Pie

It only takes about ten minutes to get these yogurt gummies from the blender to the refrigerator. They are so quick and easy you can make all five flavors in one day.  Since the yogurt gummies last two weeks in the refrigerator you can prepare them in advance (one less thing to do at the last minute!).

Yogurt gummies also provide a lot of nutrition.

The whole milk yogurt has healthy fat and protein, while the grass-fed gelatin contains protein and helps aid digestion. The gummies are low in sugar too. What’s not to love?!

Dye free, colorful, flavorful, nutritious…are you anxious to make a batch of ice cream flavored yogurt gummies? Head over to Super Healthy Kids where I share how it’s done.

Ice Cream Flavored  Yogurt Gummies | Homemade Dutch Apple Pie

In order for me to support my blogging activities, I may receive monetary compensation or other types of remuneration for my endorsement, recommendation, testimonial and/or link to any products or services from this blog.

Black Forest Popsicles | Homemade Dutch Apple Pie

Black Forest Popsicles

The sweet flavor of fresh cherries is combined with a hint of chocolate in these black forest popsicles for a unique summer treat.Black Forest Popsicles | Homemade Dutch Apple Pie

The ice cream truck has driven by for the tenth time. The kids are begging for a treat. It’s been hot for days.

Enter super mom with black forest popsicles!

This is the perfect way to use some of your fresh cherries for a unique summer treat. Black forest popsicles are creamy, fruity and chocolaty!

What’s really great is that they only take a few minutes to prepare. The hard part is waiting for the popsicles to freeze!

Black Forest Popsicles | Homemade Dutch Apple Pie

Most of the popsicle is simply pureed cherries. A touch of honey can be added to boost the sweetness.

The real secret is the hint of chocolate.  Chocolate chips, carob chips or cacao nibs are blended right in for a burst of flavor. Leave little chunks of chocolate to get the full effect.

Sweet cherries, tart cherries or both work well in black forest popsicles. Simply adjust the amount of honey added depending on which variety you choose.

I like to use these silicon popsicles molds. They are easy to fill and easy for kids to use.

Black Forest Popsicles | Homemade Dutch Apple Pie

But what about that ice cream truck?

If your kids are like mine, they love to pretend. Mom can be the ice cream truck driver while the kids order their black forest popsicles and “pay” for their treat.

Everyone has fun. Everyone stays healthy.

Black forest popsicles do contain dairy. You can swap the yogurt for coconut yogurt, coconut milk or any other milk you tolerate. So they are a very allergen friendly snack.

Black Forest Popsicles | Homemade Dutch Apple Pie

We are blessed here in Michigan to be able to go cherry picking every summer. We pit and freeze a ton of cherries to use all year in smoothies and yogurt.

I also like to use fresh or frozen cherries for:

This year I’m saving some of our cherries for black forest popsicles. My kids go crazy for them. Yours will too!

Don’t forget mom and dad deserve a treat here and there too. Black forest popsicles are for everyone.

This summer be the hero of the day with black forest popsicles.

Black Forest Popsicles | Homemade Dutch Apple Pie

Black Forrest Popsicles
Yields 6
The sweet flavor of fresh cherries is combined with a hint of chocolate in these black forest popsicles for a unique, low sugar summer treat.
Write a review
Print
Prep Time
5 min
Prep Time
5 min
Ingredients
  1. 2 cups sweet or tart cherries, fresh or frozen
  2. 4 Tbsp. chocolate chips, carob chips or cacao nibs
  3. 2 Tbsp. honey (increase if using tart cherries, omit if you don't want them as sweet)
  4. 1 cup plain whole milk yogurt or milk or coconut yogurt, coconut milk, almond milk or rice milk
Instructions
  1. Blend the cherries, yogurt/milk and honey until smooth.
  2. Add the chocolate chips.
  3. Blend well, leaving small bits of chocolate.
  4. Pour into popsicle molds and freeze until firm.
Notes
  1. You can use 4 tsp. cocoa powder or carob powder + 2 Tbsp. cane sugar in place of the chocolate chips. You will get the chocolate flavor but will not have the chocolate bits.
  2. You can replace the cherries with raspberries.
Just Take A Bite https://justtakeabite.com/

In order for me to support my blogging activities, I may receive monetary compensation or other types of remuneration for my endorsement, recommendation, testimonial and/or link to any products or services from this blog.

Gluten Free Pizza Crackers | Homemade Dutch Apple Pie

Gluten Free Pizza Crackers: Super Healthy Kids Post

These gluten free pizza crackers make the perfect on-the-go snack or lunch addition that your kids will love without filling them up on empty calories. They are also very allergen friendly so you can share them with all of your friends.

Gluten Free Pizza Crackers | Homemade Dutch Apple Pie

Summer is in full swing! That means lots of time outside and outings to the park, the zoo, etc. Kids are bound to get hungry while you are out having fun.

Healthy, portable snacks are a must.

Gluten free pizza crackers are just what you need.

With lots of herbs and just a pinch of sugar these gluten free pizza crackers have the flavor of pizza without the mess.  You don’t even need cheese!

What you do need are a few simple ingredients, including vegetables. Pizza crackers have the “cheese” and sauce baked right in.

My kids raved about these gluten free pizza crackers. They are fun to serve alongside soup, with slices of raw cheese or dipped in hummus or pummus – perfect for a simple lunch or snack.

These crackers even smell like pizza!

Want to learn how to make a batch? Head over to Super Healthy Kids where I share my recipe for gluten free pizza crackers.Gluten Free Pizza Crackers | Homemade Dutch Apple Pie


This post is linked to Savoring Saturdays.

Simple Soaked Series: Gluten Free Crackers

These gluten free crackers are made with properly prepared soaked grains and are free of dairy, eggs, nuts and corn. They make the perfect snack whether at home or on the go.Simple Soaked Series: Crackers | Homemade Dutch Apple Pie

If there is one snack most kids love it’s crackers! But it’s pretty rare to find a store-bought cracker that is not made with vegetable oils. Not to mention the grains are not properly prepared.  Both of which create a recipe for disaster.

That means one thing – it’s time to make your own crackers!  Really, crackers are so easy to make. I’ve made them many times before.

But recently I made a soaked version so I can feel really good about giving them to my kids (and myself!). So I’m finishing my simple soaked series with a basic gluten free cracker recipe that can be used in so many ways.

These soaked gluten free crackers have great crunch and just the right balance of salt and sweetness.

Simple Soaked Series: Crackers | Homemade Dutch Apple Pie

The base recipe is a Wheat Thin® style cracker.  It is made with a variety of gluten free flours for a mild flavor (I used tapioca, amaranth and sorghum). Then a bit of salt and cane sugar balance each other to make the Wheat Thin® flavor.

You can also create a rye version using teff or more of a basic butter cracker.  Both of these will use a little less sugar than the Wheat Thin® version. Try adding some  herbs and spices for a more sophisticated cracker.

Soaked gluten free crackers come together so quickly. It takes about two minutes to get the flour soaking. Then another five minutes to mix the dough and five minutes to roll and cut the dough.

Less than fifteen minutes of hands on time and you’ve got delicious, nutritious homemade crackers that your kids will love. Even better – your kids can help make them! Get in the kitchen and make a delicious snack together.

Simple Soaked Series: Crackers | Homemade Dutch Apple Pie

If you really want to make them fun use small cookie cutters and create crackers in your child’s favorite shapes.  My kids love it when I make fish shaped crackers.

These make a great addition to school lunches with slices of raw cheese. Homemade gluten free crackers are also a perfect accompaniment to a bowl of soup for lunch.  My kids love to use them for dipping!

I also like to serve homemade crackers with hummus and salsa. Since my son can’t eat wheat, rice or corn it’s so nice for him to have something to use with dips. A pile of homemade crackers with a bowl of hummus makes him one happy boy.

Make a big batch of gluten free crackers and store them in the cupboard or freezer. You’ll have a healthy snack on hand that you know is good for your kids and is something they’ll love. Homemade crackers are also a perfect snack to keep in the diaper bag.

Have you  ever made your own crackers? Try this simple, properly prepared and allergen friendly version. It’ll be a hit with the whole family.

Simple Soaked Series: Crackers | Homemade Dutch Apple Pie

Simple Soaked Series: Gluten Free Crackers
Yields 50
A simple soaked cracker that is gluten, dairy, egg, nut and corn free.
Write a review
Print
Ingredients
  1. 2 cups any combination of gluten free flour (see notes for flavor combinations)
  2. 4 Tbsp. melted coconut oil or butter
  3. 6 Tbsp. warm water
  4. 1 tsp. lemon juice, whey, kefir or yogurt
  5. 1 1/2 tsp. unrefined sea salt
  6. 8 tsp. coconut sugar or cane sugar
  7. 3-6 Tbsp. water
Instructions
  1. Combine the flour, fat, warm water and lemon juice.
  2. Cover and let sit 7-24 hours.
  3. Heat oven to 350*F.
  4. Add the salt, sugar and 3 Tbsp. water to the soaked mixture.
  5. Mix and knead dough by hand until a ball forms. Add more water if needed.
  6. Split the dough into three equal parts.
  7. Cut four pieces of parchment paper (the size of a baking sheet).
  8. Place on piece of dough on one piece of parchment paper. Top with another sheet of parchment paper.
  9. Roll the dough between the paper until it is about 1/8" thick.
  10. Remove the top layer of paper.
  11. Cut into desired shapes with a pizza cutter or cookie cutters.
  12. Sprinkle extra salt on top of the dough if desired.
  13. Transfer the parchment paper to a baking sheet.
  14. Repeat with the remaining portions of dough.
  15. Bake the crackers for about 20 minutes, until golden.
  16. Turn off oven. Leave the crackers in the oven for 7-10 minutes, until crisp.
  17. Remove from oven and let cool completely.
  18. Store crackers in an airtight container at room temperature or in the freezer for long term storage.
Notes
  1. The base recipe creates a "Wheat Thin" style cracker with a slight sweetness.
  2. For a rye flavored cracker use 1/2 cup teff flour in your flour mixture. Reduce sugar to 4 tsp.
  3. For a butter cracker use at least 1 cup of "white" flour like rice or tapioca. Reduce sugar to 4 tsp.
  4. You can add herbs and seasonings like garlic powder to the dough for a variety of flavors.
  5. You can add 1/3 cup finely grated cheese to the dough to make cheese crackers.
Just Take A Bite https://justtakeabite.com/


In order for me to support my blogging activities, I may receive monetary compensation or other types of remuneration for my endorsement, recommendation, testimonial and/or link to any products or services from this blog.

Gluten Free Dairy Free Zucchini Crackers

Zucchini crackers are crispy, allergen-friendly and full of zucchini. They make the perfect snack at home or on the go.Gluten Free Dairy Free Zucchini Crackers || Homemade Dutch Apple PieAre you in need of a healthy snack or lunch box addition for school? Zucchini crackers are just the thing!

They are very allergen-friendly. Plus they add vegetables to your diet.

Even if your child is picky about vegetables this is a great option. You can’t tell there is zucchini in them! The flecks look like seasoning. If your child can’t handle the sight of green…use golden zucchini or summer squash! Still not convinced? Simply peel the zucchini before grating it.

The dough for these crackers comes together in minutes. You just dump all of the ingredients in a bowl and stir. It’s that simple.

My kids love munching on crackers, and I can feel good about it when the crackers are homemade and made with vegetables. No vegetable oils. No strange ingredients. Just the good stuff.

I also love that I can control the seasoning. The crackers can be very mild with just sea salt (for my oral sensory child). Or I can make them with various herbs and seasoning for lots of flavor.

The next time you need a healthy snack for your kids try some zucchini crackers. You’ll love them!Gluten Free Dairy Free Zucchini Crackers || Homemade Dutch Apple Pie

Gluten Free Dairy Free Zucchini Crackers
A crispy, allergen-friendly cracker filled with zucchini.
Write a review
Print
Ingredients
  1. 1 cup any combination of gluten free flour
  2. 1/2 cup grated zucchini (may be peeled)
  3. 1/2 tsp. sea salt
  4. 1/2 tsp. cane sugar
  5. 3 Tbsp. coconut oil or palm shortening, melted
  6. 3 Tbsp. water
  7. seasoning/extra salt to taste
Instructions
  1. Heat oven to 350*F. Cut two pieces of parchment paper the size of a baking sheet.
  2. Combine all of the ingredients in a bowl.
  3. Mix until well combined.
  4. Adjust seasoning to taste.
  5. Roll the dough between the pieces of parchment paper until 1/8" - 1/4" thin. Remove the top piece of parchment paper.
  6. Sprinkle salt and/or seasoning over the top of the dough.
  7. Cut the dough into squares.
  8. Transfer the dough (on the paper) to a baking sheet.
  9. Bake for 25 minutes.
  10. Turn off the oven. Leave the crackers in the oven for an additional 15 minutes.
  11. Remove from the oven and allow to cool/crisp.
  12. Store in an airtight container.
Notes
  1. It works best to use at least half white gluten free flour (white rice or tapioca).
  2. The crackers keep well in the freezer.
  3. One batch makes about 2 cups of crackers. You can double or triple the recipe for a larger batch.
Just Take A Bite https://justtakeabite.com/

In order for me to support my blogging activities, I may receive monetary compensation or other types of remuneration for my endorsement, recommendation, testimonial and/or link to any products or services from this blog. If you order by clicking on any of my Tropical Traditions links and have never ordered from Tropical Traditions in the past, you will receive a free book on Virgin Coconut Oil, and I will receive a discount coupon for referring you.

This post is linked to From The Archives Friday.

Gluten Free Dairy Free Chocolate Graham Crackers

Give your graham crackers a little flavor boost by making chocolate graham crackers. These are allergen friendly and so easy to make!Gluten Free Dairy Free Chocolate Graham Crackers || Homemade Dutch Apple PieI make graham crackers all the time. They make a great grab ‘n’ go snack. Plus I love that I control what goes in them so they are safe for my family.

Kick it up a notch.

Once in a while I make a real treat – chocolate graham crackers! I get asked about the recipe quite often. It’s finally time to post it.

This is a great treat to prepare before school starts. Then you’ve got something easy on hand to put in lunch boxes. You can even make a double batch and freeze half of it.

A great snack.

Chocolate graham crackers are great plain or spruced up a bit. Try spreading peanut butter on top for a fun snack. I love to eat them with a slice of cheese on top! Salty, sweet and chocolaty – that is the perfect combination.

why won't my child eat 728x90

Both kids and adults will love chocolate graham crackers. This is a variety that just about everyone can enjoy since they are gluten, dairy, nut and egg free.

Need a chocolate fix? Try a chocolate graham cracker.

Gluten Free Dairy Free Chocolate Graham Crackers || Homemade Dutch Apple Pie

Gluten Free Dairy Free Chocolate Graham Crackers
A gluten and dairy free cookie that is big on chocolate flavor.
Write a review
Print
Ingredients
  1. 1 1/2 cups any combination of gluten free flours (i.e. amaranth, sorghum, rice, tapioca)
  2. 1/2 cup organic cocoa powder
  3. 1/2 cup organic cane sugar
  4. 1/2 tsp. baking soda
  5. 1/2 tsp. sea salt
  6. 1/2 cup organic palm shortening and/or coconut oil (using at least some shortening works best)
  7. 6 Tbsp. honey
Instructions
  1. Heat the oven to 350*F. Cut three pieces of parchment paper the size of baking sheets.
  2. In a large bowl, cream the shortening/oil and sugar.
  3. Add the cocoa powder. Blend well (a hand mixer works well).
  4. Add the flour, baking soda, salt and honey. Blend well.
  5. Using a spoon or your hands, check if the dough is moist enough/holds together well. If the dough is still crumbly slowly add water, 1 Tbsp. at a time until dough will hold together when squeezed with your hand.
  6. Place 1/2 of the dough onto one of the pieces of parchment paper. Place another layer of parchment paper over top
  7. Roll the dough between the parchment paper until it is 1/4″ thick. Remove top paper.
  8. Using a pizza cutter or a knife, cut the dough into squares.
  9. Place the cookies (still on the parchment paper) onto a baking sheet.
  10. Repeat this process for the second half of the dough.
  11. Bake the cookies at 350 for about 15 minutes.
  12. After removing the cookies from the oven, run the pizza cutter/knife along the cut lines again.
  13. Allow the cookies to cool completely. They will crisp as they cool.
  14. Store in an air tight container in the cupboard or in the freezer for long term storage.
Just Take A Bite https://justtakeabite.com/

In order for me to support my blogging activities, I may receive monetary compensation or other types of remuneration for my endorsement, recommendation, testimonial and/or link to any products or services from this blog.
If you order by clicking on any of my Tropical Traditions links and have never ordered from Tropical Traditions in the past, you will receive a free book on Virgin Coconut Oil, and I will receive a discount coupon for referring you.

Honeyed-Dew

honeyed-dewI often serve some kind of fruit side dish with our dinner. I try to have variety or simply make fruit salads with whatever fruit we have on hand and is in season.

Recently as I was preparing dinner I was trying to think of what to do with the fruit we had on hand. My son is allergic to grapes and bananas. So those were out. That left honeydew.

We all enjoy honeydew plain. But I wanted to spruce it up a bit. So our honeydew became honeyed-dew.

The honeyed-dew only took about 30 seconds to prepare. It was so refreshing at dinner, and everyone liked it. My son kept sucking on the fruit like a popsicle.

You can make it in a bowl to serve to a group or put the honeydew on sucker or popsicle sticks for a cool treat kids will eat any time of day.

If you don’t have honeydew you can use a different type of melon. You could even use grapes or berries. No matter what fruit you choose this is a healthy, simple side dish or snack.honeyed-dew 2

Honeyed-Dew
A simple and refreshing side dish or fun treat for kids.
Write a review
Print
Ingredients
  1. 1 cup honeydew, cut into chunks
  2. 1 Tbsp. honey
  3. 1/4 tsp. sea salt (optional)
Instructions
  1. Place the honeydew in a bowl or on sticks.
  2. Drizzle with honey.
  3. Sprinkle with salt.
  4. Mix or spread over the fruit.
  5. Freeze the fruit for about 60 minutes.
  6. Stir before serving to make sure the syrup covers the fruit.
Notes
  1. This recipe can easily be doubled, tripled, etc. depending on how many you are serving.
  2. The "popsicles" can stay in the freezer for an easy snack.
Just Take A Bite https://justtakeabite.com/

Gluten Free Vanilla Wafers


Last week I needed to make a snack for my daughter that was comparable to “vanilla cookies.” So I came up with a gluten free vanilla wafer.

Both kids LOVE these. My husband and I do too!

These wafers are very easy to make. And one batch makes about 60 cookies. You can eat them plain. Or even put peanut butter or homemade frosting between two cookies for a real treat.


We tried chocolate frosting. My daughter said they were her “Oreos.”

If you need an easy treat that isn’t full of preservatives give these a try. Gluten free vanilla wafers are a great snack for any age at any time of day.

Gluten Free Vanilla Wafers
makes about 60 cookies

6 Tbsp. butter or palm shortening
1/3 cup organic cane sugar
1/3 cup organic brown cane sugar, sucanat or coconut sugar*
3/4 cups tapioca flour*
1/2 cup white rice flour* (or amaranth or sorghum flour)
1/4 tsp. sea salt*
1/2 tsp. baking powder
1 egg
1 tsp. vanilla

Heat oven to 325 degrees F.

Cream the butter and sugar. Add the egg and vanilla. Mix well. Add the flour, salt and baking powder. Stir with a spoon until combined.

Drop quarter-sized mounds onto parchment lined baking sheets. Bake 13-15 minutes. Turn off oven. Leave cookies in the oven to crisp for 10 – 20 minutes.

*These are affiliate links. It will not change the cost for you if you buy through the link, but I will get a small commission. It helps me earn a small amount to keep putting in the time and effort to do what I do 🙂