Home » how-to » Page 3

Tag: how-to

A Simple Cure For Picky Eaters | Just Take A Bite

A Simple Cure For Picky Eaters

Sometimes picky eating is a much deeper problem than it seems. But sometimes it’s not. Here is a simple cure for picky eaters…that aren’t really that picky.

A Simple Cure For Picky Eaters | Just Take A Bite

I wouldn’t call any of my kids picky eaters.

Wait a minute. Isn’t this whole site devoted to feeding children that struggle with eating? Yep! And I learned it all from my kids.

But none of them is picky.

To me a picky eater is a child that is truly just wanting to have some control and make his own decisions about his food.

A picky eater is not a child whose diet is limited to noodles and crackers. That is a much deeper problem related to the child’s health (be on the lookout for my book on how to deal with that soon!!)

My kids all have other root causes for their eating issues. When they are feeling good they are all wonderful eaters.

Today I’m talking about the kind of picky eating that is more a battle of wills than taste buds.

If your child is a picky eater there is a simple cure. Teach your child to cook!

I can’t tell you how many times my kids have practically inhaled a meal because they helped prepare it. They feel such a sense of accomplishment.

Great idea! But how exactly do I teach my kids to cook?

Katie at Kitchen Stewardship has put together an amazing course for both parents and children to teach kids of all ages to cook.

My kids and I have been previewing the course over the last couple months. Not only are my kids absolutely loving it and learning a lot, I’m learning too!

I’m learning basic skills I was never taught as a child. I’m learning how to teach my children and how to work with them in the kitchen.

So far my kids’ favorite part has been using knives (of course). You can preview the knife skills for free right now.

But there is SO much more to learn. My four year old is already starting to crack eggs. My seven year old is very anxious to try making a detailed recipe on her own. She actually made today’s breakfast (she even planned it) of strawberry parfaits.

Kids Cook Real Food is a way to get the whole family on board with healthier eating and put that picky eating to rest. Who knows, you may have a budding chef on your hands!

The course is open for enrollment this week.

Check out the free videos and get ready to end the picky eating by teaching your child to cook. It is a skill that will benefit both you and your kids for life.

Does your child have strong opinions about what she will or won’t eat?

A Simple Cure For Picky Eaters | Just Take A Bite

There really is a simple cure for picky eaters. Get them in the kitchen! If that doesn’t work. Come back and see me when my book is ready and we’ll talk more!

In order for me to support my blogging activities, I may receive monetary compensation or other types of remuneration for my endorsement, recommendation, testimonial and/or link to any products or services from this blog. It will not change the cost of any products or services for you.

Homemade Peppermint Candy | Just Take A Bite

Homemade Peppermint Candy

Surprise your kids this year with a unique Christmas treat. No HFCS or food dyes. Homemade peppermint candy is easy to make and allergen friendly!

Homemade Peppermint Candy | Just Take A Bite

You can’t have Christmas without a candy cane. Peppermint and Christmas go hand in hand.

One thing you can do without this time of year, though, is artificial flavor and color. The excitement and wonder of Christmas is plenty to make my kids extra hyper and excited. I don’t need junk food to do that.

Finding balance.

But I’m also not Scrooge. I do want my kids to enjoy special treats this time of year. Emotional well-being is just as important as physical well-being. That includes creating memories and indulging in festive goodies.

So rather than miss out on the traditional minty treats I created my own!

Homemade Peppermint Candy | Just Take A Bite

Homemade peppermint candy only takes about ten minutes to make and is ready to eat soon after.

Safe for those with allergies and oral SPD.

One of the great things about homemade candy is that you control the flavor.

My oldest has oral SPD. So she can’t handle much mint. Yet she loves mint flavored desserts! Just mildly flavored. And that is not something you can find in a store.

I go very light with my peppermint flavor. But you can make it as minty as you like. My candy was actually almost too minty for her. I could scale back the mint just a touch.

Homemade Peppermint Candy | Just Take A Bite

The other fun thing about homemade peppermint candy is being able to choose the shape. I did stars that look like snowflakes. Candy cane molds would be perfect for this time of year! Let the kids pick what shape they like.

Note that silicon works best for hard candy since you have to pour it into molds while very hot.

Great for the whole family.

Peppermint candy is the perfect treat for the whole family. I even let my toddler try some! Even though the candy is hard it dissolves easily and can be chewed. So I broke off a few small chunks for her to taste.

Normally I like to share recipes that kids can help make. But this one is definitely for adults since you are working with hot sugar.

Homemade Peppermint Candy | Just Take A Bite

But don’t let that stop you from getting your kids in the kitchen! It is so fun to watch the candy-making process. It makes a great science lesson. Plus demonstration is the first step in teaching your kids how to cook.

This year take small steps to make your holidays happy yet healthy. Homemade peppermint candy is ready in no time and can be made days or even weeks in advance.

Are you ready to create some great Christmas memories?

I hope they include the wonderful flavor of peppermint candy.

Be sure to come back tomorrow! I’ve got another unique holiday treat that utilizes these fun candies.

Homemade Peppermint Candy | Just Take A Bite

Homemade Peppermint Candy
Yields 10
A simple, allergen friendly mint candy.
Write a review
Print
Ingredients
  1. 1/2 cup organic cane sugar
  2. 3 Tbsp. water
  3. 1/2 tsp. peppermint extract
Instructions
  1. Mix the sugar and water in a saucepan.
  2. Bring to a boil over medium heat, stirring.
  3. Simmer until the temperature reaches 300*F (this will take about ten minutes, the mixture will start to get thick/syrupy)
  4. Remove from heat.
  5. Add the peppermint extract
  6. Immediately pour into candy molds and let set until firm.
  7. Store in a closed container in the refrigerator for up to two months. The candy can be stored at room temperature, but keeping it cool is best.
Notes
  1. You can adjust the peppermint flavor to your liking. Make a batch according to the recipe. Then make another batch with more or less extract to meet your tastes.
  2. The candy can be made with silicon molds, on parchment paper (just pour in rounds) or in one large chunk in a glass pan (then broken into pieces once cooled).
  3. This works for suckers as well.
Just Take A Bite https://justtakeabite.com/
This post is linked to Savoring Saturdays.

In order for me to support my blogging activities, I may receive monetary compensation or other types of remuneration for my endorsement, recommendation, testimonial and/or link to any products or services from this blog. It will not change the cost of any products or services for you.

Natural Remedies Review | Just Take A Bite

Stuffy Noses, Tangled Hair and Allergies: A Natural Remedies Review

When the cold or flu hits, when allergies flare or when kids can’t settle down don’t reach for a pill. Instead try some simple natural remedies.

Natural Remedies Review | Just Take A Bite

When it comes to natural remedies I am definitely a novice.

I know food backwards and forwards. But herbs, oils and spices? Salves and tinctures? Come again?

Keep it simple.

You can imagine my delight when I flipped through Natural Remedies for Kids and saw just how easy it is to make so many natural treatments at home!

And I really do mean easy. Because if they weren’t I would have just put the book back down.

Natural Remedies is so easy to follow and find what you need. The advice is practical and straight forward.

Easy tips.

There are common sense tips like braiding long hair to keep it from getting tangled at night. Yes, I used that one immediately on my daughter! Then there is no need for any detangler (though if you need one there is a recipe for it).

Natural Remedies Review | Just Take A Bite

Allergy treatments.

I have talked a lot about my daughter’s environmental allergies and struggles with clogged sinuses. Natural Remedies has an easy recipe for allergy syrup that is on my to-do list.

In the mean time we’re trying nettle tea. I had no idea it was so good for allergies.

There is really some kind of remedy for just about every common concern. It includes respiratory ailments, colds, flu, skin and hair issues, bumps and bruises and even emotional problems (like hyperactivity and anxiety).

Natural Remedies Review | Just Take A Bite

Start small.

I am slowly building my supply for my natural medicine cabinet, starting with some of the more common and cheaper ingredients (like turmeric and nettle leaf). I will gradually add on as I become more familiar with and more comfortable with natural remedies.

One of the things that I love so much about finally going down this path (aside from the fact that it was one of my goals for this year that had been going by the wayside) is that I can make things that are safe for my youngest. Pretty much all OTC medications (both conventional and natural/homeopathic) contain some form of palm or coconut.

Natural Remedies Review | Just Take A Bite

Save money.

You can still get Natural Remedies for Kids at a discount price right now. I’d snatch it up! This will be my go-to resource this winter.

And if you have a child like mine that is a sponge and loves to read anything and everything let them take a look and learn right along with you!

Natural Remedies for Kids is a resource that will benefit the entire family and help promote a natural lifestyle and overall health. If you are new to natural remedies or just looking to expand your knowledge this book is for you.

Natural Remedies Review | Just Take A Bite

I have been compensated for my time commitment to review this product. However, my opinions are entirely my own and I have not been paid to publish positive comments.

In order for me to support my blogging activities, I may receive monetary compensation or other types of remuneration for my endorsement, recommendation, testimonial and/or link to any products or services from this blog. It will not change the cost of any products or services for  you.

Pectin Free Concord Grape Jelly | Homemade Dutch Apple Pie

Pectin Free Concord Grape Jelly

Wondering what to do with your homemade grape juice? Make grape jelly of course! It is a classic kid favorite that is easy to make and perfect for your pb&j!

Pectin Free Concord Grape Jelly | Homemade Dutch Apple Pie

Growing up we ate one flavor of jelly.

Grape.

That’s it.

At home. Grape. In a restaurant. Grape. On toast. Grape. On a sandwich. Grape.

That was really all we knew and all we wanted.

No jelly here.

Want to know something? I have never bought grape jelly for my kids. Most grape jellies are filled with high fructose corn syrup. Not to mention the texture kind of grosses me out now.

But homemade grape jelly – that is a whole different story. Especially when it comes from juice you made yourself!

Pectin Free Concord Grape Jelly | Homemade Dutch Apple Pie

No pectin. No canning.

The unique thing about my grape jelly is that I skip the pectin and the canning.

Most pectin contains dextrose. That’s just sugar, right? Well, yes, sort of.

But it usually comes from corn. My son is allergic to corn. So I don’t use pectin.

Instead I use gelatin and then freeze the jelly. That turns this into such a simple task. It takes about five minutes to make a whole batch of jelly.

This was my own experiment with creating an easy and allergen friendly grape jelly.

Pectin Free Concord Grape Jelly | Homemade Dutch Apple Pie

No complaints.

The consensus from my family? Great! Everyone loves it. Even the adults that grew up with more traditional jelly (both homemade and store bought).

My kids rave about it and keep asking for it on their bread.

We have been enjoying it on toast and on sunbutter and jelly sandwiches. I personally love it on sourdough bread. The contrast between the sour and sweet is delicious.

Pectin Free Concord Grape Jelly | Homemade Dutch Apple Pie

No fears.

Are you intimidated by the idea of making your own grape jelly? Set those fears aside. This pectin free concord grape jelly is so easy!

Use your homemade grape juice or quality organic grape juice. Add some grass-fed gelatin and you’re minutes away from homemade grape jelly.

Your kids will love it, and you’ll feel good about what they’re eating. No more high fructose corn syrup, dextrose and citric acid for breakfast. Just whole, simple ingredients.

Once you get the freezer stocked with grape jelly grab some blueberry juice to make blueberry jelly! It’s another great addition to your morning eggs and toast.

Pectin Free Concord Grape Jelly | Homemade Dutch Apple Pie

Pectin Free Concord Grape Jelly
Yields 7
Homemade grape jelly that is free of pectin and high fructose corn syrup.
Write a review
Print
Ingredients
  1. 4 cups unsweetened concord grape juice
  2. 3 cups organic cane sugar
  3. 6 1/2 tsp. grass-fed gelatin
Instructions
  1. In a medium saucepan combine the juice and sugar. Whisk.
  2. Slowly pour in the gelatin and whisk.
  3. Let sit one minute.
  4. Turn on heat to medium/low.
  5. Slowly whisk until the mixture is warm and the sugar and gelatin are dissolved, about 5 minutes.
  6. Remove from heat.
  7. Fill half pint glass jars, leaving 1 inch of head space.
  8. Put a lid on the jars and refrigerate until fully gelled, at least 8 hours.
  9. Store in the refrigerator for up to 3 weeks or in the freezer for up to 1 year.
Notes
  1. You may need to adjust the sweetness depending on the sweetness of the juice and your taste.
  2. You can increase the gelatin to 8 Tbsp. and pour the whole batch into molds or a glass pan to make grape gummies.
Just Take A Bite https://justtakeabite.com/

In order for me to support my blogging activities, I may receive monetary compensation or other types of remuneration for my endorsement, recommendation, testimonial and/or link to any products or services from this blog. It will not change the cost of any products or services for you.

This post is linked to Savoring Saturdays.

In order for me to support my blogging activities, I may receive monetary compensation or other types of remuneration for my endorsement, recommendation, testimonial and/or link to any products or services from this blog. It will not change the cost of any products or services for you.

Homemade Grape Juice: From The Vine to Your Cup

When it comes to juice fresh is always best. Learn how to make  your own homemade grape juice starting with picking grapes and ending with sweet juice.

In order for me to support my blogging activities, I may receive monetary compensation or other types of remuneration for my endorsement, recommendation, testimonial and/or link to any products or services from this blog. It will not change the cost of any products or services for you.


Confession. I love grape juice. Love it.

I don’t drink it very often these days because I know most juice is just empty calories with no nutrition. Otherwise I would.

Once in a while I buy pure organic concord grape juice for making jello or gummies. But I can’t afford to buy that just to drink plain.

Homemade Grape Juice | Homemade Dutch Apple Pie

Free grapes.

A few weeks ago my mom called to tell me my grandpa said I could have his grapes. My grandma passed away earlier this year and my grandpa is now in hospice. So the grapes on their farm are just sitting there.

He thought I might be able to put them to good use.

He knows me well.

Homemade Grape Juice | Homemade Dutch Apple Pie

I made a trip to the farm with my two youngest, hoping to pick a bunch of grapes. Then I realized that picking grapes when everything is soaking wet and you have a toddler with grabby hands strapped to your chest is next to impossible.

At least I had a great helper! We did pick a few to get us started. But I had to send my husband and big kids back a few days later to finish the job.

My suggestions for picking grapes:

  1. Have two free hands.
  2. Use clippers.
  3. Be prepared to get messy.

Making juice.

Once we had the grapes at home I had to figure out what to do with them.

It turns out that making homemade grape juice is quite simple. You basically just wash, cook and strain. You may need to add sweetener if you want to drink the juice plain. It just depends how tart the grapes are.

Homemade Grape Juice | Homemade Dutch Apple Pie

It also turns out that the “hardest” part is just separating the good grapes from the bad ones.

It was fun to make my own grape juice for the first time. As I did it I couldn’t help but smile and think of my grandparents standing in the kitchen on their farm making juice together every year for decades.

I felt honored to carry on the tradition, and I think of them every time I drink our homemade grape juice. They are some of the most amazing people I know. And their farm has always been one of my favorite places.

Now we have some grape juice in the freezer for later (that I will try really hard to share with my family). Plus I used some to make grape jelly! I’ll be sharing that recipe tomorrow.

Have you ever tried making homemade grape juice? If you have access to fresh, concord grapes start picking! There is nothing quite like it.

Homemade Grape Juice | Homemade Dutch Apple Pie


Homemade Grape Juice: From the Vine to Your Cup
Fresh, homemade grape juice from concord grapes.
Write a review
Print
Ingredients
  1. Freshly picked concord grapes
  2. Organic cane sugar or honey
Tools
  1. Large stockpot
  2. Large fine mesh strainer
  3. Cheesecloth
Instructions
  1. Wash the grapes. Get rid of any bad or unripe grapes.
  2. Place the grapes in a large stockpot.
  3. Mash the grapes with a potato masher to get the juices flowing.
  4. Turn the heat on to high. Bring to a boil.
  5. Reduce heat and simmer the grapes for 10 - 15 minutes, mashing periodically while they cook.
  6. Turn off the heat.
  7. Strain the grapes/juice through a fine mesh strainer lined with cheesecloth over a large bowl.
  8. Allow the grapes to strain for a few hours or over night.
  9. Discard the grapes/skin/seeds.
  10. Strain the juice a second time through clean cheesecloth.
  11. If using the juice for drinking add sugar if the grapes are too sour. Stir and let the sugar dissolve.
  12. Store in the refrigerator for up to two weeks or in the freezer for up to a year.
Notes
  1. I used about 1/4 cup cane sugar per quart of juice for drinking.
Just Take A Bite https://justtakeabite.com/

In order for me to support my blogging activities, I may receive monetary compensation or other types of remuneration for my endorsement, recommendation, testimonial and/or link to any products or services from this blog. It will not change the cost of any products or services for you.

This post is linked to Savoring Saturdays.

Homemade lunch meat makes packing healthy lunch a breeze. Plus it's great for little ones too!

Homemade Lunch Meat

Lunch time just got easier and healthier with homemade lunch meat! It is perfect for school lunches or even for babies. Add it to your to-do list!!

Homemade lunch meat makes packing healthy lunch a breeze. Plus it's great for little ones too!

Warning.

You may want to cover your ears.

I’m going to use the dreaded L word – LUNCHES.

There. I said it.

As much as I don’t like to think about it, before we know it we’ll be packing school lunches again.

Homemade lunch meat makes packing healthy lunch a breeze. Plus it's great for little ones too!

You want to send your kids to school with nutritious food. But you also don’t want to make their lunches too different or “weird” (liver pate or sardines anyone?). Not to mention you don’t want to spend an hour making lunch.

Just the other day my seven year old asked why I never put “normal” sandwiches in her lunch like her friends have. She mentioned peanut butter and jelly and ham and cheese.


Need more ideas? Check out Katie’s healthy lunch box e-book!


I don’t send peanut products often because I don’t want to make the school an unsafe place for those with allergies.

The ham and cheese? Well, we just don’t have any lunch meat.

Until now.

Homemade lunch meat makes packing healthy lunch a breeze. Plus it's great for little ones too!

Did you know you can make your own lunch meat?

Homemade lunch meat is so easy to make. It literally takes five minutes of hands on time.

Want to learn how?

Head on over to Kitchen Stewardship where I share my simple homemade lunch meat recipe.

And don’t forget to check out the Healthy Lunch Box ebook!

Homemade lunch meat makes packing healthy lunch a breeze. Plus it's great for little ones too!

In need of a few more ideas for the lunch box? Try some of these:

Sweet potato salmon burgers

Teff and sorghum cherry bars

Gluten free pizza crackers

Strawberry apple salad

Fruit on the bottom  yogurt

Soaked gluten free bread (great for sandwiches with lunch meat!!)

Gluten free crackers

Quinoa bars

Salmon salad

In order for me to support my blogging activities, I may receive monetary compensation or other types of remuneration for my endorsement, recommendation, testimonial and/or link to any products or services from this blog.

Homemade Baking Powder {corn free}

Homemade Baking Powder {Corn Free} | Homemade Dutch Apple PieCorn is in just about everything these days.  I didn’t realize just how much food contains corn until my son was diagnosed with a corn allergy.

One thing I quickly realized is that there is corn in most baking powders. For someone that likes to bake that was a problem.

But I’ve been baking powder free before while doing the GAPS diet. Often the baking powder really isn’t necessary. But for baked goods that really need help with rise there is a solution – make your own!

This is a simple substitute for baking powder. I have two versions depending on whether or not you soak your baked good. Soaking gives natural rise, so you don’t need as much.

Cream of tartar works quite well for giving rise. I find it works best if you add it in the last step of your baking since it starts working immediately.

Cream of tartar comes from grapes. So if you have a grape allergy this is not for you (my son used to be allergic to grapes too!).  If that is the case you can also try using beaten egg whites.

If you enjoy baking but can’t have corn here is a simple baking powder replacement. 

Homemade Baking Powder
A replacement for baking powder for those that are corn free.
Write a review
Print
For use in soaked baked goods
  1. 1/2 tsp. baking soda
  2. 1 tsp. cream of tartar
For use in unsoaked baked goods
  1. 1/2 tsp. baking soda
  2. 2 tsp. cream of tartar
Instructions
  1. Combine the baking soda and cream of tartar.
  2. Add it to the batter and mix just before baking as the rising action will begin as soon as it gets wet.
Notes
  1. It is best to mix this fresh every time you bake instead of mixing a bunch in advance. It doesn't stay fresh pre-mixed.
  2. Soaking grains creates natural rise, so not as much rising agent is needed.
Just Take A Bite https://justtakeabite.com/

How To Dress a Salad In Twenty Seconds

How To Dress A Salad In Twenty SecondsAre you getting sick of salads yet? I’m not!  I could eat salad every single day all year round…if my tummy would let me.

I love how you can create something different every time you make a salad. I love to use all sorts of random leftovers to make salads.

But this is not a post on what to put in your salad. I’ll leave that up to you. This is about how to put dressing on your salad very quickly.

I don’t mean pour bottled dressing on. Even organic dressings are usually made with processed vegetable oils. This is how to dress a salad with healthy ingredients when you don’t have any dressing made. It takes longer to take the ingredients out than it does to dress the salad!

As a busy mom I love making salads for lunch. But I get sick of always making dressing when I want a salad or even making a batch of dressing every few days. I like lots of dressing so I seem to run out quickly, and my kids don’t like to give me much time to make myself food. This is how I dress my salad now. I used honey mustard dressing as an example since it’s my favorite. But this would work with others as well.

There is no need to pre-mix the dressing. Just add the ingredients to your salad and toss!  It’s so easy.

For honey mustard I squeeze on mustard, then honey, then extra virgin olive oil. Then I mix my salad as always. Easy. Healthy. And completely delicious!

How To Dress A Salad In Twenty Seconds Collage

The next time you are craving a salad and don’t have dressing on hand try this trick. For honey mustard simply add honey, mustard and olive oil. You can also add a splash of apple cider vinegar if you like. For ranch add sour cream, buttermilk and some seasoning. Are you an italian fan? Drizzle some olive oil, seasoning and a splash of vinegar on your salad.

The possibilities are endless. And you can have an assortment of salads all year that only take seconds to dress.

Gluten Free Homemade Peanut Butter “Cocoa Puff” Cereal (egg free, corn free, dairy free option)

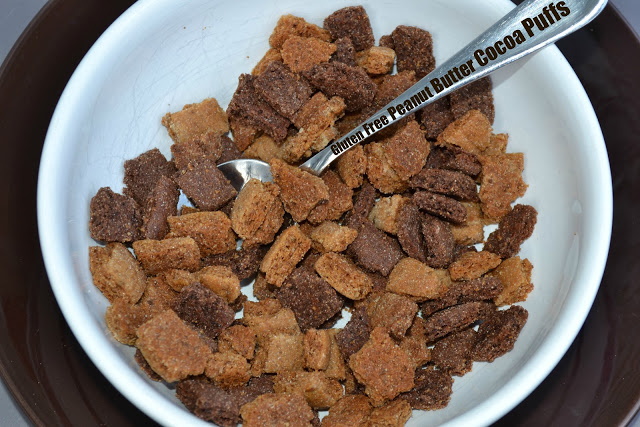
Baby stepping your way to real food? Swap out your store-bought cereal for this healthy version of peanut butter cocoa puffs. They are even gluten and egg free (with a diary free option)!

A little while back I made homemade cocoa puffs. They were a big hit! Then my daughter and I went gluten free. And I haven’t made the cocoa puffs since then.

Problem Solved

I decided to make a gluten free version…but add an extra element and make them into peanut butter puff cereal (any fans here of the “real” version of this?).

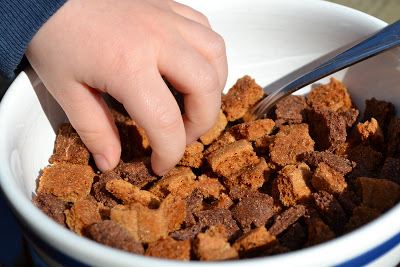
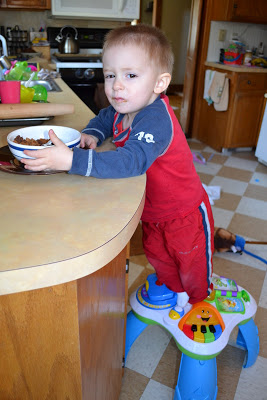
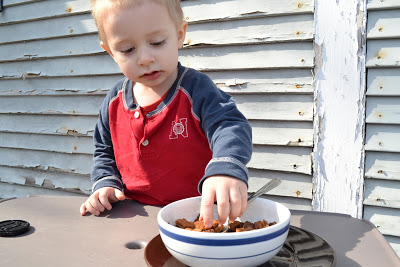
My inability to keep the kids away from the cereal means it turned out well. I could hardly even get a picture before they were digging in. And my son found whatever he could to reach the cereal on the counter and stuff his mouth full 🙂
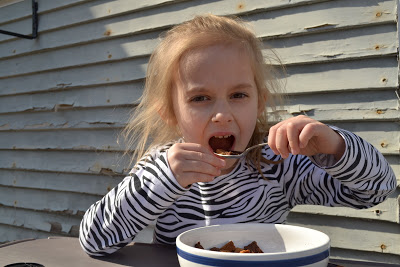
Kid Approved!

A mix of chocolate and peanut butter with a little sweetness and crunch. Both kids ate it plain after I made the cereal and then each had a bowl with milk for a bedtime snack. They really enjoyed drinking the chocolate peanut butter milk at the end.

We don’t buy cereal. My son will be 2 in a couple weeks and has no idea what cereal is. But they sure enjoyed this.

Easy and Healthy

This cereal is an easy breakfast on a busy morning. You get some protein from the peanut butter and milk (or milk substitute) and some carbohydrate to keep you going. It’s also a delicious treat any time of day. Or put some in a little container for young kids to munch on when you are out and about. A perfect finger food snack (with no preservatives or unhealthy oils!).

These puffs are also very allergen friendly. They are gluten free, egg free, corn free and soy free. The chocolate puffs are nut free and can easily be made dairy free. The peanut butter puffs are dairy free as well.

Try making a batch for your kids…or for yourself. You’ll be glad you did. It takes a little time to make two batches of dough/puffs. But it’s worth the effort. And if you aren’t fond of the combination you can just make one or the other. Plain chocolate is just like cocoa puffs. Or plain peanut butter puffs are great too.

Gluten Free Peanut Butter Cocoa Puffs
makes 10 cups

Chocolate Puffs

1 cup white rice flour
1/2 cup amaranth flour
1/4 cup tapioca flour
1/3 cup organic cocoa powder
1/2 cup organic cane sugar, sucanat or coconut sugar
1 tsp. baking soda
1/2 tsp. sea salt
1/4 cup honey
2 tsp. chocolate extract (optional)
1 tsp. vanilla extract
1/4 cup butter (can be replaced with coconut oil or palm shortening)
1/4 cup coconut oil

Heat oven to 350.
Melt butter and coconut oil in sauce pan. Set aside.
In a mixing bowl, stir together flour, cocoa, sugar, baking soda and salt. Add the liquids: honey, chocolate extract, vanilla, butter/oil. Stir well. Taste dough and adjust honey and chocolate extract to your liking. Mix until a nice ball of dough is formed. The dough should not be crumbly. If it is gradually add more honey.

Split the dough into 2 equal parts. Cut 3 pieces of parchment paper the size of a cookie sheet. Lay one piece on table. Put 1/2 of dough on the paper. Lay a 2nd piece of parchment on top of dough. Squish the dough down a little with your hand. Use a rolling pin to roll the dough between the parchment paper. Roll until the dough is about 1/4″ thick. Remove the top piece of parchment paper. Cut into very small squares (with pizza cutter). Place on a baking sheet (on the parchment paper…just move the whole thing onto the baking sheet). Repeat for other half of dough. (If you don’t care about appearance you can skip the cutting step and simply break the cookie into little chunks after it bakes.)

Bake for 12-13 minutes. Turn off oven, but leave cereal in to get crisp. Remove after about 5-7 minutes (if some of the puffs are burning remove the pan). Let cool completely. Separate squares.

Peanut Butter Puffs

1 cup white rice flour
1/2 cup amaranth flour
1/2 cup tapioca flour
1/2 cup organic cane sugar, sucanat or coconut sugar
1 tsp. baking soda
1/2 tsp. sea salt
1/3 cup peanut butter
1/3 cup coconut oil
5 Tbsp. honey
1 tsp. vanilla extract

Heat oven to 350.
Melt peanut butter and coconut oil in sauce pan. Set aside.
In a mixing bowl, stir together the flour, sugar, baking soda and salt. Add the liquids: honey, vanilla, peanut butter/oil. Stir well. Mix until a nice ball of dough is formed.The dough should not be crumbly. If it is gradually add more honey.

Split the dough into 2 equal parts. Cut 3 pieces of parchment paper the size of a cookie sheet. Lay one piece on table. Put 1/2 of dough on the paper. Lay a 2nd piece of parchment on top of dough. Squish the dough down a little with your hand. Use a rolling pin to roll the dough between the parchment paper. Roll until the dough is about 1/4″ thick. Remove the top piece of parchment paper. Cut into very small squares (with pizza cutter). Place on a baking sheet (on the parchment paper…just move the whole thing onto the baking sheet). Repeat for other half of dough. (If you don’t care about appearance you can skip the cutting step and simply break the cookie into little chunks after it bakes.)

Bake for 12-13 minutes. Turn off oven, but leave cereal in to get crisp. Remove after about 5-7 minutes (if some of the puffs are burning remove the pan). Let cool completely. Separate squares.

Combine the chocolate and peanut butter puffs in one container. Serve plain, with milk (or milk substitute) or mixed in yogurt. Store in an airtight container. You can freeze the cereal to make it last longer.