Home » Kid-friendly Recipes » breakfast » Page 16

Category: breakfast

Baked Apples

I’m always looking for new breakfast ideas. This week I came across Cara’s recipe for slow cooker baked apples.  It was just what I needed – grain and nut free and easy prep.

I was going to make them in the crockpot, but then I changed my  mind. Since I was only making a few I didn’t want to get my big crockpot dirty. So I just prepped them this morning and baked them in the oven.

So easy and so delicious! Justin said they were great. He had his topped with homemade vanilla yogurt.

I will definitely be making these again. Such a great idea for a healthy breakfast. I didn’t follow the recipe exactly since I was going from memory when I made it. It still turned out great.

The next time I make it I might modify things and just do a pan of sliced baked apples**. Then you don’t have to worry about the apples opening/the toppings falling out. And you can serve up as much or as little as you want. Plus I don’t have to worry about a picky eater complaining about apple peels 😛

Baked Apples

6 medium apples
¼ cup raisins
¼ cup honey (I also added a little organic cane sugar)
1 tsp. cinnamon
6 Tbsp. coconut oil, butter, or ghee (I forgot this…oops)
 
Core apples. To core, using an apple corer or paring knife, cut around the core (about ¼ inch from the stem all the way around) but leave about half an inch at the bottom. Use the knife to ‘drill out’ the core.
 
Divide raisins, honey, cinnamon, and coconut oil between the apples.
 
Place apples in a crock pot and add ½ inch of water. Cook on low overnight and enjoy a hot breakfast in the morning!
 
Alternatively, bake covered at 350 degrees in a glass dish for 45 minutes-1 hour in the morning.
 
**Next time I will try peeling and slicing the apples. Place them in a buttered baking dish. Sprinkle with cinnamon, honey and raisins. Cover and bake at 350 for 25 minutes.

Top with with cream, yogurt, coconut milk, or just eat plain.

Grain Free Pesto Topped Quiche…Or Egg Pizza

Eggs and pesto go very well together. I’ve made a pesto quiche before…one version that had pesto on the bottom and one that had it mixed in.

The problem is that the pesto usually kind of gets lost in the eggs. Sometimes you can’t even tell it’s there. So last night I decided to top our quiche with pesto.

I made a simple egg and cheese quiche. I let it bake until the top was just set. Then I topped it with pesto and extra cheese.

It worked very well. The pesto stayed on top and added great flavor.

Are you grain free and looking for a pizza substitute? Make the quiche thinner and this is like pesto pizza! You could even add extra toppings. Mushrooms, onions, peppers,…I may need to try this very soon.

The next time you make quiche, instead of mixing all of the meat and vegetables inside consider topping it. The possibilities are endless. (Plus picky eaters can pick off what they don’t like that way 🙂

This makes a great breakfast, brunch, lunch or dinner! And the leftovers are good warm or cold. Perfect for a quick weekday breakfast.

What is your favorite way to make quiche? What toppings would you add?

Pesto Topped Quiche

1/2 – 1 cup pesto (I blend peas, olive oil, salt and garlic powder for a simple allergen free pesto. You can add nuts and cheese and use basil or spinach for a more traditional pesto)
4 eggs + 5 egg yolks
1 cup milk or dairy kefir
salt, pepper and garlic powder to taste
1 cup shredded cheese (I used a combo of marble and parmesan)
1/4 cup shredded parmesan cheese

Grease a 9″ pie plate. Mix eggs, milk, seasoning and  1 cup shredded cheese. Pour into prepared pan.

Bake at 375 for 20 – 30 minutes, until top is set.

Spread pesto on quiche. Sprinkle parmesan cheese over top.

Bake another 25 – 35 minutes, until eggs are fully set.

Let set for 5 minutes before serving.

Breakfast Cups

A couple weeks ago I made a simple breakfast for dinner. I made egg cups and french toast cups. They came together very quickly, and we all enjoyed them. I even got them prepped mostly one handed since that’s about the only way to make dinner without running into the other room every five seconds to get Abram down from something he’s climbed on.

The basis of the recipe is putting bread in muffin cups. Then add whatever to it you want. I did eggs and cheese in some. I did eggs and maple syrup in some.

You could also use the bread in a muffin cup idea with things like sloppy joes or cheeseburger cups or pot pie. The bread is kind of the crust. Then be creative and go from there.

It’s fun to have individual servings, especially for kids. And it’s much faster than making a crust 🙂

These are great for a brunch or for a party. They are also a great prep ahead breakfast. Make them the night before or freeze a bunch and warm them when you need them.

Breakfast Cups

Mini quiche breakfast cups

3 slices whole wheat bread (or whatever bread you tolerate…gluten free, grain free, etc.)
5 eggs
1/2 cup milk
1/2 cup shredded cheese
salt and pepper to taste

Grease 6 cups of a muffin tin. Mix eggs, milk and seasoning. Place 1/4 slice of bread* in each muffin cup. Top with a little cheese. Evenly distrbute the eggs among the cups. Add another 1/4 slice of bread to each cup and push down so it absorbs the eggs. Top with extra cheese if desired. Bake at 350 for 25 – 30 minutes.

Mini french toast cups

3 slices whole wheat bread (or whatever bread you tolerate…gluten free, grain free, etc.)
6 eggs
1/2 cup milk
1/3 cup pure maple syrup
cinnamon (optional)

Grease 6 cups of a muffin tin. Mix eggs, milk and cinnamon. Place 1/4 slice of bread* in each muffin cup. Pour a little maple syrup on top. Repeat with another 1/4 slice of bread and syrup. Evenly distribute the eggs among the cups. Push bread down to be sure it all gets saturated with the eggs. Bake at 350 for 25 – 30 minutes.

*You can also do it with bread torn into chunks instead of keeping it as slices. This works espically well for french toast.

Whole Wheat Cinnamon Rolls

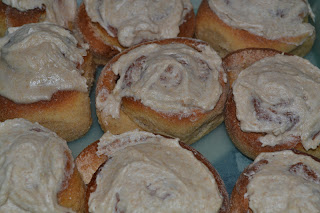
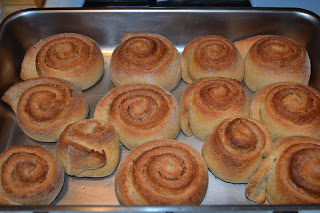
I’ve been wanting to make a batch of cinnamon rolls for some time now. I haven’t made any in years. I finally made some over the weekend. The recipe is from my MIL.

I made a few modifications to meet our standards of healthy. They turned out great!! Rebecca declared them the “best breakfast I’ve ever had.” You can’t beat that.

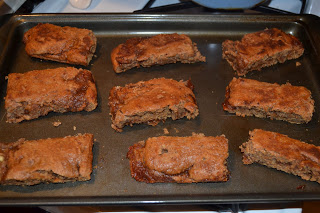
This is really two recipes – a basic sweet roll dough and the actual cinnamon roll. I prepped the dough Friday night, then made the cinnamon rolls Saturday morning. It worked out well.

I made my own version of frosting to top them. Delicious!

This post is linked to Fat Tuesday and Real Food Wednesday.

Whole Wheat Cinnamon Rolls

Sweet Roll Dough

2 1/4 tsp. active dry yeast
1/4 cup warm water
1/4 cup lukewarm milk
1/4 cup cane sugar
1/4 cup palm shortening
1/2 tsp. salt
1 egg
2 1/2 cups white whole wheat flour

Cinnamon Rolls

Sweet roll dough
2 Tbsp. butter, softened (room temp)
1/3 cup cane sugar
2 tsp. cinnamon

Frosting

1/4 cup palm shortening
1/4 cup white whole wheat flour (finely ground)
1/4 cup maple syrup

———————————
Dissolve the yeast in the warm water in a stand mixer bowl (or a large bowl if doing it by hand). Mix in milk, sugar, salt, egg, shortening and 1 1/2 cups of flour. Mix until smooth. Mix in remaining flour until a soft dough forms (add extra flour if it’s too wet). Knead by hand or with dough hook for about 5 minutes. Pour a small amount of oil on the dough and turn to coat.

At this point you can cover and refrigerate the dough for 3-4 days. Or you can use it immediately.

When you are ready to make the cinnamon rolls let the dough rise until double in size, about 2 hours (it could take longer if it was in the refrigerator…it has to come to room temp before it will rise).

Roll the dough into a 9×15 rectangle. Spread with the softened butter. Sprinkle mixture of sugar and cinnamon over top. Roll up the dough starting with the long side (so it is 15″ long). Pinch the edge of the dough to seal it.

Cut the roll into 15 equal slices.

Place slices flat side up in a greased 9×13 pan, leaving a little space between them. Let the rolls rise again until double (about 45 minutes).

Bake at 375 for 25 minutes.

Allow to cool slightly.

While the cinnamon rolls are baking mix the shortening, flour and syrup to make the frosting.

When the cinnamon rolls are slightly cooled add the frosting on top. Serve immediately.

The cinnamon rolls can be frozen before or after frosting them.

Soaked Breakfast Bar ("Cereal" Bar)

I’ve been doing lots of baking and experimenting this week. Today I came up with a soaked breakfast bar recipe. When I made a batch of soaked graham crackers earlier in the week I realized that the dough was pretty good before dehydrating it. It was soft and chewy. The best part? My 14 month old could eat it easily…and loved it!

I set aside a couple of the graham crackers to eat as-is instead of drying them. They reminded me of cereal bars. Lightbulb…use the same dough to make homemade breakfast bars!

I used my soaked graham cracker recipe. I put half of the dough in the bottom of a 9×13 pan, baked it a little, then topped it with homemade apple butter and the rest of the dough. I baked it again and cut it into bars.

The verdict? Delicious!! A soft, chewy apple cinnamon breakfast bar. The grains are soaked, there are no vegetable oils, there is nothing processed. I feel good about giving these “cereal” bars to my whole family.

You can make them any flavor, depending on what kind of jam/butter you use. Or you can just make them plain bars without a filling. Either way they taste great. And they work really well for young children that are still learning how to chew. You can get really creative and fill them with things like nut butter, coconut, nuts, dried fruit or chocolate chips.

This is an easy grab-and-go breakfast. Make a batch. Freeze them. And you’ve got some on hand whenever you need something quick.

This post is linked to Fat Tuesday and Real Food Wednesday and Fresh Bites Friday.

Soaked Breakfast Bar

2 cups whole wheat flour
1 cup kefir, yogurt or buttermilk
1/2 cup coconut oil or butter, melted (I used coconut oil)
1/2 cup rapadura/cane sugar
1 tsp. cinnamon
1 tsp. baking powder
1/2 tsp. baking soda
1/2 tsp. salt
6 Tbsp. honey

1/3 – 1/2 cup jelly, jam or fruit butter

Mix flour, cultured dairy and oil. Cover and let soak 7 – 24 hours.

Mix in remaining dough ingredients until well combined. Spread half of the dough into the bottom of a greased 9×13 pan. Bake at 350 for 10 minutes.

Remove from oven. Spread an even layer of jam on top of dough. Spread remaining dough on top. Bake at 350 for another 25 minutes.

Cut into bars. Place bars on a separate baking sheet, with space in between bars. Bake another 5-10 minutes, until dough is baked through. Allow to cool.

Blueberry Bread Pudding

Last night I tried a new bread pudding recipe that I got from our local newspaper. It was submitted by Sharon Heethuis. It’s called Over the Top Blueberry Bread Pudding. If you make it exactly according to the recipe it would be quite over the top with a white chocolate sauce to pour over top! I scaled it back a little (no sauce, less chocolate). But it was still so good  (then again I’ve never met a bread pudding I didn’t like :P)! The main thing that makes it a bit more over the top is adding white chocolate chips. I know they aren’t healthy. But I did add a few. Blueberries are in season right now, so it’s the perfect time to make this. We all enjoyed it. I would definitely make it again. It would be great with some peaches added as well. Blueberries and peaches always go well together. You can absolutely make it without the chocolate chips…it just won’t be so over the top 🙂

I only made a half recipe. I’ll post the full recipe, with some healthier substitutes. You can make it gluten free by using gluten free bread. You could even try making it grain free using a nut butter, almond flour or coconut flour bread.

This makes a great breakfast, brunch, snack or dessert! I served it with scrambled eggs for dinner.

The pictures don’t really do it justice. I had to bake it in the toaster oven, so the top got a little dark.

Over The Top Blueberry Bread Pudding

3 eggs
4 cups cream (I used a combo of raw cream and milk)
1 cup cane sugar/sucanat (maple syrup or honey would probably work as well)
3 tsp. vanilla
2 cups fresh or frozen blueberries
1 (12 oz.) package of white chocolate chips (you can omit this or use less)
1 loaf bread, cut into 1″ cubes (use whatever bread you like…we used fermented wheat bread. This is a great job for little kids…Rebecca loves to rip up all the bread)

Sauce:
1 (12 oz.) pkg. white chocolate chips
1 cup cream

In a large bowl combine the eggs, cream, sugar and vanilla. Stir in blueberries and chips. Stir in bread. Let stand for 15 minutes. Pour into a greased 9×13 pan. Bake at 350 degrees for 50-60 minutes. Let stand 5-10 minutes before serving.

For the sauce, place chocolate chips in a small bowl. Heat the cream in saucepan just to a boil. Pour over the chocolate. Whisk until smooth. Serve with bread pudding.

You can add coconut and pineapple for variation. Drain pineapple before adding.

Strawberry Banana Ice Cream Sandwiches

It’s summer…and it’s HOT. It might even be in the 100s today. It hasn’t been that hot in Michigan in a long time. When it’s hot the best thing to eat is ice cream 🙂  And sometimes it’s nice to have an ice cream treat…that isn’t filled with chemicals and vegetable oils. Yesterday Rebecca and I created a homemade ice cream sandwich. I used my basic vanilla cookie recipe and created a banana cookie. This cookie is ideal because it stays very soft. It’s even easy to eat when frozen. And it just so happens that we made a big batch of strawberry ice cream on Tuesday. Put them together and you’ve got a unique, healthy ice cream treat that you won’t find in any box.

The ice cream sandwiches turned out great! Rebecca scarfed one down for snack last night. I would even feel good about serving them for breakfast 🙂  They are perfect for adults, kids and even the littlest in the family. Abram (13m) loves homemade ice cream and really enjoyed these cookies as well. They are soft enough that he can easily chew them. This is just one variation of many I hope to try!

I also cut open a cookie and put peanut butter on it like a sandwich as part of Rebecca’s lunch yesterday. She really enjoyed it.

This post is linked to Fat Tuesday, Real Food Wednesday, Fight Back Friday and Fresh Bites Friday.

Strawberry Banana Ice Cream Sandwiches

Cookie:

1 cup whole wheat flour
3/8 cup rapadura
2 Tbsp. honey
1/2 cup mashed ripe banana
1 egg
1/4 tsp. baking soda
1/4 tsp. salt
1/2 tsp. vanilla
1/2 tsp. cinnamon (optional)

Ice Cream:

1 cup strawberries
2 1/2 cups cream
1/2 cup maple syrup or honey (or a combination)
1 tsp. vanilla
3 egg yolks

————————————————
Prepare the ice cream:

Blend all ingredients together. Process in ice cream maker (mine takes about 20 minutes in my Kitchen Aid attachment). Store in container in freezer.

Prepare the cookies:

Heat oven to 425. Stir all ingredients together. Drop by spoonful (big scoops if you want big ice cream sandwiches) onto baking sheet. Bake 8 minutes. Let cool completely.

Assemble sandwiches:

Let ice cream soften slightly. Cut open a cookie*. Place a scoop of ice cream on the bottom half. Top with other half of cookie. Place on a wax paper lined baking sheet. Repeat for remaining cookies. Place in freezer. Once ice cream is solid wrap each sandwich individually in plastc wrap, wax paper or parchment paper.

*If you want really big ice cream sandwiches you can do a full cookie on bottom and top. You can also make smaller cookies for mini ice cream sandwiches that are perfect for kids or a small treat for adults.

Ice cream sandwich variations:

Chocolate cookies (omit banana, reduce flour to 3/4 cups, add 3 Tbsp. cocoa and 1/8 cup milk) with peanut butter, chocolate, mint , cookie dough or vanilla ice cream.

Vanilla cookies with chocolate, vanilla, caramel, cookie dough or strawberry ice cream.

Cinnamon cookies with vanilla or pumpkin ice cream.

Banana cookies with chocolate or peanut butter ice cream.

Strawberry Cream Pops

Rebecca and I spotted a delicous looking recipe in my Kiwi magazine this week. It sounded so easy that we decided to make it right away. It only has a few ingredients. It is so simple and so good!! Strawberry cream pops are a healthy, delicious treat. I gave one to Rebecca for breakfast yesterday! I always have homemade yogurt on hand. Strawberries are in season (and we have a ton that we just picked). And I happened to make a fresh batch of graham crackers this week. So it was the perfect time to try this recipe. I used a little bit of maple syrup and vanilla to flavor the yogurt. I also scaled back the recipe to just make four. These really are very good. It’s kind of like strawberry cheesecake in a popsicle.

I am so excited now for blueberries to be available in a few weeks…bring on the blueberry cheesecake pops!!! I plan to make a batch with soaked graham crackers and maybe a little raw sour cream mixed in. I think I’ll be having some popsicles for breakfast soon 🙂

This post is linked to Fight Back Friday and Fresh Bites Friday and Real Food Wednesdays.

Strawberry Cream Pops

1 1/2 cups vanilla yogurt (I used homemade full fat yogurt w/ maple syrup and vanilla extract)
3/4 cups fresh or frozen strawberries hulled
3/4 cups crushed graham crackers (preferably homemade…even better use soaked)

Crush graham crackers into pea size pieces (I did this by pulsing them in the food processor a few times).

Combine yogurt and strawberries in a food processor. Process until strawberries break down and mixture turns light pink.

Pour yogurt mixture over graham crackers and mix.

Pour the mixture into 10 popsicle molds and freeze until solid.

Ham and Peas Casserole

I subscribed to Every Day with Rachael Ray a while back…like years ago. I would often rip out recipes that looked good. I had a big pile of things I was going to try making…at some point. Well, last week I found that pile of recipes. I went through it and got rid of all but two of them 😛  I saved the two that I thought I would actually make and put them on the menu this week. I tried the first one last night. It’s a simple casserole. And it’s delicious!! Ham and peas casserole is like cornbread mixed into quiche. It almost reminds me of the flavor of creamed corn with the subtle sweetness from the cornbread. We all really enjoyed this casserole. It’s great for breakfast, lunch or dinner. And the leftovers are great too (I had a delicious breakfast today :). Plus it’s very easy to make (as long as you have ham and cornbread on hand…which we actually did this week!).

I didn’t actually measure anything. I just used 2 leftover corn muffins and about a half cup of ham we had left from Sunday’s dinner. I also used more eggs than the recipe called for. And in typical RR recipe fashion I had to modify the cooking time/temp. If I had cooked it at 350 for 40 minutes we would have been eating ham and pea soup for dinner 😛  I baked mine at 400 for about an hour. I’ll post the original recipe with a few of my mods. Overall this was a great recipe. I plan to make it again.

Ham and Peas Casserole

1 1/2 cups ham, cut into small pieces
7 oz. cornbread, cut into small cubes (about 2 cups)
1 cup frozen peas, thawed (I used more than this)
1 tsp. chopped fresh thyme (I used dried)
2 cups whole milk
3 eggs plus one yolk, lightly beaten (I used 3 whole eggs and 3 yolks)
salt

Heat oven to 350 (I baked mine at 400).

Butter a 9″ casserole dish. In a bowl toss the ham, cornbread, peas and thyme. Transfer to the baking dish.

In the same bowl combine the milk, eggs and salt. Pour into baking dish. Let stand 15 minutes.

Bake until the custard is just set in the center, 40-45 minutes (I baked mine for 1 hour).

Let stand 10 minutes before serving.

Apple Honey Crunch – Three Ways

Rebecca has been helping me in the kitchen since before she was one. Now that she is four she is becoming quite a little chef! Rebecca often plays cooking and will come up with all kinds of meals/recipes/goodies. She actually has some really good ideas! When she does we try to make them. This week while she was playing she was making “apple honey crunch.” We brainstormed about how to make it…and gave it a try. We came up with three versions. They were all very simple to make and tasted great. One is kind of like a baked apple/apple dumpling. One is like apple cobbler. And one is like a brittle. They each only use a few ingredients and are very kid friendly. We just did small versions of each. They are great for individual servings. Or you can make them in larger quantities. Want to have some fun in the kitchen with your kids? Try Rebecca’s apple honey crunch recipes 🙂  Two of them are even grain free/gluten free/GAPS legal.

This post is linked to Fat Tuesday at Real Food Forager.

Apple Honey Crunch (dumpling style)
1 apple
1/8 cup chopped crispy nuts (we used pecans and walnuts)
1 Tbsp. honey

Peel and core apple. Place the apple in a small, buttered glass/oven safe dish (I used my small pyrex dishes). Sprinkle half of the nuts into the center of the apple. Pour honey into hole. Top with remaining nuts. You can add an extra little drizzle of honey over the apple if you like. Place another bowl over the apple (inverted) as a lid. Bake at 375 for 40 minutes (until the apple is soft). Let cool. Enjoy!

Apple Honey Crunch (cobbler style)

1 apple
1/8 cup chopped crispy nuts (we used pecans and walnuts)
2 Tbsp. honey
1/4 cup ground oats (or whole oats or whole wheat flour)
2 Tbsp. softened butter
1/2 tsp. cinnamon

Peel and chop apple. Sprinkle a few of the nuts in the bottom of a small, buttered glass/oven safe dish (I used my small pyrex dishes). Put apple chunks on top. Sprinkle on cinnamon.

Mix oats, butter and honey. Sprinkle over apples. (lick bowl 🙂

Bake at 375 for 35 minutes – until the top is golden and crunchy.

Apple Honey Crunch (brittle or ice cream topping)
*This didn’t get quite as solid as I would have liked. Some parts stayed a bit soft. But it was still very good. We will experiment with it to get it just right. As is it would make an awesome topping for ice cream (if you just chill it instead of freeze it).

1 apple
1/4 cup crispy nuts (broken into large pieces) (we used pecans and walnuts)
1/4 cup coconut oil
1/4 cup honey

Peel and chop apple. Cook the apple in coconut oil in small pan. When apple is tender stir in honey. Cook about 2 minutes. Remove from heat. Stir in nuts.*  Pour onto a parchment lined baking sheet. Place in freezer until solid. Break into chunks. Store in the freezer to remain solid.

*You can also pour this into a glass container and allow to cool (on the counter or in the fridge) and use it as a topping for ice cream, pancakes or waffles or as a mix in for yogurt.