Home » Kid-friendly Recipes » breakfast » Page 15

Category: breakfast

Lemon Poppy Seed Muffins

Last week I got a request from a friend for a lemon poppy seed muffin recipe. I’ve never made anything lemon poppy seed. Truth be told I’ve probably only tasted something lemon poppy seed once or twice in my life.

I’ve just never been a big fan of lemon flavored baked goods – bars, pies, muffins, cakes, anything.

At first I was just going to redirect my friend to another blog/recipe. But I quickly realized that none of the food blogs I read had lemon poppy seed recipes either!

So I had to come up with my own.

I did a little recipe searching and experimenting. Here is what I came up with. Moist. Slightly sweet. Lots of lemon flavor.

A real food recipe for lemon poppy seed muffins. I would actually eat these! Especially warm from the oven with lots of real butter.

Lemon Poppy Seed Muffins
makes 12 – 18 muffins

1/2 cup butter, room temperature
1 cup organic cane sugar
2 eggs
2 cups organic whole wheat or all purpose flour (or a combination)
1 tsp. baking powder
1/2 tsp. baking soda
1/2 tsp. salt
1 Tbsp. poppy seeds
6 Tbsp. lemon juice
1/2 cup milk
1/3 cup plain yogurt

Cream butter and sugar. Add eggs. Mix well. Add 1 cup flour, baking powder, baking soda and salt. Mix. Add milk + lemon juice. Mix. Add remaining 1 cup flour and poppy seeds. Mix. Add yogurt. Mix.

Fill paper lined muffin cups 3/4 full. Bake at 375 degrees for 25 – 30 minutes.

Quinoa Mac ‘n’ Cheese

We tried yet another new recipe for dinner last night. Quinoa Mac ‘n’ Cheese. This recipe comes from Tasty Kitchen.

The original recipe has spinach in it. I just used the concept of replacing noodles with quinoa and then made it the way I normally make macaroni and cheese.

This was quite good. It was a unique way to get my family to eat quinoa. So far they are not big fans (I really enjoy it myself…but the rest not so much). But Justin and Rebecca both finished their helpings. Since they normally only tolerate a few bites of quinoa I consider it a success :).

You could easily add any chopped, cooked vegetables to this dish. Or even add bacon or ham. That would make it even better!

I’ll post the recipe the way I made it. Very simple. And a nice change from the traditional macaroni and cheese. It’s also a great way to make a gluten free version of a classic dish. If you like your mac ‘n’ cheese to really hold together well you can mix in a couple of beaten eggs before pouring it into the pan.

This can be prepared in advance and then simply baked right before dinner. Or you can skip the topping/baking and serve it right out of the pan. This would also make a great, warming breakfast!

Quinoa “Macaroni” and Cheese
serves 3 – 4

1/2 cup dry quinoa (makes about 1 1/2 cups cooked quinoa)
1 cup water
1 tsp. evoo
1/2 tsp. sea salt

2 Tbsp. butter
2 Tbsp. flour
1 1/2 cups milk
1 – 2 cups grated cheese (depends how cheesy you like it. Any varieties will do. I used mozzarella, cheddar and parmesan.)
salt and garlic powder to taste

1/2 cup seasoned bread crumbs (optional – use gluten free or omit to keep it gluten free)
1/4 cup grated cheese (I used the same cheese mix as was in the casserole)

Rinse quinoa in a small mesh strainer for 1-2 minutes to remove bitter coating.

Toast quinoa in hot oil in a small saucepan for 1-2 minutes. Add water. Bring to a boil. Add salt. Cover. Reduce heat and simmer 15 minutes. Remove from heat. Let set covered 5 minutes. Pour quinoa into a bowl.

In the mean time melt butter in a saucepan. Add flour and mix. Cook for 1-2 minutes, stirring constantly.

Add milk very gradually, a couple Tbsp. at a time at first. Stir after each addition to incorporate into the butter/flour mixture. Add remaining milk. Bring to a boil. Reduce heat and add cheese. Stir until the cheese is melted. Season to taste.

Pour cheese sauce over quinoa and mix. Add extra seasoning if necessary. Add eggs if desired.

Pour into a greased casserole dish.

Sprinkle breadcrumbs and cheese over top.

Bake at 400 degrees for 25 – 30 minutes, until cheese on top is melted and golden. Let set for 5 minutes before serving.

Homemade Oat Squares

Earlier this week we had a long snowy day with nothing to do. And as usual Abram was begging to bake. So I brainstormed what new recipe we could try.

I was thinking a new cereal. I looked up the ingredients for Cheerios. There really isn’t much to them. So we tried to make something similar – taste and texture. I have no idea how you’d copy the shape 😛

It took about 3 minutes to mix the dough. And it tasted really good. Abram actually ate a bunch of it…and he NEVER eats the stuff we bake (either the dough or after it’s baked). He just doesn’t have a sweet tooth.

The end result? NOT Cheerios 😛  But to my surprise they taste and look a lot like Quaker Oat Squares. This used to be one of my favorite cereals. They are very easy to make.

They did end up a bit harder than I’d like. Maybe next time I’ll add some baking soda to help soften them just a bit. Otherwise these are actually really good. And they make a great portable snack.

Three ingredients is all you need to recreate a delicious cereal. Simple. As an added bonus they are dairy, gluten (if you tolerate oats), egg, nut, soy and corn free.

Homemade Oat Squares
makes about 2 cups

2 cups rolled oats
1/2 cup organic cane sugar
1/2 cup water
——————————————————————————————————–
1/2 tsp. baking soda
1/4 tsp. salt
(I have not tried it with these added yet, but I think it would improve the texture a bit.)
——————————————————————————————————–

Create oat flour by processing oats in a blender.

Mix oat flour, sugar and water until dough forms.

Using a scoop at a time, roll the dough into a small log. Cut into “squares.”

Place on a parchment lined baking sheet.

Bake at 350 for 15 minutes. Turn off oven. Leave the cereal in the oven to crisp for another 5-10 minutes.

Remove from oven. Let cool completely. Store in an airtight container.

Homemade Cocoa Puffs

Cereal. It’s one of the foods we gave up when we switched to a Real food diet. But I think it’s one of the foods my husband misses the most. And once in a while I do too. I used to be a cereal junky (seriously…I HAD to have it for breakfast every single day for about 10 years).

I’ve made soaked cereal (which I think tastes like Wheaties), granola and homemade golden grahams/cinnamon toast crunch. Yesterday I decided to try cocoa puffs.

I never liked cocoa puffs. So it’s not something I was missing. But my husband liked them. Especially for a bedtime snack.

The kids and I made a batch yesterday. They turned out pretty well. Little crunchy chocolaty bites. They aren’t little balls, but you still get the same effect. The butter gives some crunch, while the coconut oil gives the light/crispy texture.

I like to use them to make cookies and cream yogurt. Simply mix a handful into plain or slightly sweetened whole milk yogurt. A real treat.

**You can make this gluten free as well!!!

Do you still eat cereal? Did you give up cereal but miss it? What’s your favorite kind? Are there any real food versions of cereals you’d like to see?

Homemade Cocoa Puffs
makes about 4 cups

1 3/4 cups flour (organic whole wheat, all purpose or a combination)
1/3 cup organic cocoa powder
1/2 cup organic white and/or brown cane sugar or sucanat
1 tsp. baking soda
1/2 tsp. sea salt
2-3 Tbsp. honey
1 – 2 tsp. organic chocolate extract
1 tsp. organic vanilla
1/4 cup butter, melted (you can replace this with coconut oil or palm shortening to make it dairy free)
1/4 cup coconut oil, melted

Heat oven to 350. Melt butter and coconut oil in sauce pan. Set aside. In a mixing bowl, stir together flour, cocoa, sugar, baking soda and salt. Add the liquids: honey, chocolate extract, vanilla, butter/oil. Stir well. Taste dough and adjust honey and chocolate extract to your liking. Mix until a nice ball of dough is formed.  The dough should not be crumbly.  If it is gradually a couple Tbsp. of water.  If it is still crumbly gradually add more honey.

Split dough into 2 equal parts. Cut 3 pieces of parchment paper the size of a cookie sheet. Lay one piece on table. Put 1/2 of dough on the paper. Lay a 2nd piece of parchment on top of dough. Squish the dough down a little with your hand. Use a rolling pin to roll the dough between the parchment paper. Roll until the dough is about 1/8″ – 1/4″ thick. Remove the top piece of parchment paper. Cut into very small squares (with pizza cutter). Place on a baking sheet (on the parchment paper…just move the whole thing onto the baking sheet). Repeat for other half of dough.

Bake for 11-12 minutes. Turn off oven, but leave cereal in to get crisp. Remove after about 10 minutes (if some of the puffs are burning remove the pan). Let cool completely. Separate squares. Store in an airtight container at room temperature or in the freezer.

Soaked Chocolate Covered Donuts

About a year ago I was experimenting with all kinds of soaked recipes. I tried making Adrienne’s soaked whole wheat donuts. They were really good.

But then I forgot about them.

Last week I was playing with my kids with their pretend food/dishes. Rebecca had a donut on her plate, and we were brainstorming baking projects (real ones). So we thought it might it might be fun to make real chocolate covered donuts.

So I did.

And they turned out great!!

These donuts reminded me of my childhood. When we got donuts (which was a rare thing) I always got chocolate covered…and so did my siblings 🙂  One bite brought me back to my youth.

I used the same base recipe and adjusted it a bit so I can tolerate them. Then I made my own chocolate topping.

This is a delicious, warming breakfast treat. You can make them as large or as small as you like. You can make full donuts or donut holes. You can glaze the top or cover them entirely in chocolatey goodness.

You can make other flavors as well. Coat them in chopped crispy nuts. Mix in mini chocolate chips. Or go for the original cinnamon sugar.

Do you like having a donut for breakfast sometimes?  Just because you want to eat Real food does not mean you have to give them up. Just go for a healthier, easier to digest, homemade version.

What is your favorite donut flavor?

Soaked Chocolate Covered Donuts
dairy free options

4 1/2 cups whole wheat flour
4 tsp. baking soda
1/2 tsp. salt
1/2 tsp. nutmeg
1 tsp. cinnamon
3 egg yolks
2 Tbsp. milk or water
1 cup organic cane sugar or sucanat
5 Tbsp. butter or coconut oil, melted
1 cup sour milk, buttermilk, kefir or sour milk substitute. (combine 1 Tbsp. vineager or lemon juice + milk to equal 1 cup to make sour milk)

Donuts:

Combine the flour, sugar, fat and cultured/soured liquid. Let the dough rest for 12-24 hours. Add the remaining ingredients and mix well.

Roll out dough to approximately 1/2″ thickness. Cut out donuts with cutter, ring or shape into desired shapes.

Bake on an ungreased baking sheet  at 425 degrees for 8-10 minutes. Allow to cool.

Topping:

1 cup chocolate chips (I used soy free, dairy free, nut free, egg free)
1/4 cup milk or milk substitute
3 Tbsp. organic all purpose flour (or arrowroot or cornstarch)

Melt chocolate chips in a double boiler (glass bowl on top of a pot of simmering water). When all of the chocolate is melted slowly stir in the milk and flour. Mix until smooth. Remove from heat.

Dip the cooled donuts in the warm chocolate.

Store donuts in an airtight container at room temperature for short term storage. Store in a freezer for long term storage.

Graham Griddle Cakes

Last weekend I decided to make pancakes for breakfast. I flipped through all of my usual recipes and came across one that I haven’t made in years. They are called graham griddle cakes. You replace some flour with crushed graham crackers. Brilliant! Perfect for this graham cracker lover 🙂

You can use store bought organic grahams or homemade. Let the food processor do all the crushing and mixing for you.

I adjusted the recipe so that it doesn’t contain baking powder (cornstarch) or egg whites.

Slightly sweeter than your typical pancake, these are a real treat. Cover them with lots of real butter and pure maple syrup…yum!

I’m a big fan of salty/sweet combinations. And I’ve been sticking to yeast-free “breads” lately. So these were just what I needed. I used one as bread for a bacon avocado sandwich. I also ate some like bread – warmed, topped with butter and a little sea salt. Delicious!!

Tired of your usual pancake recipes? Try adding a touch of sweetness with graham crackers.

Graham Griddle Cakes (or yeast free sweet bread)
makes 6-8 pancakes

3/4 cups whole wheat flour
3/4 cups graham cracker crumbs
2 Tbsp. sucanat or organic brown cane sugar
1 tsp. baking soda
1/4 tsp. salt
1 cup milk
2 Tbsp. butter, melted
2 egg yolks (or one whole egg)

1/2 cup chopped crispy nuts and/or soy free chocolate chips (optional)

Process graham crackers in food processor until turned into crumbs. Add flour, sugar, soda and salt. Pulse to mix. Pour mixture into a bowl.

Add milk, butter and eggs. Stir well. Add nuts or chocolate chips if desired.

Scoop 1/4 – 1/3 cup batter onto a hot buttered griddle per pancake. Cook until bubbly. Flip and cook for another 60 seconds.

Serve warm with butter and maple syrup or honey.

Homemade Go-gurt

Yogurt in a tube…sounds kind of gross to me. Which is why I’ve never tried it. But kids seem to love them. Sadly my daughter was introduced to go-gurts in preschool this year.

In an effort to help her enjoy the foods she likes in a healthy manner we decided to make our own version of go-gurt.

I tried a couple methods that were ok but kind of tough to eat. Finally we came up with a good one.

I used my vacuum sealer to make a go-gurt package. Then we filled it with thick smoothie.

This go-gurt has a two-fold benefit. It does not have the fillers, sweeteners, etc. that you’d find in the boughten version. And it does have tons of nutrients – egg yolks, kefir, fresh fruit, avocado.

You can use any type of healthy yogurt or smoothie you like. Smoothies work well since you can make them very thick.

You can also turn this into a frozen treat (or use fruity water to make homemade ice pops) . Simply fill it, stand it upright and stick it in the freezer. What a great snack on a hot summer day. You could also fill it with fruity water, homemade pudding or homemade ice cream and freeze it…homemade ice pops, pudding pops or ice cream pops!

This isn’t really a recipe. It’s a how-to. Now whenever your kids want go-gurt you can give them one…and feel good about it.

My daughter wanted to decorate it, but we didn’t have time. Next time we’ll use some permanent markers to write on the bag before filling it.

This post is linked to Real Food Wednesday.

Homemade Go-gurt

Using a vacuum sealer create a “bag” with an opening about 1 1/2 inches wide. Use a funnel to pour in smoothie or yogurt of your choice. Enjoy!

Here are a few smoothie ideas: fruit smoothie, pumpkin pie smoothie, green smoothie

Real Pumpkin Pie


I don’t make many pies. Why? I just don’t like them that much.

Well, I should rephrase that. I used to not like pie. I would basically only eat blueberry pie.

Now that I make all of our food from scratch, I know what REAL pie tastes like. Let me tell you – it’s good!

The Best Pumpkin Pie

The first time I made pumpkin pie I figured I’d just follow a standard recipe. But they all have sweetened condensed milk.

So I just made my own modifications to create a truly REAL pumpkin pie.

It was delicious!!  I, Mary, ate and enjoyed pumpkin pie!  For the first time in my life. Even crazier…I enjoyed it with whipped cream on top…I don’t like whipped cream. Or so I thought. I guess I actually like REAL whipped cream as well.

How to Make Real Pumpkin Pie

A combination of my personal tastes changing over the years and using quality, real ingredients means a delicious nutritious dessert that I could finally enjoy. 

But to be honest, my favorite way to eat pumpkin pie is for breakfast! Eggs and veggies are a great way to start the day. Just be sure to eat protein with it and limit sweets the rest of the day to avoid a blood sugar roller coaster.

Do you enjoy pumpkin pie? How do you make yours?

Real Pumpkin Pie

2 cups cooked, pureed pumpkin
1 cup heavy cream or whole milk (can be replaced with coconut milk)
2 eggs OR 1 egg + 2 yolks OR 4 yolks
3/4 cups organic cane sugar (you can substitute maple syrup for some of this)
1 tsp. pumpkin pie spice
1/2 tsp. cinnamon
1/2 tsp. salt

Single pie crust (wheat)**

1 1/4 cups organic whole wheat or all purpose flour

1/2 tsp. salt
1/3 cup + 1 Tbsp. palm shortening or cold butter or lard
1/8 cup + 2 Tbsp. water w/ 1/2 tsp. vinegar

Pie Crust:
Sift flour and salt. Cut in 1/2 shortening until it resembles corn meal. Cut in other 1/2 until it looks like small peas. Add water + vinegar and mix well. (You can do this all in a food processor for a very quick dough). Roll out and place in 9″ pie plate.
 
**You can make this gluten free using a soaked gf pie crust or a regular gf pie crust.

Pumpkin Pie:

Preheat oven to 425.

Combine all ingredients in a bowl. Beat with mixer until smooth.

Pour into unbaked pie shell.

Bake for 15 minutes at 425, reduce temperature to 350 and bake for an additional 40 to 50 or until knife comes out clean.

Corn Free "Cornbread"

I never had cornbread growing up (so sad). The first time I tried it was probably when I was in college. And I’ve loved it ever since!

Corn has been out of my diet for over a year now. And I miss cornbread. It’s my go-to accompaniment for chili. Corn muffins are great with just about any kind of soup. It’s easy and delicious.

So recently I decided to try a corn free version. I know it sounds crazy. But it can be done.

I used my usual cornbread recipe and made some modifications to remove the corn (including removing the baking powder…yes, that has cornstarch!). I also made it egg white free so that it’s better for me.

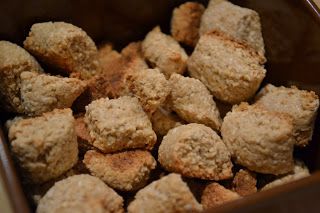
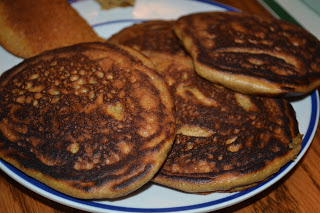
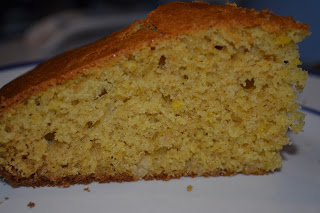
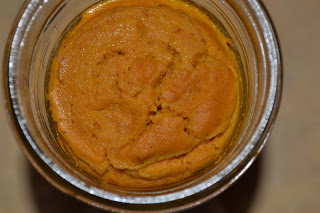
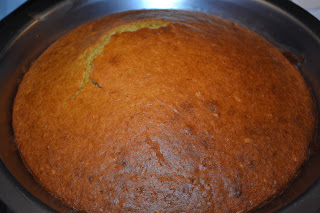
The result is a lightly sweetened cake that tastes almost just like cornbread. It even looks like cornbread…the egg yolks give it a nice golden color. All the picky eaters in my family loved it just as much as the original version.

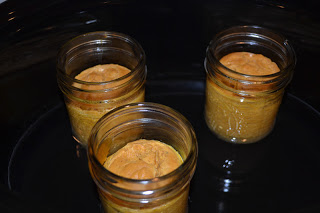
It’s also very easy to make. Add the ingredients to a bowl, mix with a spoon, pour it in the pan and bake. My 18 month old helped me make it last night (he did some pouring, mixing and egg cracking…while I held him…the whole time…yes, it’s easy enough to make one handed while keeping a little one from spilling everything).

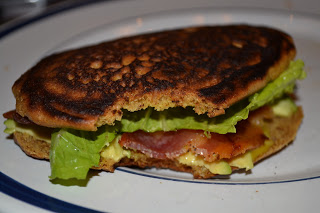
It makes a great pairing with chili. Or it’s a delicious breakfast topped with butter and honey or maple syrup. My personal favorite way to eat it is with lots of butter and a little sprinkle of sea salt. I love anything with a salty/sweet combo.

I have also added a soaked gluten free version. It is just as good as the original and easy on the tummy.

Can’t have corn? Try this corn free version of cornbread. You don’t have to go without anymore 🙂

This post is linked to Fat Tuesday and Real Food Wednesday.

Corn Free “Cornbread”

1/2 cup organic all purpose flour (or 1/2 cup white rice or tapioca flour)
1/2 cup organic whole wheat flour (or 1/2 cup amaranth flour)
1/3 – 1/2 cup organic cane sugar (depends how sweet you like it)
4 Tbsp. melted butter (you can also used coconut oil. It will give a little different texture)
1/2 cup milk or milk substitute
1 1/2 tsp. baking soda
1/2 tsp. sea salt
4-5 egg yolks (more yolks will make it more moist and more yellow)

Heat oven to 400 degrees F. Grease a 9″ round pie pan.

Add the dry ingredients to the bowl. Mix. Add the butter and milk. Mix. Add the egg yolks. Mix.

Pour into the prepared pan. Bake for 25 – 30 minutes, until golden and baked through.


Soaked Gluten Free Corn Free Cornbread

1/2 cup tapioca or white rice flour
1/2 cup amaranth flour
1/2 cup milk or coconut milk
1 Tbsp. lemon juice, yogurt, whey or kefir
1/3 cup organic cane sugar
3 Tbsp. melted butter or coconut oil
2 egg yolks
1 egg
1/2 tsp. sea salt
1 tsp. baking soda
1 tsp. cream of tartar

In a medium bowl combine the flour, milk and lemon juice. Cover and let sit for 24 hours.

Heat the oven to 400*F. Grease a 9″ round pie pan.

Add the sugar and oil to the flour mixture. Beat well.
Add the eggs and sea salt. Beat well.
Add the baking soda and cream of tartar. Mix until just combined.
Immediately pour into the prepared pan.
Bake for 30 – 35 minutes.
Let cool for 10 minutes before serving.

Crockpot Pumpkin Custard (GAPS-legal, nut free, egg white free)

Over the weekend I tried a new fall recipe for pumpkin custard. Another delicious recipe from Cara at Health, Home and Happiness. We all enjoyed it. Plus it’s grain and nut free.

I did modify it a bit. I only used egg yolks so I could eat it. I also used raw cream instead of coconut milk. And I mixed it by hand instead of in a blender. I also added more honey…and it still wasn’t very sweet. I had to drizzle extra honey over top for Rebecca to eat it. Else it almost tasted more savory (the pumpkin flavor was very strong). I didn’t make a full batch either.

Overall it was a great recipe. And I love that it cooks in the crockpot. I prepped it when I got up. Then it was ready for the family when they got up.

I’ll post the recipe the way I made it. Check out Cara’s site for the original.

Crockpot Pumpkin Custard
makes 4 1/2pt. jars

2 cups cooked pumpkin or butternut squash
5 egg yolks (or 3 whole eggs)
1/4 cup raw cream or coconut milk
1/3 – 1/2 cup maple syrup or honey
1/4 tsp. nutmeg
1/2 tsp. cinnamon
pinch of sea salt

Fill the crock pot with 1 inch of water and turn on high. Allow it to preheat for 30-45 minutes.

In a blender, puree all ingredients or simply mix by hand if your pumpkin is already pureed. Taste and adjust sweetness if needed.

Pour the mixture into oven/heat proof ramekins or mason jars, filling 2/3 full. Gently set the jars into the water. Cover. Allow to steam for 4-6 hours.

Turn the crock pot off, and it will continue to stay warm for another hour or so. Serve warm or cover with plastic wrap and store in the fridge to serve chilled.