Home » Kid-friendly Recipes » dairy free » Page 22

Category: dairy free

Soaked Gluten Free Oatmeal Muffins

Soaked gluten free oatmeal muffins make a simple, nutritious and delicious breakfast or compliment to a warm bowl of soup. Soak the flour one day. Bake the muffins the next. Easy.

Almost every single morning the first word out of my son’s mouth is “munin.” He is on a muffin kick! So I try to keep muffins on hand.

Today I made a gluten free version of some oatmeal muffins I’ve made many times before.

This is a great base recipe. You can add any kind of fruit, nut, etc. to change the flavor. Today’s recipe included cranberries and chocolate chips. Cinnamon raisin is always good too.

These muffins are gluten free and soaked to make them easier to digest. They can also be dairy free if you use lemon juice + water for soaking.
If you’re looking for a new breakfast treat try these muffins.

Soaked Gluten Free Oatmeal Muffins | Just Take A Bite
Soaked Gluten Free Oatmeal Muffins
makes 12 muffins

1 cup rolled oats
1 cup buttermilk OR yogurt OR kefir OR 2 Tbsp. lemon juice + water to equal 1 cup
2/3 cup white rice flour
1/3 cup amaranth flour
1 egg
4 Tbsp. coconut oil (melted butter would work too)
1/3 – 1/2 cup brown cane sugar, sucanat or coconut sugar
1 tsp. baking powder
1/2 tsp. baking soda
1/2 tsp. salt
1 tsp. cinnamon (optional)
1/2 – 1 cup add-ins (raisins, nuts, seeds, fresh fruit, dried fruit, chocolate chips)

Mix oats, flour and soaking liquid. Cover and let sit 7 -24 hours.

Heat oven to 400. Mix the remaining ingredients into the oat mixture (I use a hand mixer for this to work out any lumps).

Fill muffin cups 3/4 full. Bake for 18-20 min.

Soaked Gluten Free Brownies (dairy free, egg free, nut free)

When I bake I don’t always use precise measurements. Sometimes I don’t feel like getting measuring cups dirty and I just eyeball some of the ingredients. That’s how I came up with this recipe for brownies. I wasn’t trying to make brownies. But when they came out of the oven soft, chewy and chocolately I had to make a second batch to see if I could recreate them.


And I did. The best part about these brownies? They are easy on your tummy and very allergen friendly. No gluten. No eggs. No dairy. No nuts. And they taste amazing!

These are very easy to make. The brownie batter comes together in minutes. You can make a big batch and keep a stash in the freezer. But they don’t usually last long enough for me to put any away. I eat most of them myself 🙂

Have you had your brownie fix today? Give these a try. You won’t be disappointed.

Soaked Gluten Free Brownies
makes 8″ or 9″ square pan

1 1/2 cups amaranth flour*
1/2 cup tapioca flour*
1 Tbsp. lemon juice* + water to equal 1/3 cup
1/3 cup coconut oil*
1/3 cup + 3 Tbsp. honey
3 Tbsp. cane sugar, sucanat or coconut sugar*
1/2 tsp. baking soda
1/2 tsp. sea salt*
1/2 tsp. cream of tartar
1/3 cup mini chocolate chips* (optional)

Combine the flours, cocoa powder, coconut oil and water/lemon juice. Cover and let sit 7-24 hours.

Heat oven to 350 degrees F. Grease an 8″ or 9″ square baking pan.

Add the remaining ingredients (except the chocolate chips) to the soaked mixture. Mix well (I use a hand mixer for this to get any lumps worked out). Stir in the chocolate chips.

Spread in the prepared pan. Bake 20 – 25 minutes.

Allow to cool for 10 minutes. Cut into squares. Store the brownies in the refrigerator to keep them fresh. They will keep well for a long time in the freezer.

*These are affiliate links. It will not change the cost for you if you buy through the link, but I will get a small commission. It helps me earn a small amount to keep putting in the time and effort to do what I do 🙂

Gluten Free Cornbread

Almost every time I make chili I make cornbread to go with it. I have no idea why. They just seem like a good match to me. I love any salty/sweet combinations. Chili was on our menu last week, so I had to come up with a gluten free cornbread recipe.


I mostly used the same recipe I always do but modified it slightly to make it gluten free.

I made muffins this time. But it works just as well to make a full pan of cornbread.

These are very simple to make. Put the ingredients in the bowl, mix with a spoon, pour and bake.

You end up with slightly sweet, delicious cornbread. This is a great match for soup or stew. Or it works well for breakfast topped with honey or maple syrup.


Gluten Free Cornbread
makes 12 muffins or a 9″ round bread

1 cup organic cornmeal
1/2 cup white rice flour
1/4 cup amaranth flour
1/4 cup tapioca flour
2/3 cup organic cane sugar, sucanat or coconut sugar
1 tsp. sea salt
2 tsp. baking powder
1 tsp. baking soda
1 egg
1 cup milk (or milk substitute)
1/3 cup melted butter or coconut oil

Heat oven to 400 degrees. Grease a 9″ round cake pan or line a muffin tin with paper cups.

Combine the dry ingredients. Add the wet ingredients and stir until combined.

Pour into prepared pan or muffin cups.

Bake 20 – 30 minutes (less for muffins, more for bread), until golden and baked through.

Serve with butter, honey, syrup or jam.

Soaked Gluten Free Waffles

Soaked gluten free waffles make a great Saturday morning breakfast or fun weeknight dinner.

Soaked Gluten Free Waffles | Homemade Dutch Apple Pie

My daughter requested waffles the other day. So I added them to our menu.

No problem. I’ve made gluten free waffles before.

But this time I decided to try soaking them to make them easier to digest.
 
Soaked gluten free waffles are so good!!  The version I made looked a little dark because of the teff flour. But they were delicious – especially covered in homemade strawberry topping.
 
These soaked gluten free waffles come together in minutes. Just soak the flour the day before. Then beat some egg whites, mix and pour in your waffle maker.
 
Use your favorite toppings like butter, real maple syrup, honey or fresh fruit to make soaked gluten free waffles a real treat.
 
These soaked gluten free waffles are now a staple in our Friday night breakfast for dinner rotation.  Once you try them you’ll want to add them to your menu regularly as well!
 
Are you in the mood for a satisfying breakfast (or dinner!)? Try some soaked gluten free waffles.
 
Soaked Gluten Free Waffles | Homemade Dutch Apple Pie
 
Soaked Gluten Free Waffles
makes about 4 waffles
 
1/2 cup white rice flour (or sorghum)
1/3 cup tapioca flour
1/4 cup teff flour (or brown rice, buckwheat or amaranth)
1/2 cup total soaking liquid: buttermilk OR kefir OR yogurt OR 1 Tbsp. lemon juice + water to equal 1/2 cup
1 egg, separated
1/2 tsp. cream of tartar (not essential, but helps the egg whites stiffen)
1/2 cup smooth, unsweetened applesauce
1 Tbsp. organic cane sugar, sucanat or coconut sugar
1 tsp. baking soda
1/2 tsp. sea salt
Combine the flours and soaking liquid. Cover and let soak for 7-24 hours.
 
  1. Heat and grease a waffle iron.
  2. In a medium bowl beat the egg white and cream of tartar until stiff peaks form.
  3. Add the remaining ingredients to the soaked flour and beat (I like to use a hand mixer for this) until well combined (about 2 minutes).
  4. Fold in the egg white.
  5. Pour batter onto the waffle iron and allow to fully cook. You can keep the cooked waffles on a cooling rack on a baking sheet in the oven on low heat until all of the waffles are done.
  6. Serve with real maple syrup, honey, homemade powdered sugar or fruit topping.
  7. Store leftovers in a seal container in the refrigerator or freezer.

*To reheat wrap the waffles in a damp paper towel. Heat at 350 degrees in an oven or toaster oven for 5 – 8 minutes, until warmed.Soaked Gluten Free Waffles | Homemade Dutch Apple Pie

Coconut Flour Squash Scones (grain free, egg free, nut free, dairy free option)

Ever since I started a rotational diet and cut gluten back out a few months ago I’ve been making coconut flour scones. It’s a little tricky since I can’t eat eggs. And most coconut flour recipes use lots of eggs. But I like how these have turned out.

I’m not sure why I haven’t posted the recipe yet. But here it is. You don’t want to eat too many or you’ll be getting a ton of fiber. But they sure taste good!


Coconut Flour Squash Scones
makes 6-8 scones

1 cup coconut flour
1/4 cup organic cane sugar or coconut sugar
1/4 tsp. sea salt
1/4 tsp. baking soda
1/2 cup (1 stick) butter, cold, slightly cut up OR 1/2 cup organic palm shortening (coconut oil might work, but I have not tried it)
3/4 cups pureed squash or pumpkin
1 tsp. vanilla
3/4 cups milk OR milk substitute of choice
1/3 cup honey and/or maple syrup (1/3 cup total of one or a combination)
1/3 cup mini chocolate chips (optional)

Heat oven to 400 degrees. Line a baking sheet with parchment paper.

Combine the flour, sugar, salt and baking soda. Blend in butter until the mixture is crumbly (You can do this by hand. I find a food processor is easiest.). Add the squash, vanilla, milk and honey. Mix/blend until fully combined. If the dough does not hold together add more squash or milk. Stir in chocolate chips.

Drop mounds onto the prepared baking sheet. Press down slightly to flatten. Bake for 20-25 minutes, until just starting to get golden.

Allow to cool completely. The scones will hold together better if they are refrigerated. Store in the refrigerator or freezer.

Homemade Corn Tortillas

Tacos are a staple on our menu. We don’t eat a lot of Mexican food. But we all love tacos. They are easy to make. Each person can assemble them with their preferred toppings. And tacos actually make a really great gluten free meal.

The problem…finding taco shells or soft tortillas that don’t have gluten. The bigger problem…finding taco shells or tortillas that don’t contain nasty chemicals and vegetable oils.

My daughter was asking for tortillas the other day. We looked at the corn tortillas at the store. The only pack without gluten contained parabens!!! Seriously? I’ll make exceptions once in a while for some ingredients, but not parabens. No way.

As luck would have it shortly after that Health Starts in the Kitchen posted a recipe for homemade corn tortillas. Perfect!! And they are so easy. If I had known they were this easy I would have tried making them a long time ago.

I do not have a tortilla press myself. I just rolled the dough in plastic wrap. I think a tortilla press would be great for getting them just the right thickness and size. Maybe someday 🙂

At least I have an easy alternative for healthy gluten free tacos with delicious soft tortillas.

Thanks Health Starts in the Kitchen for this great recipe!!

I only made a half recipe. It was more than enough for a meal for us. I’ll just post the half recipe. You can make a big batch and freeze them to have on hand. I also kneaded my dough by hand. I tried my stand mixer, but with only 1 cup of flour it didn’t fill the bowl enough to work.

Homemade Corn Tortillas
makes about 8 tortillas

1 cup organic corn flour/corn meal
1/2 – 1 cup warm water
1/2 tsp. sea salt

Place the flour and salt in a bowl or stand mixer bowl. While mixing gradually add 1/2 cup of water. As the dough combines, add additional water to create a dough with the texture of play-dough. Knead the dough for 10 minutes then let rest for 10 minutes.

While your tortilla dough is resting, begin heating your cast iron griddle (keep it dry/no fat).

Scoop 1/4 cup portions of dough and press in a tortilla press or roll between plastic wrap.

Fry each tortilla until lightly browned on each side, about 1-2 minutes on a cast iron pan.

Store wrapped in a clean dish towel if dry-fried to be soft (this helps keep them warm and pliable if you are going to eat them fresh) or to drain on paper towel if fat-fried to be crispy.

Store in a sealed container in the refrigerator or freezer.

Soaked Gluten Free Breakfast Cookies

I keep adapting some of our favorite recipes to make them gluten free. The other day I took some breakfast cookies out of the freezer…and couldn’t let my daughter have one. So of course I had to tackle that challenge this week 🙂

Soaked, gluten free and delicious! Fresh baked this morning for a nice treat for the family. Do you ever have cookies for breakfast? If not you should give these a try.

Soaked Gluten Free Breakfast Cookies
makes 10 – 12 cookies

1 cup oats
1 cup any combination of gluten free flour (I used white rice, brown rice and teff flours)
1/2 cup butter or coconut oil
1/3 cup kefir, buttermilk, sour milk or water + lemon juice
1/3 cup honey
1 egg
1/2 tsp. salt
1/2 tsp. baking soda
1/2 tsp. cinnamon
1/2 tsp. vanilla
1 cup add-ins (chocolate chips, nuts, dried fruit, coconut)

Melt the butter or coconut oil. Mix the oats, flour, butter and kefir. Let soak 7 – 24 hours.

Heat oven to 350 degrees F.

Add the remaining ingredients to the soaked mixture. Mix well. Drop large mounds onto a parchment lined baking sheet.

Bake 20 minutes, until golden.

Serve warm or allow to cool and store in an airtight container. They freeze very well.

Gluten Free Homemade Peanut Butter “Cocoa Puff” Cereal (egg free, corn free, dairy free option)

Baby stepping your way to real food? Swap out your store-bought cereal for this healthy version of peanut butter cocoa puffs. They are even gluten and egg free (with a diary free option)!

A little while back I made homemade cocoa puffs. They were a big hit! Then my daughter and I went gluten free. And I haven’t made the cocoa puffs since then.

Problem Solved

I decided to make a gluten free version…but add an extra element and make them into peanut butter puff cereal (any fans here of the “real” version of this?).

My inability to keep the kids away from the cereal means it turned out well. I could hardly even get a picture before they were digging in. And my son found whatever he could to reach the cereal on the counter and stuff his mouth full 🙂

Kid Approved!

A mix of chocolate and peanut butter with a little sweetness and crunch. Both kids ate it plain after I made the cereal and then each had a bowl with milk for a bedtime snack. They really enjoyed drinking the chocolate peanut butter milk at the end.

We don’t buy cereal. My son will be 2 in a couple weeks and has no idea what cereal is. But they sure enjoyed this.

Easy and Healthy

This cereal is an easy breakfast on a busy morning. You get some protein from the peanut butter and milk (or milk substitute) and some carbohydrate to keep you going. It’s also a delicious treat any time of day. Or put some in a little container for young kids to munch on when you are out and about. A perfect finger food snack (with no preservatives or unhealthy oils!).

These puffs are also very allergen friendly. They are gluten free, egg free, corn free and soy free. The chocolate puffs are nut free and can easily be made dairy free. The peanut butter puffs are dairy free as well.

Try making a batch for your kids…or for yourself. You’ll be glad you did. It takes a little time to make two batches of dough/puffs. But it’s worth the effort. And if you aren’t fond of the combination you can just make one or the other. Plain chocolate is just like cocoa puffs. Or plain peanut butter puffs are great too.

Gluten Free Peanut Butter Cocoa Puffs
makes 10 cups

Chocolate Puffs

1 cup white rice flour
1/2 cup amaranth flour
1/4 cup tapioca flour
1/3 cup organic cocoa powder
1/2 cup organic cane sugar, sucanat or coconut sugar
1 tsp. baking soda
1/2 tsp. sea salt
1/4 cup honey
2 tsp. chocolate extract (optional)
1 tsp. vanilla extract
1/4 cup butter (can be replaced with coconut oil or palm shortening)
1/4 cup coconut oil

Heat oven to 350.
Melt butter and coconut oil in sauce pan. Set aside.
In a mixing bowl, stir together flour, cocoa, sugar, baking soda and salt. Add the liquids: honey, chocolate extract, vanilla, butter/oil. Stir well. Taste dough and adjust honey and chocolate extract to your liking. Mix until a nice ball of dough is formed. The dough should not be crumbly. If it is gradually add more honey.

Split the dough into 2 equal parts. Cut 3 pieces of parchment paper the size of a cookie sheet. Lay one piece on table. Put 1/2 of dough on the paper. Lay a 2nd piece of parchment on top of dough. Squish the dough down a little with your hand. Use a rolling pin to roll the dough between the parchment paper. Roll until the dough is about 1/4″ thick. Remove the top piece of parchment paper. Cut into very small squares (with pizza cutter). Place on a baking sheet (on the parchment paper…just move the whole thing onto the baking sheet). Repeat for other half of dough. (If you don’t care about appearance you can skip the cutting step and simply break the cookie into little chunks after it bakes.)

Bake for 12-13 minutes. Turn off oven, but leave cereal in to get crisp. Remove after about 5-7 minutes (if some of the puffs are burning remove the pan). Let cool completely. Separate squares.

Peanut Butter Puffs

1 cup white rice flour
1/2 cup amaranth flour
1/2 cup tapioca flour
1/2 cup organic cane sugar, sucanat or coconut sugar
1 tsp. baking soda
1/2 tsp. sea salt
1/3 cup peanut butter
1/3 cup coconut oil
5 Tbsp. honey
1 tsp. vanilla extract

Heat oven to 350.
Melt peanut butter and coconut oil in sauce pan. Set aside.
In a mixing bowl, stir together the flour, sugar, baking soda and salt. Add the liquids: honey, vanilla, peanut butter/oil. Stir well. Mix until a nice ball of dough is formed.The dough should not be crumbly. If it is gradually add more honey.

Split the dough into 2 equal parts. Cut 3 pieces of parchment paper the size of a cookie sheet. Lay one piece on table. Put 1/2 of dough on the paper. Lay a 2nd piece of parchment on top of dough. Squish the dough down a little with your hand. Use a rolling pin to roll the dough between the parchment paper. Roll until the dough is about 1/4″ thick. Remove the top piece of parchment paper. Cut into very small squares (with pizza cutter). Place on a baking sheet (on the parchment paper…just move the whole thing onto the baking sheet). Repeat for other half of dough. (If you don’t care about appearance you can skip the cutting step and simply break the cookie into little chunks after it bakes.)

Bake for 12-13 minutes. Turn off oven, but leave cereal in to get crisp. Remove after about 5-7 minutes (if some of the puffs are burning remove the pan). Let cool completely. Separate squares.

Combine the chocolate and peanut butter puffs in one container. Serve plain, with milk (or milk substitute) or mixed in yogurt. Store in an airtight container. You can freeze the cereal to make it last longer.

Gluten Free Arts and Crafts Cake (Chocolate, Strawberry, Vanilla – Dairy Free Options)

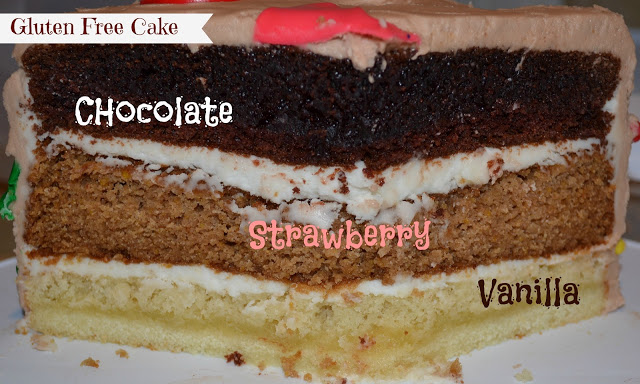
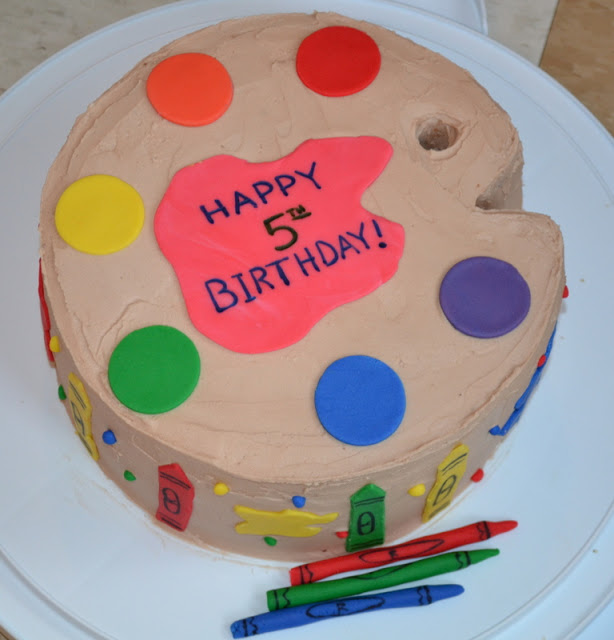
My daughter just had her 5th birthday with an arts and crafts party. She requested a 3 layer, chocolate, vanilla, strawberry cake. And we had just started her on a gluten free diet. So that meant it’s time to experiment!

I made one layer of cake and about a dozen cupcakes from each batch/flavor. I only ended up being able to freeze 6 cupcakes…my kids ate the rest 😛  I guess that means they were pretty good.

The cakes all turned out well. And the final product of putting them all together with homemade frosting was a big hit at the party.

Are you looking for a gluten free cake? Here are three flavors to try. The strawberry seemed to be the most light/moist cake. But they were all good.

Gluten Free Dairy Free Strawberry Cake
makes 2-layer 8″ or 9″ cake or 28 – 32 cupcakes

1 1/2 cups white rice flour
1/2 cup amaranth flour
3 Tbsp. tapioca flour
1 2/3 cup organic cane sugar
2/3 cup organic palm shortening
1 cup strawberry puree (frozen strawberries blended with a little bit of water until smooth)
1/4 cup coconut milk, water, milk or other milk substitute
2 tsp. baking powder
1 tsp. baking soda
1 tsp. sea salt
3 eggs, separated
1 tsp. vanilla
1/2 tsp. cream of tartar

Heat oven to 350. Grease and line with parchment paper two 8″ or 9″ cake pans or fill muffin tins with cupcake liners.

Separate eggs. Beat egg whites and cream of tartar until stiff peaks form. Set aside.

In a large bowl combine the flours, sugar, shortening, strawberry, milk, baking powder, baking soda, salt, vanilla and egg yolks. Beat until well combined, about 3 minutes. Fold in beaten egg whites.

Pour into prepared pans. Bake 45-50 min. (cake rounds) or 30-35 min. (cupcakes). Let cool for 30 min. before removing from pan. Cool completely on a wire rack before frosting.

Gluten Free Chocolate Cake
makes 2-layer 8″ or 9″ cake or 28 – 32 cupcakes

1/2 cup organic cocoa powder
1/2 cup boiling water
2/3 cup organic palm shortening
1 3/4 cups organic cane sugar
1/2 tsp. sea salt
1 tsp. vanilla
3 eggs, separated
1 1/2 tsp. baking soda
1/2 tsp. cream of tartar
1 3/4 cups white rice flour
1/4 cup amaranth flour
1/4 cup tapioca flour
1 cup buttermilk, sour milk or coconut milk

Heat oven to 350. Grease and line with parchment paper two 8″ or 9″ cake pans or fill muffin tins with cupcake liners.

Combine the boiling water and cocoa. Set aside.

Separate eggs. Beat egg whites and cream of tartar until stiff peaks form. Set aside.

In a large bowl combine the flours, sugar, shortening, salt, vanilla, egg yolks and buttermilk. Beat until well combined. Fold in beaten egg whites. Fold in cocoa mixture.

Pour into prepared pans. Bake 50 min. (cake rounds) or 30-35 min. (cupcakes). Let cool for 30 min. before removing from pan. Cool completely on a wire rack before frosting.

Gluten Free White Cake
makes 2-layer 8″ or 9″ cake or 28 – 32 cupcakes

1 1/2 cups white rice flour
1/2 cup amaranth flour
3 Tbsp. tapioca flour
1 2/3 cup organic cane sugar
2/3 cup organic palm shortening
1 1/4 cups milk, coconut milk or other milk substitute
3 tsp. baking powder
1/2 tsp. baking soda
1 tsp. sea salt
1 tsp. vanilla
3 eggs, separated
1/2 tsp. cream of tartar

Heat oven to 350. Grease and line with parchment paper two 8″ or 9″ cake pans or fill muffin tins with cupcake liners.

Separate eggs. Beat egg whites and cream of tartar until stiff peaks form. Set aside.

In a large bowl combine the flours, sugar, shortening, milk, baking powder, baking soda, salt, vanilla and egg yolks. Beat until well combined, about 3 minutes. Fold in beaten egg whites.

Pour into prepared pans. Bake 45-50 min. (cake rounds) or 30-35 min. (cupcakes). Let cool for 30 min. before removing from pan. Cool completely on a wire rack before frosting.

Gluten Free Pizza Crust

My daughter wants pizza for her birthday party. Pizza for 20 people…from scratch…and gluten free. Ummmm…ok??

I’m still fairly new to gluten free baking. But I’m always up for a challenge. And this was a big challenge. I don’t mind experimenting with my family. But I do mind when I have 20 guests. I am passionate about my food and like to make things people enjoy (yes, I am and always have been a people pleaser…if you come to my house and hate the food please don’t tell me :P).

So I used my little knowledge I’ve gained from previous baking experiments and gave it a go. And I think I came up with a pretty decent crust. Everyone in our house ate it without complaints.

This recipe is great for people with all kinds of allergies. The main recipe does use egg whites. But since I can’t have eggs right now I made some without the whites. It was a little thinner/crispier, but it still tasted great. I actually got to eat pizza!!!! Pizza that didn’t make me sick!!! A true  miracle.

It is also dairy free. So as long as you don’t pile cheese on top you can have a dairy free pizza. You can use a cheese alternative. Or you can do what I do and make a pesto pizza. The pesto gives so much flavor you don’t even need cheese. I also like to add some dollops of pureed pumpkin or winter squash here and there to give some extra depth to cheese free pizza.

So using this crust you can make a gluten free, egg free, nut free, corn free, dairy free, soy free pizza.

Do you like pizza but thought you had to give it up because of allergies? Think again. Try this great tasting, easy to prepare pizza crust for your next pizza party. Everyone can enjoy it. It’s allergen friendly and has no gums or starches.

One of the best things about this recipe is that you can make/bake the crust in advance and freeze it. Then you can have a quick pizza any night of the week. Just add your favorite toppings and bake for about 15 minutes. So easy.

I must point out that I used a small amount of flax seed in this recipe. I don’t normally use or advocate the use of flax seeds. But they help bind the dough when using gluten free flours and prevents having to use any gums. I figure one teaspoon for an entire pizza isn’t going to do much harm. You could substitute chia seeds for the flax seeds.

Gluten Free Pizza Crust
makes one 12-14″ pizza or 3-5 individual pizzas

3/4 cup white rice flour
1/4 cup tapioca flour
1/4 cup brown rice flour
1/4 amaranth flour or more brown rice flour
1 tsp. salt
1/2 tsp. baking soda
1 tsp. flax seed
1 tsp. cane sugar
1 Tbsp. evoo
1/2 cup water
2 egg whites
1/2 tsp. cream of tartar

Heat oven to 400 degrees F. Grease a pizza pan or baking pans for individual pizzas.

To make this a soaked crust combine the flour, water and 2 Tbsp. lemon juice. Cover and let set for 7-24 hours. Then proceed with the recipe.

Beat the egg whites with the cream of tartar until still peaks form. Set aside.

Combine the remaining ingredients. Fold in the egg whites. Spread onto the prepared pan(s).

Bake for 10 – 15 minutes (smaller crusts will need less time, whole pizzas will need more time), until firm.

Use crust immediately or allow to cool, remove from pan and refrigerate or freezer. Thaw frozen crust in the refrigerator when ready to use.

When ready to make the pizza, add your favorite sauce and toppings. Bake at 400 degrees for 10 – 15 minutes, until cheese is melted and pizza is hot.