Home » Kid-friendly Recipes » lunch » Page 6

Category: lunch

Soaked Gluten Free Noodles

Soaked Gluten Free Noodles | Homemade Dutch Apple PieI’ve said it before and I’ll say it again. When you have a lot of allergies to deal with you can’t just go to the store and buy simple items like bread, crackers and noodles.

This is especially true if you are gluten free and can’t have rice or corn (like my son). Removing wheat, corn and rice eliminates just about any kind of convenience food you can buy – especially noodles.Soaked Gluten Free Noodles | Homemade Dutch Apple Pie

But I really don’t want to take all pasta based meals off our menu. So I set to work making noodles my son can eat. Additionally, I wanted to be sure they were properly prepared.

The result is an easy to make pasta that works well for soup, spaghetti, macaroni and cheese…whatever you like (as you can see in the photos I’ve used them in a variety of dishes). The other great thing about these homemade noodles is that they cook in about three minutes – perfect for making a quick lunch for hungry kids!

Simply mix the dough and cut the noodles. Then let them sit for a day before using them. The leftovers can be kept in the fridge for up to two weeks or in the freezer for a few months.Soaked Gluten Free Noodles | Homemade Dutch Apple Pie

You can be really creative with these noodles and cut them into fun shapes to liven up a bowl of chicken noodle soup. Or go really simple by cooking them in broth and adding salt and butter or coconut oil for a quick side dish.

Although my son is the only member of the family that can’t have store bought pasta, we all eat these and enjoy them!

Homemade pasta does not have to be complicated. This is a simple recipe that is sure to please the whole family. Soaked Gluten Free Noodles | Homemade Dutch Apple Pie

Soaked Gluten Free Noodles
Homemade noodles that are properly prepared and free of gluten, dairy, nuts and corn.
Write a review
Print
Ingredients
  1. 1/2 cup tapioca flour (or white rice)
  2. 1/2 cup sorghum flour (or white, brown rice, millet, buckwheat or amaranth)
  3. 1/2 tsp. gelatin
  4. 1/2 Tbsp. lemon juice
  5. 3 Tbsp. warm water
  6. 1/2 tsp. unrefined sea salt
  7. 1 tsp. organic cane sugar
  8. 1 egg
  9. 1 tsp. extra virgin olive oil
Instructions
  1. Mix the gelatin and lemon juice. Let sit one minute.
  2. Combine the flour, warm water and gelatin mixture.
  3. Add the satl, sugar, egg and oil to the flour mixture. Mix until well combined.
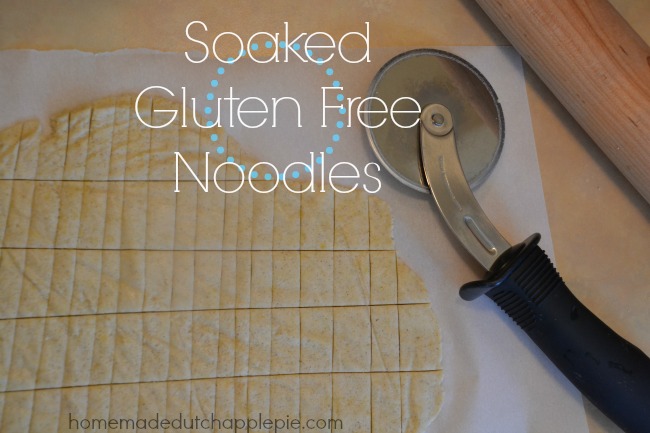
  4. Place the dough on a baking sheet size piece of parchment paper. Place another piece of parchment paper on top.
  5. Roll the dough between the parchment paper until desired thickness.
  6. Remove the top paper and use a pizza cutter or knife to cut noodles into desired shapes.
  7. Cover with parchment paper or towel and let sit 7-24 hours.
  8. When ready to use simply add the noodles to soup or cook in water or broth for 3-4 minutes.
  9. Store unused noodles in a sealed container in the refrigerator for up to a week or in the freezer for up to a month.
Just Take A Bite https://justtakeabite.com/


In order for me to support my blogging activities, I may receive monetary compensation or other types of remuneration for my endorsement, recommendation, testimonial and/or link to any products or services from this blog.

Honey Sourdough Soft Pretzels With Bacon Cheddar Cheese Sauce

Honey Sourdough Soft Pretzels with Bacon Cheddar Cheese SauceA few months ago I re-introduced wheat into our diets in the form of traditionally prepared sourdough. So far it’s going very well.  It is the only wheat we eat. Since it is fermented most of the gluten is broken down. I also use spelt since it is a milder form of wheat.

Since then I’ve been making a variety of sourdough goodies. Of course I make plenty of bread. But I also make fun food like these soft pretzels.

My kids and my husband really enjoyed these – especially with a delicious bacon cheese sauce!Honey Sourdough Soft Pretzels with Bacon Cheddar Cheese Sauce | Homemade Dutch Apple Pie

Sourdough pretzels are super easy to make. The dough is very easy to work with.

The pretzels are also very filling. You can turn them into a simple Sunday night dinner by paring the pretzels and cheese with a salad (topped with a little protein and homemade dressing with healthy fat).  You’ll get a good balance of protein, carbohydrates and fat.

Need a treat while watching sports? Sourdough soft pretzels are perfect! You can make mini ones for munching like appetizers. Or you can really feel like you’re at the game by indulging in some giant pretzels like you’d get at a concession stand (minus the neon cheese and chemicals).Honey Sourdough Soft Pretzels with Bacon Cheddar Cheese Sauce | Homemade Dutch Apple Pie

These would also be great for a kid’s birthday party. Mini soft pretzels with little cheese cups for dipping.

Honey sourdough soft pretzels with bacon cheddar cheese sauce are fun for kids and adults.  Plus they are properly prepared and don’t contain any unhealthy ingredients. Honey Sourdough Soft Pretzels with Bacon Cheddar Cheese Sauce | Homemade Dutch Apple Pie

Honey Sourdough Soft Pretzels with Bacon Cheddar Cheese Sauce
Yields 10
A traditional sourdough soft pretzel with bacon cheese dipping sauce.
Write a review
Print
Bagels
  1. 2 cups sourdough starter
  2. 3 3/4 cups spelt flour (or kamut, einkorn, whole wheat or rye)
  3. 1/2 Tbsp. sea salt
  4. 1/3 cup cold water
  5. 3 Tbsp. honey
  6. sea salt for topping
Bacon Cheese Sauce
  1. 1 Tbsp. arrowroot or tapioca flour
  2. 1 Tbsp. bacon grease
  3. 1/2 cup milk
  4. 1/2 cup grated cheddar cheese
  5. 1/4 cup cooked, crumbled bacon (optional)
  6. salt and pepper to taste
Bagels
  1. In the bowl of a stand mixer combine the starter, salt, water and honey. Gently mix with a wooden spoon until the salt and honey dissolve.
  2. Add the flour. Mix with the dough hook for 15 minutes.
  3. Remove the dough from the mixer.
  4. Divide it into 10 - 12 equal portions.
  5. Roll the each piece of dough into a long snake and shape it into a pretzel.
  6. Place the pretzels on a greased or parchment lined baking sheet.
  7. Cover and let rise 6-12 hours.
  8. Bake at 350*F for 35 - 40 minutes.
  9. Brush with butter, oil or water and sprinkle on sea salt if desired.
  10. Store unused bagels in a sealed container at room temperature or in the freezer.
Bacon Cheese Sauce
  1. Cook and crumble bacon in advance if you want bacon pieces in your sauce. Reserve the bacon grease.
  2. In a small sauce pan combine the arrowroot and bacon grease. Heat over medium heat until the grease is melted and they combined.
  3. Slowly add the milk, whisking constantly.
  4. Continue to whisk until the milk heats and gets to the point it is about to boil.
  5. Reduce heat and add cheese. Whisk until the cheese is melted and combined into the sauce.
  6. Season with salt and pepper to taste.
  7. Add crumbled bacon if desired.
Notes
  1. If you want the bagel a bit sweeter you can add an extra 1-2 Tbsp. of honey or cane sugar.
  2. Any type of cheese that melts well can be used in place of cheddar.
Just Take A Bite https://justtakeabite.com/

Broth For Breakfast: Scrambled Eggs

Broth For Breakfast: Scrambled Eggs | Homemade Dutch Apple Pie
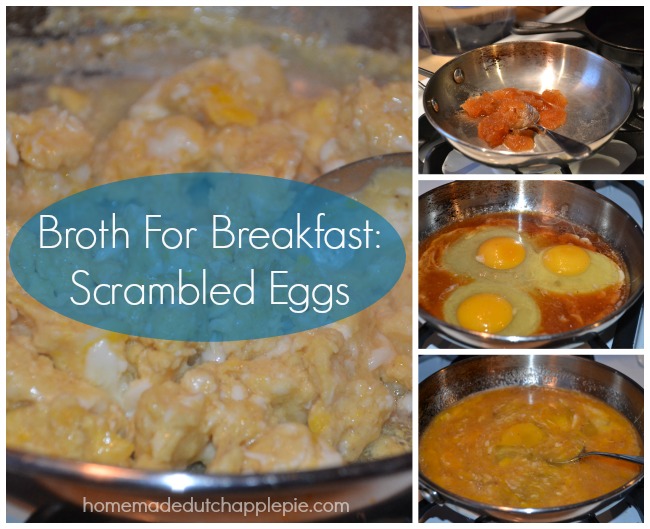
By now I’m sure you’ve heard about the benefits of bone broth. It is great for healing the gut, for boosting the immune system and for adding essential vitamins and minerals to the diet.  It is important to consume broth every day.

But what if you don’t like soup? Or maybe you just can’t stomach plain broth? There are many recipes that incorporate broth.  I have a lot of delicious ones on my site, like sloppy joes, sweet and sour meatballs, beef stroganoff and stir fry.

Those are great lunch and dinner options  But I personally like to start my day with broth. I love getting a nutritional boost right away.  Plus I think it’s important to eat a big breakfast to really fuel your body.

I do eat soup most mornings. It’s easy. I just use whatever broth and leftover meat and vegetables I have on hand. But I know not everyone can stomach the idea of soup for breakfast.Broth For Breakfast: Scrambled Eggs | Homemade Dutch Apple Pie

So I’ve come up with some easy ways to get broth into your breakfast. You won’t even know you’re eating it!

One way to easily eat broth for breakfast is in your scrambled eggs. I came up with this version of eggs for my son who is allergic to dairy.  I couldn’t use raw milk in his scrambled eggs. But milk alternatives can give a strange flavor. So I started using broth. It works so well!

Skip the milk. Add some broth to your eggs and cook them as usual. It gives the eggs a great flavor! Plus you’re getting a nutritional boost. The combination of broth and eggs is a power packed breakfast.  Add a piece of toast with homemade jam and you’ve got a complete meal to really fuel you for the day.

Do you start your day with broth? It just got a little easier.Broth For Breakfast: Scrambled Eggs | Homemade Dutch Apple Pie

Broth For Breakfast Series: Scrambled Eggs
Serves 2
Scrambled eggs cooked in broth.
Write a review
Print
Ingredients
  1. 1/2 cup broth
  2. 3 eggs
  3. sea salt and pepper to taste
  4. 2 Tbsp. coconut oil, butter, lard or bacon grease
Instructions
  1. Heat the broth and oil in a small skillet.
  2. Once the broth starts to simmer add the eggs and seasoning.
  3. Stir the eggs to break the yolks and cook as you would regular scrambled eggs.
Just Take A Bite https://justtakeabite.com/

Simple Soaked Series: Gluten Free Crackers

These gluten free crackers are made with properly prepared soaked grains and are free of dairy, eggs, nuts and corn. They make the perfect snack whether at home or on the go.Simple Soaked Series: Crackers | Homemade Dutch Apple Pie

If there is one snack most kids love it’s crackers! But it’s pretty rare to find a store-bought cracker that is not made with vegetable oils. Not to mention the grains are not properly prepared.  Both of which create a recipe for disaster.

That means one thing – it’s time to make your own crackers!  Really, crackers are so easy to make. I’ve made them many times before.

But recently I made a soaked version so I can feel really good about giving them to my kids (and myself!). So I’m finishing my simple soaked series with a basic gluten free cracker recipe that can be used in so many ways.

These soaked gluten free crackers have great crunch and just the right balance of salt and sweetness.

Simple Soaked Series: Crackers | Homemade Dutch Apple Pie

The base recipe is a Wheat Thin® style cracker.  It is made with a variety of gluten free flours for a mild flavor (I used tapioca, amaranth and sorghum). Then a bit of salt and cane sugar balance each other to make the Wheat Thin® flavor.

You can also create a rye version using teff or more of a basic butter cracker.  Both of these will use a little less sugar than the Wheat Thin® version. Try adding some  herbs and spices for a more sophisticated cracker.

Soaked gluten free crackers come together so quickly. It takes about two minutes to get the flour soaking. Then another five minutes to mix the dough and five minutes to roll and cut the dough.

Less than fifteen minutes of hands on time and you’ve got delicious, nutritious homemade crackers that your kids will love. Even better – your kids can help make them! Get in the kitchen and make a delicious snack together.

Simple Soaked Series: Crackers | Homemade Dutch Apple Pie

If you really want to make them fun use small cookie cutters and create crackers in your child’s favorite shapes.  My kids love it when I make fish shaped crackers.

These make a great addition to school lunches with slices of raw cheese. Homemade gluten free crackers are also a perfect accompaniment to a bowl of soup for lunch.  My kids love to use them for dipping!

I also like to serve homemade crackers with hummus and salsa. Since my son can’t eat wheat, rice or corn it’s so nice for him to have something to use with dips. A pile of homemade crackers with a bowl of hummus makes him one happy boy.

Make a big batch of gluten free crackers and store them in the cupboard or freezer. You’ll have a healthy snack on hand that you know is good for your kids and is something they’ll love. Homemade crackers are also a perfect snack to keep in the diaper bag.

Have you  ever made your own crackers? Try this simple, properly prepared and allergen friendly version. It’ll be a hit with the whole family.

Simple Soaked Series: Crackers | Homemade Dutch Apple Pie

Simple Soaked Series: Gluten Free Crackers
Yields 50
A simple soaked cracker that is gluten, dairy, egg, nut and corn free.
Write a review
Print
Ingredients
  1. 2 cups any combination of gluten free flour (see notes for flavor combinations)
  2. 4 Tbsp. melted coconut oil or butter
  3. 6 Tbsp. warm water
  4. 1 tsp. lemon juice, whey, kefir or yogurt
  5. 1 1/2 tsp. unrefined sea salt
  6. 8 tsp. coconut sugar or cane sugar
  7. 3-6 Tbsp. water
Instructions
  1. Combine the flour, fat, warm water and lemon juice.
  2. Cover and let sit 7-24 hours.
  3. Heat oven to 350*F.
  4. Add the salt, sugar and 3 Tbsp. water to the soaked mixture.
  5. Mix and knead dough by hand until a ball forms. Add more water if needed.
  6. Split the dough into three equal parts.
  7. Cut four pieces of parchment paper (the size of a baking sheet).
  8. Place on piece of dough on one piece of parchment paper. Top with another sheet of parchment paper.
  9. Roll the dough between the paper until it is about 1/8" thick.
  10. Remove the top layer of paper.
  11. Cut into desired shapes with a pizza cutter or cookie cutters.
  12. Sprinkle extra salt on top of the dough if desired.
  13. Transfer the parchment paper to a baking sheet.
  14. Repeat with the remaining portions of dough.
  15. Bake the crackers for about 20 minutes, until golden.
  16. Turn off oven. Leave the crackers in the oven for 7-10 minutes, until crisp.
  17. Remove from oven and let cool completely.
  18. Store crackers in an airtight container at room temperature or in the freezer for long term storage.
Notes
  1. The base recipe creates a "Wheat Thin" style cracker with a slight sweetness.
  2. For a rye flavored cracker use 1/2 cup teff flour in your flour mixture. Reduce sugar to 4 tsp.
  3. For a butter cracker use at least 1 cup of "white" flour like rice or tapioca. Reduce sugar to 4 tsp.
  4. You can add herbs and seasonings like garlic powder to the dough for a variety of flavors.
  5. You can add 1/3 cup finely grated cheese to the dough to make cheese crackers.
Just Take A Bite https://justtakeabite.com/


In order for me to support my blogging activities, I may receive monetary compensation or other types of remuneration for my endorsement, recommendation, testimonial and/or link to any products or services from this blog.

Simple Smoothie Series: The Health Nut

Simple Smoothie Series: The Health Nut || Homemade Dutch Apple PieThe final smoothie in this series is packed with nutrients and has no added sugar. So I call it the health nut.

Dates and fruit add a touch of sweetness while flax seeds, avocado, egg yolks and vegetables provide critical fats, vitamins, minerals and omega-3’s.

The health nut is a very mild smoothie. There are no strong flavors that overpower. It is perfect for kids.

I used yogurt for probiotics, but this smoothie works just as well without any dairy products. You can use coconut milk or water to get the correct consistency. Then add a powdered probiotic.Simple Smoothie Series: The Health Nut | Homemade Dutch Apple Pie

This smoothie does require a little bit of forethought. You should soak the dates in warm water for a bit before using them. The dates plus the soaking liquid will help sweeten the smoothie better that way. I just put the dates and water in the blender the night before and add the rest of the ingredients in the morning.

You can adjust the amount of dates and fruit to your liking to make the smoothie sweeter if desired.

This smoothie is great as part of your breakfast or lunch or even for a mid-day snack. Pour some in a travel mug with a straw and sip on it throughout the day when you need a little pick-me-up.

A smoothie is a great way to add nutrients to your diet with little effort. This health nut smoothie is a delicious way to do it.Simple Smoothie Series: The Health Nut | Homemade Dutch Apple Pie


Simple Smoothie Series: The Health Nut
Serves 1
A simple, nutritious smoothie with no added sweeteners.
Write a review
Print
Ingredients
  1. 3-4 dates, pitted, soaked in 4 Tbsp. warm water
  2. 1 small or 1/2 medium apple
  3. 10 -15 grapes (red or green)
  4. 1 medium stalk celery
  5. 1/2 medium carrot, peeled, cut in chunks
  6. 1/4 cup whole milk yogurt, kefir, coconut milk yogurt, milk or coconut milk
  7. 1 egg yolk
  8. 1/4 avocado
  9. 1 Tbsp. flax seeds
  10. 1/4 tsp. sea salt
Instructions
  1. Soak dates in warm water over night or at least 3 hours.
  2. Combine the soaked dates (with liquid) and the remaining ingredients in a high powered blender.
  3. Blend until smooth.
  4. Serve immediately or store in the refrigerator or freezer.
Notes
  1. You can soak the dates in the blender.
  2. The egg yolk, flax seeds and avocado are all optional, depending on your tolerance.
  3. You can substitute cucumber for the celery.
  4. You can substitute cooked squash or pumpkin for the carrot.
  5. You can add 2 Tbsp. soaked nuts if you tolerate nuts.
Just Take A Bite https://justtakeabite.com/


In order for me to support my blogging activities, I may receive monetary compensation or other types of remuneration for my endorsement, recommendation, testimonial and/or link to any products or services from this blog.

Simple Smoothie Series: Kiwi Strawberry

Simple Smoothie Series: Kiwi Strawberry || Homemade Dutch Apple PieIt’s that time of year – time to get back on track with nourishing foods.

So this month I’m doing a simple smoothie series. Smoothies are a great way to pack in nutrition, and they can be tailored to meet any dietary restrictions. Plus kids love them!

The other great thing about smoothies is that they can be prepared in advance and are great for on the go breakfasts or lunches. They can even be frozen to make a breakfast popsicle your kids will love.

If you have a little one just starting solids you can spoon feed a thick smoothie. It’s an easy way to give them things like probiotics and cod liver oil.  Be sure to leave out the honey if giving it to a child under one year of age.

A smoothie can be a meal on its own. I personally need to have a salty/starchy component to my meal or else I will feel cold. So if I drink a smoothie (which has lots of fat and protein) I like to pair it with a muffin or slice of bread or bowl of rice with salt. That gives a good fat/protein/carbohydrate balance and a good sugar/salt/saturated fat/starch balance – both of which are ideal for good health. It is especially important for adrenal health.

My first simple smoothie is kiwi strawberry. It’s perfect for the winter months. Kiwi is readily available in the store. Then add some strawberries from your summer freezer stash. It’s a delicious combination that is rich in vitamin C.

An added bonus of using strawberries is that they are the best source of ellagic acid. According to Nourishing Traditions, “strawberries contain a compound called ellagic acid, which is an antioxidant that helps detoxify carcinogens.”Simple Smoothie Series: Kiwi Strawberry || Homemade Dutch Apple Pie

The yogurt or kefir in the smoothie provides probiotics and enzymes to help digest lactose. The egg yolks provide so many nutrients – fat soluble vitamins A, D, E and K plus calcium, iron, phosphorus, zinc, thiamin, folate, vitamin B6 and vitamin B12.

I add a pinch of sea salt to smoothies for trace minerals. You can also add gelatin (use the non-gel form) and coconut oil.

Probiotic powder and liquid fermented cod liver oil can also be added in small amounts. You can also add avocado for thickness and dates for sweetness.

The end result is a refreshing kiwi strawberry drink. But when you look a bit deeper you see it is a nutrition powerhouse and a great way to start your day.

I sometimes make a large batch of smoothie on Sunday and pour it into individual cups. Then I can use them as needed throughout the week.  If you are going to make the smoothies in advance leave out the coconut oil and gelatin. They will change texture as they sit in the refrigerator.

This recipe makes enough for two adults (average size smoothies) or three to four children.

A few words of caution. Do not add raw greens to your smoothies. Most of them contain oxalates in their raw forms. If you want to add greens be sure to cook them first.

Also, I don’t advise drinking smoothies every day. It’s a good addition a couple times a week. Change it up with other breakfasts throughout the week.

A strawberry kiwi smoothie is the perfect breakfast treat for the whole family. Stay tuned for more delicious flavors.Simple Smoothie Series: Kiwi Strawberry || Homemade Dutch Apple Pie

Simple Smoothie Series: Kiwi Strawberry
Serves 2
A power packed smoothie to start the day.
Write a review
Print
Ingredients
  1. 1 cup total yogurt, kefir, sour cream, milk, coconut milk and/or coconut milk yogurt
  2. 2 egg yolks
  3. 1 cup strawberries (fresh or frozen)
  4. 1 kiwi, peeled and cut up
  5. 1/4 tsp. sea salt
  6. 2-4 Tbsp. honey and/or maple syrup (to taste)
  7. 2 tsp. gelatin (optional)
  8. 1 Tbsp. melted coconut oil (optional)
  9. 1/2 small avocado (optional)
  10. 2 dates (optional - leave out some or all of the honey if adding dates)
Instructions
  1. In a blender combine the yogurt/milk, egg yolks, strawberries, kiwi, salt and sweetener. Blend until smooth.
  2. Adjust sweetness to taste.
  3. Add gelatin and blend.
  4. While the blender is running slowly pour in the melted coconut oil.
  5. Pour into glasses and serve immediately or store in the refrigerator.
Notes
  1. If making the smoothie for a child under one year of age leave out the honey. It is not safe for a small child. They should not need extra sweetener besides the fruit. Or you can add a bit of banana for extra sweetness.
  2. If making the smoothies in advance leave out the gelatin and coconut oil.
  3. If you do not tolerate eggs you can make the smoothie without egg yolks. The taste will not change.
  4. You can substitute a different kind of berry if you do not tolerate strawberries.
Just Take A Bite https://justtakeabite.com/


In order for me to support my blogging activities, I may receive monetary compensation or other types of remuneration for my endorsement, recommendation, testimonial and/or link to any products or services from this blog.

Quick and easy salmon salad

Simple Supper Series: Salmon Salad

Quick and easy salmon saladFor the final installment in my simple supper series I have a recipe so easy it doesn’t even require any cooking!  We all have nights where we need something this easy.

Five-Minute Salmon Salad

Salmon salad takes about five minutes to prepare. You can do it right before you eat or you can prepare it in advance.

Canned salmon is combined with celery, cranberries and mayonnaise for a delicious, easy meal. The celery adds a nice crunch. The cranberries give a little sweet and tart flavor.

Then add some seasoning to taste and you’re all set.

Kid-Friendly Salmon Salad

My kids LOVE salmon salad.  They enjoy anything with salmon. But they really liked this salad. 

I served it on bread/rolls for sandwiches. You can put it on a bed of lettuce or rice or even eat it with crackers.Quick and easy salmon salad

I packed the leftovers in my daughter’s lunch (she requested it!). For the lunch I just served it plain. What an easy and nutritious lunch.

I try to serve seafood once a week. This salmon salad is a really easy way to do that and be sure the kids will eat it.

Salmon salad is perfect for a meal where you need to walk in the door and eat. It’s even great on the go.

If you don’t have salmon on hand you can use tuna or roast chicken or turkey.Quick and easy salmon salad

Salmon Salad Appetizer

Salmon salad can be spruced up a bit to make it fancy enough for guests. Add chopped nuts and diced avocado for a really rich flavor. Serve it on crackers for a delicious appetizer.

This is a great recipe for the holidays.  The red of the cranberries and green of the celery make it look very festive.

I saved the simplest for last. Salmon salad is perfect for breakfast, lunch or dinner. It only takes five minutes to prepare. And everyone loves it. I call that a winning recipe.Quick and easy salmon salad

Simple Supper Series: Salmon Salad
Serves 4
A simple salad that comes together in minutes.
Write a review
Print
Ingredients
  1. 2 (6 oz.) cans boneless skinless salmon
  2. 2 celery stalks, diced
  3. 1/4 cup dried cranberries or dried cherries
  4. 1/2 cup mayonnaise (preferably homemade - see post for link)
  5. 1 tsp. unrefined sea salt
  6. 1/2 tsp. pepper (optional)
  7. 1/2 tsp. garlic powder
  8. 1 tsp. dill weed
  9. 1/2 tsp. dried thyme
Instructions
  1. Combine all of the ingredients in a bowl. Mix until well combined.
  2. Serve immediately or cover and refrigerate until ready to eat.
Notes
  1. The cranberries can be replaced with raisins or cut up apricots.
  2. The salmon can be replaced with tuna, turkey or chicken.
  3. Serve the salad plain, on bread, with crackers or over rice or quinoa.
  4. Additional add-ins include chopped nuts and diced avocado.
Just Take A Bite https://justtakeabite.com/

Simple Soup Series: Beef Stew

Simple Soup Series Beef Stew || Homemade Dutch Apple Pie

 Last on the list in this simple soup series is beef stew. Normally when I think of stew I think of simmering something all day long.

But not here. This stew comes together in under thirty minutes. It’s packed with flavor and nutrition. And it’s very filling.

It starts with a few fresh vegetables. Add them to rich beef broth for the base.

Then add the beef and seasoning. Finally a little thickening and you’ve got a delicious dinner. 

Simple Soup Series Beef Stew || Homemade Dutch Apple Pie

Don’t forget to have an adorable assistant to help clean up vegetable peelings. That makes the preparation even more fun.

Making a simple soup is definitely something even young kids can help with. They can chop some vegetables (while being supervised of course) and then help add everything to the pot. This is a great way to get your children to eat nourishing soups. Let them help.

All of my kids love to help in the kitchen. Then when dinner is served they are so proud that they contributed. 

Simple Soup Series Beef Stew || Homemade Dutch Apple Pie

Beef stew is another great lunch box addition. It will keep your child’s belly full and give them plenty of energy.

This is also a soup that freezes well for easy weeknight meals.

Do you have more time in the morning to make food? You can either prepare the stew in a pan and put in the fridge to warm at dinner time. Or you can toss the ingredients in the crockpot and let it simmer for a few hours.

Beef stew is a simple soup that will satisfy your appetite and give your body the nourishment it needs. 

Simple Soup Series Beef Stew || Homemade Dutch Apple Pie

Simple Soup Series: Beef Stew
Serves 5
Write a review
Print
Ingredients
  1. 4 cups beef broth
  2. 4 Tbsp. cornstarch, arrowroot or tapioca flour
  3. 3 large carrots, cut in small chunks
  4. 1 large potato, cut in small chunks (optional)
  5. 1/2 onion, diced
  6. 1-2 cups any other vegetables (peas, broccoli, cauliflower, beans) (optional)
  7. 1 cup cooked, cut up beef roast
  8. sea salt, garlic powder, parsley and basil to taste
Instructions
  1. In a large saucepan combine the cold broth and cornstarch until dissolved.
  2. Add the remaining ingredients.
  3. Bring to a boil. Turn down heat and simmer 20 - 30 minutes, until the vegetables are tender and the stew is thickened.
Notes
  1. You can use 1/2 lb. cooked ground beef in place of the roast beef.
  2. You can use all frozen vegetables. If so the cook time will only be about 15 minutes.
  3. An easy way to have two delicious meals in one week is to cook a bone-in beef roast in the crockpot one day, then use the bone to make broth over night. The next day use the broth and the leftover meat to make stew.
  4. If you like the stew thicker, add more cornstarch to a small amount of cold water or broth and stir it into the stew. If you like it thinner cut down on the cornstarch or omit it completely.
Just Take A Bite https://justtakeabite.com/

Simple Soup Series: Split Pea Soup

Simple Soup Series Split Pea Soup || Homemade Dutch Apple PieHands down my favorite kind of soup is split pea!  Growing up it was such a treat when my mom would make a pot of split pea soup with big chunks of ring sausage. You could smell it simmering on the stove for hours in anticipation of dinner.

So of course I make it for my family now. But I generally do not have time to monitor a pot of soup for hours.

I make my split pea soup in the crockpot. It really doesn’t get any easier. Add peas. Add broth. Add meat. Add seasoning. Dinner is ready. It only takes about five minutes to get it going. It’s so easy my three year old can pretty much prepare it for me!Simple Soup Series Split Pea Soup || Homemade Dutch Apple Pie

What we add to the pea soup just depends what we have on hand. Sometimes I make it pure pea soup – peas, broth, salt. Sometimes I add diced ham, ring bologna or diced carrots. It would even be good with cooked sausage or leftover roasted chicken.

For the batch I photographed I used large chunks of ring bologna as a nod to how my mom made it growing up. I would eat the soup and save the sausage for the end. It was fun. But if you have small children it is easier to cut up the meat into smaller pieces.

You can make split pea soup as thin or as thick as you like. I prefer mine thicker.

One of the best parts about this soup is how much my kids love it.  I was going to take a picture of my son eating it, but he finished his bowl before I could get the camera. He just shoveled it in barely taking a breath between bites.Simple Soup Series Split Pea Soup || Homemade Dutch Apple Pie

This is even an easy soup for very young children to eat. You can thin it out with extra broth and leave out the meat chunks for little ones.

Split pea soup is very allergen-friendly. So it’s great for people with all types of dietary needs. It also freezes well.

I believe split pea soup is a Dutch soup. Maybe that’s why my grandma and my mom always made it. And maybe that’s why my family and I love it so much!

This is also a very budget friendly soup.  Make broth from chicken bones and add some dried split peas. You’ll feed the whole family for a few dollars.Simple Soup Series Split Pea Soup || Homemade Dutch Apple Pie

Note that split peas are similar to beans. They are not like sweet peas. So if you don’t tolerate beans you should only try a small amount of split pea soup to see if you can handle it. It can be gassy like beans. I learned that quickly as a nursing mom. My little one doesn’t appreciate me eating too much pea soup.

This really is the most delicious and easiest to prepare soup I make. The whole family loves it, and it’s full of vegetables and broth. It doesn’t get much better.  I even love to eat the leftovers for breakfast. Leftovers never last long here. My daughter loves it in her lunch too.

As with other soups that I make I like to add a little coconut oil or butter to individual bowls to balance it with healthy fat. Then I pair it with muffins or bread. Dinner has never been easier or tastier.

Simple Soup Series Split Pea Soup || Homemade Dutch Apple Pie


Simple Soup Series: Split Pea Soup
Serves 6
A simple, nourishing split pea soup.
Write a review
Print
Ingredients
  1. 1 lb. dried split peas (green or yellow)
  2. 6 cups chicken broth (you can substitute water if you don't have broth)
  3. 2 cups any meat of choice (cubed ham, sliced ring bologna, cooked sausage, cooked chicken)
  4. 2 tsp. sea salt (to taste)
  5. 2 tsp. garlic powder (to taste)
Instructions
  1. Rinse the split peas in a strainer.
  2. Put the split peas in the crockpot.
  3. Add the broth, meat and seasoning.
  4. Cover and cook on high 6-8 hours or low 7-12 hours, until the peas are fully cooked and the soup reaches desired thickness.
  5. Stir the soup every 3-4 hours if possible to make sure there is enough liquid. Add mor if necessary.
Notes
  1. You can make the soup thinner by adding extra broth or water.
  2. This soup freezes well.
  3. It is helpful to add a little water or broth when reheating pea soup.
  4. You can make this soup in a pot. Simmer 2-4 hours, until peas are cooked and soup thickens. Stir it periodically.
Just Take A Bite https://justtakeabite.com/

Simple Soup Series: Chicken Noodle Soup

Simple Soup Series Chicken Noodle Soup || Homemade Dutch Apple PieWhen it comes to soup chicken noodle is a classic. It’s also one of the easiest soups to make!

 Combine rich bone broth with roasted chicken and vegetables. Then add your favorite noodles. Dinner is served.

I grew up eating noodle soup out of a packet.  Powdered chemicals. Not exactly something that young children should be consuming daily. But I did. Noodle soup, toast and egg salad.

As a mom myself I understand just how important nutrition is. Soup and eggs are two very healthy foods. But instead of soup out of a box my kids now get homemade nourishing chicken noodle soup to fuel their minds and bodies.  It also helps boost their immune systems to ward off illness in the winter.

My kids love chicken noodle soup. I love that they are getting a good dose of broth. Plus I can make a couple versions to meet everyone’s needs without spending hours in the kitchen.

For some of the family I use corn noodles and for some I use rice noodles. For some I add carrots, for some I add peas. Everyone gets a healthy meal. All I have to do is mix and heat.

Chicken noodle soup is also great for school lunches or even quick lunches at home.  For young kids don’t fill a lunch container with too much of the broth. The noodles and vegetables soak up broth while it cooks, so there is still plenty of good stuff…but without the risk of spilling everywhere.

This is a great meal when feeding a crowd. Simply double or triple the recipe and pack it with veggies and noodles. Nobody will go hungry. When I make a large batch I often use half water and half broth. As much as I love nourishing broth I don’t always have ten cups of it to use in one pot of soup. It still tastes great and has plenty of nutrition. You can also add collagen to boost nutrition if you don’t have enough broth.

Chicken noodle soup. It’s easy. It’s good. It’s good for you.

Simple Soup Series Chicken Noodle Soup || Homemade Dutch Apple Pie

Simple Soup Series: Chicken Noodle Soup
Serves 5
A simple nourishing soup filled with chicken and vegetables.
Write a review
Print
Ingredients
  1. 4 cups chicken broth
  2. 4 large carrots, cut into small chunks
  3. 1 cup peas and/or corn
  4. 1 cup cooked, cut up chicken
  5. 1 cup gluten free noodles
  6. 1 tsp. sea salt (to taste)
  7. 1 tsp. garlic powder (to taste)
  8. 1/2 tsp. dried parsley (to taste)
Instructions
  1. In a large saucepan combine all ingredients, except the noodles
  2. Simmer for 20 minutes, until the carrots are tender.
  3. Add the noodles. Cook another 10 minutes.
  4. Adjust seasoning to taste.
Notes
  1. This soup freezes well.
  2. You can replace half of the broth with water.
  3. You can add 1-2 Tbsp. grass-fed collagen for added nutrition.
  4. You can replace the noodles with white rice. Increase the cooking time by 10 minutes.
Just Take A Bite https://justtakeabite.com/