Home » Kid-friendly Recipes » side dish » Page 6

Category: side dish

Mexican Layer Dip

I’m sure everyone has their own version of “7 layer dip.” I got a recipe many years ago from my sister called Mexican 8 Layer Dip. I haven’t made it in a long time. But I made some this morning for our Super Bowl dinner tonight. I think I ended up with 7 layers. I’ll post it as I made it. I love this recipe/idea because you can basically add whatever you/your family likes. I was also happy to finally have a chance to use one of my new serving dishes I got for Christmas. It was perfect for this!

Mexican Layer Dip

2 cups shredded lettuce
1 can refried beans
1/2 cup salsa
8 oz. sour cream
1 avocado, diced or guacamole or avocado dip
1 cup shredded cheddar cheese
1/2 cup diced tomatoes
(other possible toppings – sliced olives, diced onion, taco sauce, sliced green onions, sliced mushrooms, diced green chiles, corn)

Layer on platter in order listed. Cover and chill 4-24 hours. Serve with tortilla chips, crackers or raw veggies.

Beefy Cream Cheese Salsa Dip (Taco Dip/Topping)

I wanted to try one of the dip recipes from Heavenly Homemakers last night. I was debating between the cream cheese salsa dip and the simple chip dip. When I looked at the recipes I realized I couldn’t do the chip dip because I don’t have any sour cream. But I did have leftover taco meat to use up. So I kind of combined the recipes/made it my own and made beefy cream cheese salsa dip. Or taco dip. It’s Laura’s cream cheese salsa dip with taco meat mixed in. Turned out great!!! A very easy and fun food. It only took a few minutes to make (since I already had the meat cooked, just had to warm it a little). And it’s filling enough (meat, cheese, veggies) to make it part of a main dish. You can use it as a dip with chips or veggies. Or even put it over rice or pasta. It’s also very healthy. I used homemade cream cheese, homemade salsa and taco meat with homemade taco seasoning. I didn’t actually measure anything. I just added what looked right. Note that the top picture is just the cream cheese salsa dip. The bottom picture has the meat added.

Beefy Cream Cheese Salsa Dip (Taco Dip/Topping)

1 (8 oz.) package cream cheese (or homemade)
1 ¼ cups salsa
1/2 – 1 lb. taco meat (adjust to your taste)
Tortilla chips, veggies, rice or pasta

Lay cream cheese out on counter for 1-2 hours to soften. Put softened cream cheese and salsa in a bowl and mix with beaters (I just used a spoon.) until thoroughly combined. Warm meat. Stir into cream cheese mix. Serve with tortilla chips (or fresh veggies or over rice or pasta).

Baked Onion Rings

I haven’t made onion rings in a long time, but they sounded good this week. So I pulled out my old recipe. It’s fairly simple and pretty good. I think I got the recipe from an IBS message board years ago. So it’s not a fattening version of onion rings. The next time I make onion rings I want to try another recipe and actually fry them. But this one works well. Even Rebecca ate some after some initial hesitation 🙂  I don’t have any actual amounts for the ingredients on my recipe. But I’ll try to come up with some approximations.

Onion Rings

1 large onion
1 cup whole wheat flour
2 eggs
1 cup cornmeal
1/2 cup bread crumbs
salt and pepper to taste

Slice onion in 1/4″ – 1/2″ thick rings. Place flour in shallow bowl. Beat eggs in a shallow bowl. Mix cornmeal and bread crumbs in shallow bowl. Dip onions in flour, then egg (be sure it’s fully coated), then cornmeal (make more cornmeal mixture if it gets too clumpy or is running out). Place on cookie sheet. Spray/mist with olive oil. Sprinkle with salt and pepper to taste. Bake at 400 degrees for 25 – 30 minutes. Serve plain or with ketchup.

Sauerkraut

Last week I made my first batch of sauerkraut. I finally got around to tasting it today 🙂  Very good! It tastes like pickles to me. I just used the basic recipe in Nourishing Traditions. I used purple cabbage. Very simple (aside from a good arm workout pounding cabbage for 10 min.). Very good. And so great for your gut!! Plus it gets better with age. So it should taste really good in a few months 🙂

Sauerkraut
Makes 1 quart

1 medium cabbage, cored and shredded (I used my food processor for this)
1 Tbsp. caraway seeds
1 Tbsp. sea salt
4 Tbsp. whey, if not available use an additional 1 Tbsp. salt

In a bowl, mix cabbage with caraway seeds, sea salt and whey. Pound with a wooden pounder or a meat hammer for about 10 minutes to release juices. Place in a quart-sized, wide-mouth mason jar and press down firmly with a pounder or meat hammer until juices come to the top of the cabbage. The top of the cabbage should be at least 1 inch (2,5cm) below the top of the jar. Cover tightly and keep at room temperature for about 3 days before transferring to cold storage. The sauerkraut may be eaten immediately, but it improves with age.

Fermented Pickled Cucumbers

My latest experiment in fermentation is pickled cucumbers. These sound pretty safe 🙂  I assume they’ll just taste like dill pickles. They are very easy to make. I got 6 pickling cucumbers at the farmer’s market this week. 4 whole cucmbers fit in a quart jar. I sliced the other 2 and put them in a pint jar. I’ll update in a few days with the verdict. This is another Nourishing Traditions recipe.

*Edited 7-6-10: I tried one of the pickle slices on Sunday. Pretty good. Definitely tastes like a dill pickle! I still have to try the whole pickle…when I’m in the mood for a lot more pickle 😛
Pickled Cucumbers

4-5 pickling cucumbers or 15-20 gherkins
1 Tbsp. mustard seeds
2 Tbsp. fresh dill, snipped (I used dried dill since that what I have)
1 Tbsp. sea salt
4 Tbsp. whey (use an additional 1 Tbsp. salt if you don’t have any whey)
1 cup filtered water

Wash cucumbers well and place in a quart-sized, wide-mouth mason jar. Combine remaining ingredients and pour over cucumbers, adding more water if necessary to cover the cucumbers. The top of the liquid should be at least 1″ below the top of the jar. Cover tightly and keep at room temp for about 3 days before transferring to cold storage.

Variation: Pickled Cucmber Slices
Wash cucumbers well and slice at 1/4″ intervals. Proceed with recipe. Pickles will be ready for cold storage after about 2 days at room temp.

Fermented Bean Paste

I’m trying out some recipes of lacto-fermented foods. Why? Because it’s good for digestion, of course 🙂  It enhances the food’s digestibility and increases the vitamin level. It also produces helpful enzymes and antibiotic and anticarcinogenic substances. And it promotes the growth of healthy flora in the intestines. To top it off…it’s easy! So I say, why not? And especially now that it’s hot it’s nice to be able to make food that you don’t have to cook. My first recipe is fermented bean paste. It sounded easy and delicious…kind of like hummus or refried beans. We haven’t used it yet, so I’ll have to update later with the verdict. I did taste just a little when I made it. It was quite strong, but good. I think part of the strong flavor comes from the onions I used…my FIL grows very strong onions. Maybe next time I’ll use a milder onion. I forgot to take a picture when I made it, so I’ll have to update later after we try it. You do need whey to make this (and most fermented fruits/veggies). You can make whey by straining yogurt. Very simple  I got this recipe from Nourishing Traditions.

*Updated 5/29/10 – We tried this last night. It’s quite good. Justin and I both liked it. Like I said before, it’s very strong. The next time I make it I’ll use a milder onion. But it’s still good. I served it with homemade pita bread (along with some hummus). Great combo. And it’s good enough that I sometimes eat a spoonful before a meal (even if I’m not serving it with the meal) just to help my tummy. That’s what it’s for 🙂  It’s kind of a condiment…like having pickles with a meal. You just have a little with your meal.

Fermented Bean Paste
makes 1 quart

3 cups beans, cooked and drained (I used pinto beans…soaked for about 24 hours then cooked  for an hour or two)
1 onion, peeled and coursely chopped (I didn’t use this much onion and it was still very strong)
3 cloves garlic, peeled
1 Tbsp. sea salt (make sure it’s unrefined sea salt)
4 Tbsp. whey

Place the onion and garlic in food processor and process until well chopped. Add remaining ingredients and process until smooth. Place in quart-sized wide-mouth jar, leaving 1 inch of space between the top of the beans and the top of the jar. Cover tightly and leave at room temp for about 3 days before transferring to the refrigerator (it might take less time if your house is hot or longer if it’s cold). Serve as a dip with pita chips or tortilla chips.

Bread Pudding

Since I’m focusing on bread this month I decided to make bread pudding last night. It’s really more of a dessert. But I served it as a side dish with our quiche. I usually serve quiche with some kind of sweet bread, so it’s really not that different. I love bread pudding. But I’ve actually never made it before. And haven’t had it in years. This is my mom’s recipe. So simple and so good!! We all loved it. It’s hard to stop eating it 😛  It’s soft and sweet and has kind of a custardy feel to it from the eggs. And the great thing about it is that everyone pretty much always has the ingredients on hand. And it’s a great way to use up the end pieces of bread (that normally get thrown away in our house). They actually work better than regular slices. A very budget friendly dessert! And a great way to use up those last few slices of bread in a loaf. This is great on it’s own, warm or cold. And it’s also good with some vanilla ice cream on top. I bet it would be good with some apple slices baked in too. Maybe I’ll have to try that some time. Can’t wait to have more tonight! And I just thought of it…I bet this would even be a good breakfast…bread, eggs, milk, raisins…sounds good to me! That may be on our menu soon 😉

This post is linked to Fat Tuesday at Real Food Forager.

**Edited 4/24/10 – I made this today with a peeled and chopped apple. Yum!!!! Makes it even better.

Bread Pudding

4 cups bread, cubed (whole wheat, sourdough, cinnamon raisin…whatever you like) (just tear it into rough chunks)
2 cups scalded millk (heated to almost boiling)
1/4 cup butter, melted
1/2 cup organic cane sugar or sucanat (honey or maple syrup would probably work too)
2 eggs, slightly beaten
1/4 tsp. salt
1/2 cup raisins (optional, but they really do make it so much better 🙂
1 tsp. cinnamon or nutmeg (I used cinnamon)
1 apple, peeled and chopped (optional – to make apple raisin bread pudding)

Place bread crumbs in a large bowl. Pour milk over top. Let cool slightly. Add remaining ingredients. Pour into greased 1 1/2 qt. casserole. Bake at 325 for about 1 hour, until knife inserted in center comes out clean (I baked mine for a little over an hour).

Simple Whole Wheat Bread

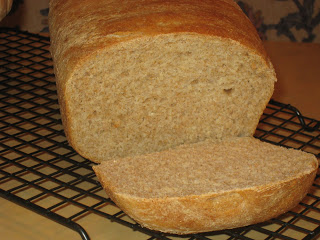
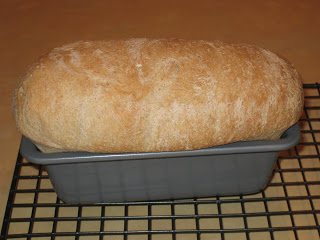
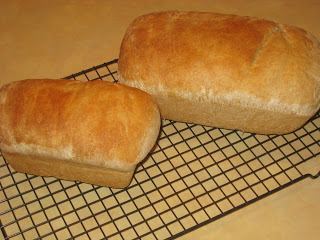
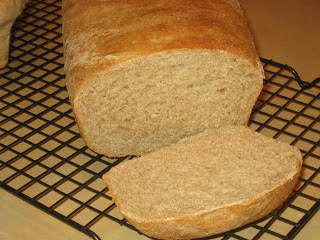
I baked my first loaf of bread for the month yesterday. I did a quick search for easy whole wheat bread, and this is first recipe I found. It’s from All Recipes. It had great reviews and didn’t sound too complicated. It’s not 100% whole wheat, but I bet you could replace some of the bread flour with whole wheat or white whole wheat flour to make it closer to 100%. I just stuck with the original recipe for my first try. This turned out really well! It was quite simple to make. And I used my mixer! No kneading by hand 🙂  Definitely a good turnout considering some of the bad breads I’ve baked in the past. I think part of my problem has been patience. Yesterday when I was making the bread I was also playing with Rebecca, making dinner, getting her to bed, etc. So each of the rise times I let go a lot longer than usual since I was busy. And it really made a difference! I still have a ways to go to become a decent bread baker, but this was a good attempt. I didn’t get it out of the oven until about 9:30 last night, but I still couldn’t resist cutting into it and tasting a sliver while it was warm. YUM!! Very soft, moist and mildly sweet. Not too heavy either. I can’t wait to try it tonight for our sandwiches. See how it holds up for sandwich bread. I only made a half recipe, so I did one full loaf and one small loaf.

Simple Whole Wheat Bread

3 cups warm water (110 degrees F/45 degrees C)
2 (.25 oz.) packages active dry yeast (4 1/2 tsp.)
1/3 cup honey
5 cups bread flour

3 Tbsp. butter, melted
1/3 cup honey
1 Tbsp. salt
3 1/2 cups whole wheat flour
2 Tbsp. butter, melted

In a large bowl (I did this right in my stand mixer bowl), mix warm water, yeast, and 1/3 cup honey. Add 5 cups white bread flour, and stir to combine. Let set for 30 minutes, or until big and bubbly (I let it set for about 45 min.).

Mix in 3 Tbsp. melted butter, 1/3 cup honey, and salt. Stir in 2 cups whole wheat flour. Flour a flat surface and knead with whole wheat flour until not real sticky – just pulling away from the counter, but still sticky to touch. This may take an additional 2 to 4 cups of whole wheat flour (I kneaded it in my mixer for a few minutes). Place in a greased bowl, turning once to coat the surface of the dough (I used my mixer bowl for this too…only got one bowl dirty:). Cover with a dishtowel. Let rise in a warm place until doubled (I let it rise for about 70 min.).

Punch down, and divide into 3 loaves. Place in greased 9 x 5 inch loaf pans, and allow to rise until dough has topped the pans by one inch (I let it rise for about 90 minutes).

Bake at 350 degrees F (175 degrees C) for 25 to 30 minutes; do not overbake. Lightly brush the tops of loaves with 2 Tbsp. melted butter or margarine when done to prevent crust from getting hard (I used a little butter spray). Cool completely.

**Edited 3/4/10
This makes awesome sandwich bread!! I used my electric knife to cut normal size slices. So good! I hope I can keep up with the bread baking. This is far better than boughten bread. It’s homemade for us!

Crockpot Rice and Beans

For lunch yesterday I wanted light, simple, healthy (since I knew Super Bowl evening food wouldn’t be)…rice and beans fit all 3. I got this recipe from A Year of Slow Cooking. It’s so so simple to prep. Literally about 5 min. I’ve never actually made or even had rice and beans. This was really good. All 3 of us liked it. Especially Rebecca. I think she’d eat rice and beans (of any kind) every day 🙂  I replaced the black beans with chick peas for Rebecca’s sake. And I scaled back the rice a bit (I like a different ratio of rice to beans, and I didn’t want to make too much). Since this was cooking while we were at church I couldn’t monitor it. So the rice was pretty mushy, but still very good. Next time I won’t cook it quite as long. I had it on high for a little bit and then on low, total of about 6 hours. This is good on its own, but we added some toppings. I served it with diced green pepper, avocado, salsa, sour cream and cheddar cheese. I’m not a huge sour cream fan, but that really went well with this. A great, cheap, meatless, healthy meal. I’ll be making this again for sure! I bet it would be good with some veggies added in too.

Crockpot Rice and Beans

1 can of black beans, drained and rinsed (I substituted chick peas…any bean will do.)
1 can of pinto beans, drained and rinsed
1 cup of rice (I used organic brown rice. I used 3/4 cups of rice and 1 1/2 cups of liquid.)
1 can (14.5 oz) of diced tomatoes, drained, liquid reserved
1 Tbsp. olive oil
1/2 tsp. kosher salt
1 tsp. Italian seasoning
1/2 Tbsp. dried onion flakes (I don’t have onion flakes. I added garlic powder.)

Put the olive oil into the bottom of your crockpot, and add the rice. Swirl the rice around in the olive oil, until it is coated nicely. Add the beans and tomatoes. Add water to the reserved tomato juice to equal 2 cups of liquid. Add to crockpot. Add seasonings. Stir well. Cover and cook on low for about 6 hours, or on high for 3-4.

Butternut Squash Soup

I tried a new squash soup for dinner last night. I’ve had some cream cheese in the fridge for a while that I wanted to use up. And I was also trying to use up some squash. I did some searching on All Recipes and came across this recipe. I didn’t follow the recipe completely…ok, not much at all, mostly just the idea of adding cream cheese. We got home later than we had hoped from shopping yesterday so I totally skipped the onions (I’m sure they would be good/add great flavor). And I used squash that I had already cooked (from freezer). So there really wasn’t much to it in terms of cooking. Basically  just throw everything in the pan, heat, blend, serve. It turned out great! Justin and I both really liked it. Rebecca didn’t try it since dinner was running late. I gave her pb and j. And for some reason lately she does not like squash at all so I doubt she would have liked it anyway. Definitely a keeper recipe. The cream cheese adds a unique creaminess to it. I never would have thought of adding that. I’ll post the original recipe and what I did. I didn’t actually measure anything, just added what looked/tasted right. I didn’t get very good pics since I was in a rush.

Butternut Squash Soup

6 Tbsp. chopped onion (I skipped this)
4 Tbsp. margarine (I skipped this)
6 cups peeled and cubed butternut squash (I used a combo of mooregold and butternut squash that I had already baked/mashed…maybe 3 cups?)
3 cups water (I used about 1 1/2 cups)
4 cubes chicken bouillon (I used a few teaspoons of organic chicken better than bouillon)
1/2 tsp. dried marjoram
1/4 tsp. ground black pepper
1/8 tsp. ground cayenne pepper (I skipped this and added some garlic powder, paprika and salt)
2 (8 ounce) packages cream cheese (I used about 2/3 of one (8 oz.) pkg., softened)

In a large saucepan, saute onions in margarine until tender. Add squash, water, bouillon, marjoram, black pepper and cayenne pepper. Bring to boil; cook 20 minutes, or until squash is tender. (I skipped all of this and just put the squash, seasoning, water, BTB and cream cheese in a pan and heated).

Puree squash and cream cheese in a blender or food processor in batches until smooth. Return to saucepan, and heat through. Do not allow to boil. (I used an immersion blender right in the pan).