Home » dessert » Page 6

Tag: dessert

Ice Cream Flavored Yogurt Gummies | Homemade Dutch Apple Pie

Ice Cream Flavored Yogurt Gummies: Super Healthy Kids Post

These fruit and yogurt gummies come in five ice cream flavors and make a perfect snack or cake decoration without any artificial ingredients.

Ice Cream Flavored  Yogurt Gummies | Homemade Dutch Apple Pie

A birthday is a time for celebration, fun and a few treats. Cake and ice cream is a classic birthday dessert that encompasses all of these.

But making a fun, colorful cake often involves lots of food coloring.

Food dyes should not be a part of any child’s diet.

They can cause hyperactivity and symptoms of ADD. Not to mention they are chemicals the human body is not meant to consume and can impair the immune system. This also puts a big strain on the liver.

That does not sound like much of a birthday treat in my opinion.

So what is the solution for making a healthy cake that is still colorful and fun? Yogurt gummies!

Ice Cream Flavored  Yogurt Gummies | Homemade Dutch Apple Pie

It only takes about ten minutes to get these yogurt gummies from the blender to the refrigerator. They are so quick and easy you can make all five flavors in one day.  Since the yogurt gummies last two weeks in the refrigerator you can prepare them in advance (one less thing to do at the last minute!).

Yogurt gummies also provide a lot of nutrition.

The whole milk yogurt has healthy fat and protein, while the grass-fed gelatin contains protein and helps aid digestion. The gummies are low in sugar too. What’s not to love?!

Dye free, colorful, flavorful, nutritious…are you anxious to make a batch of ice cream flavored yogurt gummies? Head over to Super Healthy Kids where I share how it’s done.

Ice Cream Flavored  Yogurt Gummies | Homemade Dutch Apple Pie

In order for me to support my blogging activities, I may receive monetary compensation or other types of remuneration for my endorsement, recommendation, testimonial and/or link to any products or services from this blog.

Black Forest Popsicles | Homemade Dutch Apple Pie

Black Forest Popsicles

The sweet flavor of fresh cherries is combined with a hint of chocolate in these black forest popsicles for a unique summer treat.Black Forest Popsicles | Homemade Dutch Apple Pie

The ice cream truck has driven by for the tenth time. The kids are begging for a treat. It’s been hot for days.

Enter super mom with black forest popsicles!

This is the perfect way to use some of your fresh cherries for a unique summer treat. Black forest popsicles are creamy, fruity and chocolaty!

What’s really great is that they only take a few minutes to prepare. The hard part is waiting for the popsicles to freeze!

Black Forest Popsicles | Homemade Dutch Apple Pie

Most of the popsicle is simply pureed cherries. A touch of honey can be added to boost the sweetness.

The real secret is the hint of chocolate.  Chocolate chips, carob chips or cacao nibs are blended right in for a burst of flavor. Leave little chunks of chocolate to get the full effect.

Sweet cherries, tart cherries or both work well in black forest popsicles. Simply adjust the amount of honey added depending on which variety you choose.

I like to use these silicon popsicles molds. They are easy to fill and easy for kids to use.

Black Forest Popsicles | Homemade Dutch Apple Pie

But what about that ice cream truck?

If your kids are like mine, they love to pretend. Mom can be the ice cream truck driver while the kids order their black forest popsicles and “pay” for their treat.

Everyone has fun. Everyone stays healthy.

Black forest popsicles do contain dairy. You can swap the yogurt for coconut yogurt, coconut milk or any other milk you tolerate. So they are a very allergen friendly snack.

Black Forest Popsicles | Homemade Dutch Apple Pie

We are blessed here in Michigan to be able to go cherry picking every summer. We pit and freeze a ton of cherries to use all year in smoothies and yogurt.

I also like to use fresh or frozen cherries for:

This year I’m saving some of our cherries for black forest popsicles. My kids go crazy for them. Yours will too!

Don’t forget mom and dad deserve a treat here and there too. Black forest popsicles are for everyone.

This summer be the hero of the day with black forest popsicles.

Black Forest Popsicles | Homemade Dutch Apple Pie

Black Forrest Popsicles
Yields 6
The sweet flavor of fresh cherries is combined with a hint of chocolate in these black forest popsicles for a unique, low sugar summer treat.
Write a review
Print
Prep Time
5 min
Prep Time
5 min
Ingredients
  1. 2 cups sweet or tart cherries, fresh or frozen
  2. 4 Tbsp. chocolate chips, carob chips or cacao nibs
  3. 2 Tbsp. honey (increase if using tart cherries, omit if you don't want them as sweet)
  4. 1 cup plain whole milk yogurt or milk or coconut yogurt, coconut milk, almond milk or rice milk
Instructions
  1. Blend the cherries, yogurt/milk and honey until smooth.
  2. Add the chocolate chips.
  3. Blend well, leaving small bits of chocolate.
  4. Pour into popsicle molds and freeze until firm.
Notes
  1. You can use 4 tsp. cocoa powder or carob powder + 2 Tbsp. cane sugar in place of the chocolate chips. You will get the chocolate flavor but will not have the chocolate bits.
  2. You can replace the cherries with raspberries.
Just Take A Bite https://justtakeabite.com/

In order for me to support my blogging activities, I may receive monetary compensation or other types of remuneration for my endorsement, recommendation, testimonial and/or link to any products or services from this blog.

Gluten Free Inside Out Oreos® | Homemade Dutch Apple Pie

Gluten Free Inside Out Oreos®

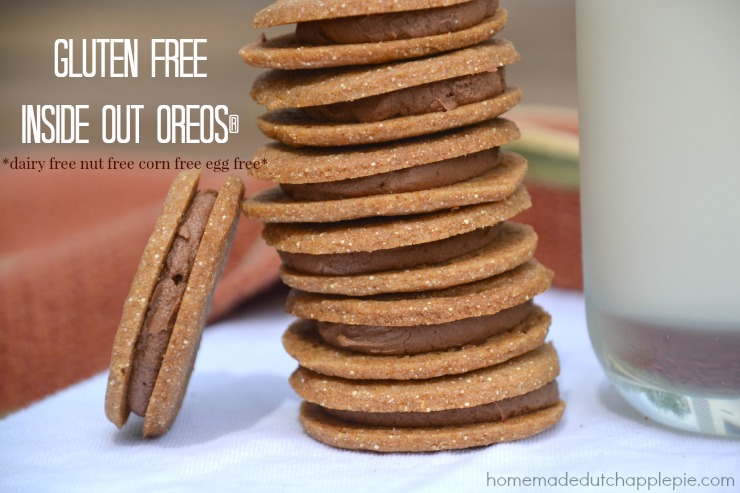
This homemade version of gluten free inside out Oreos® is a fun, allergen friendly treat that is perfect for birthdays or Father’s Day.Gluten Free Inside Out Oreos® | Homemade Dutch Apple Pie

Father’s Day is just around the corner! It’s time celebrate all the special dads in your life.

What is the best way to a man’s heart? Through his stomach of course!  A special dessert is just the thing to show your husband, father or grandfather how much you love him.

Remember to take care of that stomach, though. Don’t serve sweets with artificial ingredients, food coloring and hydrogenated oils. Instead make a homemade dessert that he can’t resist using real ingredients.

Enter gluten free inside out Oreos®. They are both fun and delicious. They will also last a while so your special man can enjoy them the whole week.

The kids can even help make gluten free inside out Oreos®.  You can make them in advance so there is plenty of time to work on them with the kids. Then they will be so proud to give them to dad.

These tasty cookies are also perfect for birthday treats. I recently made them for my son’s cow spotted birthday.

I love how easy they are to make…and how little mess they make when my kids eat them.

Gluten free inside out Oreos® do contain cocoa powder. But you can substitute carob if you need to avoid it.

Maybe you’re thinking these look great…but what about all the sugar?

Each cookie contains less than two teaspoons of sweetener. Plus there is plenty of healthy fat in the cookie to help metabolize the sugar. The combination of the cookie and the frosting actually does have a purpose!

You also have to remember this is a treat. Itis not something to eat all the time.Gluten Free Inside Out Oreos® | Homemade Dutch Apple Pie

Homemade Oreos® are definitely a family favorite. We usually make them with the traditional combination – chocolate cookies with vanilla frosting.  Sometimes we get really fancy and make special holiday versions.

Now we can add gluten free inside out Oreos® to the list.

Homemade Oreos® are even very allergen friendly. They contain no gluten, dairy, nuts, corn, rice, eggs or soy. With a family like mine that is very important.  I don’t like anyone to feel left out.

Are you still trying to decide what to make your special man for Father’s Day? Or do you need a fun birthday treat? Gluten free inside out Oroes® are just what you need. They:

  • are free of allergens
  • are easy to make
  • can be made in advance
  • are a fun project for kids to help with
  • can be eaten without a big mess

This Father’s Day don’t just go for the traditional cake or chocolate chip cookies. Surprise all the special dads in your life with this fun, allergen friendly dessert that will make his heart and his tummy happy. Gluten free inside out Oreos® are the perfect way to say I love you.Gluten Free Inside Out Oreos® | Homemade Dutch Apple Pie

Gluten Free Inside Out Oreos® {dairy free, nut free, corn free, egg free}
Yields 30
A fun, allergen friendly version of Oreos®...flipped inside out!
Write a review
Print
Cookies
  1. 1 cup sorghum flour (or white rice)
  2. 3/4 cups tapioca flour
  3. 1/2 cup amaranth flour (or brown rice)
  4. 1/2 cup organic cane sugar or coconut sugar
  5. 1/2 tsp. unrefined sea salt
  6. 1/2 tsp. baking soda
  7. 1 tsp. vanilla
  8. 6 Tbsp. honey
  9. 1/2 cup melted butter, coconut oil, palm shortening, lard or tallow
Filling
  1. 1/2 cup palm shortening OR 1/4 cup palm shortening + 1/4 cup butter (at room temp)
  2. 3-4 Tbsp. cocoa powder
  3. 1 Tbsp. carob powder
  4. 10 Tbsp. tapioca flour
  5. 1/4 - 1/3 cup maple syrup
Cookies
  1. Heat the oven to 350*F. Cut 3 sheets of parchment paper the size of a baking sheet.
  2. In a large bowl combine the flour, sugar, salt and soda. Stir to remove any lumps.
  3. Add the vanilla, honey and melted fat. Stir to combine. Use hands to form a ball of dough.
  4. Split the dough in half. Place one half on a piece of parchment paper. Roll until 1/4" thin.
  5. Cut the dough into desired shapes and transfer to a parchment lined baking sheet.
  6. Repeat this process until all of the dough is used.
  7. Bake the cookies for 12-13 minutes. Turn off the oven and leave the cookies in for 5-10 minutes.
  8. Allow to cool completely.
Filling
  1. Beat all of the ingredients together in a medium size bowl.
Fill the cookies
  1. Use a spoon or a piping bag to put filling on one cookie. Top with another cookie and gently push down. Repeat until the filling is gone.
  2. Keep the cookies in the refrigerator for the filling to harden.
Notes
  1. This makes three trays of cookies if cutting shapes. Alternately you can simply roll the dough and cut it into squares and bake them without having to transfer the cookies to another sheet. You will only need two baking sheets of cookies with this method.
  2. You can replace the gluten free flours with whole wheat or all purpose flour.
Just Take A Bite https://justtakeabite.com/


In order for me to support my blogging activities, I may receive monetary compensation or other types of remuneration for my endorsement, recommendation, testimonial and/or link to any products or services from this blog.

Cow Spotted Birthday Cake {soaked gluten free chocolate cake}

Cow Spotted Birthday CakeI’m not quite sure how it happened, but my son recently turned four!  He was active in my belly and has not stopped moving since the day he was born. He keeps life interesting and exciting for sure!

One of the fun things about my son is that he is already very passionate and knows what he likes. His enthusiasm is a gift.  One of his passions is construction trucks and “worker men.” The other is farming. He is sure we are moving to a farm soon and will have every animal possible. He has even assigned the whole family their chores already! I love his enthusiasm and wouldn’t be surprised if he really does have a farm of his own some day (and mama would be very proud of him if he does!).Cow Spotted Birthday Cake | Soaked Gluten Free Chocolate Cake | Homemade Dutch Apple Pie

My son’s favorite animal is a “baby calf.” So this year we decided to do a cow spotted birthday for him.  He loved the idea. I loved that it didn’t require any color for decorations. I think my only problem was that I kept thinking of more fun treats to go along with the theme!

My first priority was to make his cake have cow spots. I recently made a soaked gluten free vanilla cake for my daughter’s birthday (with really fun, colorful decorations!). That served as the starting point. Then I created this soaked gluten free chocolate cake to use for the spots.

The cake turned out so well! Every time we cut into the cake the spots changed. It was so fun. The other great thing was that we had lots of extra cake batter since the chocolate was only used for spots. So we made the rest into donuts.Cow Spotted Birthday Cake | Soaked Gluten Free Chocolate Cake | Homemade Dutch Apple Pie

My son was so happy with his cow spotted cake and birthday celebration.  I made chocolate spots and chocolate frosting to decorate the cake. Then to really turn it into a cow spotted celebration I made inside out “Oreos”, chocolate suckers, chocolate/vanilla yogurt gummies, fudge swirl ice cream (like this without the caramel and cone) and chocolate milk (using this chocolate sauce).

I do try to limit the amount of chocolate my son eats since it tends to make him hyper. But this was a fun and special birthday treat for him. If you avoid cocoa you can substitute carob in this recipe.Cow Spotted Birthday Cake | Soaked Gluten Free Chocolate Cake | Homemade Dutch Apple Pie

This cake is also quite allergen friendly since it is gluten, dairy, nut, corn, rice and soy free.  It does contain eggs whites. Side note – don’t get rid of those leftover yolks! They are packed with nutrition. Use them for Russian custard, pudding, ice cream or smoothies.

Do you have a farmer-in-training? Or maybe you need a special way to celebrate an older farmer in your life? This cow spotted cake is so fun and delicious!  Plus the grains are properly prepared. It’s the perfect treat for kids and adults. You can make it simple with just the cake. Or go all out with cow spots everywhere! Happy farming and happy birthday!Cow Spotted Birthday Cake

Soaked Gluten Free Chocolate Cake {Cow Spotted Cake}
A soaked gluten free chocolate cake that can be used as is or in a vanilla, spotted cake.
Write a review
Print
Ingredients
  1. 1 cup sorghum flour (or white rice)
  2. 1/2 cup amaranth flour (or brown rice)
  3. 1/4 tapioca flour (or arrowroot)
  4. 1/2 cup cocoa powder (or carob)
  5. 3/4 cups water, milk or milk substitute
  6. 2 Tbsp. lemon juice, yogurt, whey or kefir
  7. 1 1/4 cups organic cane sugar or coconut sugar
  8. 2 Tbsp. melted coconut oil, palm shortening or butter
  9. 1/2 tsp. unrefined sea salt
  10. 3 egg whites
  11. 1/2 tsp. cream of tartar
  12. 1 tsp. baking soda
  13. 1/2 tsp. cream of tartar
Soak the flour
  1. Combine the flour, cocoa powder, water/milk and lemon juice/yogurt.
  2. Cover and let sit 7-24 hours.
Bake the cake
  1. Grease and line with parchment paper two 8" or 9" round cake pans or one 9x13 pan.
  2. Heat the oven to 350*F.
  3. Beat the egg whites and 1/2 tsp. cream of tartar until stiff peaks form. Set aside.
  4. Add the sugar, butter and salt to the soaked mixture. Beat well (it will be thick).
  5. Fold in the egg whites.
  6. Stir in the baking soda and 1/2 tsp. cream of tartar.
  7. Immediately pour the batter into the prepared pans.
  8. Bake for 35 minutes for 8/9" rounds, 40 minutes for 9x13 or 25 minutes for cupcakes.
Notes
  1. This batter can be used for donuts. Simply grease and fill the donut pans with the batter. Bake for 20 - 25 minutes.
  2. To make the cow spotted cake prepare the vanilla batter at the same time as the chocolate batter. Fill the pans with all of the vanilla batter. Drop spoonfuls of the chocolate batter into the vanilla batter. You will use about 1/4 - 1/3 of the chocolate batter for the spots. Bake 35 minutes.
Just Take A Bite https://justtakeabite.com/


In order for me to support my blogging activities, I may receive monetary compensation or other types of remuneration for my endorsement, recommendation, testimonial and/or link to any products or services from this blog.

Sticky Toffee Pudding {grain free, dairy free, nut free, corn free}

Sticky Toffee Pudding | Homemade Dutch Apple Pie

A while back I was browsing some of my cookbooks for inspiration. I rarely look at cookbooks. With all of our allergies, etc. there is usually so much modification that needs to be done on a recipe that it’s not worth it.

But when I came across a recipe for sticky toffee pudding in Earth To Table I realized it was something we could eat! With a few slight modifications of course.

Earth To Table by Jeff Crump and Bettina Schormann is a neat cookbook about seasonal foods and organic farming.  Everything in it looks delicious! Though I’m pretty sure this is the first recipe from it that I’ve ever made (I’ve had the cookbook for over five years).

Sticky toffee pudding is a British dessert. I’m not sure why it’s called pudding since it’s cake. But I don’t know much about anything British. Either way it tastes great!

I happened to have some caramel sauce and crispy pecans on hand when I made it. What a great combination.

The cake is slightly sweet and chewy. The dates/plums really give a unique flavor. Everyone in our family really enjoyed this sticky toffee pudding.

This cake would be perfect for a birthday or special event. It is quite allergen friendly since it is grain, dairy, nut, soy and corn free. It does have eggs, though.

Now I’m sharing the recipe with you!  I will post it the way I made it. If you want the original be sure to check out Earth To Table.Sticky Toffee Pudding | Homemade Dutch Apple Pie

Sticky Toffee Pudding {Grain Free, Dairy Free, Nut Free, Corn Free}
Yields 6
A delicious chocolate cake sweetened with dates.
Write a review
Print
Ingredients
  1. 2 cups pitted dates or a combination of dates and dried plums
  2. 2 cups water
  3. 1 1/2 tsp. baking soda
  4. 1/2 cup coconut sugar or cane sugar
  5. 2 Tbsp. coconut oil, palm shortening or butter, at room temp
  6. 3 eggs
  7. 1/4 cup molasses
  8. 2 Tbsp. honey or maple syrup
  9. 1/2 tsp. vanilla
  10. 1/2 cup tapioca flour
  11. 1 tsp. cream of tartar (or baking soda)
  12. 1 tsp. unrefined sea salt
Instructions
  1. In a saucepan combine the dates (plums) and water.
  2. Bring to a boil. Reduce heat and simmer until dates are tender and the water is mostly evaporated, about 30 minutes.
  3. Remove the pan from the heat and stir in the baking soda.
  4. Puree the mixture with an immersion blender or regular blender, leaving dates slightly chunky.
  5. Heat oven to 325*F. Grease a muffin pan.
  6. In a medium bowl cream the sugar and fat.
  7. Beat in eggs, molasses, honey and vanilla until combined.
  8. Stir in flour, cream of tartar and salt. Stir in date mixture.
  9. Pour the mixture into the prepared muffin cups.
  10. Bake about 35 minutes. Let stand 5 minutes before serving.
Notes
  1. This will make about six large cakes or nine smaller cakes.
Adapted from Earth To Table
Just Take A Bite https://justtakeabite.com/

In order for me to support my blogging activities, I may receive monetary compensation or other types of remuneration for my endorsement, recommendation, testimonial and/or link to any products or services from this blog.

Ultimate Strawberry Frozen Yogurt + Yogurt Cultures and Oxo Review

Ultimate strawberry frozen yogurt | Homemade Dutch Apple Pie

*I am working with Stonyfield and Oxo for this post. I have been compensated for my time commitment to use these products. However, my opinions are entirely my own and I have not been paid to publish positive comments.*

My kids have been begging for frozen yogurt for a while. So it’s been on my to-do list…when I have time. How lucky for them that I was given the opportunity to try this amazing strawberry frozen yogurt recipe from the cookbook Yogurt Culture by Sternman Rule!

The frozen yogurt is easy to make. It is so beautiful with a deep pink color.  I strayed from the original recipe slightly since I was making it for kids. I left out the vinegar and rosemary. I’m sure both ingredients would add a unique and delicious flavor. As always I used Stonyfield Organic plain full fat yogurt, though Greek yogurt would also work.Ultimate strawberry frozen yogurt | Homemade Dutch Apple Pie

If you haven’t heard of Yogurt Cultures, it is a really great cookbook. But more than that it is so fascinating to read about all of the ins and outs of yogurt making. The chapters include Flavor, Slurp, Dine and Lick where Rule explores the many ways to use yogurt – salty, sweet, fruits, meats, drinks, desserts, etc. There is something for everyone.

To help make this frozen yogurt I also had the opportunity to work with Oxo. I tried their strawberry huller and ice cream scoop.

I had no idea strawberry hullers even existed. But this thing is so cool!!!  I’m already anxious for strawberry picking and preserving so I can use the huller. I probably wouldn’t use it if I was taking a few strawberries out to munch on. But if I have a whole basket of strawberries to hull this is so handy. No knife. No mess. Just push it in, twist and pull. Amazing. This is a great way to have kids help with strawberries too since they don’t need a knife.Ultimate strawberry frozen yogurt | Homemade Dutch Apple Pie

The ice cream scoop also works very well. It is heavier than any ice cream scoop I have in the house. It can scoop through hard ice cream pretty easily. I would recommend it if you are looking to buy one.

As for the frozen yogurt – my kids loved it! They both gave it two thumbs up. My husband really enjoyed it too.  Being dairy free right now I couldn’t taste it. But it sure looks and smells good! I will make this again for sure and maybe play around with our own flavor combinations.

Ultimate strawberry frozen yogurt | Homemade Dutch Apple Pie

Ultimate Strawberry Frozen Yogurt
Yields 1
Balsamic vinegar and minced rosemary lend subtle notes that heighten the berry essence without overshadowing it.
Write a review
Print
Ingredients
  1. 1 pound strawberries, preferably organic
  2. ½ cup plus 2 tablespoons sugar
  3. 2 tablespoons balsamic vinegar (I did not add this)
  4. 2½ cups plain whole-milk yogurt (not Greek) or 1½ cups plain whole-milk Greek yogurt
  5. 1 tablespoon light corn syrup (I used honey)
  6. 1 tablespoon plus 1 teaspoon finely minced fresh rosemary, plus (optional) additional minced rosemary for garnish (I did not add this)
Instructions
  1. PREP THE BERRIES. In a food processor, pulse the strawberries, sugar, and vinegar in five 1-second bursts. Let stand at room temperature (go ahead and keep it in the food processor), covered, for 1 hour.
  2. MEANWHILE, PREP THE YOGURT. If using traditional yogurt, spoon it into a fine-mesh sieve set over a deep bowl. Refrigerate to drain off the whey for 1 hour only. Discard the whey or reserve it for another use. Add the yogurt to the food processor with the strawberries. (If using Greek yogurt, do not strain, but do not add the yogurt to the berries until after they have stood for 1 hour.)
  3. PUREE AND CHILL. Add the corn syrup to the yogurt mixture. Process until nearly smooth. Transfer to a covered container and refrigerate for at least 4 hours or overnight.
  4. FREEZE. Freeze the mixture in an ice cream maker according to the manufacturer’s instructions. After 20 minutes, add the rosemary. Continue churning until the mixture has fully thickened and is nearly scoopable. You may eat it now, soft-serve style, but I recommend transferring it to a metal loaf pan to further chill and develop deeper flavor. Press a sheet of parchment directly on the surface of the frozen yogurt, then cover tightly with aluminum foil. Freeze for several hours.
  5. SERVE. Let the yogurt stand at room temperature at least 20 minutes before scooping with a hot, dry scoop. Garnish sparingly with rosemary.
Adapted from Yogurt Culture
Just Take A Bite https://justtakeabite.com/

In order for me to support my blogging activities, I may receive monetary compensation or other types of remuneration for my endorsement, recommendation, testimonial and/or link to any products or services from this blog.

Soaked Gluten Free Vanilla Cake | Just Take A Bite

Soaked Gluten Free Vanilla Cake {dairy free, nut free, corn free}

Celebrate your birthday without sacrificing nutrition. This soaked gluten free vanilla cake is properly prepared and tastes divine.

Soaked Gluten Free Vanilla Cake | Just Take A BiteBirthday season is in late winter and early spring for my family. It’s just one after another for both my immediate and extended family. So this is the time of year I start thinking about birthday cakes.

I’ve had a passion for making and decorating cakes for many years. It is always fun to create something new. I’ve done an arts and crafts cake, a bulldozer cake and many more! It would be fun some day to have a cake business for specialty cakes (gluten free, dairy free, real ingredients, etc.). So I always get excited when it’s time to decorate birthday cakes.

This year I wanted to be sure our birthday cakes would be healthy – which means properly prepared grains.  So I set to work making a soaked vanilla cake.Soaked Gluten Free Vanilla Cake | Homemade Dutch Apple Pie

Sometimes soaked cake can be tricky because too much sugar or too much moisture can make the cake dense or gooey. But this vanilla cake has just the right balance of everything.

It is not overly sweet. It has just the right amount of moisture. It has a lightness to it from beaten egg whites.

I am not picky when it comes to textures. If it is a food I like I’ll eat it just about any way it is served. But that is not the case with half of my family. So the real test was serving it to them.

This soaked cake got two thumbs and two toes up from my oldest. She called the cake “indescribable!” My husband even enjoyed it and was pleasantly surprised by the texture.  My son was a big fan too. Though he is like me and will eat just about anything.Soaked Gluten Free Vanilla Cake | Homemade Dutch Apple Pie

Now I have a great cake to serve my family as we enter birthday season. It is soaked, gluten free, dairy free and corn free. A combination that allows the whole family to enjoy a special treat.

This particular cake ended up being an early birthday dessert for myself. It certainly was a treat to have delicious cake I can eat!

I made both vanilla and strawberry frosting (some for the cake, some for cupcakes). I love all vanilla!! My kids always want strawberry. We all got something special.

So as a birthday present from me to you I’m sharing the recipe today. I hope your family enjoys it as much as mine does. Soaked Gluten Free Vanilla Cake | Homemade Dutch Apple Pie

Soaked Gluten Free Vanilla Cake {dairy free, nut free, corn free, rice free}
A simple vanilla cake that is properly prepared and free of most allergens.
Write a review
Print
Ingredients
  1. 1/2 cup tapioca flour
  2. 1/2 cup amaranth flour
  3. 1 cup sorghum flour
  4. 3/4 cup warm water, milk or milk substitute
  5. 2 Tbsp. lemon juice, yogurt, whey or kefir
  6. 1 cup organic cane sugar
  7. 2 Tbsp. melted coconut oil or palm shortening (or butter)
  8. 1 tsp. vanilla
  9. 1/2 tsp. salt
  10. 3 egg whites + 1/2 tsp. cream of tartar
  11. 1 tsp. baking soda
  12. 1/2 tsp. cream of tartar
Instructions
  1. Combine the flour, warm water and lemon juice. Cover and let sit 7-24 hours.
  2. Heat oven to 350*F.
  3. Grease two 9" cake pans or line a muffin pan with cupcake liners.
  4. Beat the egg whites and 1/2 tsp. cream of tartar until stiff peaks form. Set aside.
  5. Add the sugar, coconut oil, vanilla and salt to the soaked mixture. Beat well.
  6. Gently fold in the egg whites.
  7. Gently stir in the baking soda and cream of tartar.
  8. Immediately pour the batter into the prepare pan or liners.
  9. Bake cupcakes for 25 - 28 minutes or cakes for 30 - 33 minutes, until golden and baked through.
  10. Allow to cool completely.
  11. Frost and store in a sealed container.
Notes
  1. Other gluten free flours can be substituted, but the texture of the cake may be a little different.
  2. This can be made with whole wheat, spelt, kamut or einkorn flour if you are not gluten free.
Just Take A Bite https://justtakeabite.com/

Lemon Cupcakes with Strawberry Buttercream {soaked, gluten free, dairy free, nut free, corn free}

Lemon Cupcakes with Strawberry Buttercream soaked gluten free dairy free nut free corn free | Homemade Dutch Apple PieValentine’s Day is right around the corner. It’s a day to really show your loved ones how much you care.

What better way to show you care than by making a special treat that is not loaded with high fructose corn syrup, artificial colors and chemicals?Lemon Cupcakes with Strawberry Buttercream soaked gluten free dairy free nut free corn free | Homemade Dutch Apple Pie

These lemon cupcakes are the perfect confection for your Valentine. They are soaked, gluten free, dairy free, nut free and corn free. Free of most allergens, free of chemicals and soaked for easier digestion – that is a {real} treat.

The idea for these cupcakes actually came from my daughter. She loves Valentine’s Day. So she wanted me to create a unique dessert. She also helped me make them! She’s my little traditional food baker in training.Lemon Cupcakes with Strawberry Buttercream soaked gluten free dairy free nut free corn free | Homemade Dutch Apple Pie

The strawberry frosting was a requirement since she wanted them pink. It is light and fluffy. I think I could eat a bowlful plain!  I make it with homemade powdered sugar to avoid corn and processed sugar. We also made chocolate hearts for decorations. They are just melted dairy free chocolate chips poured into candy molds.

Both of my kids were crazy about these cupcakes. My son declared them “the best cupcakes I’ve ever had.”

I really loved them too. Which surprised me since I’m not a big lemon fan. But these are really good. They are a bit moister than a typical cupcake because of the lemon. The flavor reminds me of lemon bars.Lemon Cupcakes with Strawberry Buttercream soaked gluten free dairy free nut free corn free | Homemade Dutch Apple Pie

If you don’t like a moist cupcake you can cut back on the lemon juice and use a few drops of lemon essential oil or a natural lemon flavoring.

If you are going to be busy on Valentine’s Day with school parties or errands you can bake the cupcakes in advance.  Simply store them in the freezer. Then give them about an hour to thaw while you make the frosting. They also keep well for about a week in a sealed container at room temperature even with the frosting on.

Lemon cupcakes with strawberry buttercream are the perfect Valentine’s Day treats for your loved ones. Skip the artificial sweets. Take the time to make something that is both delicious and healthy.Lemon Cupcakes with Strawberry Buttercream soaked gluten free dairy free nut free corn free | Homemade Dutch Apple Pie

Lemon Cupcakes with Strawberry Buttercream {soaked, gluten free, dairy free, nut free, corn free}
Yields 20
A fresh lemon cupcake with sweet strawberry buttercream.
Write a review
Print
Cupcakes
  1. 2 cups any combination of gluten free flour
  2. 1/2 cup lemon juice
  3. 1/2 cup warm water
  4. 1/4 cup melted coconut oil, palm shortening or butter
  5. 1 egg
  6. 1 1/4 cups organic cane sugar or coconut sugar
  7. 1/4 tsp. sea salt
  8. 1/2 tsp. baking soda
  9. 1 tsp. cream of tartar
  10. 1 tsp. tapioca flour or arrowroot
Buttercream
  1. 1 cup strawberries(fresh or frozen, thawed), pureed
  2. 2/3 cup palm shortening or butter at room temperature
  3. 1 1/2 cups homemade powdered sugar (see recipe for link)
Cupcakes
  1. Combine the flour, lemon juice and water.
  2. Cover and let sit 7-24 hours.
  3. Heat oven to 350*F. Fill muffin pan with paper liners.
  4. Add the melted fat. Beat just until mixed.
  5. Add the egg. Beat just until mixed.
  6. Add the sugar, salt, soda, cream of tartar and tapioca.
  7. Beat until just mixed.
  8. Fill the muffin cups with batter, about 3/4 full.
  9. Bake for 40 minutes.
  10. Allow to cool completely.
  11. Frost or freeze until ready to use.
Buttercream
  1. Combine the strawberries, shortening and sugar in a medium bowl.
  2. Beat until combined and fluffy, about 4 minutes.
  3. Pipe or spread onto cupcakes.
Notes
  1. For a cupcake it works best to use at least 1/2 "white" flour like tapioca or white rice.
  2. You can substitute whole wheat or all purpose flour if you are not gluten free. Reduce the amount of flour by 1/4 cup.
  3. You can use 1 tsp. baking powder in place of the cream of tartar and tapioca flour if you tolerate corn.
Just Take A Bite https://justtakeabite.com/


In order for me to support my blogging activities, I may receive monetary compensation or other types of remuneration for my endorsement, recommendation, testimonial and/or link to any products or services from this blog.

This dairy-free pumpkin pie ice cream is filled with pumpkin and spice and crunchy pieces of pie crust. It is the perfect dessert for transitioning from summer into fall.

Dairy-Free Pumpkin Pie Ice Cream

This dairy-free pumpkin pie ice cream is filled with pumpkin and spice and crunchy pieces of pie crust. It is the perfect dessert for transitioning from summer into fall.This dairy-free pumpkin pie ice cream is filled with pumpkin and spice and crunchy pieces of pie crust. It is the perfect dessert for transitioning from summer into fall.

Every fall pumpkin spice is everywhere.

Some love it. Some hate. Me? I think pumpkin spice is delicious!

Which is why I created this dairy-free pumpkin pie ice cream. It’s got all of the pumpkin spice flavor you love in a dairy-free treat!

Pumpkin Pie Alternative

If you need an alternative to pumpkin pie for Thanksgiving, Christmas or any special occasion this ice cream is perfect. It is creamy and spicy with a bit of crunch from the pie crust. It’s so rich you’ll never know it is also egg-free.This dairy-free pumpkin pie ice cream is filled with pumpkin and spice and crunchy pieces of pie crust. It is the perfect dessert for transitioning from summer into fall.

All that pumpkin you’re stocking up on or loading into your freezer – pumpkin-pie ice cream is the way to use it!

You can use any pie crust or even graham crackers to add the “pie” component to the ice cream. Sprinkle cinnamon and sugar on the crust or crackers before baking. This will give an extra boost of spice to the ice cream. If you’re really in a hurry you can make it without the crust. It still tastes great.This dairy-free pumpkin pie ice cream is filled with pumpkin and spice and crunchy pieces of pie crust. It is the perfect dessert for transitioning from summer into fall.

Quick Pumpkin Pie!

You can prepare the crust well in advance. Then the ice cream batter comes together in minutes. All you have to wait for is the ice cream mixer to finish!

This is a great treat for those that are dairy-free. It is even a hit with kids. My three-year old loves this ice cream. If you tolerate dairy you can replace the coconut milk with cream.

Do you like pumpkin pie? Now you can enjoy it in ice cream form. Dairy-free pumpkin pie ice cream is the perfect treat to celebrate the end of the year and anticipate what’s to come in the new year.This dairy-free pumpkin pie ice cream is filled with pumpkin and spice and crunchy pieces of pie crust. It is the perfect dessert for transitioning from summer into fall.


Dairy Free Pumpkin Pie Ice Cream
Serves 6
A dairy free ice cream with all the flavors of pumpkin pie.
Write a review
Print
Ingredients
  1. 1 cup cinnamon sugar pie crust pieces (see post for recipe link)
  2. 2 cans full fat coconut milk
  3. 3/4 cup pureed pumpkin
  4. 1 tsp. cinnamon
  5. 1/4 tsp. nutmeg
  6. 1 Tbsp. tapioca flour or arrowroot powder
  7. 1 Tbsp. vanilla
  8. 3/4 cup any combination of sweetener (cane sugar, coconut sugar, honey, maple syrup)
  9. 1/2 tsp. sea salt
Instructions
  1. Prepare the pie crust. Sprinkle cinnamon and sugar on top of the crust before baking it. Break it into small pieces. Set aside.
  2. In a blender combine the coconut milk, pumpkin, cinnamon, nutmeg, tapioca, vanilla, sweetener and salt. Blend until well combined.
  3. Process in an ice cream mixer according to manufacturer's directions.
  4. Transfer the ice cream to a freezer safe container.
  5. Stir in the pie crust pieces.
  6. Cover and freeze until firm.
Notes
  1. The pie crust can be made up to a week ahead if using fresh or a couple months in advance if you freeze it. You can make a whole crust recipe and use the extra for a snack or just make 1/3 of a crust recipe. Sprinkle cinnamon and sugar on top of the crust before baking.
  2. Pumpkin pie spice can be used in place of the cinnamon and nutmeg.
Just Take A Bite https://justtakeabite.com/

This post is linked to Savoring Saturdays.

The Perfect Gluten Free Dairy Free Chocolate Chip Cookie

The Perfect Gluten Free Dairy Free Chocolate Chip Cookie || Homemade Dutch Apple PieNow that my daughter is in school all day my son helps me with most of my baking. He HAS to help if he knows I’m working in the kitchen. And he likes to decide what we make.

Of course one of his first requests was chocolate chip cookies. I happily obliged.

I’ve made gluten free dairy free cookies before. Some turn out better than others. It’s hard to find the right combination of flour and the right amount of fat that will create a good cookie that isn’t grainy and doesn’t crumble.

But with the help of my budding baker I think I did it! These are the best gf df cookies we’ve ever made. They are slightly crispy yet still a bit soft in the middle.

The best part is that they are very easy to make and do not require any strange ingredients like xanthan gum.

One key to these cookies is using palm shortening. As much as I LOVE coconut oil, it just doesn’t work that well for cookies. Using at least half palm shortening really helps bind the cookies and gives them the right texture. You could also try lard if you don’t have palm shortening.

Think you don’t have time to scoop cookies? Try turning them into bars. Then you simply pour the batter into one pan, pop it in the oven and you’re done! That’s my favorite thing to do when I’m short on time.

These cookies freeze very well. So make a big batch, eat some fresh and store some in the freezer for later.

If you’re searching for a delicious cookie that is gluten and dairy free search no further. This is the perfect cookie recipe. Not a fan of chocolate chips? Swap them for dried fruit, nuts or seeds. No matter what you add these cookies will be a hit.

The Perfect Gluten Free Dairy Free Chocolate Chip Cookie || Homemade Dutch Apple Pie

The Perfect Gluten Free Dairy Free Chocolate Chip Cookies
Yields 30
A delicious gluten and dairy free chocolate chip cookie or bar.
Write a review
Print
Ingredients
  1. 1 cup tapioca flour
  2. 1/2 cup amaranth flour
  3. 1/3 cup organic cane sugar
  4. 1/3 cup organic brown cane sugar or coconut sugar
  5. 1/2 tsp. baking powder
  6. 1/2 tsp. baking soda
  7. 1/4 tsp. unrefined sea salt
  8. 2 eggs
  9. 6 Tbsp. organic palm shortening (see notes for whether or not to melt it)
  10. 1 tsp. vanilla
  11. 3/4 cups dairy free chocolate chips
Instructions
  1. Preheat the oven to 325*F.
  2. In a large bowl cream the shortening and sugars.
  3. Add the eggs and vanilla. Beat well.
  4. Add the flours, powder, soda and salt. Beat well.
  5. Stir in the chocolate chips.
  6. Place 2 Tbsp. mounds on ungreased baking sheets.
  7. Bake for 15 minutes.
  8. Turn off the oven. Leave cookies in the oven for about 6 minutes.
  9. Allow the cookies to cool and remove from baking sheet.
  10. Store in an airtight container at room temperature or in the freezer for long term storage.
Notes
  1. If you like cookies that are wider and flatter melt the shortening first. If you like puffy cookies do not melt the shortening.
  2. The palm shortening can be replaced with butter if you tolerate dairy (either melted or at room temp).
  3. The palm shortening can be replaced with coconut oil, but the cookies may not hold together as well.
  4. To make the cookies into bars add an extra egg to the batter. Pour the batter into a greased 7x11 pan. Bake at 350 for 30 minutes.
Just Take A Bite https://justtakeabite.com/


In order for me to support my blogging activities, I may receive monetary compensation or other types of remuneration for my endorsement, recommendation, testimonial and/or link to any products or services from this blog.