Home » Kid-friendly Recipes » dairy free » Page 26

Category: dairy free

Baked Apples

I’m always looking for new breakfast ideas. This week I came across Cara’s recipe for slow cooker baked apples.  It was just what I needed – grain and nut free and easy prep.

I was going to make them in the crockpot, but then I changed my  mind. Since I was only making a few I didn’t want to get my big crockpot dirty. So I just prepped them this morning and baked them in the oven.

So easy and so delicious! Justin said they were great. He had his topped with homemade vanilla yogurt.

I will definitely be making these again. Such a great idea for a healthy breakfast. I didn’t follow the recipe exactly since I was going from memory when I made it. It still turned out great.

The next time I make it I might modify things and just do a pan of sliced baked apples**. Then you don’t have to worry about the apples opening/the toppings falling out. And you can serve up as much or as little as you want. Plus I don’t have to worry about a picky eater complaining about apple peels 😛

Baked Apples

6 medium apples
¼ cup raisins
¼ cup honey (I also added a little organic cane sugar)
1 tsp. cinnamon
6 Tbsp. coconut oil, butter, or ghee (I forgot this…oops)
 
Core apples. To core, using an apple corer or paring knife, cut around the core (about ¼ inch from the stem all the way around) but leave about half an inch at the bottom. Use the knife to ‘drill out’ the core.
 
Divide raisins, honey, cinnamon, and coconut oil between the apples.
 
Place apples in a crock pot and add ½ inch of water. Cook on low overnight and enjoy a hot breakfast in the morning!
 
Alternatively, bake covered at 350 degrees in a glass dish for 45 minutes-1 hour in the morning.
 
**Next time I will try peeling and slicing the apples. Place them in a buttered baking dish. Sprinkle with cinnamon, honey and raisins. Cover and bake at 350 for 25 minutes.

Top with with cream, yogurt, coconut milk, or just eat plain.

Scalloped Sweet Potatoes and Apples

Earlier this week I made another recipe from my Old Pennsylvania Dutch Recipes book. It is called Scalloped Sweet Potatoes and Apples. Perfect for fall in Michigan!

It was quite easy to make and turned out really well. I cooked the sweet potatoes first thing in the morning. Then did the peeling and slicing when it was time to make dinner.

This got two thumbs up from the family. I used sweet potatoes from our garden and apples from my in-laws’ farm. It would be a great recipe for a large crowd, a holiday or a potluck. I only made a half recipe and we had plenty of leftovers.

This post is linked to Fight Back Friday and Fresh Bites Friday.

Scalloped Sweet Potatoes and Apples

6 medium sweet potatoes
1 1/2 cups apple slices
1/2 cup rapadura (or organic cane brown sugar)
1/2 tsp. salt
1 tsp. ground mace (I don’t even know what mace is…I just used cinnamon)
1/4 cup butter

Wash and cook sweet potatoes in boiling water to cover until just tender. Peel and cut into crosswise slices 1/4 in. thick.

Butter a 2 qt. casserole and arrange one half of the sweet potatoes in the bottom. Then later one half of the apple slices. Sprinkle with one half of a mixture of the brown sugar, salt and mace. Dot with 2 Tbsp. butter. Repeat layering, ending with apples, seasoning and butter.

Bake at 350 degrees for 50 minutes.

Zucchini Soup | Homemade Dutch Apple Pie

Zucchini Soup

Zucchini soup is a great way to use up some of your larger zucchini and get kids to eat it! Pair it with zucchini crackers and cheese…lunch is served.

Zucchini Soup | Homemade Dutch Apple Pie

Zucchini just keeps coming.

I’m still working on using up the last of the zucchini from our garden. Sound familiar? You can only make so much zucchini bread!

One nourishing way to use that extra zucchini is in zucchini soup. It is so good! And so simple. Just cook and puree some vegetables in broth. It turns into a creamy, flavorful nourishing soup.

Zucchini is the base. But you can add any vegetables to complement the zucchini.

I like to use the zucchini that gets a little too big for soup. You can’t tell the difference.

Getting ready for fall.

As fall approaches and I think about school…I also think about sickness. Once all of those kids are together the germs start spreading.

Eating zucchini soup during the summer is a great way to build up the immune system ahead of time. Getting your family to consume broth year round is a great idea.

Soup for breakfast.

I eat soup for breakfast most days. I love it when I have leftover soup that I can just grab out of the fridge and eat cold. Zucchini soup is perfect for an easy breakfast or lunch that you don’t have to cook.

It also makes a great dip for raw vegetables or crackers.

Are you struggling to come up with more ways to use your zucchini? Try zucchini soup!

Zucchini Soup

3 medium zucchinis, chopped
1 small carrot, chopped
1 small red onion, chopped
2 cups chicken broth
salt, pepper, garlic powder to taste
1 cup diced, cooked chicken (optional)

  1. Cook vegetables in broth until very tender, about 30 minutes.
  2. Add seasoning.
  3. Puree with an immersion blender or regular blender.
  4. Return soup to pot, taste and adjust seasoning.
  5. Add diced, cooked chicken and simmer for 10 minutes.

Here are a few more zucchini recipes you may enjoy:

Zucchini cake with two frostings

Zucchini crackers

Zucchini pizza bites

Chocolate zucchini scones

Zucchini salmon cakes

Chocolate zucchini cupcakes

Crockpot Peppercorn Steak

We still have quite a bit of beef in our freezer from last year. I’m always looking for new ways to cook it. After searching for a steak recipe I found a simple one on A Year of Slow cooking. I modified it a little, using what I had on hand.

It turned out great! I used rib steak…which I don’t generally care about much. But it was very tender and flavorful this way. I would definitely make this again. I served it over rice. It would also work well over mashed potatoes or polenta. You could also add potatoes right in the crockpot and make it a one pot meal. I’ll post the recipe the way I made it.

Crockpot Peppercorn Steak

Steak (any kind you like. I used one large rib steak. There was plenty of sauce. I could have cooked two steaks in it)
1 pint tomato soup (preferably homemade, else plain tomato sauce)
1/2 cup water
1 small onion, chopped
4 large carrots, chopped
1 medium zucchini, sliced
(any vegetables you like will work here)
2 tsp. sea salt
2 tsp. Italian seasoning
1//2 tsp. pepper

Place meat in crockpot. Add vegetables. Pour in tomato soup, water and seasoning. Cook on low 7 or more hours (the longer it cooks the more tender it will be) or on high 5 or more hours.

Homemade Whole Wheat "Oreos"

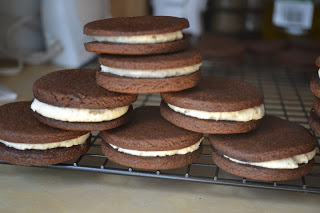
On Sunday Rebecca got to try an Oreo at church (slight cringe :P). Then she asked if we could make our own Oreos so we could make Oreo sundaes (love this girl…what four year-old asks if she can make something from scratch instead of going and buying more:). Why not? So that was our project yesterday.

I had no recipe and no real starting point. I just started experimenting. And I must admit I am quite impressed with what we came up with! Sometimes homemade baked goods taste good…but not quite like the “real” thing. These actually really taste like Oreos…but they are made with REAL ingredients.

These do not have all of the preservatives and hydrogenated oils that make them shelf stable for half a year. So I store them in the refrigerator. That also keeps the cream filling solid. You can make a big batch and freeze them.

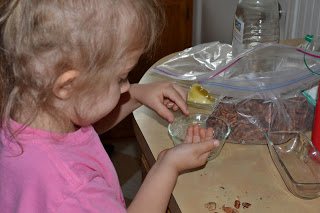
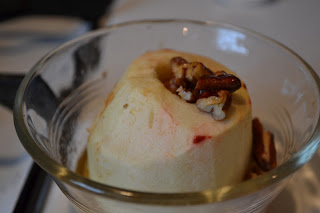
There really isn’t much more to say except these are delicious! The whole family agreed. What could top homemade Oreos? We made homemade cookies and cream ice cream with some of them later in the day 🙂  I also used some leftover cookie to make cookies and cream yogurt. Yum! I’m taking a cookie break today, though 😛

I used butter in my cookie dough. I find that it gives the best consistency/firmness. But if you want to make them vegan/dairy free you could use coconut oil or palm shortening in place of the butter. I also used all purpose flour in the cream filling because that is what I tolerate. You could use organic corn starch or arrow root. I personally like the soft texture the flour gives. Maybe next time I make them I’ll even try soaking the cookie dough.

Please give these a try and let me know what you think! Can you make homemade Oreos? Yes you can! If you think they look good, wait until you taste them!

This post is  linked to Real Food Wednesdays and Fresh Bites Friday and Fat Tuesday.

Whole Wheat “Oreos”
makes 17 – 20 cookies (depending on the size of your cookie cutter and the thickness of your dough)

1/4 cup organic palm shortening
5 – 6 Tbsp. organic all purpose flour (you can substitute corn starch or arrow root)
1/4 cup maple syrup

1 1/2 cups whole wheat flour
1/2 cup cocoa powder
3-4 tsp. chocolate extract
1/2 cup organic cane sugar
1 tsp. baking soda
1/2 tsp. salt
1/2 cup butter, room temp (you can substitute coconut oil or palm shortening)
6 Tbsp. honey
water

To make the cookies:

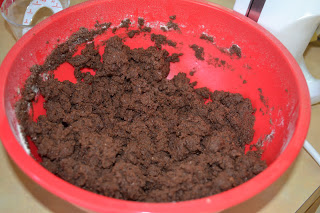
Cream butter and sugar in a large bowl. Add cocoa and chocolate extract. Blend well (a hand mixer works well). Taste. Add more chocolate extract until strong enough. Add flour, baking soda, salt and honey. Blend well. If dough is still crumbly slowly add water, 1 Tbsp. at a time until dough will hold together when squeezed with your hand.

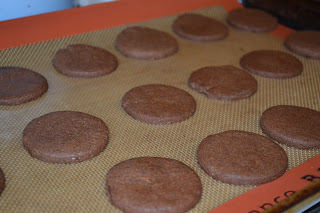
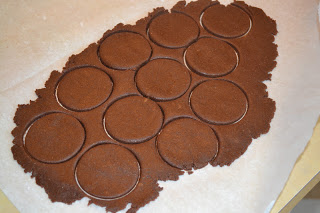
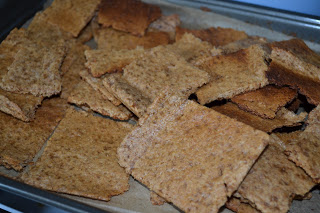
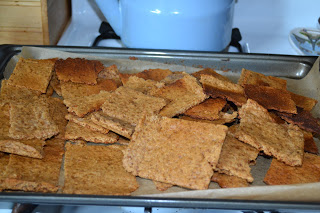
Place 1/3 of dough onto parchment paper. Place another layer of parchment paper over top. Roll dough between parchment paper until it is 1/8 – 1/4″ thick. Remove top paper. Cut circles and place onto parchment lined baking sheet. Repeat this process until you have used all of the dough.

Bake cookies at 350 for about 13 minutes. Allow to cool completely.

To make the filling:

Cream shortening, flour and maple syrup in a small bowl. Add more flour for a stiffer cream (note that it will firm up/become solid when chilled). Add more maple syrup for a sweeter cream. You can prep the filling ahead and store it in the refrigerator. Let it come to room temperature before filling cookies.

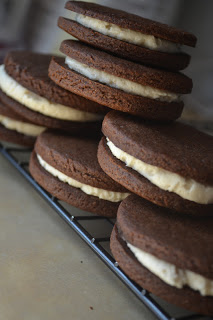
To assemble the cookies:

Place the cream filling in a small plastic bag. Cut off one of the corners of the bag for a pastry bag. Pipe some cream onto the center of one cookie, leaving space at the edge . Top with another cookie. Press together just until the cream reaches the edge. Repeat this process until all of the cookies are filled. Store in an airtight container in the refrigerator. You can also freeze the cookies.

Sourdough Peanut Butter Blondies (vegan)

I’ve been searching for new sourdough recipes lately. I came across a recipe for sourdough peanut butter blondies on Cake Walk. They looked simple and delicious.

Yesterday morning both kids helped me make them (that’s how easy they are to make). It only takes a few minutes to mix the batter. Then pop them in the oven.

They turned out quite well. Very moist and chewy. They were a little heavy on the peanut butter taste for me. But Justin and Rebecca really liked them. I think they would be better with some chocolate chips to balance the flavor 🙂

I accidentally used more coconut oil than the recipe calls for. So mine were extra moist!

I don’t have any peanuts in the house, so I topped them with crispy almonds.

These happen to be vegan. I’m not sure I’ve ever made a vegan recipe before…at least not knowingly 😛  If you aren’t looking for a vegan recipe you could replace the coconut oil with butter.

And back to the original topic of sourdough. These do not taste anything like sourdough.

Sourdough Peanut Butter Blondies

3/4 cup peanut butter
1 cup sourdough starter
1/6 cup oil (coconut oil works well)
1 cup brown cane sugar or sucanat
2 tsp. vanilla
1/2 cup whole wheat flour
1/2 tsp. baking powder
1/2 tsp. salt
1/3 cup nuts (for topping)

Preheat oven to 350. Grease an 8×8 baking pan or 8″ round cake pan.

In a large bowl, mix together peanut butter, oil and brown sugar. Mix well, until well incorporated. Add the sourdough starter and vanilla, and blend in thoroughly (kids are very good at this part:).

Stir in flour, baking powder, and salt. Mix the dough (using your hands if you need to) well. The batter is very thick, and doesn’t spread on it’s own. Transfer dough to baking tin, press into sides, and press the peanuts into the top.

Bake for 25-30 minutes, until set and lightly browned on top. Cool completely in tin before slicing

Sourdough Graham Crackers

As I was making a fresh batch of soaked graham crackers this week I thought it might be fun to try making sourdough graham crackers. Rebecca and I set to work right away 🙂  I used this recipe as my base and adjusted it to use my sourdough starter.

The graham crackers turned out quite well. I think I made them a little too thin, so they are quite crispy. But still delicious. I also used all coconut oil (out of convenience…it’s hot enough that it’s already liquid…so I didn’t have to add a step of melting anything 🙂 instead of all butter or a butter/coconut oil combo. I think using all coconut oil makes them a little more crumbly. Next time I’ll use some butter. But if you can’t have dairy using all coconut oil definitely works.

I love graham crackers. And this is another great, healthy variation. A perfect snack for kids or adults.

I wasn’t able to get many photos…I had a little boy in my arms that had just woken up from a short nap 😛

This post is linked to Fat Tuesday and Real Food Wednesday and Fresh Bites Friday.

Sourdough Graham Crackers

1 1/2 cups whole wheat flour
3/4 cups sourdough starter

1/2 cup rapadura (dehydrated cane sugar)

1 tsp. baking powder
1/2 tsp. baking soda
1/2 tsp. salt
1 tsp. cinnamon
4 – 6 Tbsp. honey
1 tsp. vanilla
1 stick butter or 1/2 cup coconut oil, melted (Works very well to use half butter and half coconut oil)

Heat oven to 350. Melt butter/coconut oil in sauce pan. Set aside. In a mixing bowl, stir together flour, sugar, baking powder, baking soda, salt and cinnamon. Add the liquids: honey, sourdough, vanilla, butter. Stir well until a nice ball of dough is formed – not crumbly (if too dry add more butter/coconut oil or honey). Taste the dough for sweetness. Add a little rapadura or honey if the dough is too sour. It will get a little sweeter as you bake it.

Split dough into 2 equal parts. Cut 3 pieces of parchment paper the size of a cookie sheet. Lay one piece on table. Put 1/2 of dough on the paper. Lay a 2nd piece of parchment on top of dough. Squish the dough down a little with your hand. Use a rolling pin to roll the dough between the parchment paper. Roll until the dough until it is about 1/8 in. thick. Remove the top piece of parchment paper. Cut into squares (with pizza cutter). If the dough sticks to the pizza cutter wait until the crackers have been baking 5 – 8 minutes to cut them (pull them out, cut and put them back in). Place the dough on a baking sheet (on the parchment paper…just move the whole thing onto the baking sheet). Repeat for other half of dough.

Bake for 12-18 minutes, until the crackers are just barely turning golden. Let cool completely. Store in airtight container or in the freezer.

Apple Honey Crunch – Three Ways

Rebecca has been helping me in the kitchen since before she was one. Now that she is four she is becoming quite a little chef! Rebecca often plays cooking and will come up with all kinds of meals/recipes/goodies. She actually has some really good ideas! When she does we try to make them. This week while she was playing she was making “apple honey crunch.” We brainstormed about how to make it…and gave it a try. We came up with three versions. They were all very simple to make and tasted great. One is kind of like a baked apple/apple dumpling. One is like apple cobbler. And one is like a brittle. They each only use a few ingredients and are very kid friendly. We just did small versions of each. They are great for individual servings. Or you can make them in larger quantities. Want to have some fun in the kitchen with your kids? Try Rebecca’s apple honey crunch recipes 🙂  Two of them are even grain free/gluten free/GAPS legal.

This post is linked to Fat Tuesday at Real Food Forager.

Apple Honey Crunch (dumpling style)
1 apple
1/8 cup chopped crispy nuts (we used pecans and walnuts)
1 Tbsp. honey

Peel and core apple. Place the apple in a small, buttered glass/oven safe dish (I used my small pyrex dishes). Sprinkle half of the nuts into the center of the apple. Pour honey into hole. Top with remaining nuts. You can add an extra little drizzle of honey over the apple if you like. Place another bowl over the apple (inverted) as a lid. Bake at 375 for 40 minutes (until the apple is soft). Let cool. Enjoy!

Apple Honey Crunch (cobbler style)

1 apple
1/8 cup chopped crispy nuts (we used pecans and walnuts)
2 Tbsp. honey
1/4 cup ground oats (or whole oats or whole wheat flour)
2 Tbsp. softened butter
1/2 tsp. cinnamon

Peel and chop apple. Sprinkle a few of the nuts in the bottom of a small, buttered glass/oven safe dish (I used my small pyrex dishes). Put apple chunks on top. Sprinkle on cinnamon.

Mix oats, butter and honey. Sprinkle over apples. (lick bowl 🙂

Bake at 375 for 35 minutes – until the top is golden and crunchy.

Apple Honey Crunch (brittle or ice cream topping)
*This didn’t get quite as solid as I would have liked. Some parts stayed a bit soft. But it was still very good. We will experiment with it to get it just right. As is it would make an awesome topping for ice cream (if you just chill it instead of freeze it).

1 apple
1/4 cup crispy nuts (broken into large pieces) (we used pecans and walnuts)
1/4 cup coconut oil
1/4 cup honey

Peel and chop apple. Cook the apple in coconut oil in small pan. When apple is tender stir in honey. Cook about 2 minutes. Remove from heat. Stir in nuts.*  Pour onto a parchment lined baking sheet. Place in freezer until solid. Break into chunks. Store in the freezer to remain solid.

*You can also pour this into a glass container and allow to cool (on the counter or in the fridge) and use it as a topping for ice cream, pancakes or waffles or as a mix in for yogurt.

Pesto Sausage Cakes (GAPS legal, grain free, dairy free, nut free)

Last night for dinner I was going to make zucchini sausage muffins. But it was a HOT day. So I didn’t really want to turn on the oven. So I figured I’d make zucchini sausage cakes instead. I already had zucchini and sausage thawed. But the zucchini was not cooperating and was super stringy…which I knew Rebecca would not touch. So I came up with a new recipe for pesto sausage cakes. I happened to make a fresh batch of pesto yesterday morning. I also happened to make a fresh batch of mayo in the morning…which worked out well…I served these with pesto mayo. These cakes turned out very well! And they were really easy to throw together. I used ground pork. Ground chicken or turkey would work well too. I don’t measure ingredients when I make this kind of food, but I’ll try to give a rough estimate of quantities. If you want to make this grain free you can use coconut flour in place of the bread crumbs. I made 6 cakes with a bread crumb coating and 3 without. It works well either way. I like the crunchy coating, but it’s easier for the kids to eat without it.

I’m happy with how well these turned out. Even Abram kept saying “mmmm” as he was eating his. I liked them so much I had another one for bedtime snack and another one for breakfast today 🙂

This post is linked to Fat Tuesday at Real Food Forager.

Pesto Sausage Cakes

1 lb. ground pork, chicken or turkey
1/2 cup pesto (My pesto is nut and dairy free. It is just peas, evoo, salt and garlic blended together. Use whatever kind you like.)
1 egg
1 egg yolk
1/4 cup bread crumbs or coconut flour (optional, but it helps bind things together)
salt, garlic powder, cumin to taste

bread crumbs or coconut flour to coat (optional)
fat for cooking (palm shortening, coconut oil, lard, butter)

Mix meat, pesto, eggs, bread crumbs and seasoning. Form into 8-10 patties. Coat patties in bread crumbs or coconut flour. Heat fat in skillet over medium heat. Cook patties in fat until cooked through, about 8 minutes per side.

Serve with extra pesto or pesto mayo (mix equal parts pesto and mayo).

Crockpot Baked Potato Soup

This week we need several prep ahead meals…which  usually means crockpot meals. By the third one I wanted to try something new. I decided to make potato soup. I’ve never made any kind of potato soup before. I checked A Year of Slow Cooking to see if Stephanie had a good one. I went with the first recipe I found for baked potato soup. It was super easy to make and tasted really good. I didn’t eat it for dinner since I can’t eat potatoes, but I did taste it…made me wish I could 🙂  Justin and Rebecca both really enjoyed it. I only made a half recipe. It still made quite a bit. I modified it slightly to our tastes/with what I had on hand. I also made a quick batch of homemade cream cheese to use in it instead of store bought. If you don’t have any cream cheese or want it to be dairy free this would be just fine without it. Or you could substitute sour cream. I served the soup with crumbled bacon and shredded cheese.

Crockpot Baked Potato Soup

2 lbs. potatoes, peeled and cut into chunks
1 small onion, roughly chopped
2 cups broth or water (if using water add extra seasoning)
sea salt and garlic powder to taste
1 cup homemade cream cheese (or 8 oz. pkg. of cream cheese)

Toppings: crumbled bacon, shredded cheese, sour cream, olives, chives

Place potatoes, onion, broth and seasoning in crockpot. Cook on low 8+ hours or on high 4+ hours (until potatoes are tender…cooking longer won’t hurt anything). Mash or blend potatoes to desired consistency (I made it smooth with my immersion blender).

Add cream cheese. Stir. Cook on high about 30 minutes.

Pour into bowls and add toppings.