Home » Kid-friendly Recipes » grain free » Page 16

Category: grain free

Raw Yogurt

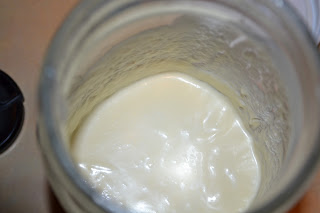
Last week I made my first batch of yogurt. I decided to start with the easiest method. After all, if the easiest method produces good yogurt it makes sense to make it that way. Plus the easiest method keeps the milk raw and unheated. So you don’t lose anything. I followed the method in the GAPS book. You basically put some yogurt into milk and let it sit. That’s it.

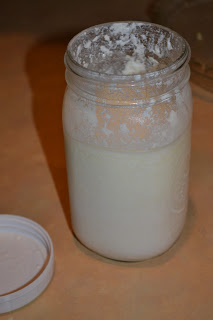
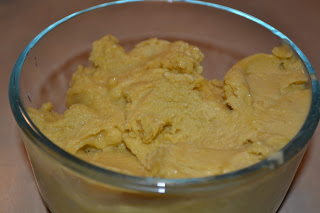
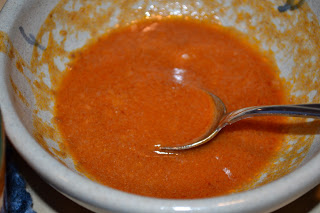
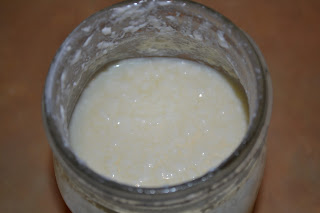
Did it work? Yes, it did. But it doesn’t produce quite the texture we like. It was quite lumpy/loose (you can tell in the picture). It doesn’t get smooth when you stir it. It tastes fine. And honestly I’d be ok eating it. But I think Justin and Rebecca weren’t crazy about it. They have more of a texture issue than I do. So this will not be my regular method of making yogurt. But I might do it once in a while for myself or if I’m really in a rush and don’t have time to make the cooked version. From what I understand this method is more unpredictable…meaning it will turn out differently every time. I bet this yogurt would work well for making cottage cheese.

I’m glad I tried this. Who knew making yogurt could be so easy?

Raw Yogurt

1 quart raw milk
1/4 cup plain, live yogurt

Mix yogurt into milk. Cover. Place jar in a warm, dark spot to culture for 24 hours. Transfer to fridge.

Guest Post – Pumpkin Smoothie…Plus GAPS-legal Pumpkin Ice Cream!

Today I have a guest post at Gapalicious! My first guest post. Go check it out. Thanks, Hannah for asking me!

A little add on to my smoothie post…you can turn it into ice cream! Yesterday morning I made my usual smoothie. Then I put half of it in my ice cream maker. 15 minutes later…GAPS-legal, nourishing pumpkin pie ice cream 🙂  If you don’t have an ice cream maker you can just freeze it as is. I’ve done that too. Still a tasty cold treat 🙂  And you can freeze it in single servings so it’s all set to go when you want it…and so you don’t go overboard 😉  Ice cream is my absolute favorite food…and the hardest thing I had to give up. But I’m finding ways to get my fix again…the healthy way.

Sour Cream (GAPS-legal)

I mentioned before that we started our cow share on Monday. So my dairy adventures continue this week. I made ice cream on Tuesday. Yesterday I made sour cream. I have read various methods on how to do it/what ingredients to use. So I just started experimenting and using what I have on hand. I used a little bit of cream that was left after making ice cream and some plain yogurt for the culture. I was very happy to see that it thickened nicely and has great flavor. I really enjoyed it in my soup this morning. I’ll have to experiment with times and ratios. I was just using a little leftover cream to give it a try this time. I think I used about a pint of cream and a couple Tbsp. of yogurt. It cultured for about 24 hours. Now I understand why it was so hard to find a “recipe” for sour cream. There isn’t really one. Just mix cream with a live culture and let it sour in a warm place. I’ll have to update this post when I figure out our ideal ratios. But I’m thankful that my first attempt went well. Maybe I’ll trying making it with kefir sometime to get even more good bacteria in it. It was almost impossible to take a picture of it. But you get the idea. Today’s adventure…yogurt. Post(s) to come 🙂  Homemade sour cream is allowed already on GAPS intro. So this is a great dairy product to make right away when doing GAPS.

Sour Cream

Cream (preferably raw) (1 pt – 1 qt)
live culture (yogurt, kefir, buttermilk) (2-5 Tbsp.)

Mix cream and yogurt in a glass jar. Cover and place in a warm, dark spot for about 24 hours to culture. Transfer to the refrigerator.

Pepper Steak (Grain Free, Dairy Free, GAPS-legal)

Once in a while I ask Justin if he has any specific requests for dinner. This week he asked for pepper steak and mashed potatoes. So that’s what I made last night. It’s a recipe from my MIL. It’s very simple and very good. I adjusted the ingredients to make it healthier (since I don’t use soy sauce or bouillion). The full recipe is not GAPS legal. But just the steak part is (minus the gravy). The gravy uses flour, so that part is not grain free. But the meat is great without the gravy. There is plenty of sauce in the pan that you can use as gravy even if you don’t thicken it. I put mine on top of squash. Justin had his over mashed potatoes. We all enjoyed it. The one thing I have never understood is why it’s called pepper steak…there is no pepper in it 😛  The recipe calls for round steak. Use whatever you have. I used sirloin because that’s what I could find first buried under all of our pork 😛  This is a great recipe to use with grassfed beef since it simmers a long time and the meat gets very tender. I hadn’t intended to post this recipe at first, but after serving it I realized I should. So I had to take pictures of what was left after dinner and what I packed for Justin’s lunch.

Pepper Steak

1 large steak (round or sirloin work well), cut into chunks
olive oil, coconut oil, lard or palm shortening
1 cup beef broth, chicken broth or water (may need more as it cooks)
1/4 cup ketchup (I used homemade fermented ketchup)
salt and garlic powder to taste

1 Tbsp. flour
1/4 cup cold water

Brown meat in oil in skillet. Add water/broth, ketchup and seasoning. Cover and simmer over low heat 1 1/2 hours. Stir periodically and add extra liquid if it gets too dry. You can serve it like this over veggies, rice or potatoes.

To make gravy: Remove meat from pan. Mix flour and water until the lumps are gone. Gradually add the flour mixture to the sauce in the pan, stirring over low heat. Add more water until desired consistency and quantity of gravy. Serve gravy on the side or add the meat back to the pan for serving.

Pumpkin Nut Butter Bread

Yesterday I made a pumpkin version of nut butter bread to go with our chicken apple chili. I just kind of guessed on quantities, lowering the pb to add the pumpkin. So I wasn’t sure how it would turn out. But it worked great! Rebecca loves it. We’ll see if our guests like it tonight 🙂

Pumpkin Nut Butter Bread

3/4 cup peanut butter (or any nut butter)
3/4 cups pumpkin
3 eggs
pinch salt
1/2 tsp. baking soda
1 tsp. cinnamon
1/4 tsp. pumpkin pie spice
1/3 – 1/2 cup honey

Blend all ingredients in a bowl (I do it by hand). Pour into a greased loaf pan (1 large or 2 smaller). Bake at 350 for 45-70 minutes (depends on the size of pan you’re using…just keep an eye on it that it doesn’t get too dark on top).

Crockpot Stuffed Peppers (Grain Free, Dairy Free, Nut Free, GAPS-legal)

Yesterday I had a doctor appt. in the afternoon, so I needed a prep ahead dinner. I decided to try making stuffed peppers in the crockpot. I didn’t really use a recipe. I just made a simple meat mixture and stuffed it into a couple peppers. 

It cooked all day in the crockp0t. What a super easy, super tasty dinner! I just ate the meat since peppers bother my little one. But it was still good. Even my daughter ate all of hers.

The peppers get super tender. You can peel the skins right off (a big bonus for kids). You can mix just about anything into the meat…rice, veggies, beans, cheese. I kept it very simple so that I could eat it. I used one pound of meat for 2 large peppers…that could easily serve 4 people.

Crockpot Stuffed Peppers

2 large bell peppers, top cut off, seeds/insides removed
1 lb. ground beef
1 egg
1/3 cup ketchup
2 Tbsp. mustard
salt and garlic powder to taste
(any other fillings you like)

Prepare the peppers.

Mix the meat with the remaining ingredients. Stuff the meat mixture into the peppers.

Put the tops on the peppers.

Put a small amount of water in the bottom of the crockpot. Place the peppers inside (I found it worked well to have them against the sides since they get soft and can tip while cooking).

Cover and cook on high 4-8 hours or low 6-12 hours (I think I had mine on high for a few hours then switched it to low for the rest of the day…about 9 hours total).

Easy Chicken Nuggets…Another Way to Use a Roasted Chicken (grain free, dairy free, GAPS-legal)

On Sunday I roasted a chicken. I love having all the leftover meat to use in other meals. I had planned to make chicken nuggets this week. I usually use boneless skinless chicken breasts for that. Cut them, bread them, fry them. But when I deboned my chicken this week I had very limited time so most of the meat was still in large chunks. Then I thought, wouldn’t it be easier to use that to make my chicken nuggets? So I tried it last night…AWESOME!! Best chicken nuggets I’ve ever made I think. The meat is already cooked, so you just have to fry it until you have a nice crust. So quick and easy…and much less messy…no raw chicken to deal with. I broke the meat into the size of strips/nuggets I thought looked right. Then I dipped them in egg, rolled them in coconut flour and pan fried them in a combo of lard and palm shortening. Delicious!! I served them with homemade honey mustard. It reminded me of eating chicken strips at Fudruckers when I was younger…the flavor anyway…this meat was far superior 🙂  Rebecca absolutely loved them as well. I don’t know that I’ve seen her eat/chew her food that quickly in a long time 🙂  I can’t wait to have leftovers for lunch today. Dip them in honey mustard with extra egg yolk mixed in…tons of nutrition. I think I know what I’ll be making with leftover roasted chicken in the future 🙂  You could even make a huge batch and freeze them for even easier meals on busy nights. Just warm and serve.

This post is linked to Grain Free Real Food Linky Carnival at Real Food Forager.

Easy Chicken Nuggets

Leftover roasted chicken in large chunks
1 egg, beaten
1/4 – 1/2 cup coconut flour
salt to taste
lard, palm shortening, coconut oil, tallow or butter for frying

Break chicken into strips/chunks. Coat chicken in egg. Then in flour/salt mixture. Fry in hot grease/oil in cast iron skillet, a few minutes on each side until golden and crispy. Serve with honey mustard or fermented ketchup.

Easy GAPS Snack Ideas

At the beginning of the month I said I wanted to make a snack list so that I wouldn’t run out of ideas (meals are easy…snacks are tough). It seems I’m always wondering what to eat between meals when I just need a little something. So here are some GAPS legal snacks. I can’t eat all of them at the moment (the ones with dairy). But they are still good options for a healthy snack for our family. I’ll keep adding to the list as I think of things. And I’ll add links to recipes as I have time.

GAPS Snacks

pesto
navy bean hummus
crispy nuts
hard boiled eggs
leftover roasted veggies
raw veggies
coconut milk ice cream
kefir smoothies
nut milk smoothies
zucchini cakes
nut butter pancakes
nut butter w/ fruit or on pancakes
gf granola
frozen fruit
fresh fruit
honey butter or honey coconut oil
roasted beets
olives
cheese crisps
leftovers
gf baked goods – scones, breakfast cookies, muffins, bread
chicken, salmon, tuna or egg salad
salmon cakes
broth
apple raisin bars

Stuffed Squash (egg free, dairy free, grain free, GAPS-legal)

Last night for dinner I made stuffed squash. This isn’t totally a new recipe. I made stuffed squash before (and it was awesome!). But I made a grain free version yesterday. So I figured I’d do a new post for it. Same concept, though. Just bake the squash and stuff it with what you like, really. I made ours very filling with lentils, cut up green beans, peas, homemade chicken sausage and bacon. And I topped Justin’s with parmesan cheese. I love that these are a whole meal in one (although I did serve other stuff with them). They do take a bit of work to prep all of the components before assembling. But it’s worth the effort 🙂  I did not add any nuts this time, but pine nuts, pistachios or some other chopped nuts add a nice crunch to it.

This post is linked to Grain Free Real Food Linky Carnival at Real Food Forager.

Stuffed Squash

1 small squash of choice (Buttercup works well)
3 slices bacon, cooked
1/3 cup cooked sausage
1/2 cup cooked lentils
cooked, chopped veggies (I just used some leftovers we had in the fridge. If you are using fresh you can saute them first. Peppers, onions, carrots, mushrooms and celery would all be good).
Seasoning to taste (I used sea salt and garlic powder)
cheese (optional…you can mix it into the fill and/or grate it on top)
nuts (optional)

Cut squash in half. Scoop out seeds. Place on baking sheet. Sprinkle with salt. Cover with foil. Fill bottom of pan with water. Bake at 400 until fully cooked (1 – 11/2 hours). Mix remaining ingredients. Stuff each half of the squash with the filling. Top with cheese if desired. Bake at 350 for 20 minutes.

Ketchup

We eat quite a bit of ketchup. I was making fermented ketchup for a while. Then I got out of the habit when I got pregnant and couldn’t handle anything fermented. Recently I saw a recipe for fermented ketchup on Nourished and Nurtured and thought I should get back into the habit and give a new recipe a try. So I made this at the beginning of the week and let it set on the counter for a few days. We gave it a try yesterday. At first Rebecca said she liked it. Then she seemed unsure. It is good, but I think I will have to still modify it a bit more to our liking. I did adjust as I was making it, so I didn’t follow the recipe 100%. The thing I have a hard time with when making homemade ketchup is the texture. Maybe I’ll try making it in the blender next time. Yesterday I used my immersion blender on this batch. It helped smooth it out a little, but it’s still thicker than boughten ketchup. I think maybe I need a little more liquid and then I can blend it. Anyway, I’m glad I tried it. I’m glad we have a fermented condiment for dipping again. I’ll have to keep experimenting. But this is a good base recipe. I’ll post the original recipe. I didn’t make a full recipe. Just enough to fit in one pint jar. I’ll update later if I come up with some mods.

Fermented Ketchup

three 7-oz jars of tomato paste, preferably in glass jars to avoid BPA

1/4 cup plus 2 Tbsp. raw honey
3 Tbsp. raw apple cider vinegar
3 small garlic cloves, pressed (I just used garlic powder)
6 Tbsp. whey
2 1/4 tsp finely ground celtic sea salt
pinch cayenne pepper (I didn’t add this)

Combine all ingredients in a bowl (if using a quart mason jar, you can save on dirty dishes by mixing this up directly in the jar). Stir well to combine. If using pint mason jars, pour the ketchup into the jars.

Ensure that the top of the ketchup is at least 1-inch below the top of the jar(s).

Using a clean cloth or paper towel, wipe the top of the jar above the ketchup clean.

Put lid on jar and leave at room temperature for 3 days; then transfer to the refrigerator.