Home » Kid-friendly Recipes » grain free » Page 6

Category: grain free

Light and Dark Hot Cocoa | Just Take A Bite

Light and Dark Hot Cocoa

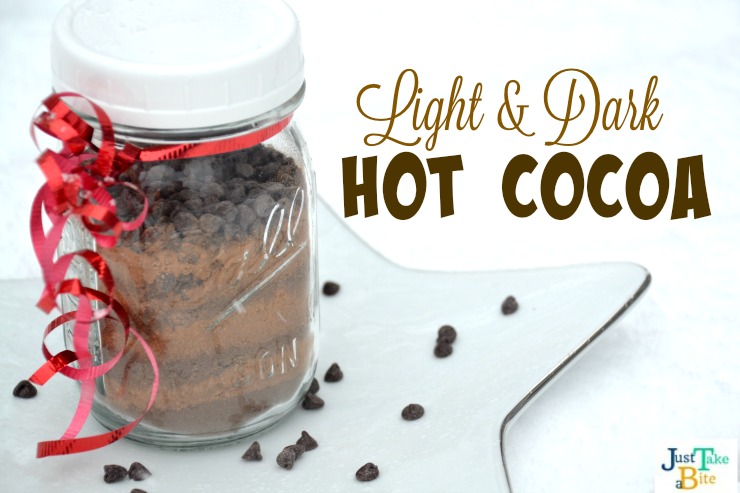
Are you looking for the perfect teacher gift? I’ve got you covered! My daughter created Rebecca’s light and dark hot cocoa to give as gifts. Everyone that tries it is blown away by the flavor. You will be too!

Light and Dark Hot Cocoa | Just Take A Bite

I remember the first year my oldest was in Kindermusik. She wasn’t even two yet.

We were finally at the point of venturing out of the house without having to worry about nursing schedules. And I wanted the chance to talk to another human being with a little more to talk about than dolls and dancing.

Class started in the fall and ended just before Christmas. That was fun, I thought. Then the last day rolled around…and everyone started handing gifts to the teacher.

Learning how to give.

Wait a minute.

We’re supposed to give a Christmas gift to every teacher/leader our children have? I guess I missed that part in the parenting handbook.

Light and Dark Hot Cocoa | Just Take A Bite

Now with three kids I know that it is totally a personal choice who you give to and how much. Some years we go shopping and let the kids pick out gifts for teachers. But that gets to be just one more thing to do.

So two years ago I simplified our gift giving. We give gifts to the teachers we see on a regular basis (maybe I’m Scrooge, but I don’t give something to every bus driver and mail carrier. You have to draw the line somewhere).

And I don’t shop for gifts either. We have two gifts we make every year. One is homemade granola. This year teachers get a special treat with kettle corn granola!

Light and Dark Hot Cocoa | Just Take A Bite

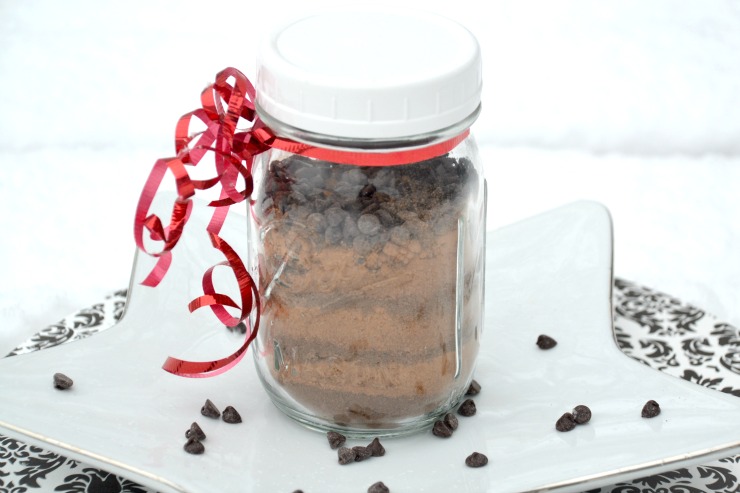
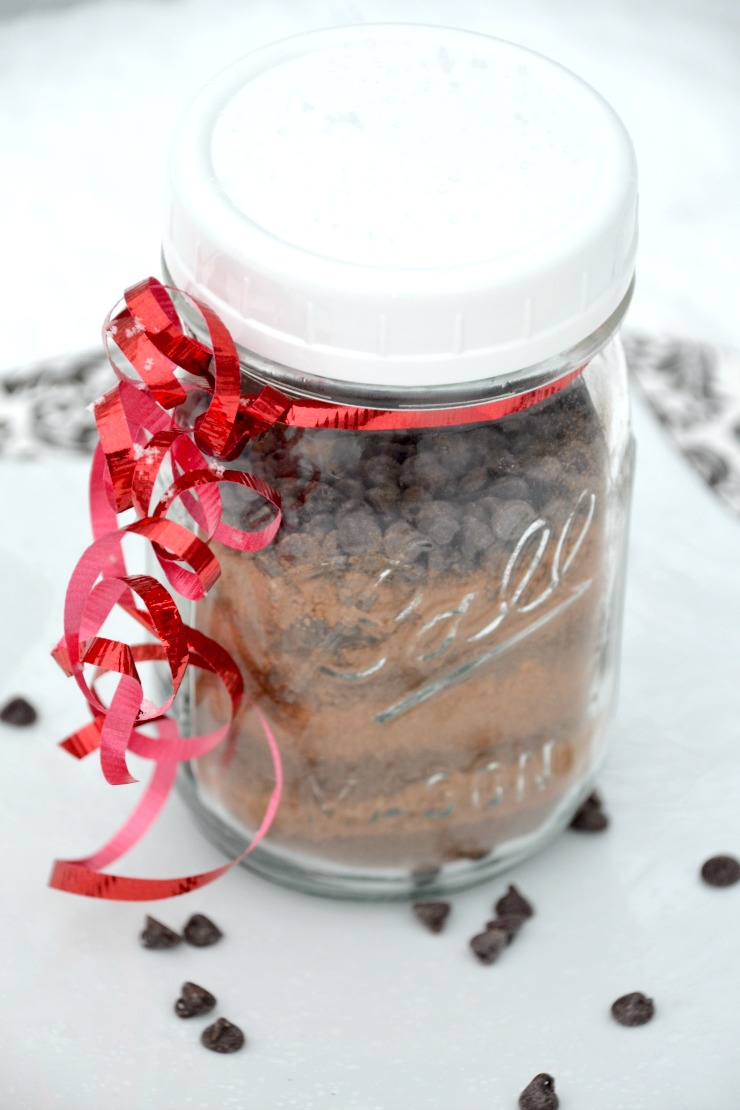
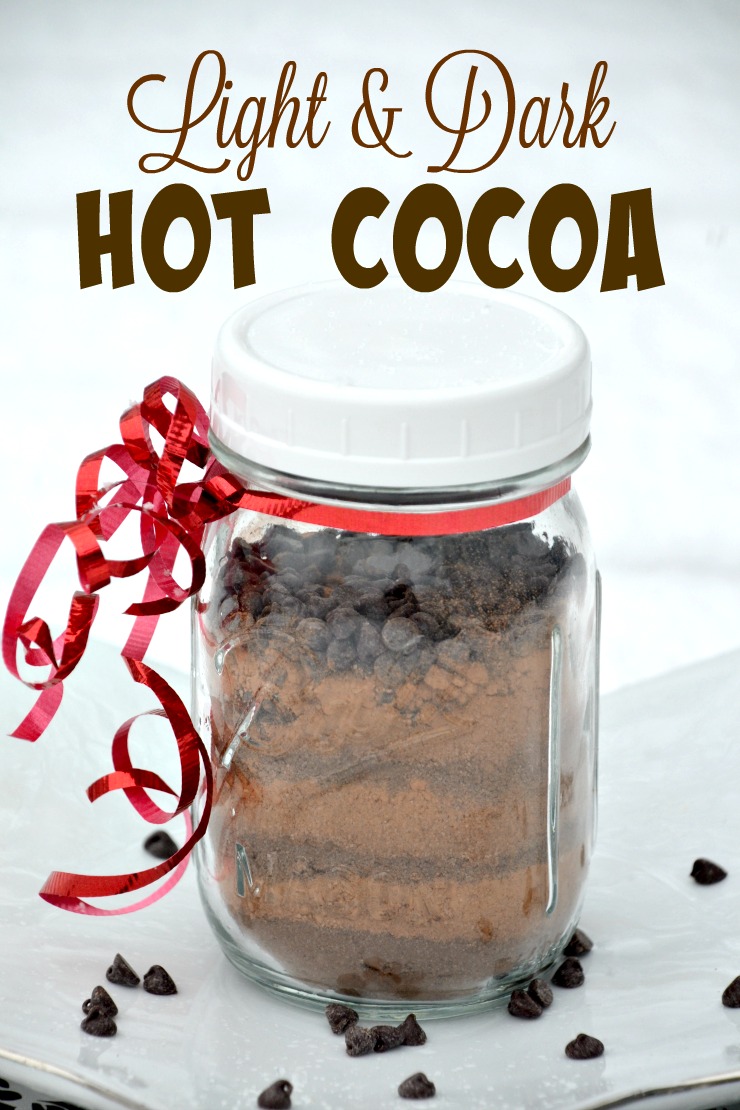
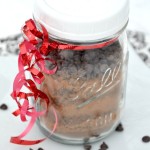
The other is my daughter’s “famous” light and dark hot cocoa. She came up with the idea of a layered cocoa mix.

It’s that good.

It is always fun to see the reaction of the people that try it. They assume when a five year old gives them homemade hot cocoa it will be fine. Then they taste it.

Some have even said it’s the best hot cocoa they’ve ever tried.

I love how simple it is to make. And that it doesn’t contain any powdered milk, flavorings, thickeners, etc. Just a few simple ingredients create the most delicious hot cocoa you’ve ever had.

I also love that it is super allergen friendly. Even I can drink it! And if I can drink it anyone can (I haven’t met many people with as many food restrictions as I have). If you can’t have cocoa you can replace all of it with carob. It won’t be light and dark hot cocoa anymore, but it will still taste great.

I even have a couple secret ingredients – unrefined sea salt and grass-fed collagen! Just because you’re drinking hot chocolate doesn’t mean you need to leave the nutrition out.
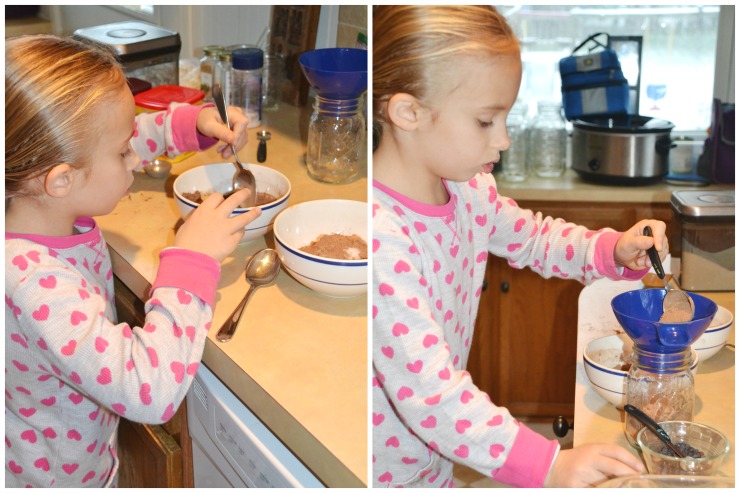
Light and Dark Hot Cocoa | Just Take A Bite

Let the kids help.

This is a great project for kids of just about any age. My oldest (age seven) can make it on her own. My four year old can make it with a little help from me. Even with kids helping it only takes about five minutes to make.

Let the kids create a pretty label and teacher gifts are done! And I have yet to find a teacher that doesn’t like hot cocoa.

Make a big batch. Give some away as gifts. Keep some for the family and enjoy a mug while you open presents or after playing in the snow (if it will ever snow this year!)

I’ve even got a cute gift tag to attach to the jar for you! Just click the link below, print and cut.

Light And Dark Hot Cocoa Gift Tag

Are you looking for a simple, heart-felt gift this year?

Light and dark hot cocoa makes the perfect teacher gift or special treat.

Light and Dark Hot Cocoa | Just Take A Bite

Light and Dark Hot Cocoa
Yields 2
A rich, homemade hot cocoa with light and dark layers.
Write a review
Print
Ingredients
  1. 3 cups organic cane sugar
  2. 1/2 cup cocoa powder
  3. 1/2 cup dark cocoa powder
  4. 1/2 tsp. unrefined sea salt
  5. 1/2 cup mini chocolate chips
  6. optional: 2 Tbsp. grass-fed collagen
Instructions
  1. In a medium size bowl combine 1 1/2 cups sugar, cocoa powder, 1/4 tsp. salt and 1 Tbsp. collagen.
  2. In another bowl combine 1 1/2 cups sugar, dark cocoa powder, 1/4 tsp. salt and 1 Tbsp. collagen.
  3. In two pint size jars layer 3 Tbsp. cocoa mixture, 3 Tbsp. dark cocoa mixture and a few chocolate chips (about 2 tsp.).
  4. Repeat four times, until the mixture is used.
To use
  1. Mix 1 - 2 Tbsp. of the cocoa mixture into 1 cup of hot water or milk.
Notes
  1. This is enough to fill two pint jars.
  2. Light and dark hot cocoa makes a great gift.
  3. I use Enjoy Life chocolate chips since they are allergen friendly.
Just Take A Bite https://justtakeabite.com/
Peppermint Stick Ice Cream | Just Take A Bite

Peppermint Stick Ice Cream

Celebrate Christmas with the traditional flavors of peppermint and chocolate in this homemade version of peppermint stick ice cream topped with hot fudge.

Peppermint Stick Ice Cream | Just Take A Bite

Mint and chocolate. Chocolate and mint.

It is a match made in heaven. And it is a favorite of my entire family.

One of my husband’s requests every Christmas is peppermint stick ice cream with hot fudge. I usually buy some. A little holiday indulgence.

But this year I wanted my kids to enjoy it too.

So I created my own version of peppermint candy and used it to make peppermint stick ice cream.

Peppermint Stick Ice Cream | Just Take A Bite

It tastes great as is. But it is even better topped with gluten free hot fudge or chocolate sauce. Or you can add chocolate right into the ice cream with mini chocolate chips.

It only takes about three minutes to prepare the ice cream batter. Then the hard part begins – waiting for it to churn and freeze!

Peppermint Stick Ice Cream | Just Take A Bite

Peppermint stick ice cream can be dairy free by using coconut milk. The eggs are also optional, so it is very allergen friendly.

There really isn’t much more to say about this delicious Christmas treat. Run to the kitchen and get a batch started. The taste will speak for itself.

Creamy mint ice cream with little bits of crunchy peppermint candy scattered throughout. Your whole family is sure to love it.

Peppermint Stick Ice Cream | Just Take A Bite

What Christmas goodies do you make every year? Sugar cookies? Gingerbread men? Apple pie?

This year give peppermint stick ice cream a try. Maybe you’ll make it part of your Christmas tradition!

Get the peppermint candy recipe here!

Peppermint Stick Ice Cream | Just Take A Bite

Peppermint Stick Ice Cream
Serves 12
Mint ice cream with homemade peppermint candy pieces.
Write a review
Print
Ingredients
  1. 2 1/2 cups cream (preferably raw) (or coconut milk)
  2. 1/2 cup whole milk (preferably raw) (or coconut milk)
  3. 1/2 - 3/4 cups choice of sweetener (organic cane sugar, honey, maple syrup)
  4. 1 tsp. peppermint extract
  5. 1 Tbsp. organic vanilla or vodka (note that some vanilla comes from corn)
  6. 2 egg yolks (optional)
  7. 1 Tbsp. tapioca or arrowroot (optional)
  8. 1/2 recipe peppermint candy, broken into small pieces (see post for recipe link)
  9. 1/3 cup mini chocolate chips (optional)
Instructions
  1. In a blender combine all of the ingredients, except candy and chocolate chips.
  2. Blend until well mixed. Adjust sweetness and peppermint flavor if needed.
  3. Process in an ice cream mixer according to manufacturer instructions.
  4. Transfer ice cream to a freezer safe container.
  5. Stir in candy and chocolate chips.
  6. Freeze until firm.
Notes
  1. The batter should be slightly sweeter than you want the ice cream to taste. The sweetness will go down as the ice cream churns.
  2. Serve with hot fudge.
Just Take A Bite https://justtakeabite.com/
This post is linked to Savoring Saturdays.

In order for me to support my blogging activities, I may receive monetary compensation or other types of remuneration for my endorsement, recommendation, testimonial and/or link to any products or services from this blog. It will not change the cost of any products or services for you.

Homemade Peppermint Candy | Just Take A Bite

Homemade Peppermint Candy

Surprise your kids this year with a unique Christmas treat. No HFCS or food dyes. Homemade peppermint candy is easy to make and allergen friendly!

Homemade Peppermint Candy | Just Take A Bite

You can’t have Christmas without a candy cane. Peppermint and Christmas go hand in hand.

One thing you can do without this time of year, though, is artificial flavor and color. The excitement and wonder of Christmas is plenty to make my kids extra hyper and excited. I don’t need junk food to do that.

Finding balance.

But I’m also not Scrooge. I do want my kids to enjoy special treats this time of year. Emotional well-being is just as important as physical well-being. That includes creating memories and indulging in festive goodies.

So rather than miss out on the traditional minty treats I created my own!

Homemade Peppermint Candy | Just Take A Bite

Homemade peppermint candy only takes about ten minutes to make and is ready to eat soon after.

Safe for those with allergies and oral SPD.

One of the great things about homemade candy is that you control the flavor.

My oldest has oral SPD. So she can’t handle much mint. Yet she loves mint flavored desserts! Just mildly flavored. And that is not something you can find in a store.

I go very light with my peppermint flavor. But you can make it as minty as you like. My candy was actually almost too minty for her. I could scale back the mint just a touch.

Homemade Peppermint Candy | Just Take A Bite

The other fun thing about homemade peppermint candy is being able to choose the shape. I did stars that look like snowflakes. Candy cane molds would be perfect for this time of year! Let the kids pick what shape they like.

Note that silicon works best for hard candy since you have to pour it into molds while very hot.

Great for the whole family.

Peppermint candy is the perfect treat for the whole family. I even let my toddler try some! Even though the candy is hard it dissolves easily and can be chewed. So I broke off a few small chunks for her to taste.

Normally I like to share recipes that kids can help make. But this one is definitely for adults since you are working with hot sugar.

Homemade Peppermint Candy | Just Take A Bite

But don’t let that stop you from getting your kids in the kitchen! It is so fun to watch the candy-making process. It makes a great science lesson. Plus demonstration is the first step in teaching your kids how to cook.

This year take small steps to make your holidays happy yet healthy. Homemade peppermint candy is ready in no time and can be made days or even weeks in advance.

Are you ready to create some great Christmas memories?

I hope they include the wonderful flavor of peppermint candy.

Be sure to come back tomorrow! I’ve got another unique holiday treat that utilizes these fun candies.

Homemade Peppermint Candy | Just Take A Bite

Homemade Peppermint Candy
Yields 10
A simple, allergen friendly mint candy.
Write a review
Print
Ingredients
  1. 1/2 cup organic cane sugar
  2. 3 Tbsp. water
  3. 1/2 tsp. peppermint extract
Instructions
  1. Mix the sugar and water in a saucepan.
  2. Bring to a boil over medium heat, stirring.
  3. Simmer until the temperature reaches 300*F (this will take about ten minutes, the mixture will start to get thick/syrupy)
  4. Remove from heat.
  5. Add the peppermint extract
  6. Immediately pour into candy molds and let set until firm.
  7. Store in a closed container in the refrigerator for up to two months. The candy can be stored at room temperature, but keeping it cool is best.
Notes
  1. You can adjust the peppermint flavor to your liking. Make a batch according to the recipe. Then make another batch with more or less extract to meet your tastes.
  2. The candy can be made with silicon molds, on parchment paper (just pour in rounds) or in one large chunk in a glass pan (then broken into pieces once cooled).
  3. This works for suckers as well.
Just Take A Bite https://justtakeabite.com/
This post is linked to Savoring Saturdays.

In order for me to support my blogging activities, I may receive monetary compensation or other types of remuneration for my endorsement, recommendation, testimonial and/or link to any products or services from this blog. It will not change the cost of any products or services for you.

Muffin Tin Mini Pumpkin Pot Pies | Just Take A Bite

Muffin Tin Mini Pumpkin Pot Pies

Turn Thanksgiving leftovers into a fun and delicious breakfast, lunch or dinner. Muffin tin mini pumpkin pot pies are perfect for the whole family.

Muffin Tin Mini Pumpkin Pot Pies | Just Take A Bite

The Thanksgiving feast is over. You’re left with a little bit of this and a little bit of that.

There isn’t enough for a full meal. Or is there?

Combine those leftovers to create muffin tin mini pumpkin pot pies that the whole family will love. What kid doesn’t like pie for dinner?!

It only takes a half cup of pumpkin (or squash) to create a fun post-Thanksgiving brunch or lunch. The pumpkin replaces the traditional pot pie cream sauce.

Start with a simple crust (only 4 ingredients!) that you can quickly mix by hand. This is a great project for kids. They love to work with their hands and press the dough into the muffin cups.

Muffin Tin Mini Pumpkin Pot Pies | Just Take A Bite

The filling is made with pumpkin or squash, vegetables and turkey. Don’t forget the real star of the show – turkey broth!! It is packed with vitamins, minerals and gelatin.

Prepare them all at once or in steps as you have time.

Muffin tin mini pumpkin pot pies are simple, versatile and delicious! Plus they are a great way to use Thanksgiving leftovers or to enjoy a taste of Thanksgiving any time of year.

Head over to Super Healthy kids where I show you how to make this fun dish that can be served for breakfast, lunch or dinner!

In order for me to support my blogging activities, I may receive monetary compensation or other types of remuneration for my endorsement, recommendation, testimonial and/or link to any products or services from this blog. It will not change the cost of any products or services for you.

Creamy Cranberry Jello | Just Take A Bite

Creamy Cranberry Jello

Looking for a kid-friendly spin on cranberry sauce? Try some creamy cranberry jello! It is packed with nutrients and kids will love the taste.

Creamy Cranberry Jello | Just Take A Bite

I am working with Stonyfield for this post. I have been compensated for my time commitment. But the opinions and ideas are my own. I have not been paid to post positive reviews.

I’ll be honest. I always skipped the cranberry sauce growing up.

Tart, gelatinous red stuff shaped like a can…not really my thing. I’m not even sure I ever actually tasted it!

It looked that bad to me.

Not much has changed.

Fast forward thirty years. I’m still not entirely sure I’ve ever tasted cranberry sauce. I honestly couldn’t tell you what it tastes like. Even though it sounds really good…assuming it’s not out of a can.

I’ve never made it or served it to my family (though this homemade version from Raising Generation Nourished sure looks good!)

So when challenged by Stonyfield to recreate a holiday dish using yogurt I figured I should try to improve on the one Thanksgiving dish I never even bother making.

Creamy Cranberry Jello | Just Take A Bite

I turned cranberry sauce into creamy cranberry jello!

Sweet success.

My kids love it.

A little sweet. A little tart. A little creamy. Perfect.

Creamy cranberry jello really couldn’t be any easier to make either.

Five ingredients. Five minutes of hands on time.

The cranberry comes from pure cranberry juice. The creaminess comes from Stonyfield Plain Greek yogurt or strained whole milk yogurt. And the jello comes from quality grass-fed gelatin.

I love the simplicity of this dish and that it is very kid-friendly. I also love that you can make it up to a couple days in advance. One less thing to think about the day of Thanksgiving or Christmas!

If your kids tend to be hesitant to try new foods and flavors like cranberry try using these fun Thanksgiving printables.

Thanksgiving-stickers

They can be printed out on a self-adhesive paper and placed on soup bowls, paper plates, napkins and glasses. Cute illustrations can sometimes motivate children to eat, but if that’s not enough, writing out funny rhymes or riddles about food can really do the trick.

They can also be used for labeling each dish so those with allergies know what’s safe.

Are you still finalizing your holiday meal plans?

Be sure to keep cranberries ON the menu this year. Nobody will pass them up in the form of creamy cranberry jello. Not even the kids!

Creamy Cranberry Jello | Just Take A Bite

Creamy Cranberry Jello
Serves 8
A creamy, kid friendly twist on cranberry sauce.
Write a review
Print
Ingredients
  1. 2 cups pure cranberry juice (NOT cranberry juice cocktail)
  2. 1 cup organic cane sugar
  3. 1/4 tsp. unrefined sea salt
  4. 1/2 cup Greek yogurt or 1 cup whole milk yogurt, strained
  5. 1 1/2 - 2 Tbsp. grass-fed gelatin
Instructions
  1. In a medium saucepan combine the juice, sugar, salt and yogurt. Whisk until combined.
  2. Add the gelatin while whisking to prevent clumping. Let sit one minute.
  3. Heat over medium heat, whisking frequently, until the sugar and gelatin are dissolved (about 3 minutes, mixture will be warm).
  4. Pour into a heat-safe serving dish.
  5. Refrigerate until firm.
  6. Serve cold.
Notes
  1. If you like your jello on the softer side use 1 1/2 Tbsp. of gelatin. If you like it firmer use 2 Tbsp. of gelatin.
  2. You can turn this into finger jello by using 2 1/2 - 3 Tbsp. of gelatin.
  3. You can add whole cranberries to the jello before refrigerating.
  4. You can replace half of the sugar with honey. You may need to increase the gelatin slightly.
  5. You can substitute coconut yogurt to make this dairy free.
Just Take A Bite https://justtakeabite.com/

Looking for more delicious jello recipes for the holidays? Give these a try!

Candy Corn Finger Jello

Pear Lime Jello Salad

Strawberry Lemon Jello Salad

Cherry Rhubarb Jello

In order for me to support my blogging activities, I may receive monetary compensation or other types of remuneration for my endorsement, recommendation, testimonial and/or link to any products or services from this blog. It will not change the cost of any products or services for you.

Five Minute Salted Honey Chocolates | Just Take A Bite

Five Minute Salted Honey Chocolates

Got five minutes? Then you have enough time to make a melt-in-your-mouth allergen friendly treat! Salted honey chocolates are perfect for holidays, birthdays or any day.

Five Minute Salted Honey Chocolates | Just Take A Bite

As we enter the holiday season with parties and family gatherings, goodies and sweets are everywhere. For most people that is exciting.

But if you have allergies you often have to go without.

I’ve got a five minute treat that just about anyone can enjoy. Salted honey chocolates are the perfect bite size treat for sharing with friends.

Five Minute Salted Honey Chocolates | Just Take A Bite

Kids can even help make some and give them as teacher gifts.

Simple ingredients.

Raw cream style honey and unrefined sea salt are combined to create a gooey caramel filling that doesn’t require any cooking or dairy.

These chocolates remind me of Caramelo® candy bars. Sweet chocolate with soft caramel inside.

Five Minute Salted Honey Chocolates | Just Take A Bite

Salted honey chocolates really only take five minutes of hands on time.

  1. Melt the allergen friendly chocolate chips over a double boiler.
  2. Pour melted chocolate in candy molds.
  3. Add honey.
  4. Sprinkle with mineral rich salt.
  5. Add more chocolate.
  6. Done.

Make it even easier.

No time to melt chocolate chips? Or you’re a busy mom with a baby in one arm and one kid around your ankle? I’ve got a solution.

Put a scoop of honey in a dish. Sprinkle it with salt. Dip chocolate chunks in the honey. Dessert is served.

Sanity is preserved.

Energy is restored.

Five Minute Salted Honey Chocolates | Just Take A Bite

I actually enjoy this little treat when the chocolate is still melted. Put honey and salt in a dish. Pour some melted chocolate over top. Dig in with a spoon!

No flours. No baking. No allergens. Simple and oh so delicious.

Kids love to help.

Let your kids get in on the fun. It could get messy. But it will be a tasty mess! And your kids will cherish the time with you and memories made.

Even if you are making sweets, getting kids in the kitchen will teach them life skills and what real food is all about.

Salted honey chocolates are one of the rare treats my entire family can eat.

Well, I haven’t actually let my toddler have chocolate yet. But she isn’t allergic to it. And I would let her have a little spoon of salted honey.

Her favorite treat these days is a scoop of lard with a little honey and sea salt. Perfect for the little one.

Five Minute Salted Honey Chocolates | Just Take A Bite

What are you waiting for? Grab some honey, chocolate and sea salt and get in the kitchen! Your after dinner snack or “mommy needs a break” fix is only five minutes away.

Just be sure to make a big batch. You’d be surprised how quickly they disappear! You may want to hide them in the back of the fridge.

Want to try your hand at another type of chocolate? You’ll love this chocolate covered toffee.

Five Minute Salted Honey Chocolates | Just Take A Bite| Salted creamy honey between layers of sweet chocolate

Five Minute Salted Honey Chocolates
Yields 12
An allergen friendly chocolate filled with raw honey and sea salt.
Write a review
Print
Ingredients
  1. 1 cup Enjoy Life chocolate chunks (or other chocolate chip you tolerate)
  2. 2 Tbsp. raw cream style honey
  3. 1/2 tsp. unrefined sea salt
Instructions
  1. Melt the chocolate over a double boiler.
  2. Fill the candy molds 1/3 full with chocolate. Refrigerate 5 minutes to partially set.
  3. Put 1/2 tsp. honey in each mold.
  4. Sprinkle with a pinch of sea salt.
  5. Top the honey with melted chocolate, filling each mold.
  6. Chill until firm.
  7. Remove from molds.
  8. Store in the refrigerator.
Notes
  1. A glass bowl on top of a pan with 1 inch of water works well as a double boiler.
  2. You can dip chocolate chunks in salted honey for a quick version.
  3. Salted honey mixed with the melted chocolate is another way to enjoy this treat.
Just Take A Bite https://justtakeabite.com/
In order for me to support my blogging activities, I may receive monetary compensation or other types of remuneration for my endorsement, recommendation, testimonial and/or link to any products or services from this blog. It will not change the cost of any products or services for you.

This post is linked to Savoring Saturdays.

Molasses Tonic | Just Take A Bite

Molasses Tonic

In need of a warm drink that not only tastes good but is packed with essential minerals? Molasses tonic is the perfect warm up and pick-me-up drink for cold weather.

Molasses Tonic | Just Take A Bite

I like warm drinks. Do you?

Even on the hottest summer days I still start the day with a warm drink. It has a calming effect on my mind and body. In fact I’m sipping on one right now while I write this post!

I’ve never been a coffee drinker. I usually go for tea.

But these days I pretty much drink one of two things. Either healing hot chocolate or molasses tonic. Both provide minerals in a great tasting, soothing beverage.

You may be wondering, what’s so great about molasses? Isn’t that just sugar?

Molasses Tonic | Just Take A Bite

Molasses is actually packed with vitamins and minerals.

It contains:

  • potassium
  • magnesium
  • calcium
  • iron
  • vitamin B6
  • niacin
  • pantothenic acid
  • choline
  • phosphorus
  • zinc
  • copper
  • selenium
  • chromium
  • cobalt
  • sodium

It has also been shown to be helpful with a variety of health issues from PMS, headaches and acne to bone health and constipation.

What’s not to love?

Well, maybe the flavor.

Molasses is an acquired taste.

At least for me. If you are not a fan just start with a small amount and work your way up to a full tablespoon.

You can even do half molasses and half maple syrup to start. Maple syrup has minerals too!

As you can see molasses is very nutritious. You could just take a big spoonful once or twice a day.

Molasses Tonic | Just Take A Bite

I like to combine it with some other nutrients in a hot drink to really give my body a boost.

So you can add any or all of the following to create a molasses tonic:

  • stinging nettle (allergy relief, reduce inflammation)
  • grass-fed collagen (easy-to-digest protein, gut healing)
  • unrefined sea salt (trace minerals, hydration/electrolyte balance)
  • cocoa powder (magnesium, iron, fiber, manganese, zinc, flavonoids)
  • carob powder (calcium, magnesium, phosphorus, potassium)
  • maple syrup (calcium, iron, magnesium, phosphorus sodium, potassium, zinc)
  • butter and/or coconut oil (healthy saturated fat, helps balance the protein and carbohydrates)

When you put all of these together molasses tonic can practically be a meal replacement! And if you have a super busy morning here and there it could be. I drink it after a meal. Though it is best to wait an hour after eating to let your food settle/start digesting first.

If you don’t have time or all of the ingredients to make the full molasses tonic you can simply add molasses and sea salt to hot water. You’ll still get a big nutritional boost and feel hydrated.

The next time you need a hot beverage skip the coffee. Instead whip up a power packed molasses tonic.

This is great for kids too. Add some whole milk or coconut milk to their molasses tonic for a creamy drink.

Do you consume molasses regularly? What is your favorite way to use it? 
Molasses Tonic | Just Take A Bite

Molasses Tonic
Serves 1
A warm drink packed with vitamins and minerals
Write a review
Print
Ingredients
  1. 1 1/2 - 2 cups boiling water
  2. 1/2 - 1 Tbsp. blackstrap molasses
  3. 1/4 tsp. unrefined sea salt
optional
  1. 1 tsp. nettle leaf
  2. 1 Tbsp. grass-fed collagen
  3. 1 tsp. organic cocoa powder
  4. 1/2 tsp. organic carob powder
  5. 2 tsp. grade B maple syrup
  6. 1 Tbsp. butter or coconut oil
  7. 2-4 Tbsp. whole milk or coconut milk
Instructions
  1. If using nettle leaf, use a tea strainer or cheesecloth to steep nettle leaves in 1/2 cup boiling water for 10 minutes. Remove the leaves.
  2. Add the remaining boiling water and ingredients.
  3. Stir to combine.
  4. Allow to cool enough to drink or add ice cubes or milk.
Notes
  1. This can be served warm or cold (iced molasses tonic).
  2. This can be placed in a water bottle and packed for school lunch.
Just Take A Bite https://justtakeabite.com/

In order for me to support my blogging activities, I may receive monetary compensation or other types of remuneration for my endorsement, recommendation, testimonial and/or link to any products or services from this blog. It will not change the cost of any products or services for you.

Candy Corn Finger Jello | Just Take A Bite

Candy Corn Finger Jello: KS Post

Candy corn finger jello is the perfect Halloween treat. It has bright colors and fruit flavor without anything artificial.

Candy Corn Finger Jello | Just Take A Bite

I’ve never been that crazy about  Halloween.

Don’t get me wrong, getting dressed up is fun. Spending time with friends is great.

Of course as a kid the candy is the real star of the show.

An adult perspective.

But on the whole it’s more of a hassle than anything, especially as a parent. Scrambling to find a costume (I’m cheap and just get creative with what we have on hand…anybody with me?). Spending half the week’s grocery budget on junk food for the neighborhood. Not my cup of tea.

But there is one part of Halloween and fall in general that I have always loved.

Candy corn.

I liked the taste. But more than that it reminded me of my grandparents. They lived on a farm and always kept a chicken feeder on the kitchen table to feed their little chicks – their grandchildren!

For some reason I was more into this tradition than any of my siblings or cousins. If my grandparents knew I was coming they were sure to stock it with candy corn for me. I ran to it first thing when I entered the house to check and have a little chicken feed.

My days of visiting the farm are coming to an end as my grandmother passed away earlier this year and my grandfather is in hospice. But when I do get there the chicken feeder is still sitting there on the table as soon as I walk in the door.

Candy Corn Finger Jello | Just Take A Bite || Candy corn finger jello is the perfect Halloween treat. It has bright colors and fruit flavor without anything artificial.

A new tradition.

I am honored that it will soon be the centerpiece of my own table! I can carry on the tradition of feeding my kids and someday grandkids just like little chicks.

But in a different way.

My candy corn will not come out of a bag. It will not have artificial flavors and food coloring.

Instead it will be full of nourishing gelatin!

Want to see how I made this fun treat? Head over to Kitchen Stewardship! I’ll show you just how easy and healthy candy corn finger jello is.

If you’re looking for more holiday treats check out these great real food dessert books:

Naturally Sweetened Sweets - A Community Cookbook

Smart Sweets

This post is linked to Savoring Saturdays.

Spiced Apple Ice Cream | Just Take a Bite

Spiced Apple Ice Cream

It is fall!! That means apple season is definitely here! Celebrate with a dish of spiced apple ice cream. Warm spices, cooked apples, cold cream. Perfection.

Spiced Apple Ice Cream | Just Take a Bite

Fall is a special time in Michigan. There are orchards all around and apples of every variety.

If you have a child in school they will likely have a field trip to an orchard. Facebook is full of family apple picking photos.

Apple goodies abound. Apple cider. Apple donuts. Apple crisp. Apple pie (the Dutch variety too!). Applesauce. Apple pie parfaits. Apple pie cake. The list goes on.

Something new.

This year I created a new way to enjoy apples – in ice cream!

Spiced Apple Ice Cream | Just Take a Bite

Spiced apple ice cream is a mix of sauteed, sweetened apples (think apple pie filling), warm spices and thick raw cream.

Start by sauteing chunks of apples in butter, honey and your favorite blend of spices. Then make a rich cinnamon ice cream. Mix in the apples and let it freeze.

For the spice you can go simple with just cinnamon. Or you can add nutmeg and cloves. I actually used a cinnamon spice blend from Ground 2 Table. It worked really well.

Enjoyment all around.

Spiced apple ice cream was definitely a winner with my family. Even my in-laws got to sample some and thoroughly enjoyed it!

Of course it tastes great plain. But spiced apple ice cream is really good served on vanilla cake or apple crisp!

Spiced Apple Ice Cream | Just Take a Bite

Maybe you’re like me and need a little crunch? Crumble some homemade pumpkin spice graham crackers over the ice cream. It’ll taste like crust so you get the full apple pie effect.

You can also add crunch with chopped crispy pecans. Sprinkle them on top or mix them right in the ice cream. You’ll really bump up the flavor by using sugar coated pecans!

If you want to add to the creaminess and nutrition you can use pastured egg yolks. But if you don’t have access to quality eggs or you don’t tolerate eggs you can leave them out.

For sweetener cane sugar, maple syrup and honey all work. I like to use a combination of two or all three of them to create a more neutral flavor.

No guilt.

Does this sound too indulgent for you? Check out this amazing resource to learn how to Stop Fighting Food and enjoy what you eat. Then dig in!

Now that apple season is in full swing it’s time to create some fall treats. Grab your favorite variety of apple and fresh cream. You’re well on your way to a dish of rich spiced apple ice cream.

What is your favorite way to enjoy fall and the abundance of apples?

Spiced Apple Ice Cream | Just Take a Bite

Spiced Apple Ice Cream
Serves 12
Write a review
Print
Ingredients
  1. 2 medium apples, peeled and diced
  2. 2 tsp. butter (or coconut oil)
  3. 1 tsp. cinnamon
  4. optional: nutmeg, cloves or a cinnamon spice blend
  5. 1 Tbsp. honey
  6. 2 1/2 cups cream (raw if possible) (or coconut milk)
  7. 1/2 cp whole milk (raw if possible) (or coconut milk)
  8. 2 egg yolks (optional)
  9. 1/2 cup cane sugar, maple syrup and/or honey
  10. 1 Tbsp. vanilla or vodka
  11. 1 Tbsp. tapioca flour or arrowroot
  12. 1/4 tsp. unrefined sea salt
  13. 2 tsp. cinnamon
Instructions
  1. Sautee apples in butter, spices and honey over medium heat about 5 minutes, until tender but not mushy. Set aside to cool.
  2. In a blender combine the remaining ingredients. Blend until well mixed.
  3. Process the ice cream in an ice cream mixer according to manufacturer's directions (it takes 15 - 20 minutes in my Kitchen Aid ice cream maker attachment).
  4. Transfer the ice cream to a freezer safe container.
  5. Stir in the apples.
  6. Freeze until firm.
Notes
  1. You can add 1/4 cup chopped crispy pecans or sugar coated pecans when you stir in the apples.
Just Take A Bite https://justtakeabite.com/

In order for me to support my blogging activities, I may receive monetary compensation or other types of remuneration for my endorsement, recommendation, testimonial and/or link to any products or services from this blog. It will not change the cost of any products or services for you.

This post is linked to Savoring Saturdays.

Honey Sweetened Pumpkin Butter Three Ways | | Homemade Dutch Apple Pie

Honey Sweetened Pumpkin Butter Three Ways: SHK Post

Now that fall is here it’s time for pumpkin everything! Use this nutrient packed vegetable to create three variations on pumpkin butter. It is so easy and delicious. Your kids will love it.

Honey Sweetened Pumpkin Butter Three Ways | | Homemade Dutch Apple Pie

Coming up with healthy snacks can be a challenge. Kids want sweet and tasty. You want quick and nutritious.

Honey sweetened pumpkin butter is the perfect solution!

Pumpkin is not a vegetable most people eat very often. But it really is packed with nutrients. Pumpkin contains vitamin A (a lot of it!), vitamin C, potassium, copper and iron in addition to lots of phyto-nutrients. So it makes the perfect component to a healthy snack like pumpkin butter.

There are three variations of pumpkin butter – original, chocolate and sunflower. They each have a unique flavor that your kids are sure to love. And with only three or four ingredients they are all easy to make.

Honey Sweetened Pumpkin Butter Three Ways | | Homemade Dutch Apple Pie

It only takes about ten minutes to make all three pumpkin butters! It is that easy. After a few minutes in the refrigerator they are ready to eat. I like to prepare them in advance. Then snack time is easy. The pumpkin butter will last up to a week in the refrigerator.

Are you ready to whip up one or all three of these tasty fall treats? Head on over to Super Healthy Kids where I show you just how easy it is. Then surprise your kids with a delicious after school treat.

Don’t forget to really add to the fun by making a batch of pumpkin spice graham crackers to go along with the pumpkin butter. Maybe homework time will go a bit smoother with a fun snack. At the very least your kids will have their mouths and bellies full of good stuff.

In order for me to support my blogging activities, I may receive monetary compensation or other types of remuneration for my endorsement, recommendation, testimonial and/or link to any products or services from this blog. It will not change the cost of any products or services for you.

This post is linked to Savoring Saturdays.