Home » Kid-friendly Recipes » snack » Page 10

Category: snack

Strawberry Apple Salad | Homemade Dutch Apple Pie

Strawberry Apple Salad

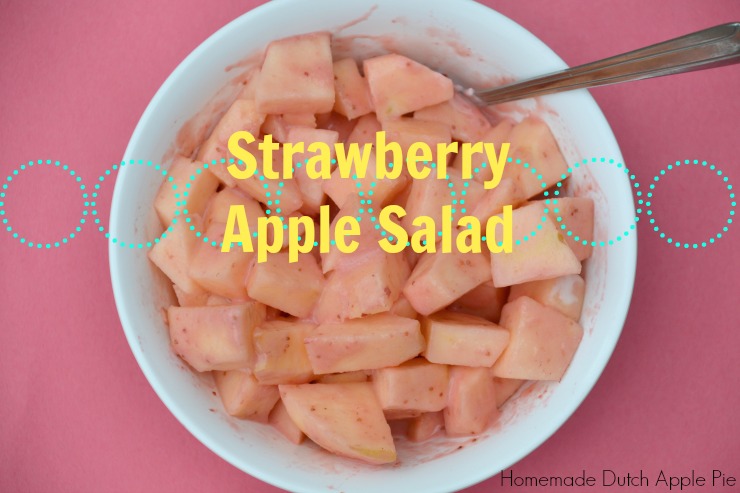
Strawberry apple salad is a simple way to add a burst of strawberry flavor to your summer meal.Strawberry Apple Salad | Homemade Dutch Apple Pie

I am a planner.  I always make meal plans for the week (I’ve been posting them for several years if you need inspiration!). It’s usually not too difficult to come up with main dishes.

But side dishes…

I struggle there. It usually ends up being the same boring sides week after week. Broccoli, beans, applesauce…

If you’re tired of boring sides you’re in luck.  Today I’ve got a bright, fun, easy side dish that is perfect for any week night meal. It can also be doubled or tripled and served at your next picnic or potluck.

There is no cooking or baking required. Just some chopping and mixing.

Strawberry apple salad features one of summer’s gems – fresh strawberries.  It is naturally very allergen friendly and low in sugar. It puts a fun summer spin on the year round staple of apples.

If you’re like me and don’t need much sweetness to feel like you’re having a treat, strawberry apple salad could even be used as dessert. Top it with a sprinkle of granola or crispy walnuts. Dessert is ready!Strawberry Apple Salad | Homemade Dutch Apple Pie

One of the things I love about this salad is that you can prepare it in advance.  The longer you let it sit the better! The apples will just absorb more and more of the strawberry flavor.

I like to let my kids help make this strawberry apple salad.  Even the young ones can get involved. I peel and core the apples. Then they use a dull knife to cut the apples into chunks. After I blend the strawberry dressing they can pour it on the apples and mix.

Of course if your child helps make the salad you have to let them be a taste tester.  That is the most important job! My kids sure loved sampling strawberry apple salad.

Strawberry apple salad is the perfect park snack.

Fill half pint mason jars with the salad and put a lid on. Grab a spoon and you’re all set. No need to worry about messy hands since you eat it with a spoon.

Whether it is strawberry season or not you can make strawberry apple salad. Frozen strawberries work too!  No apples on hand? No problem. Swap pears, peaches or plums. It’ll still taste great.

Put strawberry apple salad on your menu this week. I bet your kids will love it as much as mine do!Strawberry Apple Salad | Homemade Dutch Apple Pie

Strawberry Apple Salad
Serves 4
A simple summer salad that turns ordinary apples into a fun strawberry treat.
Write a review
Print
Ingredients
  1. 1/4 plain whole milk yogurt
  2. 1 cup strawberries (fresh or frozen, thawed)
  3. 2 Tbsp. honey
  4. 5-6 medium apples, peeled, cored and cut into bite size pieces
  5. optional - 1 tsp. poppy seeds
Instructions
  1. Puree the yogurt, strawberries and honey in a blender.
  2. Pour the mixture into a medium size bowl. Add poppy seeds if desired.
  3. Add the apples to the bowl and toss to coat.
  4. Chill for at least 2 hours before serving.
Notes
  1. This can be made a day ahead.
  2. Top the salad with granola or crispy nuts if desired.
  3. Fill half pint mason jars with the salad to take it on the go.
Just Take A Bite https://justtakeabite.com/


In order for me to support my blogging activities, I may receive monetary compensation or other types of remuneration for my endorsement, recommendation, testimonial and/or link to any products or services from this blog.

Strawberry Lemon Jello Salad | Homemade Dutch Apple Pie

Strawberry Lemon Jello Salad

When you see strawberries at the farmer’s market you know summer is here! Use that fresh fruit to kick off the season with this fun strawberry lemon jello salad the whole family will love.

Strawberry Lemon Jello Salad | Homemade Dutch Apple Pie

I recall eating a lot of jello growing up.  Of course we had it plain. But we also ate a lot of jello salads.

Church potlucks are notorious for a variety of jello dishes. Some have chunks of fruit. Some are layered. Some are meant to be eaten with your hands. I know I got my fill as a kid!

Jello salads are fruity and fun. Of course kids love them. Who wouldn’t with the bright colors and sweet flavor?

Is Jello Harmful?

It’s been a couple years now since we adopted a strict no food coloring policy in our house.

My children just react way too strongly to artificial colors and flavors.

Plus after researching I realize just how bad all of that artificial stuff is for everyone’s health (think ADHD, hyperactivity, etc.).  I still cringe every time I see a child eating a brightly colored cupcake, cookie or candy. Especially knowing that it is most likely a daily occurrence for them.

So jello out of a box is not something my children ever eat. But I do like to make real jello with nourishing grass-fed gelatin (use code TAKE10 for 10% off).  It is especially fun in the summer.

Strawberry Lemon Jello Salad | Homemade Dutch Apple Pie

Real Food Strawberry Lemon Jello Salad

Recently I decided I wanted to recreate some of my childhood favorite jello recipes.

I started with this strawberry lemon jello salad. It is actually a combination of two jello salads my mom made.

But this one is made with real fruit, grass-fed gelatin, natural sweeteners, pastured eggs and raw milk!

The first layer is a simple strawberry jello made with fresh berries. The top layer is a bright, lemon pudding.

Together they make an irresistible combination. And check out that color!!! No need for anything artificial when you’ve got quality ingredients with vibrant hues.

The final test is the flavor. My whole family gave it two thumbs up! The strawberry and lemon pair well. The jello is not overly sweet. It is a great combination.

Strawberry lemon jello salad would make a great addition to any summer picnic or potluck!

Are you a jello fan? Treat  yourself and your family to this amazing real food version of a classic. Strawberry lemon jello salad is sure to be a hit.

Strawberry Lemon Jello Salad | Homemade Dutch Apple Pie

Strawberry Lemon Jello Salad
Serves 12
Real strawberry jello topped with homemade lemon pudding.
Write a review
Print
Strawberry Layer
  1. 2 cups strawberries (fresh or frozen, thawed)
  2. 1/2 cup organic cane sugar
  3. 2 Tbsp. grass-fed gelatin
  4. 1 cup water
Lemon Layer
  1. 2 egg yolks
  2. 1/3 cup lemon juice
  3. 1/2 cup organic cane sugar
  4. 3 Tbsp. arrowroot, tapioca flour or corn starch
  5. 1 cup cream or whole milk
Strawberry Layer
  1. Puree the strawberries, sugar and water in a blender. Pour into a sauce pan.
  2. Stir the gelatin into the mixture. Let set 1 minute.
  3. Heat the strawberry mixture over low-medium heat, stirring, until the gelatin is dissolved, about 4 minutes.
  4. Pour into an 8" glass pan.
  5. Put in the refrigerator until set, about 1 hour.
Lemon Layer
  1. In a medium saucepan combine the egg yolks, lemon juice, sugar, arrowroot and milk. Whisk to combine.
  2. Heat over medium heat, whisking frequently, until the pudding begins to thicken (will take around 5-10 minutes).
  3. Continue whisking for 30 seconds. Turn off heat. Whisk until fully thickened.
  4. Pour the pudding into a bowl to cool for 20 minutes.
  5. Pour the pudding over the strawberry layer.
  6. Chill until fully set, about 2 hours.
  7. Serve cold.
Just Take A Bite https://justtakeabite.com/
Gluten Free Inside Out Oreos® | Homemade Dutch Apple Pie

Gluten Free Inside Out Oreos®

This homemade version of gluten free inside out Oreos® is a fun, allergen friendly treat that is perfect for birthdays or Father’s Day.Gluten Free Inside Out Oreos® | Homemade Dutch Apple Pie

Father’s Day is just around the corner! It’s time celebrate all the special dads in your life.

What is the best way to a man’s heart? Through his stomach of course!  A special dessert is just the thing to show your husband, father or grandfather how much you love him.

Remember to take care of that stomach, though. Don’t serve sweets with artificial ingredients, food coloring and hydrogenated oils. Instead make a homemade dessert that he can’t resist using real ingredients.

Enter gluten free inside out Oreos®. They are both fun and delicious. They will also last a while so your special man can enjoy them the whole week.

The kids can even help make gluten free inside out Oreos®.  You can make them in advance so there is plenty of time to work on them with the kids. Then they will be so proud to give them to dad.

These tasty cookies are also perfect for birthday treats. I recently made them for my son’s cow spotted birthday.

I love how easy they are to make…and how little mess they make when my kids eat them.

Gluten free inside out Oreos® do contain cocoa powder. But you can substitute carob if you need to avoid it.

Maybe you’re thinking these look great…but what about all the sugar?

Each cookie contains less than two teaspoons of sweetener. Plus there is plenty of healthy fat in the cookie to help metabolize the sugar. The combination of the cookie and the frosting actually does have a purpose!

You also have to remember this is a treat. Itis not something to eat all the time.Gluten Free Inside Out Oreos® | Homemade Dutch Apple Pie

Homemade Oreos® are definitely a family favorite. We usually make them with the traditional combination – chocolate cookies with vanilla frosting.  Sometimes we get really fancy and make special holiday versions.

Now we can add gluten free inside out Oreos® to the list.

Homemade Oreos® are even very allergen friendly. They contain no gluten, dairy, nuts, corn, rice, eggs or soy. With a family like mine that is very important.  I don’t like anyone to feel left out.

Are you still trying to decide what to make your special man for Father’s Day? Or do you need a fun birthday treat? Gluten free inside out Oroes® are just what you need. They:

  • are free of allergens
  • are easy to make
  • can be made in advance
  • are a fun project for kids to help with
  • can be eaten without a big mess

This Father’s Day don’t just go for the traditional cake or chocolate chip cookies. Surprise all the special dads in your life with this fun, allergen friendly dessert that will make his heart and his tummy happy. Gluten free inside out Oreos® are the perfect way to say I love you.Gluten Free Inside Out Oreos® | Homemade Dutch Apple Pie

Gluten Free Inside Out Oreos® {dairy free, nut free, corn free, egg free}
Yields 30
A fun, allergen friendly version of Oreos®...flipped inside out!
Write a review
Print
Cookies
  1. 1 cup sorghum flour (or white rice)
  2. 3/4 cups tapioca flour
  3. 1/2 cup amaranth flour (or brown rice)
  4. 1/2 cup organic cane sugar or coconut sugar
  5. 1/2 tsp. unrefined sea salt
  6. 1/2 tsp. baking soda
  7. 1 tsp. vanilla
  8. 6 Tbsp. honey
  9. 1/2 cup melted butter, coconut oil, palm shortening, lard or tallow
Filling
  1. 1/2 cup palm shortening OR 1/4 cup palm shortening + 1/4 cup butter (at room temp)
  2. 3-4 Tbsp. cocoa powder
  3. 1 Tbsp. carob powder
  4. 10 Tbsp. tapioca flour
  5. 1/4 - 1/3 cup maple syrup
Cookies
  1. Heat the oven to 350*F. Cut 3 sheets of parchment paper the size of a baking sheet.
  2. In a large bowl combine the flour, sugar, salt and soda. Stir to remove any lumps.
  3. Add the vanilla, honey and melted fat. Stir to combine. Use hands to form a ball of dough.
  4. Split the dough in half. Place one half on a piece of parchment paper. Roll until 1/4" thin.
  5. Cut the dough into desired shapes and transfer to a parchment lined baking sheet.
  6. Repeat this process until all of the dough is used.
  7. Bake the cookies for 12-13 minutes. Turn off the oven and leave the cookies in for 5-10 minutes.
  8. Allow to cool completely.
Filling
  1. Beat all of the ingredients together in a medium size bowl.
Fill the cookies
  1. Use a spoon or a piping bag to put filling on one cookie. Top with another cookie and gently push down. Repeat until the filling is gone.
  2. Keep the cookies in the refrigerator for the filling to harden.
Notes
  1. This makes three trays of cookies if cutting shapes. Alternately you can simply roll the dough and cut it into squares and bake them without having to transfer the cookies to another sheet. You will only need two baking sheets of cookies with this method.
  2. You can replace the gluten free flours with whole wheat or all purpose flour.
Just Take A Bite https://justtakeabite.com/


In order for me to support my blogging activities, I may receive monetary compensation or other types of remuneration for my endorsement, recommendation, testimonial and/or link to any products or services from this blog.

Apple Pie Breakfast Parfait | Homemade Dutch Apple Pie

Apple Pie Breakfast Parfait

This apple pie breakfast parfait is a simple layered breakfast that is easy enough for kids to make and fancy enough for guests.
Apple Pie Breakfast Parfait | Homemade Dutch Apple PieSaturday mornings I like to make fun breakfasts and often let my kids choose what we have.  That usually includes things like:

But sometimes by Friday I just don’t have the energy or time to measure and soak flour and get things ready for baking. I need a simple breakfast that is still fun and delicious.

Enter the apple pie breakfast parfait! It is so easy to make that your kids can almost do it by themselves. But what’s even better about it is the taste.Apple Pie Breakfast Parfait | Homemade Dutch Apple Pie

Both of my big kids said it really tastes like apple pie. Then they proceeded to devour it!

There is no refined sugar (unless it is added to your granola). Apple pie breakfast parfait has a good balance of protein and fat from the yogurt and carbohydrates from the apples and granola. There is even some sea salt for balance if you use this kettle corn granola!

Don’t think this is just for kids, though!

Apple pie breakfast parfait looks so pretty and tastes so great it is perfect for entertaining house guests.

I would even make mini versions to serve at a brunch, whether for a playdate or a party.

I prepare the apple filling the night before so it can cool completely. Then in the morning I just layer the ingredients before breakfast. This would be a great thing for kids to do on their own or if they have friends over – build your own apple pie parfait!Apple Pie Breakfast Parfait | Homemade Dutch Apple Pie

This breakfast is very allergen friendly, being gluten, nut, corn, soy and egg free. If you are dairy free you can use coconut milk yogurt.

Apple pie breakfast parfait is also a perfect breakfast for the summer when you want something easy and cold.  You can prepare it in advance or assemble it in the morning.

Are you in a breakfast rut? Try an apple pie breakfast parfait. Your kids will love it. You will too!

Apple Pie Breakfast Parfait | Homemade Dutch Apple Pie

Apple Pie Breakfast Parfait
Yields 4
A simple, yet elegant breakfast parfait made with real ingredients and very allergen friendly.
Write a review
Print
Ingredients
  1. 3 medium apples, peeled, cored and cut into small chunks
  2. 1/2 tsp. cinnamon
  3. 3 Tbsp. honey, maple syrup, coconut sugar or cane sugar
  4. 1 - 1 1/2 cups whole milk yogurt or coconut milk yogurt
  5. 1 cup prepared granola
Instructions
  1. Heat oven to 350*F.
  2. Combine the apples, cinnamon and sugar in a small baking dish.
  3. Bake 40 minutes. Stir.
  4. Cover and refrigerate over night.
  5. Layer the yogurt, apples and granola in four dishes.
Just Take A Bite https://justtakeabite.com/
In order for me to support my blogging activities, I may receive monetary compensation or other types of remuneration for my endorsement, recommendation, testimonial and/or link to any products or services from this blog.

Rhubarb + Apple Sauce

This rhubarb + apple sauce combines the flavors of spring with a staple fruit available all year long to make a delicious side for any spring or summer meal.Rhubarb + Apple Sauce | Homemade Dutch Apple Pie

School is out! Summer has officially begun. Before you move on to strawberries, blueberries and cherries sneak in one last rhubarb dish.

I know strawberries are the classic pairing with rhubarb. It makes sense since they are available at the same time of year. But I’m learning rhubarb goes with so many other fruits!  Cherry and rhubarb blend well in this jello.

Now you can mix rhubarb with a fall staple – apples. Since apples are readily available year round this side dish is easy to make in the spring or summer.

My kids loved this rhubarb applesauce. There is sweetness from the apples, spice from the cinnamon and hint of tart from the rhubarb.

Rhubarb applesauce is great any time of day. Breakfast, lunch, dinner or even a snack – you really can’t go wrong.

The preparation for this side is minimal. Since the apples cook down you don’t have to chop them much ahead of time, especially if you are going to puree the sauce. The rhubarb should be peeled first (I just do this with my hands) to remove the stringy outside. Then a rough chop and you’re all set.

Kids can help make rhubarb applesauce. Peeling rhubarb is a great task for them! Then using a safe knife to roughly chop apples (after you peel/core them) and put them in the pan. My kids love helping make this.

Are you getting bored with plain applesauce? Try a spruced up spring version with rhubarb added.  You’ll add vitamins and boost the flavor. It is also a great way to introduce your kids to rhubarb.

Rhubarb + apple sauce is perfect for early summer picnics, family barbeques and easy lunches while the kids are home.Rhubarb + Apple Sauce | Homemade Dutch Apple Pie

Rhubarb + Apple Sauce
Serves 6
A tart and sweet applesauce with the flavor of early summer.
Write a review
Print
Ingredients
  1. 4 medium apples, peeled, cored and chopped
  2. 1 cup rhubarb, peeled and diced (about 1 large stalk)
  3. 1/3 cup cane sugar or honey
  4. 1 tsp. cinnamon
  5. 1/2 tsp. nutmeg (optional)
  6. 1/2 cup water
Instructions
  1. Combine all of the ingredients in a medium saucepan.
  2. Bring to a boil, reduce heat and simmer for 15 - 25 minutes (will depend on the firmness of the apples), stirring periodically.
  3. Mash or puree the sauce.
  4. Serve warm or cold.
Just Take A Bite https://justtakeabite.com/

Fruit On The Bottom Yogurt

This fruit on the bottom yogurt only requires a few simple ingredients but is full of flavor and nutrients. It’s perfect for summer when fresh fruits are everywhere and you want something cold for breakfast.Fruit On The Bottom Yogurt | Homemade Dutch Apple Pie

Growing up we only got one kind of yogurt – fruit on the bottom.  As kids sometimes we would eat the plain yogurt first and then eat the fruit part last. It was fun.

These days most yogurts are blended and overly sweet. Many of them also contain artificial flavors and colors. Then there is one of my biggest critiques…low fat or worse, no fat. Why would I want yogurt that has had the healthy fat taken out and artificial ingredients added in?

My solution is always homemade.  We eat yogurt a lot for breakfast. I usually just add whatever fruit we have fresh or frozen to plain, whole milk yogurt (kids need lots of healthy fat!!).

But I came up with a fun, fruit on the bottom yogurt so my kids could enjoy it just like I did when I was little. Even if they don’t have to my kids always stir their yogurt before eating it. So when I set a fruit on the bottom yogurt in front of them for breakfast they were very excited! My son enjoyed helping me make it too.Fruit On The Bottom Yogurt | Homemade Dutch Apple Pie

I like using a see through container to serve this so the kids can see the bright fruit at the bottom. Or you could use something opaque and tell them the flavor is a surprise. Then as they stir kids see the yogurt change color.

I keep the sweetness level pretty low in our yogurt. My husband and kids enjoyed this as is. But if you are used to store bought flavored yogurts you might want to add a little extra sweetener.  I divided one batch of fruit among three containers of yogurt. You can split it between two to boost the flavor.

One thing I love about making my own fruit-filled yogurt is no addition of thickeners, particularly corn starch! My son is allergic to corn, so we have to avoid it.

As fresh fruit comes in season (strawberries are here!!!) just use whatever is available. Strawberries, raspberries, blueberries, cherries, peaches – they all work well.  If using blueberries you’ll have to mash them a little to get the juices flowing.Fruit On The Bottom Yogurt | Homemade Dutch Apple Pie

Fruit on the bottom yogurt is simple to make, uses quality ingredients and is fun for kids.  It takes three minutes to cut up a few pieces of fruit and add honey. Then in the morning top it with plain, whole milk yogurt. Serve it with homemade granola, granola bars, quinoa bars or cereal.

This also makes a great addition to a picnic lunch.

Fresh fruit works well in this yogurt, but you can just as easily use frozen. Simply let it thaw a bit before cutting up the fruit.

Did you grow up eating fruit on the bottom yogurt? Now you can serve it to your kids – but in a much healthier way.Fruit On The Bottom Yogurt | Homemade Dutch Apple Pie

Fruit on the Bottom Yogurt
Serves 3
A fun, fruit on the bottom yogurt made with real ingredients.
Write a review
Print
Ingredients
  1. 1/2 cup strawberries, blueberries, raspberries, cherries or peaches
  2. 2 Tbsp. honey or maple syrup (add more if you like it sweeter)
  3. 1 1/2 - 2 cups plain, whole milk yogurt or coconut yogurt
Instructions
  1. Cut up the fruit into small pieces or mash the blueberries.
  2. Add the honey/syrup.
  3. Refrigerator for 1 hour or over night.
  4. Divide the fruit into two or three cups.
  5. Top with 1/2 - 3/4 cups yogurt.
  6. Stir when serving.
Just Take A Bite https://justtakeabite.com/


In order for me to support my blogging activities, I may receive monetary compensation or other types of remuneration for my endorsement, recommendation, testimonial and/or link to any products or services from this blog.

Cherry Rhubarb Jello

Cherry rhubarb jello is the perfect kid-friendly way to use fresh produce and welcome summer weather.

Cherry rhubarb jello is a dye-free, allergy-friendly treat that all kids love. The perfect finger food.

We have two rhubarb plants in our garden. Most years we get a few decent stalks from them that I use to make a special dessert like crisp, ice cream, cake or even cheesecake!

This year our rhubarb plants were huge! After making three strawberry rhubarb crisps there was still plenty left. That means it is time to experiment with new ways to use rhubarb.

What Flavors Go Well With Rhubarb

I came up with cherry rhubarb jello. This is the perfect, nutritious way to use fresh, spring produce in combination with last year’s freezer stash (we still have a couple gallons of sweet cherries left!).

The cherries give sweetness and a deep maroon color while the rhubarb gives a hint of tartness. It’s the perfect combination.

Cherry rhubarb jello is a dye-free, allergy-friendly treat that all kids love. The perfect finger food.

Cherry rhubarb jello makes a great finger food lunch addition or snack for kids. The fruit provides vitamins while the gelatin provides easy-to-digest protein (Use the code TAKE10 for 10% off your gelatin purchase HERE).

Allergen-Free Cherry Rhubarb Jello

An added bonus is that cherry rhubarb jello is very allergy-friendly. Not to mention there is no food coloring or artificial flavor (food dyes are connected with behavioral issues). So it makes a unique and healthy treat for everyone.

Are you looking for a dish to pass at your next potluck or picnic? Cherry rhubarb jello is just the thing. You can make it in advance and both kids and adults will enjoy it.

Sometimes I even serve this for breakfast. My oldest can take her time eating in the morning. If we need to get out the door on time jello is great. It is soft and easy to chew.

Don’t forget the really important part – cherry rhubarb jello is so easy to make! Just cook, puree, add the gelatin and chill. It takes about five minutes of hands on time. Who doesn’t love that?!

Before rhubarb season ends grab a few stalks and make this fun treat to celebrate the end of the school year and welcome summer.

Cherry rhubarb jello is a dye-free, allergy-friendly treat that all kids love. The perfect finger food.

Cherry Rhubarb Jello
Serves 12
Write a review
Print
Ingredients
  1. 2 cups sweet cherries (fresh or frozen)
  2. 2 cups rhubarb, peeled and chopped
  3. 3/4 cups organic cane sugar or coconut sugar
  4. 1/4 tsp. unrefined sea salt
  5. 1/2 cup water
  6. 2 Tbsp. grass-fed gelatin
Instructions
  1. Combine the cherries, rhubarb, sugar and salt in a saucepan.
  2. Bring to a boil, reduce heat and simmer about 20 minutes.
  3. Pour the mixture into a blender. Blend until smooth.
  4. Return the mixture to the saucepan.
  5. Dissolve the gelatin in 1/2 cup cold water. Let sit 1 minute.
  6. whisk the gelatin water into the hot puree until dissolved, about 1 minute.
  7. Pour the mixture into an 8" square pan or a bowl.
  8. Refrigerate until firm.
  9. Scoop or cut into squares to serve.
Just Take A Bite https://justtakeabite.com/

Ultimate Strawberry Frozen Yogurt + Yogurt Cultures and Oxo Review

Ultimate strawberry frozen yogurt | Homemade Dutch Apple Pie

*I am working with Stonyfield and Oxo for this post. I have been compensated for my time commitment to use these products. However, my opinions are entirely my own and I have not been paid to publish positive comments.*

My kids have been begging for frozen yogurt for a while. So it’s been on my to-do list…when I have time. How lucky for them that I was given the opportunity to try this amazing strawberry frozen yogurt recipe from the cookbook Yogurt Culture by Sternman Rule!

The frozen yogurt is easy to make. It is so beautiful with a deep pink color.  I strayed from the original recipe slightly since I was making it for kids. I left out the vinegar and rosemary. I’m sure both ingredients would add a unique and delicious flavor. As always I used Stonyfield Organic plain full fat yogurt, though Greek yogurt would also work.Ultimate strawberry frozen yogurt | Homemade Dutch Apple Pie

If you haven’t heard of Yogurt Cultures, it is a really great cookbook. But more than that it is so fascinating to read about all of the ins and outs of yogurt making. The chapters include Flavor, Slurp, Dine and Lick where Rule explores the many ways to use yogurt – salty, sweet, fruits, meats, drinks, desserts, etc. There is something for everyone.

To help make this frozen yogurt I also had the opportunity to work with Oxo. I tried their strawberry huller and ice cream scoop.

I had no idea strawberry hullers even existed. But this thing is so cool!!!  I’m already anxious for strawberry picking and preserving so I can use the huller. I probably wouldn’t use it if I was taking a few strawberries out to munch on. But if I have a whole basket of strawberries to hull this is so handy. No knife. No mess. Just push it in, twist and pull. Amazing. This is a great way to have kids help with strawberries too since they don’t need a knife.Ultimate strawberry frozen yogurt | Homemade Dutch Apple Pie

The ice cream scoop also works very well. It is heavier than any ice cream scoop I have in the house. It can scoop through hard ice cream pretty easily. I would recommend it if you are looking to buy one.

As for the frozen yogurt – my kids loved it! They both gave it two thumbs up. My husband really enjoyed it too.  Being dairy free right now I couldn’t taste it. But it sure looks and smells good! I will make this again for sure and maybe play around with our own flavor combinations.

Ultimate strawberry frozen yogurt | Homemade Dutch Apple Pie

Ultimate Strawberry Frozen Yogurt
Yields 1
Balsamic vinegar and minced rosemary lend subtle notes that heighten the berry essence without overshadowing it.
Write a review
Print
Ingredients
  1. 1 pound strawberries, preferably organic
  2. ½ cup plus 2 tablespoons sugar
  3. 2 tablespoons balsamic vinegar (I did not add this)
  4. 2½ cups plain whole-milk yogurt (not Greek) or 1½ cups plain whole-milk Greek yogurt
  5. 1 tablespoon light corn syrup (I used honey)
  6. 1 tablespoon plus 1 teaspoon finely minced fresh rosemary, plus (optional) additional minced rosemary for garnish (I did not add this)
Instructions
  1. PREP THE BERRIES. In a food processor, pulse the strawberries, sugar, and vinegar in five 1-second bursts. Let stand at room temperature (go ahead and keep it in the food processor), covered, for 1 hour.
  2. MEANWHILE, PREP THE YOGURT. If using traditional yogurt, spoon it into a fine-mesh sieve set over a deep bowl. Refrigerate to drain off the whey for 1 hour only. Discard the whey or reserve it for another use. Add the yogurt to the food processor with the strawberries. (If using Greek yogurt, do not strain, but do not add the yogurt to the berries until after they have stood for 1 hour.)
  3. PUREE AND CHILL. Add the corn syrup to the yogurt mixture. Process until nearly smooth. Transfer to a covered container and refrigerate for at least 4 hours or overnight.
  4. FREEZE. Freeze the mixture in an ice cream maker according to the manufacturer’s instructions. After 20 minutes, add the rosemary. Continue churning until the mixture has fully thickened and is nearly scoopable. You may eat it now, soft-serve style, but I recommend transferring it to a metal loaf pan to further chill and develop deeper flavor. Press a sheet of parchment directly on the surface of the frozen yogurt, then cover tightly with aluminum foil. Freeze for several hours.
  5. SERVE. Let the yogurt stand at room temperature at least 20 minutes before scooping with a hot, dry scoop. Garnish sparingly with rosemary.
Adapted from Yogurt Culture
Just Take A Bite https://justtakeabite.com/

In order for me to support my blogging activities, I may receive monetary compensation or other types of remuneration for my endorsement, recommendation, testimonial and/or link to any products or services from this blog.

Soaked Gluten Free “Whole Wheat” Bagels

Soaked Gluten Free Whole Wheat Bagels | Homemade Dutch Apple PieHave I mentioned before that I love bagels? I wish I had them on hand at all times.  I recently shared a recipe for sourdough bagels with strawberry cream cheese.

The sourdough bagels are great! But not if you’re gluten free.

So I figured I better come up with a gluten free recipe too. This is my “whole wheat” bagel that is soaked (for your digestion), gluten free, dairy free, nut free and corn free.  The teff gives a wheat flavor and color to the bagel.Soaked Gluten Free Whole Wheat Bagels | Homemade Dutch Apple Pie

The outside is a bit chewy. The inside is soft. The texture is perfect for kids – not too hard to chew.

I used a donut pan to make these bagels. If you don’t have a donut pan you can make them in a muffin pan – there just won’t be a hole in the middle.

Homemade bagels are great for a quick breakfast or they are easy to pack up for a school lunch.

Bagels also freeze well. So you can make a double or triple batch and keep your freezer stocked for easy meals.Soaked Gluten Free Whole Wheat Bagels | Homemade Dutch Apple Pie

Try the bagels with a variety of toppings – butter, coconut oil, jam, cream cheese, cashew butter or nut butter. You can also turn it into a sandwich with egg salad, salmon salad, chicken salad or locally made lunch meat.

You really can’t go wrong with a bagel. And this version is safe for almost everyone! An added bonus is that there are no gums or fillers in these bagels. Just pure, simple ingredients.

Do you enjoy bagels as much as I do? You have to give these a try.

Soaked Gluten Free Whole Wheat Bagels | Homemade Dutch Apple Pie

Soaked Gluten Free "Whole Wheat" Bagels
Yields 6
A "wheaty" bagel that is gluten, dairy, nut and corn free.
Write a review
Print
Ingredients
  1. 1/2 cup tapioca flour
  2. 1/2 cup sorghum flour (or white rice)
  3. 1/4 cup amaranth flour (or brown rice)
  4. 1/4 cup teff flour
  5. 1/2 cup warm water
  6. 1 Tbsp. lemon juice or apple cider vinegar
  7. 1/2 tsp. active dry yeast
  8. 2 tsp. cane sugar
  9. 1 Tbsp. water
  10. 2 egg whites
  11. 1 tsp. extra virgin olive oil
  12. 1/4 tsp. unrefined sea salt
  13. 2 tsp. cane sugar
  14. 1/2 tsp. baking soda
  15. 1/2 tsp. cream of tartar
Soak the flour
  1. In a large bowl combine the flours. Stir to remove any lumps.
  2. Add the water and lemon juice. Mix. Cover. Let sit 7-24 hours.
Make the bagels
  1. Grease a bagel or muffin pan.
  2. Combine the yeast, 2 tsp. sugar and 1 Tbsp. very warm water. Let sit 5 - 10 minutes.
  3. Add the egg whites and olive oil to the flour mixture. Beat one minute.
  4. Add the yeast mixture to the bowl. Beat 20 seconds.
  5. Add the salt, sugar, soda and cream of tartar to the bowl. Beat 20 seconds.
  6. Immediately pour the batter into the prepared donut pan, filling to the top.
  7. Place the donut pan in the oven. Turn on the oven light.
  8. Let rise 45 minutes.
  9. With the pan still in the oven, turn the oven on to 400*F.
  10. Set timer for 25 minutes.
  11. Remove the bagels from the pan and cool.
  12. Store in a bag at room temperature for up to a week or in the freezer for up to 6 months.
  13. Slice in half and serve with your favorite toppings.
Just Take A Bite https://justtakeabite.com/


In order for me to support my blogging activities, I may receive monetary compensation or other types of remuneration for my endorsement, recommendation, testimonial and/or link to any products or services from this blog.

Broth For Breakfast: Toast

Broth For Breakfast: Toast | Homemade Dutch Apple PieI have another super simple way to add broth to your breakfast.  It doesn’t even require cooking (unless you consider making toast cooking).

The only thing this does require is very gelled broth. It should be unseasoned or very mildly seasoned if you want to add jam.

Then just grab a knife, some toast and start spreading!

Gelled broth is a lot like jelly. You can use it the same way. I personally just add the broth and sprinkle sea salt on top.  But if you’re not a fan of the broth flavor you can use a thinner layer of broth and spread jam on top. You’ll never know it’s there. The broth sort of melts onto the toast.

This is an easy way to get kids to eat broth. They don’t even have to know it’s there!

Pair toast with jam and broth with broth scrambled eggs for a really nutrient dense breakfast. You’ll have protein, carbohydrates and fat. You’ll have starch, sugar, salt and saturated fat. You’ll have the healing benefits of broth combined with eggs to make a complete protein.

That is about as good as it gets for breakfast. Your body and metabolism will be soaring for the rest of the day.

Broth For Breakfast: Toast | Homemade Dutch Apple Pie

Broth For Breakfast: Toast
Serves 1
A simple breakfast dish that uses broth.
Write a review
Print
Ingredients
  1. 1 slice of bread of choice
  2. 1-2 Tbsp. gelled broth
  3. sea salt to taste
Instructions
  1. Toast the bread or keep at room temperature.
  2. Spread the broth on the toast.
  3. Sprinkle with sea salt.
Notes
  1. You can spread butter or coconut oil on the bread before the broth.
  2. You can spread nut butter, jam or honey on top of the broth.
Just Take A Bite https://justtakeabite.com/