Home » Kid-friendly Recipes » nut free » Page 10

Category: nut free

Honey Sweetened Pumpkin Butter Three Ways | | Homemade Dutch Apple Pie

Honey Sweetened Pumpkin Butter Three Ways: SHK Post

Now that fall is here it’s time for pumpkin everything! Use this nutrient packed vegetable to create three variations on pumpkin butter. It is so easy and delicious. Your kids will love it.

Honey Sweetened Pumpkin Butter Three Ways | | Homemade Dutch Apple Pie

Coming up with healthy snacks can be a challenge. Kids want sweet and tasty. You want quick and nutritious.

Honey sweetened pumpkin butter is the perfect solution!

Pumpkin is not a vegetable most people eat very often. But it really is packed with nutrients. Pumpkin contains vitamin A (a lot of it!), vitamin C, potassium, copper and iron in addition to lots of phyto-nutrients. So it makes the perfect component to a healthy snack like pumpkin butter.

There are three variations of pumpkin butter – original, chocolate and sunflower. They each have a unique flavor that your kids are sure to love. And with only three or four ingredients they are all easy to make.

Honey Sweetened Pumpkin Butter Three Ways | | Homemade Dutch Apple Pie

It only takes about ten minutes to make all three pumpkin butters! It is that easy. After a few minutes in the refrigerator they are ready to eat. I like to prepare them in advance. Then snack time is easy. The pumpkin butter will last up to a week in the refrigerator.

Are you ready to whip up one or all three of these tasty fall treats? Head on over to Super Healthy Kids where I show you just how easy it is. Then surprise your kids with a delicious after school treat.

Don’t forget to really add to the fun by making a batch of pumpkin spice graham crackers to go along with the pumpkin butter. Maybe homework time will go a bit smoother with a fun snack. At the very least your kids will have their mouths and bellies full of good stuff.

In order for me to support my blogging activities, I may receive monetary compensation or other types of remuneration for my endorsement, recommendation, testimonial and/or link to any products or services from this blog. It will not change the cost of any products or services for you.

This post is linked to Savoring Saturdays.

Gluten Free Squash Cookies | Homemade Dutch Apple Pie

Gluten Free Squash Cookies: KS Post

If you are in need of a healthy breakfast, lunch or dessert gluten free squash cookies are just the thing. Easy to make. Properly prepared grains. And vegetables!

Gluten Free Squash Cookies | Homemade Dutch Apple Pie

All summer long you are in control of what your kids eat and when they eat.

There is an abundance of fresh fruit to serve IF they need a little snack (not when snack time is a mandatory part of their day). Breakfasts don’t have to be made AND consumed in ten minutes in order to catch the bus. Lunches can be cooked and served warm.

Then school starts.

Mornings are chaotic getting everyone dressed and fed and out the door.

Lunches have to be simplified and packed.

It is a challenge to maintain the nutrient dense status of your kids’ food. Not to mention they are bombarded with special treats for everything from birthdays to good behavior as soon as they step foot in the door.

So as the new school year gets under way why not combine the need for nourishment with the desire for something sweet? Did I mention it is also easy?

These super simple gluten free squash cookies are portable and work for breakfast or lunch. Vegetables in your breakfast and dessert? Yes, please!

Head over to Kitchen Stewardship to find out how I make these easy and delicious cookies.

Gluten Free Squash Cookies | Homemade Dutch Apple Pie

Grain Free Sunbutter and Jelly Bars | Homemade Dutch Apple Pie

Grain Free Sunbutter and Jelly Bars

No time to make a sandwich? No problem. Grab some grain free sunbutter and jelly bars from the freezer and an allergen friendly lunch is ready in no time.

Grain Free Sunbutter and Jelly Bars | Homemade Dutch Apple Pie

We’ve been back to school for exactly one week. And I’m already sick of packing lunches. Anybody else?

In all honesty I don’t mind it *too* much. But it sure is nice when I have some easy things to pack that are filling and nutritious.

Skip the nuts.

Of course I’m always conscious of allergies too. So while peanut butter and jelly sandwiches are about the easiest thing to make I don’t pack them in my daughter’s lunch (even though she is not allergic to nuts).

Recently I started using sunbutter in place of nut butters. My kids love it! I love that I don’t have to worry about them getting nuts on their baby sister when they eat it. Plus I can send it to school without potentially causing another child harm.

That means my daughter does get sunbutter sandwiches once in a while. They are easy and delicious.

Grain Free Sunbutter and Jelly Bars | Homemade Dutch Apple Pie

Skip the bread.

But there is something even easier!

Grain free sunbutter and jelly bars are easy to make, easy to pack and easy to eat. You get the added bonus that you don’t have to worry about making or finding decent bread! This is especially key if you are gluten, grain or anything else free.

To make the dough simply dump all of the ingredients in a bowl and mix. The “jelly” filling is just three ingredients pureed in the blender for thirty seconds.

Then pour, bake and eat.

Grain Free Sunbutter and Jelly Bars | Homemade Dutch Apple Pie

Skip the long lunch prep.

I like to make a big batch so I can keep a bunch in the freezer. Then packing lunch is easy and has virtually no preparation. In fact kids can pack it themselves!

A sunbutter and jelly bar paired with veggies and dip and some fresh fruit is a great lunch. Or you can really boost the nutrition factor by pairing it with a thermos of your favorite soup. My daughter loves split pea!

Grain Free Sunbutter and Jelly Bars | Homemade Dutch Apple Pie

Change the flavor.

Let your kids pick the jelly flavor. Strawberry is a favorite here. But raspberry, cherry and blueberry all work well.

If your kids don’t like jelly then you can make the bars without the filling. It will be like a sunbutter and honey sandwich.

Are you in need of another easy lunch component to add to your rotation? Skip the sandwich. Go for grain free sunbutter and jelly bars. They are sure to be a hit!

Don’t need to pack a lunch? Serve them for breakfast. Kids love them any time of day.

Grain Free Sunbutter and Jelly Bars | Homemade Dutch Apple Pie

Grain Free Sunbutter and Jelly Bars
Serves 12
A nut free bar that is easy to pack and takes the place of a sandwich.
Write a review
Print
Bar
  1. 1/2 cup sunbutter
  2. 1/2 cup tapioca flour
  3. 2 eggs (or flax or gelatin eggs)
  4. 1/4 cup honey
  5. 1/4 cane sugar
  6. 1/2 tsp. unrefined sea salt
  7. 1/4 tsp. baking soda
Filling
  1. 1 cup fruit (strawberry, blueberry, cherry, raspberry), thawed and drained if using frozen
  2. 1 1/2 tsp. grass-fed gelatin
  3. 1 Tbsp. honey
Bar
  1. Heat oven to 350*F. Grease a 7x11 baking pan.
  2. In a large bowl combine all of the bar ingredients. Beat until well mixed.
  3. Spread half of the dough into the greased pan.
  4. Blend the filling ingredients in a blender until pureed. Pour the filling over the dough in the pan. Spread.
  5. Pour the remaining half of the dough on top of the filling.
  6. Bake for 40 minutes.
  7. Allow to cool. Cut into bars.
  8. Store in the refrigerator for up to two weeks or in the freezer for up to one year.
Notes
  1. White rice flour can be substituted for tapioca. It will no longer be grain free.
  2. The eggs can be replaced with ground flax seeds.
  3. You can also assemble the bars by pouring all of the batter into the pan and pouring the filling on top.
  4. Any nut or seed butter will work in place of the sunbutter.
Just Take A Bite https://justtakeabite.com/
This post is linked to Savoring Saturdays.

Brain Booster Milkshake | Homemade Dutch Apple Pie

Brain Booster Milkshake

Get the school morning started right with a brain booster milkshake. Full of protein, vitamins and minerals it will keep your kids going all day.

Brain Booster Milkshake - Nutrient-dense drink kids love!

School mornings can be hard. Get breakfast on the table. Feed the baby. Brush everyone’s teeth. Find shoes and backpacks.

You do your best to prepare and have things go smoothly. But even with good planning it is tough to always give your kids the nourishment they need before heading out the door.

Especially if you have a child like mine that eats very slowly and ends up often only managing a few bites of breakfast.

To make sure she starts her day the right way I created my brain booster milkshake.

Brain Booster Milkshake - Nutrient-dense drink kids love!

Are Milkshakes Healthy?

This milkshake is packed with some nutritional powerhouses.

  • raw milk – easy to digest protein, calcium and vitamins
  • raw pastured egg yolks – B vitamins that are critical for brain function and concentration
  • probiotics – for gut health and boosting the immune system
  • grass-fed collagen – easy to digest protein and important amino acids
  • maple syrup – carbohydrates for energy and trace minerals
  • unrefined sea salt – trace minerals

I usually serve the milkshake with something else like a homemade granola bar or even dinner leftovers! But even if she doesn’t take a single bite of her breakfast I know she’s going to be fueled for the morning as long as she drinks her brain booster milkshake.

This is a really good option for kids with oral SPD and chewing problems. A milkshake goes down pretty quickly. It is also easy on the digestive system. The nutrients are very easy to absorb and utilize.

Brain Booster Milkshake - Nutrient-dense drink kids love!

One of the key components is the raw, pastured egg yolk. Have you ever read about them? Though often deemed as unhealthy or bad for your heart the opposite is actually true. And eaten raw (as long as they are pastured) the nutrients are not damaged and are easy to absorb.

Egg yolks are amazing little packages of nutrients, specifically B vitamins that are essential for your child’s brain development and ability to focus. They contain other nutrients such as choline (necessary for methylation), selenium (great for the thyroid) and biotin (helps with blood sugar regulation – perfect for breakfast!).

Milkshake for Breakfast or Lunch

I sometimes put milkshakes in my daughter’s lunch too. She struggles to eat much lunch at school. There just isn’t enough time for her, and she’s busy talking. But she usually comes home with an empty cup!

This is also great for kids going through orthodontic work. The day after adjustments their mouth can be very sore and chewing can be a challenge. A milkshake is always in my daughter’s lunch the day after her expander gets adjusted. I tell her that even if she can’t eat anything she should be sure to drink her brain booster milkshake.

Brain Booster Milkshake - Nutrient-dense drink kids love!

Healthy Chocolate Milkshake

The base milkshake recipe is vanilla. But you can create other flavors too. My kids love when I add a bit of cocoa powder or carob powder for a chocolate shake.

Add some strawberries from your freezer stash for a strawberry shake. Any berry or even cherries will work.

Sometimes we really get creative and add mint extract. It tastes like mint ice cream (my kids’ favorite!).

If you can’t have dairy, coconut milk is a great substitute! Any milk alternative will work.

Serve it in a fun cup with a straw or in a sealed cup to pack in a lunch box.

Whether you serve it for breakfast, lunch or both you’ll know your child is getting essential nutrients with a brain booster milkshake. All they have to know is they get something delicious to drink!

Get your kids excited about breakfast. What flavor do you think they’ll like best?

Brain Booster Milkshake - Nutrient-dense drink kids love!

Brain Booster Milkshake
Serves 1
A delicious shake perfect for breakfast or lunch that will give your kids the nutrients they need to perform their best.
Write a review
Print
Ingredients
  1. 1 cup raw milk or coconut milk
  2. 1 - 2 raw pastured egg yolks
  3. 1 Tbsp. grade B maple syrup
  4. 1/4 tsp. unrefined sea salt
  5. 2 tsp. grass-fed collagen
  6. 1/2 capsule preferred probiotics
  7. 1/2 capsule preferred multi-vitamin
  8. optional: 2 tsp. carob powder or cocoa powder OR 1/4 cup berries or cherries
  9. optional: 1/2 tsp. organic vanilla OR 1/4 tsp. organic mint extract
Instructions
  1. Combine all of the ingredients in a blender or a cup with a lid.
  2. Blend or shake until well combined.
  3. Serve immediately or refrigerate until ready to serve.
Just Take A Bite https://justtakeabite.com/
In order for me to support my blogging activities, I may receive monetary compensation or other types of remuneration for my endorsement, recommendation, testimonial and/or link to any products or services from this blog.

This post is linked to Savoring Saturdays.

Lemon Elderberry Gummies | Homemade Dutch Apple Pie

Lemon Elderberry Gummies

Help ward off the back-to-school illnesses with a fun, fruity treat. Lemon elderberry gummies not only taste great, they are good for you!

Lemon Elderberry Gummies | Homemade Dutch Apple Pie

For many school is already back in session. For others it is only a week away. Either way there is one thing on every parent’s mind when school starts.

How long until the kids start getting sick?

As kids start spending more time inside and around their friends it is inevitable that germs will spread. There are many natural remedies to help your child’s immune system stay strong and avoid some illness.

One simple remedy is elderberry syrup. It helps ward off viruses and minimizes their severity. My kids love taking it right off the spoon.

Lemon Elderberry Gummies | Homemade Dutch Apple Pie

Make it fun.

Another great way to add elderberry syrup into your diet is adding it to gummies. Kids don’t even know they are doing something good for themselves by eating these fun, fruity candies.

The lemon adds some vitamin C along with the elderberry for even more immune support.

These gummies are also packed with grass-fed gelatin that is helpful for healing the gut and supporting the whole body. Plus it provides easy-to-digest pure protein.

Great for everyone.

I like to serve lemon elderberry gummies for breakfast and snacks or pack them in lunches for my oldest. They are great to have around for the younger kids as well. Even toddlers love to munch on gummies!

No need to buy fruit snacks. Most of them are filled with artificial flavors and colors.

Even if you buy the ogranic/natural varieties they still contain “natural flavor” which is actually almost the same thing as artificial flavor. And for kids like mine it has the same effect on their mental clarity and behavior.

Lemon Elderberry Gummies | Homemade Dutch Apple Pie

Fast food.

Although homemade gummies may sound like a daunting snack to make it is actually very simple. Lemon elderberry gummies go from the pan to the fridge in about five minutes.

Simply mix the ingredients, heat and pour. That’s all there is to it.

You can get the kids involved with this project by letting them pick the shapes. See what candy molds your grocery store carries or buy some online. I like to use silicon molds so I don’t have to worry about putting hot liquid in plastic. Plus gummies are much easier to remove from the silicon molds.

If you don’t have any molds you can simply pour the warm liquid into a glass pan. When the lemon elderberry gummies are gelled you can cut them into squares or any shape you like.

No lemon juice on hand? You can use blueberry, cherry or lime juice instead. Try all four varieties and see what your kids like best.

Are you looking for easy, healthy snacks for school lunches? Are you looking for easy ways to help keep your kids healthy?

Lemon elderberry gummies are just what you’re looking for! Fruity, fun and healthy. Whip up a batch to start the school year right.

Lemon Elderberry Gummies | Homemade Dutch Apple Pie

Lemon Elderberry Gummies
Yields 25
A fun, fruity treat to help ward off colds.
Write a review
Print
Ingredients
  1. 1 cup organic lemon juice
  2. 2 Tbsp. elderberry syrup
  3. 1/2 cup honey
  4. 4 Tbsp. grass-fed gelatin (NOT collagen)
  5. 1/4 tsp. unrefined sea salt
Instructions
  1. In a small saucepan combine the lemon juice, elderberry syrup, honey and salt. Whisk to combine.
  2. Add the gelatin and whisk to combine.
  3. Let sit one minute.
  4. Heat over low-medium heat, stirring frequently, until mixture is warm and has become liquid again.
  5. Pour mixture into molds or a glass pan (smaller pan for thicker gummies, larger pan for thinner).
  6. Refrigerate until firm, about thirty minutes.
  7. Remove from molds or cut into shapes.
  8. Store in a sealed container in the refrigerator for up to two weeks.
Just Take A Bite https://justtakeabite.com/

In order for me to support my blogging activities, I may receive monetary compensation or other types of remuneration for my endorsement, recommendation, testimonial and/or link to any products or services from this blog.

This post is linked to Savoring Saturdays.

Salted Caramel Cupcakes with Maple Bacon Glaze | Homemade Dutch Apple Pie

Salted Caramel Cupcakes with Maple Bacon Glaze

Looking for a unique treat that is both salty and sweet? Salted caramel cupcakes with maple bacon glaze are the perfect solution. They are free of gluten, dairy, corn and nut but full of flavor.

Salted Caramel Cupcakes with Maple Bacon Glaze | Homemade Dutch Apple Pie

When it comes to dessert cupcakes top the list for fun, portable and easy to eat. No need to fuss with cutting or plating.

Simple. Just the way I like it.

There are so many cupcake flavors to choose from. Chocolate, vanilla and yellow are traditional flavors. Or you can add some fun with strawberry and coconut.

But if you really want to kick your cupcakes up a notch try a salted caramel cupcake base with maple bacon glaze.

The cake is properly prepared with soaked gluten free grains. The glaze is made with only four simple ingredients, including bacon grease and urefined sea salt!

Salted Caramel Cupcakes with Maple Bacon Glaze | Homemade Dutch Apple Pie

The family consensus.

I thought these salted caramel cupcakes were amazing! I am a sucker for anything sweet with a pop of saltiness. Add bacon on top? You’ve got a winner. I would have gladly eaten the whole batch myself.

And I may have eaten a few for breakfast!

My husband enjoyed them, but wasn’t sure he liked quite so much bacon flavor in his cupcake.

The kids felt the same – good cupcakes, pretty strong on bacon.

You can adjust the bacon flavor to your liking by adjusting the amount of bacon grease used in the glaze. It will also depend on your bacon. Ours is quite smokey and has a very strong flavor.

Salted Caramel Cupcakes with Maple Bacon Glaze | Homemade Dutch Apple Pie

The cake.

Salted caramel cupcakes have a great balance of salty and sweet. They are actually good without adding any frosting or glaze.

You could go for a simple vanilla buttercream on top too if you like more sweet. Chocolate frosting would also pair well with the salty base.

The cake itself is soft and moist from soaking the gluten free grains. Not too dense but also not crumbly. It holds up well in little hands.

Allergen friendly.

These cupcakes are gluten, dairy, nut, corn, rice, soy and coconut free. If you can’t have eggs you could use an egg replacement.

In other words they are safe for just about everyone!

Bring on the birthday parties. Salted caramel and bacon are the perfect combination for a celebration.

Are you a salty and sweet fan? Looking for a confection that’s unique and allergen friendly?

Salted caramel cupcakes with maple bacon glaze give a whole new meaning to dessert. Easy, fun, salty, sweet goodness.

Salted Caramel Cupcakes with Maple Bacon Glaze | Homemade Dutch Apple Pie

Salted Caramel Cupcakes with Maple Bacon Glaze
Yields 12
An allergen friendly salty and sweet cupcake perfect for birthdays and holidays.
Write a review
Print
Cupcake
  1. 1/4 cup amaranth or brown rice flour
  2. 1 cup sorghum or white rice flour
  3. 1/2 cup tapioca flour
  4. 1 cup warm water
  5. 1 Tbsp. lemon juice
  6. 1/4 cup maple syrup
  7. 1 tsp. organic vanilla (use corn free if allergic to corn)
  8. 1 1/2 tsp. unrefined sea salt
  9. 1 tsp. baking soda
  10. 1 egg or egg substitute
  11. 1 1/2 Tbsp. extra virgin olive oil
  12. 1/4 cup organic cane sugar or coconut sugar
Glaze
  1. 2 Tbsp. melted bacon grease
  2. 2 Tbsp. maple syrup
  3. 4 Tbsp. organic cane sugar
  4. pinch sea salt (optional)
Cupcake
  1. Combine the amaranth, sorghum and tapioca flour. Whisk to remove any lumps.
  2. Add the water and lemon juice. Mix and work out any lumps.
  3. Cover and let sit 7-24 hours.
  4. Heat the oven to 325*F. Line a muffin pan with muffin cups.
  5. Add the syrup, vanilla, salt, soda, egg, oil and sugar to the soaked mixture.
  6. Beat until well combined.
  7. Fill muffin cups almost full.
  8. Bake for 45 minutes.
  9. Allow to cool completely before glazing.
Glaze
  1. Combine the melted bacon grease, syrup, sugar and salt. Mix well.
  2. Top the cupcakes with glaze.
  3. Refrigerate to solidify the glaze.
  4. Serve at room temp or straight from the refrigerator.
  5. Store in a covered container in the refrigerator.
Notes
  1. Some or all of the bacon grease can be replaced with melted lard, butter or coconut oil to reduce the bacon flavor.
  2. The cupcakes freeze well. Freeze without glaze.
Just Take A Bite https://justtakeabite.com/
In order for me to support my blogging activities, I may receive monetary compensation or other types of remuneration for my endorsement, recommendation, testimonial and/or link to any products or services from this blog.

This post is linked to Savoring Saturdays.

Nectarine Squash Pops | Homemade Dutch Apple Pie

Nectarine Squash Pops: Sugar Free First Birthday Popsicles!!

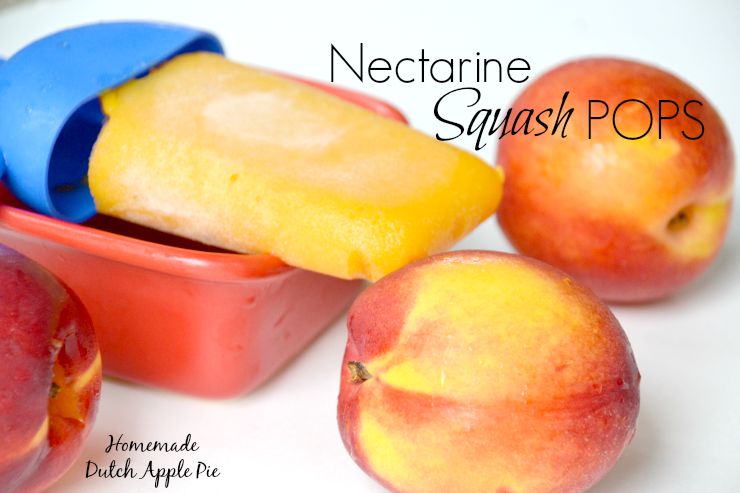
When your summer baby turns one you need a safe, sugar free treat. Nectarine squash pops are the perfect solution! Two ingredients, lots of flavor and no allergens.

Nectarine Squash Pops | Homemade Dutch Apple Pie

First birthdays definitely require a celebration.

You made it! You made it through the first year.

The first year of sleepless nights, crying and dirty diapers.

The first year full of firsts! Smiles, coos, laughs, rolling, crawling and maybe even walking. First foods, first teeth, first words.

Nectarine Squash Pops | Homemade Dutch Apple Pie

Let them eat cake.

A birthday celebration requires a special birthday treat. Usually that means cake.

I LOVE decorating cakes. I look forward to our family birthdays each year because I get to create new cakes.

I’ve done Dora, monkeys, dinosaurs, cars, arts and crafts, Legos, cows, Frozen, bulldozers, April showers and princesses for my kids. I’ve even done airplanes, sports and Cat in the Hat for my nephew, basketball and Calvin Knights for my dad, a fall cake for other family members and a neat recital cake for my sister-in-law.

I wanted to continue that tradition with my third child. With the challenges we’ve faced over the last year we are all certainly ready to celebrate.

Of course I set to work experimenting with new recipes that were free of her allergens.

I made a couple batches of cupcakes (that she loved!)…only to find out more foods that bother her.

Nectarine Squash Pops | Homemade Dutch Apple Pie

Who needs cake?

My daughter’s allergies combined with my preference to keep her at least gluten free for now (she’s been grain free up to this point) make birthday cake almost impossible. We can’t use:

  • wheat
  • rye
  • barley
  • oats
  • rice
  • sorghum
  • amaranth
  • buckwheat
  • tapioca
  • potato
  • arrowroot
  • coconut
  • almond
  • nuts
  • quinoa
  • millet
  • beans

Add to that no coconut oil, palm shortening, butter or egg whites and you’re not left with much.

Birthday Pops.

I gave up on the idea of birthday cake and opted to do popsicles! They make a perfect summer treat.

Since these popsicles are for a one year old I made them without any added sweetener. I even added some vegetables to keep them mild and nutritious.

Nectarine squash pops make a birthday dessert you can really feel good about serving to the whole family.

Nectarine Squash Pops | Homemade Dutch Apple Pie

Eat in season.

I chose fruit that is in season here in Michigan in late August. Nectarines are so sweet and have such a bright color. They make a great base for a popsicle.

You can use peaches instead if you prefer the flavor.

I ended up making a second batch since we ate the first batch before the birthday! I added some watermelon to the second batch for extra color and sweetness. Watermelon is another late summer fruit that almost everyone enjoys.

Nectarine Squash Pops | Homemade Dutch Apple Pie

Fun and Fast.

Nectarine squash pops are the easiest birthday dessert you’ll ever make. Puree cooked squash and cut up nectarine with an immersion blender or in a regular blender and pour the puree into the popsicle molds. Done!

They are also easy to serve. Simply take them out of the molds a few minutes before serving to take the chill off. Pass them out and enjoy.

For older kids you can add chunks of fruit like cut up strawberries, whole blueberries or raspberries to the puree before filling the molds. Then you’ll really have a fruity, colorful treat.

You can also add a tablespoon or two of honey for big kids. It really covers up any hint of squash flavor. My oldest is pretty picky about flavors and textures. She said she couldn’t taste the squash at all when I added a bit of honey.

I was very disappointed that I couldn’t make a cake for my baby’s first birthday. But I’m so happy with how these nectarine squash pops turned out! I’m even happier that my daughter likes them…and that they are so healthy and free of allergens.

Do you celebrate any summer birthdays?

Instead of cake try nectarine squash pops. They make summer celebrations delicious and healthy.

Nectarine Squash Pops | Homemade Dutch Apple Pie

Nectarine Squash Pops
Serves 4
A fruity, sugar free summer birthday treat.
Write a review
Print
Ingredients
  1. 3 medium nectarines, peeled and pitted
  2. 3/4 cups cooked butternut squash
  3. optional: 1/2 cup watermelon (seeds removed)
  4. optional: 1 - 2 Tbsp. honey
Instructions
  1. Puree the nectarines and squash (and watermelon and honey) with an immersion blender or in a blender.
  2. Fill popsicle molds and freeze until firm.
Notes
  1. You can replace the nectarines with peaches.
  2. For little ones let the popsicles sit out for a few minutes to soften before serving.
Just Take A Bite https://justtakeabite.com/
In order for me to support my blogging activities, I may receive monetary compensation or other types of remuneration for my endorsement, recommendation, testimonial and/or link to any products or services from this blog.

This post is linked to Savoring Saturdays.

Herb Roasted Vegetables with Creamy Honey Mustard | Homemade Dutch Apple Pie

Herb Roasted Vegetables with Creamy Honey Mustard Dressing

Herb roasted vegetables with creamy honey mustard dressing put a new spin on salad. They make the perfect side dish all year long.

Herb Roasted Vegetables with Creamy Honey Mustard | Homemade Dutch Apple Pie

I am partnering with Wayfair and Stonyfield for this post. I have been compensated for my time commitment to use these products. However, my opinions are entirely my own and I have not been paid to publish positive comments.

I love a fresh salad in the summer. To be honest I could eat a salad for breakfast, lunch and dinner all summer long!

But I do have a family to cook for. And I don’t have any big salad fans.

That means it’s time to put a new spin on salad.

My kids LOVE roasted vegetables. They often eat all of their vegetables first when I roast them.

So when challenged by Stonyfield and Wayfair to create a new summer salad I went with something I knew my kids would enjoy.

Herb roasted vegetables with creamy honey mustard is a hearty summer salad everyone will love.

Herb Roasted Vegetables with Creamy Honey Mustard | Homemade Dutch Apple Pie

The vegetables.

Most of the time I roast cauliflower, Brussels sprouts or cabbage. If you think those are vegetables your kids don’t like try them roasted. You might be surprised!

During the summer there are plenty of other fresh vegetables to add to the mix, like zucchini, peppers and beans.

I used a combination of year round staples and fresh summer vegetables to create a colorful blend.

Add lots of extra virgin olive oil, unrefined sea salt and some fresh or dried herbs for a pop of flavor.

Herb Roasted Vegetables with Creamy Honey Mustard | Homemade Dutch Apple Pie

The dressing.

What’s a salad without dressing? To top this beautiful blend I put a creamy spin on my favorite honey mustard by adding whole milk Stonyfield yogurt.

The bright yellow dressing really pops against the rainbow of vegetables. And it adds a burst of flavor. Roasted vegetables with creamy honey mustard will be the center of attention at your dinner table.

Creamy honey mustard also makes a great veggie dip.

My kids may not be huge salad fans, but they do love veggies and dip! So another way to eat salad in the summer is to skip the lettuce and go straight for fresh vegetables with creamy honey mustard.

Herb Roasted Vegetables with Creamy Honey Mustard | Homemade Dutch Apple Pie

The presentation.

Herb roasted vegetables with creamy honey mustard is a great salad for entertaining. All of the prep work is done in advance so you can visit with your guests.

But you can’t serve a beautiful salad without the proper dishes. That’s where Wayfair comes in.

Have you checked out their assortment of salad bowls and kitchen gadgets? There is so much to choose from!

My favorite color is blue and I like simple. So of course I picked a stunning cobalt blue salad bowl. I love how it is wide and shallow – perfect for presenting a colorful salad. You can see the whole assortment of vegetables.

I have been searching for a salad dressing container for some time now. I usually just use a small mason jar. But for serving to guests that is not so convenient. This cruet is just what I’ve been looking for. (Plus I learned a new word…cruet). These will come in so handy when I serve salads at parties and family gatherings.

Herb Roasted Vegetables with Creamy Honey Mustard | Homemade Dutch Apple Pie

My favorite product from Wayfair is this set of condiment cups. They are perfect for dipping veggies in dressing. They are also great for holding after school snacks. They come in four fun colors so each kid can pick what color they like. Did you know that can make vegetables taste better? It can.

Whether you need a fancy salad to serve to guests or you’re just trying to get your kids to eat more veggies, herb roasted vegetables with creamy honey mustard work well.

Let your kids help chop all of the vegetables and make the simple dressing. Then use some fun, festive serveware from Wayfair to brighten up the table.

What is your favorite summer salad? How do you dress it up?

Let Stonyfield and Wayfair spruce up your next salad.

Herb Roasted Vegetables with Creamy Honey Mustard | Homemade Dutch Apple Pie

Herb Roasted Vegetables with Creamy Honey Mustard Dressing
Serves 6
Bright vegetables seasoned with herbs and drizzled with a creamy honey mustard dressing.
Write a review
Print
Vegetables
  1. 10 cups variety of vegetables (cauliflower, Brussels sprouts, carrots, onions, peppers, zucchini, cabbage, beets, parsnips, rutabaga)
  2. 1/3 cup extra virgin olive oil
  3. 2 tsp. unrefined sea salt
  4. 1 tsp. dried basil
  5. 1/2 tsp. dried thyme
  6. 1 tsp. dried dillweed
Dressing
  1. 1/2 cup plain, whole milk yogurt
  2. 1/2 cup honey
  3. 1/4 cup mustard
  4. 1/4 tsp. unrefined sea salt
Vegetables
  1. Cut the vegetables into uniform chunks.
  2. Heat oven to 375*F.
  3. Place vegetables on a parchment lined baking sheet.
  4. Pour olive oil over vegetables and season with salt and herbs.
  5. Toss to coat.
  6. Bake for about 1 hour, until vegetables are tender and browned.
Dressing
  1. Combine all of the ingredients and mix well.
  2. Refrigerate until ready to serve.
  3. Serve vegetables warm, drizzled with honey mustard.
Notes
  1. The dressing can be made in advance.
  2. The dressing will last about 2 weeks in the refrigerator.
  3. The dressing can be used as a veggie dip.
Just Take A Bite https://justtakeabite.com/

In order for me to support my blogging activities, I may receive monetary compensation or other types of remuneration for my endorsement, recommendation, testimonial and/or link to any products or services from this blog.

Rustic Chicken Zucchini Pie With Olive Oil Crust | Homemade Dutch Apple Pie

Rustic Chicken Zucchini Pie with Olive Oil Crust

Looking for a new way to use up your abundance of zucchini? Rustic chicken zucchini pie with olive oil crust makes the perfect breakfast, lunch or dinner! Serve it warm or cold any time of day for a filling and nutritious meal.

Rustic Chicken Zucchini Pie With Olive Oil Crust | Homemade Dutch Apple Pie

Summer is about having fun, getting outside and being active. That includes riding bikes, picnics at the park and pool parties.

But summer is also about slowing down, taking it easy and enjoying the simple pleasures. Think lounging on the beach, sitting by the fire watching the stars and snuggling with your kids on a quiet rainy day.

When it comes to soaking up the summer I think of simple, comfort food that utilizes fresh produce.

Rustic Chicken Zucchini Pie With Olive Oil Crust | Homemade Dutch Apple Pie

Summer food.

Rustic chicken zucchini pie is comfort and summer all wrapped up in a pie crust.

It is a cross between pie and pizza.

The crust is a simple soaked dough made with flour, water, olive oil and salt. The filling is chicken and a bit of squash simmered in bone broth until a thick sauce forms. Finally a layer of zucchini tops the pie for a beautiful and delicious dish.

Simple and versatile.

Rustic chicken zucchini pie is fancy enough for dinner guests. Though you might want to make two! It will go quickly.

It is also simple enough for a weeknight meal that the kids will devour.

Eat it with a fork and knife or your hands. Serve it at the dinner table or pack it in a picnic.

Breakfast, lunch or dinner. Warm or cold.

A full meal all wrapped up in a delicious package, rustic chicken zucchini pie is really that good and that versatile.

Rustic Chicken Zucchini Pie With Olive Oil Crust | Homemade Dutch Apple Pie

Allergen friendly.

The thing I love about it is that it is naturally dairy, egg, nut, corn and coconut free. I did use a wheat crust, but gluten free flour can replace the wheat. So it is safe for just about everyone!

If you can tolerate cheese some fresh mozzarella mixed into the sauce or grated parmesan on top would taste great.

No chicken on hand? Swap it for another meat like sausage. Or simply make it a veggie pie. The sauce underneath can be made without the meat. Simply add a little extra squash to the broth for a creamy base.

Lunch time!

For all of the busy moms out there chicken zucchini pie is perfect for a grab and go lunch. It’s hard enough to feed the kids let alone find time to make your own lunch. Make a pie at the beginning of the week and grab a slice or two each day for lunch.

If you want to get a head start on school lunches you could make a few chicken zucchini pies, cut them into slices and freeze individual pieces. Simply pull out a piece when you need it for adding to a lunch box or even for an easy breakfast.

I don’t know about you but any time I can get my kids to eat broth while at school is great. Vegetables on top of it is a bonus.


Check out the Lunch Box ebook for more fun recipes (35% off through 9/7/15!)


Don’t let that pile of zucchini go to waste! Create a simple summer dish the family will love. Rustic chicken zucchini pie with olive oil crust is perfect for any occasion.

How do you like to use zucchini – in sweets like zucchini bread, cake and scones or in a savory dish?

Rustic Chicken Zucchini Pie With Olive Oil Crust | Homemade Dutch Apple Pie

Rustic Chicken Zucchini Pie with Olive Oil Crust
Serves 4
Creamy chicken, fresh zucchini and a simple olive oil crust - the perfect breakfast, lunch or dinner!
Write a review
Print
Crust
  1. 1 cup whole wheat, all purpose or gluten free flour
  2. 1/2 tsp. unrefined sea salt
  3. 3 Tbsp. extra virgin olive oil
  4. 2-3 Tbsp. cold water
  5. 1 Tbsp. lemon juice
Filling
  1. 2 Tbsp. pureed squash
  2. 2 medium zucchini
  3. 1 cup cooked, shredded or diced chicken
  4. 3/4 cup chicken broth
  5. 1/4 tsp. unrefined sea salt
  6. 1 tsp. of a combination of basil, rosemary and thyme
Crust
  1. In a food processor combine the flour, salt and olive oil. Pulse until crumbly.
  2. Add the water and lemon juice.
  3. Process until a ball of dough forms.
  4. Wrap in plastic wrap and refrigerate 7-24 hours.
Filling
  1. Slice the zucchini and lay it on a cooling rack.
  2. Sprinkle with salt and let sit 20 minutes. Flip and repeat. (This will remove a lot of the water.)
  3. Pat the zucchini dry with paper towel when done draining.
  4. While the zucchini is draining, cook the chicken, squash and salt in broth. Simmer until it is thick and the liquid is evaporated, 5-10 minutes.
  5. Heat oven to 350*F.
  6. Roll the dough into a 12" round on parchment paper.
  7. Spread the chicken filling on the dough, leaving a 2" border.
  8. Layer the zucchini on top of the chicken.
  9. Season with herbs.
  10. Fold edges of dough onto zucchini.
  11. Drizzle the top with olive oil.
  12. Bake for 70 minutes.
  13. Allow to cool for 10 minutes before slicing.
Notes
  1. This can be served warm, room temp or cold.
  2. This can be frozen whole or in slices.
  3. You can add 1/2 cup shredded cheese to the filling and/or the top.
  4. To make a meatless pie omit the chicken and increase the squash to 1/2 cup.
Just Take A Bite https://justtakeabite.com/
Rustic Chicken Zucchini Pie With Olive Oil Crust | Homemade Dutch Apple Pie

In order for me to support my blogging activities, I may receive monetary compensation or other types of remuneration for my endorsement, recommendation, testimonial and/or link to any products or services from this blog.

Green Bean and Bacon Casserole | Homemade Dutch Apple Pie

Green Bean and Bacon Casserole

Green bean and bacon casserole is a real food version of the classic side dish. With nourishing ingredients like bacon, raw milk and fresh beans it is healthy and filling enough to be a main dish.

Green Bean and Bacon Casserole | Homemade Dutch Apple Pie

Every summer we have a garden with a variety of vegetables. We change up what we grow each year.

But one thing we always have is beans!

I am in the kitchen freezing beans a couple times a week all through July and into August so we can enjoy them all year.

Our favorite way to enjoy beans is cooked fresh. My son always has to have second and sometimes third helpings. He knows what’s good!

Green Bean and Bacon Casserole | Homemade Dutch Apple Pie

A new twist on an old favorite.

This year I decided to use some of our abundance to recreate the classic green bean casserole.

The original includes canned beans, canned cream soups and fried “onions” on top. To me that means MSG, thickeners and all sorts of strange ingredients I don’t care to consume.

My homemade green bean and bacon casserole is made with fresh beans, homemade bone broth, raw milk and pastured bacon. It really doesn’t get any better than that!

Green bean and bacon casserole can be served traditionally as a side dish. But my version is so filling that I served it as the main course! Give me a big pile of green bean and bacon casserole and a slice of sourdough bread and I am a happy mama.

The kid seal of approval.

This was the first time eating a green bean casserole for my kids. They couldn’t get enough! My husband thoroughly enjoyed it as well.

Green bean and bacon casserole is great when beans are fresh. It also works with frozen beans. So you can enjoy it year round.

Green Bean and Bacon Casserole | Homemade Dutch Apple Pie

Make it work for your schedule.

It is perfect for potlucks, family gatherings and holidays. You can even make it for an easy week night meal. Green bean and bacon casserole can be prepared in advance and baked at dinner time.

As a busy mom I love meals like this. I prepare it during the day while the kids are napping or at school. Then when dinner time rolls around and everyone needs my attention I just pop it in the oven.

No time to bake it? No problem. Green bean and bacon casserole is great straight from the pan. Serve it on a bed of rice and you’ve got a complete meal.

If you enjoy the crispy onions on top of green bean casserole simply fry up some onion slices until crispy. Add them to the top after it is done baking.

If you don’t have bacon on hand you can substitute cooked chicken. Then use whatever fat you have on hand in place of the bacon grease (lard, tallow, butter, etc.).

Whether you’ve got fresh summer beans or you’re working through your freezer stash green bean and bacon casserole is sure to please the whole family.

My only regret when making this was that I didn’t have time to take better photos before my kids devoured it!

Did you grow up on green bean casserole? You’ll love this updated, nutrient dense version.

Green Bean and Bacon Casserole | Homemade Dutch Apple Pie

Green Bean and Bacon Casserole
Serves 6
An updated version of the classic green bean casserole. This one is filled with nourishing ingredients and can be served as a main dish.
Write a review
Print
Ingredients
  1. 1 lb. green/yellow beans, snipped, cut
  2. 1 cup chicken broth
  3. 1 cup milk (can be replaced with broth to make it dairy free)
  4. 2 Tbsp. all purpose flour, tapioca flour or cornstarch
  5. 1 tsp. salt
  6. 1/2 tsp. pepper (optional)
  7. 1/2 tsp. garlic powder
  8. 1/2 lb. pastured, nitrite/nitrate free bacon, cooked, crumbled, grease reserved
  9. 2 Tbsp. bacon grease
  10. 1/2 small onion. sliced (optional)
Instructions
  1. Cook the beans in water until tender, 30 - 40 minutes. Drain.
  2. Heat the bacon grease in a large skillet.
  3. Stir in all purpose flour OR mix tapioca or cornstarch with 1/4 cup of the broth and add to grease.
  4. Cook 1 minute.
  5. Slowly stir in the broth and milk.
  6. Season and simmer until it thickens.
  7. Add the cooked beans and simmer on low 5 minutes.
  8. Add the bacon.
  9. Transfer to a 1 1/2 qt. casserole dish.
  10. Bake at 350*F for 20 minutes.
  11. Cook onion slices in bacon grease until crispy.
  12. Top casserole with onion slices when serving.
Notes
  1. This can be served straight from the pan without baking.
  2. This can be prepared in advance and baked when ready to eat.
Just Take A Bite https://justtakeabite.com/
In order for me to support my blogging activities, I may receive monetary compensation or other types of remuneration for my endorsement, recommendation, testimonial and/or link to any products or services from this blog.