Looking for that perfect Christmas breakfast or dessert? This adorable and easy candy cane mason jar fruit salad is great for both kids and adults!

I am working with Stonyfield Yogurt for this post. I have been compensated for my time commitment. All opinions expressed are my own. I have not been paid to post positive reviews.
When it comes to holiday entertaining (for a crowd or just for my own family) I have two requirements:
- Nutritious
- Simple
I’ve learned how to host a crowd without stress and still serve real food. The big stuff is easy – meat, potatoes, veggies, etc. But I tend to neglect the little things like breakfast, dessert and fruit sides.
Three-in-One Recipe
Today I’m sharing my solution for all three!
Candy cane mason jar fruit salads work for breakfast, dessert or a simple side dish.
Start with whole milk Stonyfield yogurt that you strain to make it really thick. We like to use the vanilla, but you could use plain to make it without any added sugar. The strained vanilla yogurt is a simple alternative to whipped cream that has probiotics! My kids could not get enough of it! And I always have quarts of Stonyfield yogurt on hand. Actually I usually have about four or five in my fridge because we eat it so often.
I add our own fruit, sweeteners and other add-ins (like kettle corn granola and chia seeds) to the plain, whole milk organic yogurt for an easy breakfasts a couple times a week. That way I know we’re eating good quality food! I love that Stonyfield is all organic and is committed to using quality ingredients.
And if you’re concerned about sugar content, Stonyfield has less sugar than other brands.
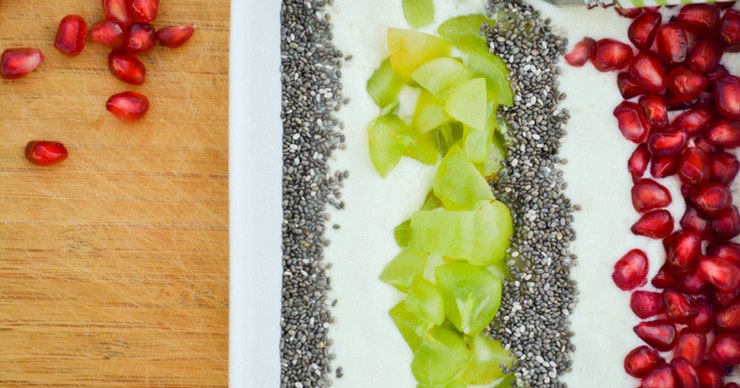
If you like your yogurt/cream really thick (like I do!) you can even use strained Greek yogurt for the fruit salads. But it would be a bit on the tart side. The strained yogurt works perfectly for these fruit salads so the fruit does not sink into the yogurt. You can really see those layers!
Fruit Stripes
Once strained, simply layer the yogurt with your favorite festive fruits. We use pomegranate seeds, kiwi, raspberries and grapes. Taylor it to your tastes and the look you like. Little kids might not be keen on pomegranate seeds. While adults might like a mix with everything. My toddler enjoyed a combination of raspberries and green grapes. But my big kids loved the pomegranate seeds and kiwi.
I make a variety and let everyone choose what they like. I keep some all green and some all red and some I mix. They look so festive! Like a candy cane in a jar.
How to Save Time
Best of all? You can make them ahead of time for a super easy breakfast or dessert. Don’t want to interrupt opening Christmas presents to make breakfast? Make these fruit salads the night before and munch while you unwrap. Or prep them before your guests arrive for a super easy dessert.
If you’re really busy you can skip the last step and simply turn breakfast into a candy cane parfait buffet. Set out all the ingredients and let everyone assemble their own! Add granola, chia seeds and nuts for a complete meal. This works very well for a big crowd.
Kids Can Cook Too!
I really love that my kids can actually make these on their own. They’ve been learning to cook for two years now through the Kids Cook Real Food eCourse. So they are proficient with knives and many other kitchen tools. I could give them all the supplies and let them prepare the fruit salads as a fun project. Then I’m free to work on the main meals.
Interested in teaching your kids how to cook? Check out the Kids Cook Real Food eCourse HERE!

Coffee with Dessert?
Whether serving mason jar fruit salads for breakfast or dessert, a cup of coffee is an excellent accompaniment for the adults. If you like coffee that is. Me? I’ve never been a coffee drinker. But my husband and in-laws are! Whenever my in-laws come visit I have no drink to offer them with dessert. My brother and sister-in-law actually bring their own! They know I never serve any.
Thanks to Krups I now have a great coffee maker! And I can finally learn how to make some decent coffee. No more embarrassed hostess here.
Cutest Candy Canes
Now let’s be honest, the real reason we all want to make these mason jar fruit salads is simply because they are so stinkin’ cute! Seriously. Who wouldn’t want one? My kids were sad I hadn’t made two for each of them. I guess next time I know to make a huge batch. They could be easy grab ‘n’ go snacks or great additions to school lunches. Use seasonal fruit to change it up throughout the year.
Festive and nutritious holiday dishes don’t have to be complicated. Keep it simple and fun with these fresh, fruity candy cane mason jar fruit salads. They are sure to be a family favorite.
- 4 cups Stonyfield whole milk vanilla yogurt (or plain or Greek)
- Seeds of 1 pomegranate
- 2 kiwis
- Medium bunch of red and/or green grapes
- 2 cups raspberries or strawberries
- (Optional) 2 Tbsp. chia seeds
- Strain the yogurt in cheesecloth for one hour. Hang it over a bowl to get as much whey out as you can.
- While the yogurt is straining chop/seed the fruit into bite-size pieces.
- Layer the fruit and yogurt in 1/2-pint mason jars, small glass bowls or festive dishes.
- Top with chia seeds or more fruit.
- The fruit salads can be made with all red fruit, all green fruit or a combination.
- Older kids can help prepare the fruit and layer the salads.
- This makes 6 - 8 1/2-pint mason jars, depending on the ratio of fruit to yogurt you like.


 I’ve said it before and I’ll say it again…I’m not very good at making jams and jellies. Even when I use the packs of pectin!


 Can It Forward