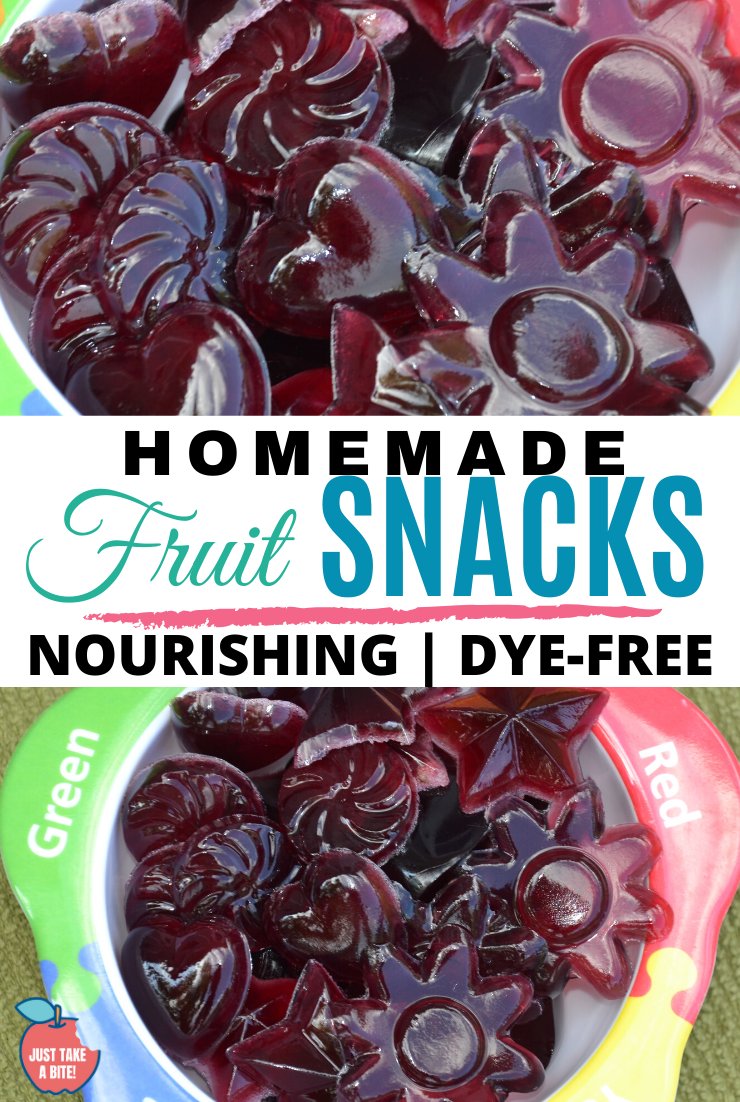
Home » Kid-friendly Recipes » gluten free » Page 3

Category: gluten free

When it comes to replacing store-bought snacks with homemade it doesn't get much easier than granola bars. These chewy granola bars come together in minutes. The hardest part is waiting for them to bake!

Baked Chewy Granola Bars | Gluten-Free | Nut-Free

When it comes to replacing store-bought snacks with homemade it doesn’t get much easier than granola bars. These baked chewy granola bars come together in minutes. The hardest part is waiting for them to bake!When it comes to replacing store-bought snacks with homemade it doesn't get much easier than granola bars. These chewy granola bars come together in minutes. The hardest part is waiting for them to bake! I always have homemade granola bars on hand in the freezer. They are easy to make and taste great. The only problem is that they don’t hold up well unless they are refrigerated. So they are good at home…but not so good for packing in a diaper bag, putting in a lunch, etc.

Allergen-Free Granola Bars

I decided to experiment a bit and make a new version of chewy granola bars. They are baked, they use sunbutter instead of nut butter, and they have eggs to help hold them together.

These granola bars turned out quite well. They are still chewy, but not as gooey as the no-bake bars. They would hold up well sitting out all day. I wish I had made these before our vacation.When it comes to replacing store-bought snacks with homemade it doesn't get much easier than granola bars. These chewy granola bars come together in minutes. The hardest part is waiting for them to bake!

Homemade Chewy Granola Bars

I have seen recipes for other baked granola bars that don’t use eggs, so if you can’t have eggs you could definitely try these without. Just increase the honey and/or oil.

I’m usually a fan of rolled oats. But when it comes to granola bars quick oats actually hold up much better. Not to mention they are easier to eat for Intuitive Eaters. You can also another flour combined with oats (wheat, rice, etc.)

The other nice thing about these bars is that I was able to use chocolate chips in them…without the chips melting! A very versatile granola bar that holds up well and can be adapted to many special diets. I love them. My kids do too!!

When it comes to replacing store-bought snacks with homemade it doesn't get much easier than granola bars. These chewy granola bars come together in minutes. The hardest part is waiting for them to bake!

Are Granola Bars Healthy?

As much as we like to think that granola bars are a healthy snack option – they usually are not. Especially when it comes to store-bought versions!

Even organic granola bars have some questionable ingredients, like agave, xanthan gum, palm oil, and natural flavors.

Besides the quality of ingredients, store-bought granola bars typically have a lot of sugar and very little protein or healthy fat. Which can lead to blood sugar issues (anybody else have a kid that gets HANGRY very easily?…blood sugar problems).

That’s why I prefer to stick with homemade as often as I can. And since they are so easy to make and freeze so well it’s not too hard! Homemade granola bars have eggs and sunbutter for protein and butter or coconut oil for healthy fat.

Then there is the added bonus that they taste better. My husband is always upset when we are out of homemade granola bars. He likes them so much better than store-bought.

Fun little fact – granola bars a product of the Chemical Revolution. They are derived from military inventions of the 1940’s due to food rationing. Not exactly the place I’d look for a healthy snack.

Gluten-Free Granola Bars

By using gluten-free oats these granola bars are totally gluten-free. Although we don’t have any wheat allergies, we choose to eat gluten-free for other reasons.

You’d be surprised how many packaged granola bars have wheat flour added. Making homemade granola bars is a great way to be sure you are avoiding allergens or reactive foods.

Are granola bars a go-to snack for your kids? Try switching to homemade!

5 from 1 vote
Print

Baked Chewy Granola Bars

Servings 16

Ingredients

  • 4 cups quick oats
  • 1/2 cup honey
  • 1/2 cup butter or coconut oil melted
  • 1/4 cup sunbutter
  • 2 eggs (can be replaced with an extra 1/4 cup of honey and oil)
  • 1 tsp. cinnamon optional
  • 1 cup mix-ins dried coconut, raisins, dried fruit, chopped nuts, chocolate chips, seeds

Instructions

  1. Melt coconut oil and/or butter. Let cool slightly.

  2. Mix oats/flour, honey, oil, nut butter, eggs and cinnamon. The mixture should be quite moist. If it is not add more honey/oil. This is what binds the granola bars, so be sure all of the oats/flour are wet.

  3. Stir in mix-ins.

  4. Pour mixture into a greased or parchment lined 9x13-in. pan.

  5. Bake at 350 for about 20 minutes, until the edges just start to become golden.

  6. Let cool for about 20 minutes.

  7. Cut into bars (they will still be quite soft at this point) in the pan (do not remove).

  8. Allow to cool/solidify completely in the pan for 1-2 hours.

  9. Remove bars from pan and wrap individually. Store in the refrigerator for up to a week or in the freezer for up to a year.

Recipe Notes

You can replace some or all of the quick oats with rolled oats, ground oats, wheat flour, rice flour, buckwheat flour.

When it comes to replacing store-bought snacks with homemade it doesn't get much easier than granola bars. These chewy granola bars come together in minutes. The hardest part is waiting for them to bake!

Soaked Teff Crackers | Just Take A Bite

Soaked Teff Crackers | Healthy Gluten-Free Snacks

Tired of the same old crackers? Try something new with soaked teff crackers. Allergy-friendly, crunchy and salty these crackers are easy to eat for toddlers or strong enough to use for dipping.

Soaked Teff Crackers | Just Take A Bite

Normally when I do any gluten-free baking I use at least two different flours, usually three. I really like this combination.

Gluten-Free Baking with Teff

But when you are on a very limited diet and are trying to rotate starches, that gets tricky. You sometimes have to limit yourself to one grain/starch a day. Most gluten-free flours don’t work well alone (have you ever tried baking with just tapioca…it doesn’t work so well). But there is one that does.

Teff!

Soaked Teff Crackers | Just Take A Bite

What is Teff?

Teff is a very hearty grain that reminds me of wheat or rye. It gives great depth of flavor to baked goods. Sometimes I use it for about a quarter of the flour in my baking.

But other times I use it alone. Like in these soaked teff crackers.

Kid-Friendly Teff Crackers

I started making these crackers for my little one and I so we had something safe to snack on. But soon the whole family wanted them. My son even requested these in place of the crackers I had already made for him.

I like to keep a batch on hand at all times for dipping (hummus is my favorite), eating with soup or for an easy snack on the go.

These teff crackers have a hint of sweetness, so they are like Wheat Thins®. But they don’t have any vegetable oils, gums or fillers. Plus the flour is soaked for better digestion. Teff crackers are the perfect solution to delicious gluten-free snacking. I love to add extra salt on top to really satisfy my craving for a crunchy, salty snack.

Soaked Teff Crackers | Just Take A Bite

Easy Gluten-Free Snack for Kids

What’s even better is how easy they are to make! It takes about one minute to get the flour soaking. Then the next day you’ll have crackers in the oven with about ten minutes of hands-on time.

This is a great project for little hands. Invite your kids into the kitchen (check out this course for help!) and show them how fun and easy it is to make food from scratch.

Double the recipe and store half in the freezer. Snack on some and save some for easy lunch packing. Teff crackers, cheese slices and homemade lunch meat make the perfect homemade Lunchable®.

The next time  you are in the mood for something crunchy make a batch of teff crackers. Just be sure to make it a big batch! They’ll go quickly.

Teff Recipes

One of my other favorite ways to use teff is to make teff porridge. It’s a great alternative to oatmeal!

Some great breakfasts or snacks are my teff and sorghum cherry bars or my teff and rice granola bars. They are both loaded with flavor.

Have you ever baked with teff?

Give it a try with these foolproof soaked teff crackers. The whole family will love them.

Soaked Teff Crackers | Just Take A Bite

Soaked Teff Crackers
Yields 50
A gluten free Wheat Thin style cracker made with teff flour.
Write a review
Print
Ingredients
  1. 2 cups teff flour
  2. 4 Tbsp. extra virgin olive oil (or melted lard, tallow or butter)
  3. 6 Tbsp. warm water
  4. 1 tsp. lemon juice
  5. 1 1/2 tsp. unrefined sea salt
  6. 6 tsp. organic cane sugar
  7. 1/2 tsp. baking soda
  8. 3-6 Tbsp. water
Instructions
  1. Combine the flour, fat, warm water and lemon juice.
  2. Cover and let sit 7-24 hours.
  3. Heat oven to 350*F.
  4. Add the salt, sugar, baking soda and 3 Tbsp. water to the soaked mixture.
  5. Mix and knead dough by hand until a ball forms. Add more water if needed.
  6. Split the dough into three equal parts.
  7. Cut four pieces of parchment paper (the size of a baking sheet).
  8. Place one piece of dough on one piece of parchment paper. Top with another sheet of parchment paper.
  9. Roll the dough between the paper until it is about 1/8" thick.
  10. Remove the top layer of paper.
  11. Cut into desired shapes with a pizza cutter or cookie cutters.
  12. Sprinkle extra salt on top of the dough.
  13. Transfer the parchment paper to a baking sheet.
  14. Repeat with the remaining portions of dough.
  15. Bake the crackers for about 20 minutes, until golden.
  16. Turn off oven. Leave the crackers in the oven for 7-10 minutes, until crisp.
  17. Remove from oven and let cool completely.
  18. Store crackers in an airtight container at room temperature for up to a month or in the freezer for up to a year.
Just Take A Bite https://justtakeabite.com/
 This post is linked to Savoring Saturdays.

Easy Allergen-Free Sweet and Sour Meatballs | GAPS, Grain-free

Easy, Allergen-Free Sweet and Sour Meatballs | GAPS-Legal

Looking for a quick, nutrient-dense meal that your kids will actually eat? These sweet and sour meatballs are free of all major allergens and GAPS-legal. Not to mention they are loaded with broth! They are sure to be a family favorite to add to your weekly meal plans.
 
Easy Allergen-Free Sweet and Sour Meatballs | GAPS, Grain-free
 

When I embarked on the GAPS diet years ago there weren’t that many resources available. Which meant I had to come up with most of my own recipes.

Although I came off the GAPS diet a long time ago, it taught me how to be really creative in the kitchen.

That is how I came up with this easy sweet and sour meatball recipe that has been both a family favorite and reader favorite for years!

Allergen-Free Meatballs

Most meatball recipes include egg. Sometimes they also have bread or breadcrumbs and some type of milk.

Those ingredients do make a delicious meatball. But when you are dealing with allergies, it’s hard to substitute.

So I created meatballs that are not only allergen-free, but can also be nightshade free!Easy Allergen-Free Sweet and Sour Meatballs | GAPS, Grain-free

Easy Gluten-Free Sweet and Sour Sauce 

The real secret about these meatballs is not actually the meatball at all. Instead it’s the sauce!

A combination of broth and honey cook down to a rich and gooey sauce that kids love.

Depending on dietary needs I add ketchup, dijon mustard, and/or a bit of pumpkin to bring it all together.

Healthy Dinner in Less Than 30 Minutes

Taste aside, I love that I can make these meatballs in under 30 minutes. Simply brown, add the sauce ingredients, and simmer until thick.

My kids love sweet and sour meatballs served with buttered gluten-free noodles. Any time I ask my five-year-old what she wants for dinner I get the same answer – meatballs and noodles! Sweet and sour meatballs are also great with rice, mashed potatoes, mashed sweet potatoes, or squash.

If you are in need of an easy, nourishing weeknight dinner that the kids will gobble up, this is it! They’ll get lots of broth without even knowing it. Plus grassfed beef for loads of protein and vitamins. A win all around!

Do you have a go-to easy button dinner? Give these allergen-free sweet and sour meatballs a try.

This post is linked to Fat Tuesday at Real Food Forager.

Easy Allergen-Free Sweet and Sour Meatballs | GAPS, Grain-free

Easy Allergen-Free Sweet and Sour Meatballs

A quick and easy meatball recipe kids will love.

Prep Time 5 minutes
Cook Time 18 minutes
Servings 4

Ingredients

  • 1 lb. grassfed ground beef, pastured ground chicken, or ground pork
  • 1 tsp. salt
  • 1 tsp. onion powder
  • 1/2 tsp. garlic powder
  • 1/2 tsp. turmeric
  • 1 Tbsp. avocado oil, tallow, lard, or coconut oil
  • 1-2 cups chicken or beef broth
  • 1/4 cup ketchup optional
  • 1/4 cup honey
  • 1/2 tsp. salt

Instructions

  1. Combine the meat, salt, garlic powder, onion powder, and turmeric. Mix well.

  2. Form into meatballs.

  3. Heat a large skillet over medium-high heat. When hot add 1 Tbsp. fat.

  4. Brown the meatballs on all sides.

  5. Add the broth, ketchup, honey, and salt. Simmer until thick, about 10 minutes, stirring periodically to coat the meatballs.

  6. Add extra broth and continue to simmer for more sauce.

Recipe Notes

For a nightshade-free version, replace the ketchup with 1/4 cup dijon mustard or 1/4 cup pureed pumpkin.


Homemade Fruit Snacks

How to Make Homemade Fruit Snacks | Dye-Free & Allergy-Friendly!

Impress your kids and avoid strange ingredients by making homemade fruit snacks! Just a few simple and nourishing ingredients create a fun and healthy snack.

Homemade Fruit Snacks - Dye-free healthy snacks

One of the best decisions I made as a parent was to stop buying packaged fruit snacks. Let’s face it – they are sort of weird, food-like morsels that really are more like candy than anything.

Even the “natural” or organic versions still have some questionable ingredients. And basically zero nutrition.

Why You Should Make Your Own Fruit Snacks

My solution to this problem is always homemade.

I’ve been making homemade fruit snacks (also known as gummies) from scratch for my kids for quite some time. I get lots of requests for the recipe.

Most people are amazed at how simple it is. But beyond that, it’s amazing how healthy they are!

We used to buy organic fruit snacks once in a while as a special treat. But not anymore.Homemade Fruit Snacks - Dye-free healthy snacks

Homemade Fruit Snacks with Grass-fed Gelatin

These fruit snacks are filled with nourishing gelatin (use code TAKE10 for 10% off) which is great for gut healing. They are also very safe for almost any allergy. I love that I can even make a variety of flavors for my little guy that is allergic to multiple fruits (have you ever tried finding something fruit flavored at the store that does not contain banana, grape or pear? Impossible).

My kids will easily eat a whole batch in a week if I let them. So I often have to make a new batch almost weekly! I try to make different flavors like blueberry lemon, lemon lime, lemonade and cherry. I love having very healthy snacks on hand that my kids truly love. And they don’t have to feel like they are missing out.

Healthy Snacks for Toddlers

One of the things that surprised me is how much my toddler loves homemade fruit snacks. I just make them in a pan and cut them into small squares. It’s a great finger food! Bonus that I can pack them up for when we are out and about. No little puffs or melts with strange ingredients. Just fruit and gelatin.

Do your kids like fruit snacks?

Try replacing the store-bought version with a homemade version. You can make them in any shape and flavor. Let your kids choose which ones. They’ll think it’s great! And you can know they are eating something that is healthy and healing.

This post is linked to Allergy Free Wednesday.

Homemade Fruit Snacks - Dye-free healthy snacks

Homemade Fruit Snacks
A fun, fruity snack that is full of nourishing gelatin and free of allergens and artificial ingredients.
Write a review
Print
Ingredients
  1. 1 cup pure juice (i.e. blueberry, cherry, lemon, lime)
  2. 3/4 cups sweetener (cane sugar, coconut sugar, honey, maple syrup)
  3. 3 -6 Tbsp. grass-fed gelatin
  4. 1/4 tsp. sea salt (optional)
Instructions
  1. Combine the juice, salt and sweetener in a small saucepan. Heat slightly and mix until the sugar/honey dissolves.
  2. Taste the juice and add more sweetener if necessary.
  3. Allow the juice to cool for 10 - 30 minutes.
  4. Add the gelatin to the juice while gently whisking.
  5. Let sit for one minute.
  6. Heat the juice/gelatin mixture over low heat, whisking gently until the gelatin completely dissolves.
  7. Pour the mixture into molds or a glass pan.
  8. Refrigerate until solid (about 20 minutes).
  9. Remove fruit snacks from molds or cut into squares/desired shape from a pan.
  10. Store in a container in the refrigerator.
Notes
  1. Do not use juice from concentrate/juice that you would drink plain. Use pure juice.
  2. You may need extra sweetener for some flavors like lemon and lime.
  3. You can use one type of juice or a combination - blueberry lemon, cherry lime, lemon lime, etc.
  4. Using less gelatin will make a softer gummy and they will need more time to set. More gelatin will make it firmer.
Just Take A Bite https://justtakeabite.com/
Gluten-Free Pumpkin Bread

Gluten-Free Pumpkin Bread {dairy free, nut free, corn free}

Gluten-free pumpkin bread is easy to make and will be a hit with the whole family. Both kids and adults will love this tasty way to add pumpkin into your diet.Gluten-Free Pumpkin Bread

Fall is time for all things pumpkin. Do you agree?

If you’re like me and have grown to love pumpkin and enjoy eating it in season, then this recipe is for you!

How to Get Kids to Eat Pumpkin

My kids LOVE this bread.  It’s slightly sweet with just a hint of spice. Spread some butter on and you have the perfect snack or breakfast treat.

I always try to get some feedback from my family when I make a new recipe. According to my six year old this bread is “a bajillion times good.”  She gave it two thumbs and two toes up.

Then she told me “it tastes like it came from the store…it tastes like it’s processed!”  That may sound odd, but her definition of processed is anything that doesn’t come from our kitchen. In other words, she thought it was so good you’d never know it was gluten-free and that we didn’t buy it.

I must say that I agree with her assessment. Sadly two loaves disappeared pretty quickly. Now I have to make more.Gluten-free pumpkin bread is easy to make and will be a hit with the whole family. Both kids and adults will love this tasty way to add pumpkin into your diet.

How to Use Up Leftover Pumpkin

Do you have leftover pumpkin from making pies or leftover squash from Thanksgiving dinner? Gluten-free pumpkin bread is the perfect way to use them!Gluten-Free Pumpkin Bread: Dairy-Free, Nut-Free, Corn-Free

This would make a great day after Thanksgiving breakfast or accompaniment to some turkey noodle soup.

Add chocolate chips or chopped nuts to make gluten-free pumpkin bread extra special.

Gluten-Free Pumpkin Bread

Be sure to make a big batch of gluten-free pumpkin bread so you can stock your freezer. Simply cool, slice and wrap a loaf of bread. Freeze it. Then take slices out as  you need them.

This recipe makes one large loaf (9×5-in.) and one medium loaf (8×4-in.). If you don’t want to make loaves you can turn this into muffins. Simply put the batter in muffin pans and cut the baking time in half.

When to Stock Up on Pumpkin

October and November is the time of year to stock up on pumpkin. Pumpkins at the orchard are cheap and easy to roast, puree and freeze. Or this is when pumpkin at the store is the cheapest it will be all year. Fill your pantry or freezer now so you can enjoy pumpkin bread whenever you want without spending a lot.

This pumpkin bread is gluten, dairy, nut, corn and coconut free. But you’ll never know! All you get is sweet pumpkin and a hint of cinnamon. Bake a batch or two for a delicious fall treat. Gluten-Free Pumpkin Bread

Gluten-Free Pumpkin Bread

Author Mary | Just Take A Bite

Ingredients

  • 1 cup organic white rice flour
  • 1 cup organic sorghum flour or brown rice flour
  • 1/2 - 1 cup organic cane sugar or coconut sugar (adjust sweetness to liking)
  • 1 tsp. psyllium husk powder
  • 1 tsp. baking soda
  • 1 tsp. cream of tartar
  • 1/2 tsp. salt
  • 1 tsp. cinnamon
  • 1 cup pureed pumpkin
  • 1 tsp. organic vanilla extract
  • 1/2 cup olive oil or avocado oil
  • 3 eggs
  • 1/2 cup mini chocolate chips, chopped walnuts optional

Instructions

  1. Heat the oven to 350 degrees F. Grease two loaf pans (one large, one medium).

  2. In a large bowl combine the flour, sugar, soda, cream of tartar, salt and cinnamon.

  3. Add the vanilla, pumpkin and oil. Mix.

  4. Add the eggs. Mix until well combined.

  5. Stir in chips or nuts if desired.

  6. Pour the batter into the prepared pans.

  7. Bake for 50 - 60 minutes, until baked through.

  8. Allow to cool before slicing.

  9. Store in an airtight container at room temperature or in the freezer for long term storage.

Recipe Notes

  • You can sprinkle cinnamon and sugar on the batter before baking the bread for a crunchy topping.
  • You can replace the pumpkin with squash.
  • To make the batter into muffins, fill muffin cups 3/4 full with batter and bake for 30 minutes.
This healing hot cocoa will warm you up, keep you hydrated and nourish your body. Plus it tastes great! The perfect cold weather drink.

How to Make Homemade Hot Cocoa That Heals

This healing hot cocoa will warm you up, keep you hydrated and nourish your body. Plus it tastes great! The perfect cold weather drink.This healing hot cocoa will warm you up, keep you hydrated and nourish your body. Plus it tastes great! The perfect cold weather drink. #realfood #glutenfree #homemade

Ever since I got pregnant with baby number two (in 2010) I have been hooked on hot chocolate. While I had morning sickness, it was about the only way I could get fluids down. For some reason even when I’m sick chocolate still sounds good.

Even after giving birth I still enjoyed hot chocolate, but didn’t need it daily any more. I should say I’d try not to drink it daily…I was trying to be “good.”

Being good didn’t work.

Why Water Doesn’t Hydrate

I’d go for stretches where I only drank lots of plain water or water with a little lemon juice (that’s supposed to be healthy, right?). But I started to notice that I always felt so full after drinking plain water. It felt like I never absorbed it unless I just took tiny sips at a time. And I would always have to go to the bathroom frequently. Plus I would get very cold.
 
But give me a big mug of hot chocolate – completely different! I can go through the whole thing in a few minutes and not feel like I have a belly full of liquid. I feel like my body absorbs it and uses it. It helps me get warm and stay warm.

So whenever I’m feeling dehydrated, like I’m not absorbing fluids, or like I need something to help warm up I reach for a big mug of homemade hot cocoa.

This healing hot cocoa will warm you up, keep you hydrated and nourish your body. Plus it tastes great! The perfect cold weather drink. #realfood #glutenfree #homemade

Why Hot Cocoa Heals

I’ve tried other drinks, but they never do the same thing. Why would this be?

Turns out my body really does know what it needs.

First, cocoa is actually quite high in magnesium. And that’s something I am lacking.


You can also increase your magnesium levels with this two-ingredient DIY magnesium lotion OR buy a high quality magnesium lotion HERE. We love both!


Cocoa is also high in iron. And I just found out this week that I’m anemic. So I better keep drinking my hot chocolate!

Finally, as a tired mom with adrenal fatigue, plain water just makes me sluggish. This healthy hot cocoa gives my adrenals the boost they need to get through the day.

Healthy Hot Cocoa

After reading Eat For Heat I know that some fluids like plain water, tea, coffee and soda just flush the minerals out of your body. But cocoa is is a very warming food. And so is salt…which I add to my hot chocolate to make it even more warming!

Finally I saw this article recently about the health benefits of honey and cinnamon.

I combine all of these benefits into a cup of delicious, healing, hydrating, warming hot cocoa. It only takes a few seconds to make (once you have hot water). And it is very allergy-friendly (dairy, eggs, wheat, gluten, soy, etc.). If you can handle cocoa powder it is even GAPS legal.

You can also use cacao or carob in place of the cocoa. Whichever you choose make sure it’s organic.

With the salt/sweet/mineral content this could even replace your sports drink.

Make Your Homemade Hot Cocoa Even Better

If you really want a nutrient boost you can add collagen, butter and/or coconut oil!

Want to take a step towards good health? Instead of drowning in ounce after ounce of plain water try a delicious mug of healing hot cocoa. Your body and your taste buds will thank you.

A little disclaimer – I’m not a doctor. I don’t have scientific data to back this up. I just know how my body responds. I always feel warm and hydrated when I drink my homemade hot cocoa. But I feel full and cold when I drink most other fluids.

How about you? Does your body respond well to hot cocoa?

Want to learn more about hydration, thyroid, and adrenals? Read why I cut way down on drinking plain water.

This healing hot cocoa will warm you up, keep you hydrated and nourish your body. Plus it tastes great! The perfect cold weather drink. #realfood #glutenfree #homemade

5 from 2 votes
Print

Homemade Hot Cocoa That Heals

Prep Time 2 minutes
Servings 1

Ingredients

  • 1 - 2 tsp. organic cocoa powder it is important to use organic to avoid GMOs (you can also use carob powder if you can't tolerate cocoa)
  • 2 tsp. raw honey, organic cane sugar or maple syrup
  • 1/4 tsp. cinnamon optional
  • 1/8 tsp. unrefined sea salt
  • 1/4 cup milk or milk substitute optional
  • 2 tsp. collagen  optional
  • 2 tsp. butter optional
  • 2 tsp. coconut oil optional
  • hot water

Instructions

  1. Place cocoa powder, honey, cinnamon, collagen and salt in a mug.

  2.  Fill the mug with hot water and stir to dissolve.

  3. Add a splash of milk if desired for creaminess/to cool the hot chocolate.

Kettle corn granola is a little salty and little sweet. You get the flavor of kettle corn in your breakfast bowl!

Kid-Friendly Kettle Corn Granola Recipe

Kettle corn granola is a little salty and little sweet. You get the flavor of kettle corn in your breakfast bowl!Kettle corn granola is a little salty and little sweet. You get the flavor of kettle corn in your breakfast bowl!

Granola is one of my absolute favorite foods. I got hooked on it in college…and ate it every day. I wish I had known back then just how easy it is to make your own granola.

Now I make it all the time. I always have some on hand for an easy snack or quick breakfast.  It’s great mixed in yogurt or eaten plain with milk. I even love putting some in my daughter’s lunch for a filling finger food.

A super easy breakfast that my kids love is a granola bar bowl – you get the taste of granola bars without the work. Grab the recipe here.

Sweet and Salty Homemade Granola

I’ve been making granola for many years now. I have several granola recipes already on the blog.  I don’t usually follow a recipe anymore. I just use what we have on hand and create something new every time.

But this version of granola is hands down my favorite!

It’s salty and sweet and very addictive!! I call it kettle corn granola because it really tastes like kettle corn.Kettle Corn Granola || Homemade Dutch Apple Pie

Easy Finger Food Snack

My kids love to munch on this stuff. As you can see my son had no problems helping me make the granola and being my taste tester.

One of the great things about granola is that you can make a huge batch (I usually do about 10 cups of oats at a time – a double batch of this recipe) and freeze it.  Then when you want granola you are set.

You don’t even have to thaw it! Granola is ready straight from the freezer. I usually keep a small jar in the cupboard and refill it from the freezer stash as we use it up.Kettle corn granola is a little salty and little sweet. You get the flavor of kettle corn in your breakfast bowl!

Budget-Friendly Breakfast

 The other thing I love about granola is how much money it saves.  Have you looked at the price of granola made with quality ingredients? I was recently at a small meat market. They had locally made granola…$4 for about 6 oz.!!! That is insane. My kids would eat that much in one sitting.

When you make granola at home you control the ingredients AND you save a ton of money. Always good.

You also make a very allergy-friendly breakfast treat. This one is gluten, dairy, nut and egg free.Kettle corn granola is a little salty and little sweet. You get the flavor of kettle corn in your breakfast bowl!

Quick-Prep Homemade Granola

Granola only takes about five minutes to prepare. The end result is a huge batch of homemade cereal that will last a long time. It is also the perfect project to do with kids. When I make granola each kids gets his or her own bowl to create their own batch. They can add whatever they like. My kids love being creative with granola. Sometimes we end up baking theirs, but usually they eat it before it gets to the oven.

This would make a great Christmas gift. Make a couple batches, package it and pass it around to family and friends. Throw a few mini chocolate chips in after the granola has cooled and you’ll really be giving a delicious treat.

Soaked Granola Recipe

If you want to be sure you’re really getting all of the nutrients out of your granola you can make this into a soaked version. You’ll have to plan ahead, but it’s still oh, so delicious!

Do you like the salty sweet combination of kettle corn? Now you can enjoy it for breakfast with kettle corn granola.

Kettle corn granola is a little salty and little sweet. You get the flavor of kettle corn in your breakfast bowl!

Kettle Corn Granola
A delicious granola cereal that has the sweet and salty flavor of kettle corn.
Write a review
Print
Unsoaked
  1. 5 cups old fashioned oats
  2. 1/2 cup water
  3. 3/4 cup coconut oil and/or butter
  4. 1/2 cup coconut sugar
  5. 1/4 cup honey
  6. 1/4 cup maple syrup
  7. 1 tsp. unrefined sea salt
Soaked
  1. 5 cups old fashioned oats
  2. 2 1/2 cups warm water + 2 Tbsp. yogurt, kefir or lemon juice
  3. 1/3 cup coconut oil and/or butter
  4. 1/2 cup coconut sugar
  5. 1/4 cup honey and/or maple syrup
  6. 1 tsp. unrefined sea salt
Unsoaked
  1. Heat the oven to 350*F.
  2. In a large bowl combine the oats, water and salt.
  3. In a saucepan heat the sugar, honey, syrup and oil until the oil is melted and the sugars and oil combine.
  4. Pour the sugar/oil mixture over the oats. Mix until well combined.
  5. Spread the oat mixture onto a large parchment lined baking sheet.
  6. Bake for about one hour, stirring every 20 minutes, until golden brown.
  7. Remove from the oven and allow to cool completely.
  8. Store in an air tight container in the cupboard or in the freezer for long term storage.
Soaked
  1. Combine the oats, warm water and soaking agent.
  2. Cover and let sit 24 hours.
  3. Spread the oat mixture onto dehydrator trays and dry until crisp, about 8 hours.
  4. Crumble dried oats into a large bowl.
  5. Heat oven to 350*F.
  6. In a small saucepan combine the salt, butter, sugar and honey.
  7. Cook until melted and combined.
  8. Pour the butter mixture over the oats. Mix well.
  9. Spread onto a parchment lined baking sheet (it may fit on one large sheet or you may need to spread it on two sheets).
  10. Bake for 30 minutes.
  11. Allow to cool completely.
  12. Crumble the granola and store in an air tight container or in the freezer.
Notes
  1. This recipe easily doubles or triples and freezes well.
  2. Granola is ready straight from the freezer.
Just Take A Bite https://justtakeabite.com/
This post is linked to From The Archives Friday.

Missing tacos due to dietary restrictions? Bring back taco night with this simple night-shade free cucumber salsa. Free of allergens and nightshades, and low in Vitamin A, it's sure to be a hit!

Nightshade-Free Cucumber Salsa

Missing tacos due to dietary restrictions? Bring back taco night with this simple night-shade free cucumber salsa. Free of allergens and nightshades, and low in Vitamin A, it’s sure to be a hit!Missing tacos due to dietary restrictions? Bring back taco night with this simple night-shade free cucumber salsa. Free of allergens and nightshades, and low in Vitamin A, it's sure to be a hit!

Sometimes when I’m trying to meal plan and just can’t think of anything to put on the menu, I crowd source. In other words, I ask my kids.

It’s inevitable that at least one of them suggests tacos (though I try not to bore my husband and actually serve them every week).

It’s usually my son making the suggestion. He has been my taco meat chef since he was six, and jumps at the chance to cook his “famous” taco meat (you can get his taco seasoning recipe here).

Taco night has always been one of my favorites too, from childhood until now. I mean, who doesn’t love a good taco?

Vitamin A Detox Diet Tacos

Our tacos have certainly evolved over the years, through all sorts of food allergies and dietary restrictions. These days taco night is a bit more challenging on the Vitamin A Detox Diet. No tomatoes, peppers, avocado, or cheese.

I know that may not sound like much is left.

But we still have delicious tacos regularly!Missing tacos due to dietary restrictions? Bring back taco night with this simple night-shade free cucumber salsa. Free of allergens and nightshades, and low in Vitamin A, it's sure to be a hit!

One key component is this nightshade-free cucumber salsa.

Not only is it easy to make, it’s totally delicious! Even my pickiest eater loves it.

Nightshade-Free Cucumber Salsa

There is no cooking involved to make cucumber salsa. The most work you’ll have to do is peel and chop a cucumber. Or better yet, delegate it to your kids. My oldest loves to make cucumber salsa for the family when we’re having tacos.


Teach your kids to cook with the Kids Cook Real Food eCourse!

Check it out HERE!


Once the veggies are prepped you just mix all of the ingredients in a jar and let it chill for a few minutes. So, you can still have delicious salsa even if you don’t remember to make it until fifteen minutes before dinner!Missing tacos due to dietary restrictions? Bring back taco night with this simple night-shade free cucumber salsa. Free of allergens and nightshades, and low in Vitamin A, it's sure to be a hit!

This nightshade-free cucumber salsa tastes amazing as a dip with organic tortilla chips.

Most of the time we use it on tacos, taco bowls, or nachos (topped with this gooey dairy-free cheese sauce!).

What is on VAD Diet Tacos?

For VAD Diet-safe tacos we use either organic blue corn hard shells (I like this brand) or homemade white corn soft shells, and fill them with seasoned ground beef or chicken.

Toppings include:

  • Cucumber salsa
  • Grated zucchini cheese (grab the recipe here)
  • Sour cream (my kids can have a small amount of cream)
  • Black beans or refried pinto beans (I cook them in the Instant Pot)

Our tacos are simple, but so, so delicious!Missing tacos due to dietary restrictions? Bring back taco night with this simple night-shade free cucumber salsa. Free of allergens and nightshades, and low in Vitamin A, it's sure to be a hit!

What Are Nightshades?

Most healing diets eliminate nightshades. These include tomatoes, peppers, eggplants, and potatoes, plus a few other less-common foods like goji berries, ashwagandha, Cape gooseberries, ground cherries, and garden huckleberries.

For many people nightshades are a pain – literally. Nightshades cause calcinosis, a calcification of soft tissues, due to calcitriol. Calcitriol is a very potent hormone, possibly the most powerful hormone in your body!

Calcitriol tells your intestines to absorb calcium. Too much can quickly lead to hypercalcemia. This is the cause of calcium deposits in your soft tissue, also known as joint pain, muscle stiffness, arthritis, coronary artery disease, and more.

If you struggle with any type of chronic pain or weakness, consider cutting nightshades out of your diet. Or if you have issues with osteoporosis you might want to consider eliminating nightshades as well.

Here is a a great article on nightshades if you want to read more!

We do still eat some potatoes (though not if they are green or sprouting!). But we avoid all of the other nightshades.Missing tacos due to dietary restrictions? Bring back taco night with this simple night-shade free cucumber salsa. Free of allergens and nightshades, and low in Vitamin A, it's sure to be a hit!

Salsa Without Tomatoes

Now even if you are nightshade-free you can enjoy chips and salsa or everyone’s favorite taco night with this super simple cucumber salsa. Having salsa without tomatoes is totally doable and delicious.

What is taco night like at your house? What are your favorite toppings?

5 from 1 vote
Print

Nightshade-Free Cucumber Salsa (VAD Diet)

A quick and easy salsa free of nightshades.

Prep Time 10 minutes
Cook Time 0 minutes
Servings 4
Author Mary | Just Take A Bite

Ingredients

  • 2 cups cucumber peeled and diced
  • 1 1/2 tsp. apple cider vinegar or white vinegar
  • 3/4 tsp. salt
  • 1/4 tsp. garlic powder of 1 clove fresh garlic, minced
  • 1 1/2 tsp. organic cane sugar
  • 1/4 cup white onion, diced optional

Instructions

  1. Combine all of the ingredients in a jar.

  2. Mix and chill for at least 10 minutes.

  3. Store in the refrigerator for up to a week.

Gluten Free Strawberry Rhubarb Upside Down Cake

The perfect early summer treat – combine sweet strawberries and tart rhubarb in this easy gluten-free strawberry rhubarb upside down cake!

Do you enjoy rhubarb?

It seems to be one of those foods that you either love or hate. I had never tasted it until I was an adult (i.e. my family was in the “I hate rhubarb” camp).

I guess I’m the oddball of the family because I love it!

What to do with Rhubarb

I’ve made quite a few unique rhubarb dishes in the past. Some of my favorites are:

Of course rhubarb tastes best when there is plenty of sugar added since it is so tart. So it is typically used in dessert.

Is Rhubarb Hard to Grow?

Believe it or not rhubarb is quite easy to grow. And you really only need a couple plants to get enough for a few spring treats.

We have a few rhubarb plants in our flower garden. They might actually produce enough for us to use if our chickens would stop eating them!The perfect early summer treat - combine sweet strawberries and tart rhubarb in this easy gluten-free strawberry rhubarb upside down cake!

How to Eat Rhubarb

Since it is so tart I think rhubarb is best paired with another fruit. Our first choice is strawberries. And since they are in season at the same time it just makes sense!

Even if you don’t have a lot of rhubarb you can fill in with other fruits. You’ll still get the rhubarb flavor you’re looking for.

Gluten-Free Strawberry Rhubarb Upside Down Cake

This simple cake is super moist and has plenty of sweetness. It is a perfect early summery treat, especially paired with some homemade vanilla ice cream.

The cake recipe is a great base for desserts all summer long. You can replace the strawberries and rhubarb with a variety of fruits (blueberries, peaches, plums, etc.).

It also works well for those with food allergies. It is naturally gluten and nut free. You can make it dairy free too.

Strawberry rhubarb upside down cake is a delicious dessert that you can make all summer long with whatever fruit is in season.

What is your favorite dessert fruit combination? If you’re not sure what to do with your rhubarb give this cake a try. It’ll be a big hit.


Gluten-Free Strawberry Rhubarb Upside Down Cake

Prep Time 15 minutes
Cook Time 1 hour
Servings 12
Author Mary | Just Take A Bite

Ingredients

  • 1/4 cup butter or coconut oil
  • 1 cup organic brown cane sugar  packed
  • 2 cups fresh strawberries sliced
  • 2 cups fresh rhubarb chopped
  • 1 1/2 cups white rice flour
  • 1/4 cup brown rice flour
  • 1/4 cup tapioca flour
  • 1/4 cup amaranth flour
  • 1 1/2 cups organic cane sugar
  • 1/2 cup butter room temp (can be replaced with coconut oil
  • 1 1/4 cups milk or coconut milk, rice milk or almond milk
  • 2 tsp. baking powder
  • 1 tsp. baking soda
  • 1 tsp. salt
  • 1 tsp. vanilla
  • 3 eggs separated
  • 1/2 tsp. cream of tartar

Instructions

  1. Heat oven to 350°F.

  2. In a 9x13-inch pan melt the butter in the oven.

  3. Sprinkle the brown sugar evenly over the butter.

  4. Arrange the strawberries and rhubarb on the brown sugar. Press down gently.

  5. Beat the egg whites with the cream of tartar until stiff peaks form.

  6. Beat the egg yolks for two minutes.

  7. Add the remaining ingredients to the egg yolks. Beat for two minutes.

  8. Fold in the egg whites.

  9. Pour the batter over the strawberries and rhubarb.

  10. Bake for 50-60 minutes.

  11. Immediately run knife around sides of pan to loosen cake. Place heatproof serving plate upside down on pan (I used a small baking sheet); turn plate and pan over.

  12. Leave pan over cake 5 minutes so the brown sugar topping can drizzle over cake.

  13. Cool 30 minutes. Serve warm or cool with whipped cream or ice cream.

  14. Store covered in refrigerator.

In need of an easy, allergen-free breakfast? These sunbutter breakfast cookies only take a few minutes of prep time and are free of gluten, dairy, eggs, nuts, rice, corn, soy and coconut.

Gluten-Free Sunbutter Breakfast Cookies

In need of an easy, allergen-free breakfast? These sunbutter breakfast cookies only take a few minutes of prep time and are free of gluten, dairy, eggs, nuts, rice, corn, soy and coconut.In need of an easy, allergen-free breakfast? These sunbutter breakfast cookies only take a few minutes of prep time and are free of gluten, dairy, eggs, nuts, rice, corn, soy and coconut.

When I ask my kids what they want for breakfast nine times out of ten they say breakfast cookies.

I don’t blame them. Who doesn’t want a cookie for breakfast?!

Easy Gluten-Free Breakfast Cookies

I’ve been making a variety of breakfast cookies for years. But recently we experimented with an egg free diet for my oldest. So I had to come up with yet another version.

Sunbutter makes a great allergy-friendly substitute for eggs. Not to mention it is delicious! It also replaces the fat. So there is no need to use dairy or coconut.

I also add some ground flax seeds to make sure the cookies hold together.In need of an easy, allergen-free breakfast? These sunbutter breakfast cookies only take a few minutes of prep time and are free of gluten, dairy, eggs, nuts, rice, corn, soy and coconut.

Soak Grains for Better Digestion

Sunbutter breakfast cookies start with a long soak to reduce the phytic acid content. This is especially important when using oats as they are very high in phytic acid.

If you’ve never soaked your grains before, rest assured it’s a very simple thing to do. Mix the grains with water and lemon juice. Done.

When you are ready to bake all you have to do is add the remaining ingredients, mix, scoop and bake.In need of an easy, allergen-free breakfast? These sunbutter breakfast cookies only take a few minutes of prep time and are free of gluten, dairy, eggs, nuts, rice, corn, soy and coconut.

Kids in the Kitchen

This is a great recipe to let little ones help with. No chopping. No egg cracking. No butter melting. Just measure, pour and mix.


You can teach even your youngest children all the necessary skills for making these delicious breakfast cookies with the Kids Cook Real Food eCourse! Check it out HERE.


Kids can even sample the ingredients as you go. Somebody has to make sure the honey tastes good, right?!

You can add whatever extras you like to sunbutter breakfast cookies. My kids always ask for mini chocolate chips. Dried fruit, nuts, seeds and coconut all work, depending on your dietary needs.In need of an easy, allergen-free breakfast? These sunbutter breakfast cookies only take a few minutes of prep time and are free of gluten, dairy, eggs, nuts, rice, corn, soy and coconut.

Seasonally-Inspired Breakfast Cookies

Change up the flavor of your sunbutter breakfast cookies by adding seasonal ingredients.

In the summer add diced strawberries, blueberries, or peaches.

For fall you could add some diced apples and cinnamon. Be sure to chop the apples finely enough to make them bite sized for kids.

Dried cranberries make a very festive cookie during the holidays.

Are you looking for an allergen friendly breakfast treat for your family? Sunbutter breakfast cookies will be a family favorite.

Easy Prep-Ahead Breakfast Cookies

Be sure to make a big batch so you can stock the freezer for effortless breakfasts on busy school mornings. Paired with a big glass of homemade rice milk you’ll have breakfast on the table in under a minute!

You can also add them to lunch boxes for a delicious and healthy treat.

I have to share a fun fact that I learned while making these.

When you mix a lot of baking soda with sunbutter it turns green!

Don’t worry. I adjusted the recipe so you won’t have green cookies like we did. But it is perfectly safe to eat them even if they are green.

In need of an easy, allergen-free breakfast? These sunbutter breakfast cookies only take a few minutes of prep time and are free of gluten, dairy, eggs, nuts, rice, corn, soy and coconut.

In need of an easy, allergen-free breakfast? These sunbutter breakfast cookies only take a few minutes of prep time and are free of gluten, dairy, eggs, nuts, rice, corn, soy and coconut.
5 from 1 vote
Print

Allergen Free Sunbutter Breakfast Cookies

A simple breakfast cookies that is free of gluten, eggs, dairy, nuts, rice, corn and coconut.

Prep Time 10 minutes
Cook Time 20 minutes
Servings 20

Ingredients

  • 2 1/2 cups gluten-free oats
  • 1/2 cup sorghum flour or brown rice or amaranth
  • 3/4 cups warm water
  • 2 Tbsp. lemon juice
  • 1/2 cup sunbutter unsweetened
  • 2/3 cup honey
  • 1/2 tsp. salt
  • 1/2 tsp. baking soda
  • 1/4 cup ground flax seeds
  • 1/2 cup add-ins: chocolate chips dried fruit, coconut, seeds, nuts

Instructions

  1. Combine the oats, sorghum, water and lemon juice in a bowl. Cover and let sit 24 hours.

  2. Heat the oven to 350 degrees F. Line two baking sheets with parchment paper.

  3. Add the sunbutter, honey, salt, soda, and flax seeds to the oat mixture. Mix well.

  4. Stir in the add-ins.
  5. Scoop mounds of dough onto the prepared baking sheet (as large or as small as you like).

  6. Bake for 15 - 20 minutes (less time for smaller cookies, more time for larger cookies).
  7. Let cool.
  8. Store in sealed container in the refrigerator for up to a week or in the freezer for up to a year.

This post is linked to Savoring Saturdays.