Home » Kid-friendly Recipes » dairy free » Page 11

Category: dairy free

Rhubarb + Apple Sauce

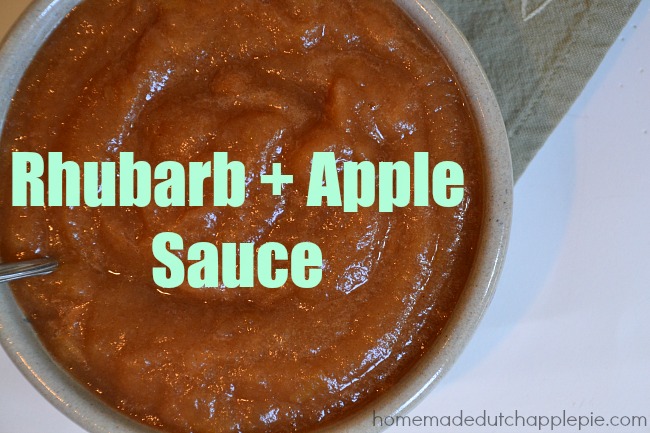
This rhubarb + apple sauce combines the flavors of spring with a staple fruit available all year long to make a delicious side for any spring or summer meal.Rhubarb + Apple Sauce | Homemade Dutch Apple Pie

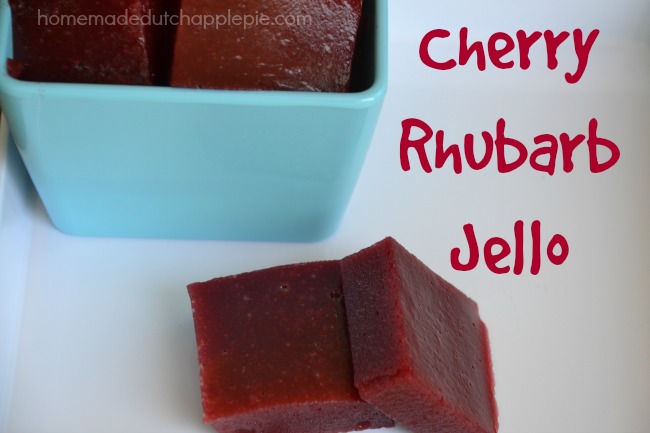
School is out! Summer has officially begun. Before you move on to strawberries, blueberries and cherries sneak in one last rhubarb dish.

I know strawberries are the classic pairing with rhubarb. It makes sense since they are available at the same time of year. But I’m learning rhubarb goes with so many other fruits!  Cherry and rhubarb blend well in this jello.

Now you can mix rhubarb with a fall staple – apples. Since apples are readily available year round this side dish is easy to make in the spring or summer.

My kids loved this rhubarb applesauce. There is sweetness from the apples, spice from the cinnamon and hint of tart from the rhubarb.

Rhubarb applesauce is great any time of day. Breakfast, lunch, dinner or even a snack – you really can’t go wrong.

The preparation for this side is minimal. Since the apples cook down you don’t have to chop them much ahead of time, especially if you are going to puree the sauce. The rhubarb should be peeled first (I just do this with my hands) to remove the stringy outside. Then a rough chop and you’re all set.

Kids can help make rhubarb applesauce. Peeling rhubarb is a great task for them! Then using a safe knife to roughly chop apples (after you peel/core them) and put them in the pan. My kids love helping make this.

Are you getting bored with plain applesauce? Try a spruced up spring version with rhubarb added.  You’ll add vitamins and boost the flavor. It is also a great way to introduce your kids to rhubarb.

Rhubarb + apple sauce is perfect for early summer picnics, family barbeques and easy lunches while the kids are home.Rhubarb + Apple Sauce | Homemade Dutch Apple Pie

Rhubarb + Apple Sauce
Serves 6
A tart and sweet applesauce with the flavor of early summer.
Write a review
Print
Ingredients
  1. 4 medium apples, peeled, cored and chopped
  2. 1 cup rhubarb, peeled and diced (about 1 large stalk)
  3. 1/3 cup cane sugar or honey
  4. 1 tsp. cinnamon
  5. 1/2 tsp. nutmeg (optional)
  6. 1/2 cup water
Instructions
  1. Combine all of the ingredients in a medium saucepan.
  2. Bring to a boil, reduce heat and simmer for 15 - 25 minutes (will depend on the firmness of the apples), stirring periodically.
  3. Mash or puree the sauce.
  4. Serve warm or cold.
Just Take A Bite https://justtakeabite.com/

Cherry Rhubarb Jello

Cherry rhubarb jello is the perfect kid-friendly way to use fresh produce and welcome summer weather.

Cherry rhubarb jello is a dye-free, allergy-friendly treat that all kids love. The perfect finger food.

We have two rhubarb plants in our garden. Most years we get a few decent stalks from them that I use to make a special dessert like crisp, ice cream, cake or even cheesecake!

This year our rhubarb plants were huge! After making three strawberry rhubarb crisps there was still plenty left. That means it is time to experiment with new ways to use rhubarb.

What Flavors Go Well With Rhubarb

I came up with cherry rhubarb jello. This is the perfect, nutritious way to use fresh, spring produce in combination with last year’s freezer stash (we still have a couple gallons of sweet cherries left!).

The cherries give sweetness and a deep maroon color while the rhubarb gives a hint of tartness. It’s the perfect combination.

Cherry rhubarb jello is a dye-free, allergy-friendly treat that all kids love. The perfect finger food.

Cherry rhubarb jello makes a great finger food lunch addition or snack for kids. The fruit provides vitamins while the gelatin provides easy-to-digest protein (Use the code TAKE10 for 10% off your gelatin purchase HERE).

Allergen-Free Cherry Rhubarb Jello

An added bonus is that cherry rhubarb jello is very allergy-friendly. Not to mention there is no food coloring or artificial flavor (food dyes are connected with behavioral issues). So it makes a unique and healthy treat for everyone.

Are you looking for a dish to pass at your next potluck or picnic? Cherry rhubarb jello is just the thing. You can make it in advance and both kids and adults will enjoy it.

Sometimes I even serve this for breakfast. My oldest can take her time eating in the morning. If we need to get out the door on time jello is great. It is soft and easy to chew.

Don’t forget the really important part – cherry rhubarb jello is so easy to make! Just cook, puree, add the gelatin and chill. It takes about five minutes of hands on time. Who doesn’t love that?!

Before rhubarb season ends grab a few stalks and make this fun treat to celebrate the end of the school year and welcome summer.

Cherry rhubarb jello is a dye-free, allergy-friendly treat that all kids love. The perfect finger food.

Cherry Rhubarb Jello
Serves 12
Write a review
Print
Ingredients
  1. 2 cups sweet cherries (fresh or frozen)
  2. 2 cups rhubarb, peeled and chopped
  3. 3/4 cups organic cane sugar or coconut sugar
  4. 1/4 tsp. unrefined sea salt
  5. 1/2 cup water
  6. 2 Tbsp. grass-fed gelatin
Instructions
  1. Combine the cherries, rhubarb, sugar and salt in a saucepan.
  2. Bring to a boil, reduce heat and simmer about 20 minutes.
  3. Pour the mixture into a blender. Blend until smooth.
  4. Return the mixture to the saucepan.
  5. Dissolve the gelatin in 1/2 cup cold water. Let sit 1 minute.
  6. whisk the gelatin water into the hot puree until dissolved, about 1 minute.
  7. Pour the mixture into an 8" square pan or a bowl.
  8. Refrigerate until firm.
  9. Scoop or cut into squares to serve.
Just Take A Bite https://justtakeabite.com/

Cow Spotted Birthday Cake {soaked gluten free chocolate cake}

Cow Spotted Birthday CakeI’m not quite sure how it happened, but my son recently turned four!  He was active in my belly and has not stopped moving since the day he was born. He keeps life interesting and exciting for sure!

One of the fun things about my son is that he is already very passionate and knows what he likes. His enthusiasm is a gift.  One of his passions is construction trucks and “worker men.” The other is farming. He is sure we are moving to a farm soon and will have every animal possible. He has even assigned the whole family their chores already! I love his enthusiasm and wouldn’t be surprised if he really does have a farm of his own some day (and mama would be very proud of him if he does!).Cow Spotted Birthday Cake | Soaked Gluten Free Chocolate Cake | Homemade Dutch Apple Pie

My son’s favorite animal is a “baby calf.” So this year we decided to do a cow spotted birthday for him.  He loved the idea. I loved that it didn’t require any color for decorations. I think my only problem was that I kept thinking of more fun treats to go along with the theme!

My first priority was to make his cake have cow spots. I recently made a soaked gluten free vanilla cake for my daughter’s birthday (with really fun, colorful decorations!). That served as the starting point. Then I created this soaked gluten free chocolate cake to use for the spots.

The cake turned out so well! Every time we cut into the cake the spots changed. It was so fun. The other great thing was that we had lots of extra cake batter since the chocolate was only used for spots. So we made the rest into donuts.Cow Spotted Birthday Cake | Soaked Gluten Free Chocolate Cake | Homemade Dutch Apple Pie

My son was so happy with his cow spotted cake and birthday celebration.  I made chocolate spots and chocolate frosting to decorate the cake. Then to really turn it into a cow spotted celebration I made inside out “Oreos”, chocolate suckers, chocolate/vanilla yogurt gummies, fudge swirl ice cream (like this without the caramel and cone) and chocolate milk (using this chocolate sauce).

I do try to limit the amount of chocolate my son eats since it tends to make him hyper. But this was a fun and special birthday treat for him. If you avoid cocoa you can substitute carob in this recipe.Cow Spotted Birthday Cake | Soaked Gluten Free Chocolate Cake | Homemade Dutch Apple Pie

This cake is also quite allergen friendly since it is gluten, dairy, nut, corn, rice and soy free.  It does contain eggs whites. Side note – don’t get rid of those leftover yolks! They are packed with nutrition. Use them for Russian custard, pudding, ice cream or smoothies.

Do you have a farmer-in-training? Or maybe you need a special way to celebrate an older farmer in your life? This cow spotted cake is so fun and delicious!  Plus the grains are properly prepared. It’s the perfect treat for kids and adults. You can make it simple with just the cake. Or go all out with cow spots everywhere! Happy farming and happy birthday!Cow Spotted Birthday Cake

Soaked Gluten Free Chocolate Cake {Cow Spotted Cake}
A soaked gluten free chocolate cake that can be used as is or in a vanilla, spotted cake.
Write a review
Print
Ingredients
  1. 1 cup sorghum flour (or white rice)
  2. 1/2 cup amaranth flour (or brown rice)
  3. 1/4 tapioca flour (or arrowroot)
  4. 1/2 cup cocoa powder (or carob)
  5. 3/4 cups water, milk or milk substitute
  6. 2 Tbsp. lemon juice, yogurt, whey or kefir
  7. 1 1/4 cups organic cane sugar or coconut sugar
  8. 2 Tbsp. melted coconut oil, palm shortening or butter
  9. 1/2 tsp. unrefined sea salt
  10. 3 egg whites
  11. 1/2 tsp. cream of tartar
  12. 1 tsp. baking soda
  13. 1/2 tsp. cream of tartar
Soak the flour
  1. Combine the flour, cocoa powder, water/milk and lemon juice/yogurt.
  2. Cover and let sit 7-24 hours.
Bake the cake
  1. Grease and line with parchment paper two 8" or 9" round cake pans or one 9x13 pan.
  2. Heat the oven to 350*F.
  3. Beat the egg whites and 1/2 tsp. cream of tartar until stiff peaks form. Set aside.
  4. Add the sugar, butter and salt to the soaked mixture. Beat well (it will be thick).
  5. Fold in the egg whites.
  6. Stir in the baking soda and 1/2 tsp. cream of tartar.
  7. Immediately pour the batter into the prepared pans.
  8. Bake for 35 minutes for 8/9" rounds, 40 minutes for 9x13 or 25 minutes for cupcakes.
Notes
  1. This batter can be used for donuts. Simply grease and fill the donut pans with the batter. Bake for 20 - 25 minutes.
  2. To make the cow spotted cake prepare the vanilla batter at the same time as the chocolate batter. Fill the pans with all of the vanilla batter. Drop spoonfuls of the chocolate batter into the vanilla batter. You will use about 1/4 - 1/3 of the chocolate batter for the spots. Bake 35 minutes.
Just Take A Bite https://justtakeabite.com/


In order for me to support my blogging activities, I may receive monetary compensation or other types of remuneration for my endorsement, recommendation, testimonial and/or link to any products or services from this blog.

Sticky Toffee Pudding {grain free, dairy free, nut free, corn free}

Sticky Toffee Pudding | Homemade Dutch Apple Pie

A while back I was browsing some of my cookbooks for inspiration. I rarely look at cookbooks. With all of our allergies, etc. there is usually so much modification that needs to be done on a recipe that it’s not worth it.

But when I came across a recipe for sticky toffee pudding in Earth To Table I realized it was something we could eat! With a few slight modifications of course.

Earth To Table by Jeff Crump and Bettina Schormann is a neat cookbook about seasonal foods and organic farming.  Everything in it looks delicious! Though I’m pretty sure this is the first recipe from it that I’ve ever made (I’ve had the cookbook for over five years).

Sticky toffee pudding is a British dessert. I’m not sure why it’s called pudding since it’s cake. But I don’t know much about anything British. Either way it tastes great!

I happened to have some caramel sauce and crispy pecans on hand when I made it. What a great combination.

The cake is slightly sweet and chewy. The dates/plums really give a unique flavor. Everyone in our family really enjoyed this sticky toffee pudding.

This cake would be perfect for a birthday or special event. It is quite allergen friendly since it is grain, dairy, nut, soy and corn free. It does have eggs, though.

Now I’m sharing the recipe with you!  I will post it the way I made it. If you want the original be sure to check out Earth To Table.Sticky Toffee Pudding | Homemade Dutch Apple Pie

Sticky Toffee Pudding {Grain Free, Dairy Free, Nut Free, Corn Free}
Yields 6
A delicious chocolate cake sweetened with dates.
Write a review
Print
Ingredients
  1. 2 cups pitted dates or a combination of dates and dried plums
  2. 2 cups water
  3. 1 1/2 tsp. baking soda
  4. 1/2 cup coconut sugar or cane sugar
  5. 2 Tbsp. coconut oil, palm shortening or butter, at room temp
  6. 3 eggs
  7. 1/4 cup molasses
  8. 2 Tbsp. honey or maple syrup
  9. 1/2 tsp. vanilla
  10. 1/2 cup tapioca flour
  11. 1 tsp. cream of tartar (or baking soda)
  12. 1 tsp. unrefined sea salt
Instructions
  1. In a saucepan combine the dates (plums) and water.
  2. Bring to a boil. Reduce heat and simmer until dates are tender and the water is mostly evaporated, about 30 minutes.
  3. Remove the pan from the heat and stir in the baking soda.
  4. Puree the mixture with an immersion blender or regular blender, leaving dates slightly chunky.
  5. Heat oven to 325*F. Grease a muffin pan.
  6. In a medium bowl cream the sugar and fat.
  7. Beat in eggs, molasses, honey and vanilla until combined.
  8. Stir in flour, cream of tartar and salt. Stir in date mixture.
  9. Pour the mixture into the prepared muffin cups.
  10. Bake about 35 minutes. Let stand 5 minutes before serving.
Notes
  1. This will make about six large cakes or nine smaller cakes.
Adapted from Earth To Table
Just Take A Bite https://justtakeabite.com/

In order for me to support my blogging activities, I may receive monetary compensation or other types of remuneration for my endorsement, recommendation, testimonial and/or link to any products or services from this blog.

Dairy Free Grilled Cheese

Dairy Free Grilled “Cheese”

Dairy free grilled “cheese” is a simple sandwich made without fake cheese alternatives. It is perfect for a quick lunch or a side with nourishing soup.Dairy Free Grilled CheeseI L.O.V.E grilled cheese.  Really love it. When I’m pregnant it’s one of the only foods that sounds good in the first trimester. When I’m getting over sickness it always appeals to me. I could eat grilled cheese just about any time.

Salty + gooey = love.

No Dairy, No Problem

Being dairy free for seven months now I haven’t eaten grilled cheese in a while. I actually rarely miss cheese. If I could indulge in dairy it would probably just be a big glass of raw milk.

That being said I do miss grilled cheese.

The other day I was making tomato soup…and of course that means grilled cheese. Instead of just making myself something else like usual I decided to make a dairy free grilled “cheese” that I could eat.Dairy Free Grilled Cheese | Homemade Dutch Apple Pie

To my great surprise this turned out so well! I think I could have eaten two or three of these.  My four year old (that can’t have cheese either) thought it was great too! I made it with sourdough bread (I love that sour and salty combination). Any bread you tolerate will work. Soaked gluten free bread would be great too.

Make It Gooey

The “cheese” is made from a combination of pumpkin or squash with gelatin (I love both this brand and this one!), cane sugar and salt.  Then coconut oil + a sprinkle of sea salt gives you a buttery flavor for grilling.

So you get vegetables and healthy protein in your grilled cheese. Please note that gelatin is not a complete protein, so you should pair it with another protein in your meal.  Adding bacon to this grilled cheese would be perfect! (note to self…make bacon grilled cheese ASAP!)  Leftover chicken or canned tuna or salmon would be great too. Or simply pairing it with a soup with meat works well.

Easy Lunch

I love that this is a quick lunch component. Being dairy, egg, nut and bean free there is not much I can make that is quick and still has protein. So if I don’t have leftover meat I’m left with nothing. This sandwich works well for days when there is nothing on hand and I need an easy meal. I even put it in my kids’ lunch box. It’s great cold!

I have made this a few times now. One thing I noticed…if you let the grilled cheese sit for a bit the gelatin has more time to gel and the filling has even more of a cheese texture!  I actually think it tastes a bit like American cheese. It reminded me of my childhood.

I like to make grilled cheese when we have soup for dinner. But I rarely make it these days since only half of the family can eat it. But I’ll be adding it back to the menu now! The whole family can enjoy grilled cheese again.

Do you miss grilled cheese after removing dairy from your diet? You’re in luck. Now you can have it!Dairy Free Grilled Cheese | Homemade Dutch Apple Pie

Dairy Free Grilled "Cheese"
Serves 1
A simple dairy free version of grilled cheese without fake cheese alternatives.
Write a review
Print
Ingredients
  1. Two slices of bread of choice.
  2. 3 Tbsp. pureed squash or pumpkin
  3. 2 tsp. grass-fed gelatin
  4. 1/2 tsp. cane sugar
  5. 1/2 tsp. unrefined sea salt
  6. coconut oil + sea salt for cooking
Instructions
  1. Mix the squash, gelatin, sugar and salt. Let sit two minutes.
  2. Heat a medium pan over low-medium heat.
  3. Spread the squash mixture on one slice of bread. Top with the other slice.
  4. Add coconut oil and a sprinkle of sea salt to the warm pan.
  5. Place the sandwich in the pan and cook until golden, 3-5 minutes.
  6. Flip sandwich, add extra coconut oil and salt to the pan. Cook another 3-5 minutes, until golden.
Notes
  1. This grilled cheese should be cooked slowly so the gelatin has time to warm and dissolve.
  2. This makes enough filling for two small or one large grilled cheese, it depends on the size of your bread.
  3. The longer the sandwich sits/cools after cooking the more the gelatin will firm up and feel like cheese.
Just Take A Bite https://justtakeabite.com/


*If you order by clicking on any of my Tropical Traditions links and have never ordered from Tropical Traditions in the past, you will receive a free book on Virgin Coconut Oil, and I will receive a discount coupon for referring you.

Crockpot Philly Cheese Steak Soup

Crockpot Philly Cheese Steak Soup | Homemade Dutch Apple Pie
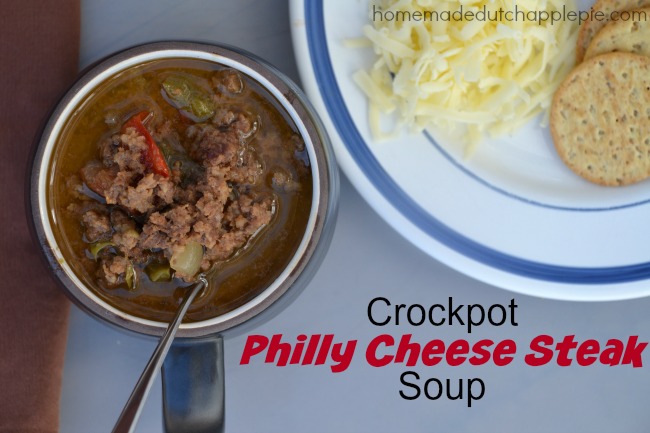
Yes, I know it’s spring. So hot soup may not be the first meal that comes to mind. But soup is really great all year long.

It is packed with nutrition, of course. But what’s great about soup in the spring and summer is how easy it is to make so you have lots of time to play outside! Soup gets even easier when you make it in the crockpot.  Toss the ingredients into the crockpot in the morning, go about your day and dinner is ready when you need it.Crockpot Philly Cheese Steak Soup | Homemade Dutch Apple Pie

This soup was inspired by the classic Philly cheese steak sandwich.  Beef, peppers and onions are simmered all day in a delicious broth. Then you can serve it topped with shredded cheese.

For my dairy free friends you can add a dollop of pureed squash to get the cheesy feel. Or just make the soup creamier with an extra splash of your favorite milk substitute.

Pair the soup with your favorite bread (I like to make garlic bread with this soup) or crackers. Add a fresh salad and dinner is served.Crockpot Philly Cheese Steak Soup | Homemade Dutch Apple Pie

The whole family enjoyed this soup. I love how easy it is to make. The leftovers are great for lunches. Or you can make a big batch and freeze a whole meal’s worth so you have an even easier meal on hand.

This is also a very budget friendly meal. Ground beef, onions and peppers are very affordable!

Do you like Philly cheese steak sandwiches? You’ll love this soup version.Crockpot Philly Cheese Steak Soup | Homemade Dutch Apple Pie

Crockpot Philly Cheese Steak Soup
Serves 6
A simple soup version of a Philly Cheese steak.
Write a review
Print
Ingredients
  1. 1 lb. ground beef
  2. 1 small onion, chopped
  3. 1 - 2 cups bell peppers, chopped
  4. 2 tsp. unrefined sea salt
  5. 1 tsp. garlic powder
  6. 1 tsp. season salt (I use Redmond)
  7. 1 cup milk or milk substitute
  8. 2 cups beef or chicken broth
  9. 2 cups shredded cheese of choice or 1/2 cup pureed squash (optional - for topping)
Instructions
  1. Turn the crockpot to high.
  2. Add the beef, onion, peppers, salt, garlic powder and season salt. Spread out the beef.
  3. Cover and let cook for 1 hour to start browning the meat.
  4. Break up/stir the meat.
  5. Add the broth and milk.
  6. Cover and cook on high 3-6 hours or low 5 - 10 hours.
  7. Top with cheese or squash if desired when serving.
Just Take A Bite https://justtakeabite.com/

Soaked Gluten Free Noodles

Soaked Gluten Free Noodles | Homemade Dutch Apple Pie
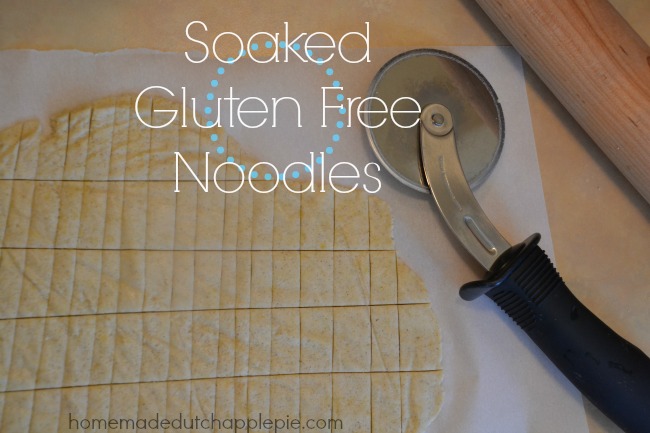
I’ve said it before and I’ll say it again. When you have a lot of allergies to deal with you can’t just go to the store and buy simple items like bread, crackers and noodles.

This is especially true if you are gluten free and can’t have rice or corn (like my son). Removing wheat, corn and rice eliminates just about any kind of convenience food you can buy – especially noodles.Soaked Gluten Free Noodles | Homemade Dutch Apple Pie

But I really don’t want to take all pasta based meals off our menu. So I set to work making noodles my son can eat. Additionally, I wanted to be sure they were properly prepared.

The result is an easy to make pasta that works well for soup, spaghetti, macaroni and cheese…whatever you like (as you can see in the photos I’ve used them in a variety of dishes). The other great thing about these homemade noodles is that they cook in about three minutes – perfect for making a quick lunch for hungry kids!

Simply mix the dough and cut the noodles. Then let them sit for a day before using them. The leftovers can be kept in the fridge for up to two weeks or in the freezer for a few months.Soaked Gluten Free Noodles | Homemade Dutch Apple Pie

You can be really creative with these noodles and cut them into fun shapes to liven up a bowl of chicken noodle soup. Or go really simple by cooking them in broth and adding salt and butter or coconut oil for a quick side dish.

Although my son is the only member of the family that can’t have store bought pasta, we all eat these and enjoy them!

Homemade pasta does not have to be complicated. This is a simple recipe that is sure to please the whole family. Soaked Gluten Free Noodles | Homemade Dutch Apple Pie

Soaked Gluten Free Noodles
Homemade noodles that are properly prepared and free of gluten, dairy, nuts and corn.
Write a review
Print
Ingredients
  1. 1/2 cup tapioca flour (or white rice)
  2. 1/2 cup sorghum flour (or white, brown rice, millet, buckwheat or amaranth)
  3. 1/2 tsp. gelatin
  4. 1/2 Tbsp. lemon juice
  5. 3 Tbsp. warm water
  6. 1/2 tsp. unrefined sea salt
  7. 1 tsp. organic cane sugar
  8. 1 egg
  9. 1 tsp. extra virgin olive oil
Instructions
  1. Mix the gelatin and lemon juice. Let sit one minute.
  2. Combine the flour, warm water and gelatin mixture.
  3. Add the satl, sugar, egg and oil to the flour mixture. Mix until well combined.
  4. Place the dough on a baking sheet size piece of parchment paper. Place another piece of parchment paper on top.
  5. Roll the dough between the parchment paper until desired thickness.
  6. Remove the top paper and use a pizza cutter or knife to cut noodles into desired shapes.
  7. Cover with parchment paper or towel and let sit 7-24 hours.
  8. When ready to use simply add the noodles to soup or cook in water or broth for 3-4 minutes.
  9. Store unused noodles in a sealed container in the refrigerator for up to a week or in the freezer for up to a month.
Just Take A Bite https://justtakeabite.com/


In order for me to support my blogging activities, I may receive monetary compensation or other types of remuneration for my endorsement, recommendation, testimonial and/or link to any products or services from this blog.

Soaked Gluten Free “Whole Wheat” Bagels

Soaked Gluten Free Whole Wheat Bagels | Homemade Dutch Apple PieHave I mentioned before that I love bagels? I wish I had them on hand at all times.  I recently shared a recipe for sourdough bagels with strawberry cream cheese.

The sourdough bagels are great! But not if you’re gluten free.

So I figured I better come up with a gluten free recipe too. This is my “whole wheat” bagel that is soaked (for your digestion), gluten free, dairy free, nut free and corn free.  The teff gives a wheat flavor and color to the bagel.Soaked Gluten Free Whole Wheat Bagels | Homemade Dutch Apple Pie

The outside is a bit chewy. The inside is soft. The texture is perfect for kids – not too hard to chew.

I used a donut pan to make these bagels. If you don’t have a donut pan you can make them in a muffin pan – there just won’t be a hole in the middle.

Homemade bagels are great for a quick breakfast or they are easy to pack up for a school lunch.

Bagels also freeze well. So you can make a double or triple batch and keep your freezer stocked for easy meals.Soaked Gluten Free Whole Wheat Bagels | Homemade Dutch Apple Pie

Try the bagels with a variety of toppings – butter, coconut oil, jam, cream cheese, cashew butter or nut butter. You can also turn it into a sandwich with egg salad, salmon salad, chicken salad or locally made lunch meat.

You really can’t go wrong with a bagel. And this version is safe for almost everyone! An added bonus is that there are no gums or fillers in these bagels. Just pure, simple ingredients.

Do you enjoy bagels as much as I do? You have to give these a try.

Soaked Gluten Free Whole Wheat Bagels | Homemade Dutch Apple Pie

Soaked Gluten Free "Whole Wheat" Bagels
Yields 6
A "wheaty" bagel that is gluten, dairy, nut and corn free.
Write a review
Print
Ingredients
  1. 1/2 cup tapioca flour
  2. 1/2 cup sorghum flour (or white rice)
  3. 1/4 cup amaranth flour (or brown rice)
  4. 1/4 cup teff flour
  5. 1/2 cup warm water
  6. 1 Tbsp. lemon juice or apple cider vinegar
  7. 1/2 tsp. active dry yeast
  8. 2 tsp. cane sugar
  9. 1 Tbsp. water
  10. 2 egg whites
  11. 1 tsp. extra virgin olive oil
  12. 1/4 tsp. unrefined sea salt
  13. 2 tsp. cane sugar
  14. 1/2 tsp. baking soda
  15. 1/2 tsp. cream of tartar
Soak the flour
  1. In a large bowl combine the flours. Stir to remove any lumps.
  2. Add the water and lemon juice. Mix. Cover. Let sit 7-24 hours.
Make the bagels
  1. Grease a bagel or muffin pan.
  2. Combine the yeast, 2 tsp. sugar and 1 Tbsp. very warm water. Let sit 5 - 10 minutes.
  3. Add the egg whites and olive oil to the flour mixture. Beat one minute.
  4. Add the yeast mixture to the bowl. Beat 20 seconds.
  5. Add the salt, sugar, soda and cream of tartar to the bowl. Beat 20 seconds.
  6. Immediately pour the batter into the prepared donut pan, filling to the top.
  7. Place the donut pan in the oven. Turn on the oven light.
  8. Let rise 45 minutes.
  9. With the pan still in the oven, turn the oven on to 400*F.
  10. Set timer for 25 minutes.
  11. Remove the bagels from the pan and cool.
  12. Store in a bag at room temperature for up to a week or in the freezer for up to 6 months.
  13. Slice in half and serve with your favorite toppings.
Just Take A Bite https://justtakeabite.com/


In order for me to support my blogging activities, I may receive monetary compensation or other types of remuneration for my endorsement, recommendation, testimonial and/or link to any products or services from this blog.

Soaked Gluten Free Tortillas {dairy free, nut free, egg free, corn free}

Soaked Gluten Free Tortillas | Homemade Dutch Apple PieWhen you have to eat gluten, corn and rice free there isn’t much convenience food you can buy at the store. So a simple meal like tacos gets pretty boring when you have no shell or chips for your meat – especially for a kid!

But no need to cross taco night off your menu – you can make your own tortillas! My son inspires me to create homemade versions of things you just can’t get at the store without his allergens.  So when we had tacos recently I decided to make homemade tortillas.

This tortilla is soaked and free of gluten, corn, rice, eggs, dairy and nuts.  Simply mix the dough, roll the tortillas, let them sit and then cook for about a minute when you are ready to eat.  If you have a tortilla press (that will be on my next gift list!) they would be even easier to make.

You can also make a double or triple batch and stock your freezer so you have some on hand at all times. They thaw in minutes.Soaked Gluten Free Tortillas | Homemade Dutch Apple Pie

My son loved these!!! He was so happy to be able to eat a regular taco like everyone else (I was pretty happy that I could have one too!).

You can also use them for any sandwich creation – chicken salad, salmon salad, ham and cheese or even peanut butter and honey. Homemade tortillas make a fun substitute for a hot dog bun too!  They are perfect for fun lunch foods.

I personally liked them to snack on – simply spread butter or coconut oil and dash of salt on top for the perfect energy booster.

I use gelatin to bind the flour and give some flexibility to the tortilla. Plus it boosts the nutritional value!

If you need a homemade tortilla because you are allergic to the store bought versions or you simply don’t like all the unhealthy ingredients in them this is the perfect recipe!  Get your flour soaking for delicious tortillas. Taco night just got a little healthier.Soaked Gluten Free Tortillas | Homemade Dutch Apple Pie

Soaked Gluten Free Tortillas {dairy free, nut free, corn free}
Yields 8
A simple homemade tortilla that is very allergen friendly.
Write a review
Print
Ingredients
  1. 1/2 cup tapioca flour
  2. 1 cup amaranth flour
  3. 1/4 cup warm water
  4. 1 Tbsp. lemon juice
  5. 2 tsp. gelatin dissolved in 1/4 cup hot water
  6. 1 1/2 tsp. unrefined sea salt
  7. 2 Tbsp. extra virgin olive oil
Instructions
  1. In a medium bowl, combine all of the ingredients. Mix until a ball of dough forms.
  2. Split the dough into 8 balls.
  3. Roll each ball of dough between two pieces of parchment paper until about 1/8" thick/desired tortilla thickness
  4. Layer tortillas between pieces of parchment paper. Place under a towel or in a bag and let sit 7-24 hours.
When ready to serve
  1. Cook the tortillas on a hot, ungreased skillet - about 20 seconds per side.
  2. Place the warm tortillas in a bag or under a towel until ready to serve to keep them soft and pliable.
To reheat
  1. Place the tortillas in a wet paper towel and warm in the oven/toaster oven for a minute or two. This will also help soften them.
Just Take A Bite https://justtakeabite.com/

In order for me to support my blogging activities, I may receive monetary compensation or other types of remuneration for my endorsement, recommendation, testimonial and/or link to any products or services from this blog.

Sourdough Bacon Pancakes {dairy free, nut free, corn free}

Sourdough Bacon Pancakes | Homemade Dutch Apple Pie
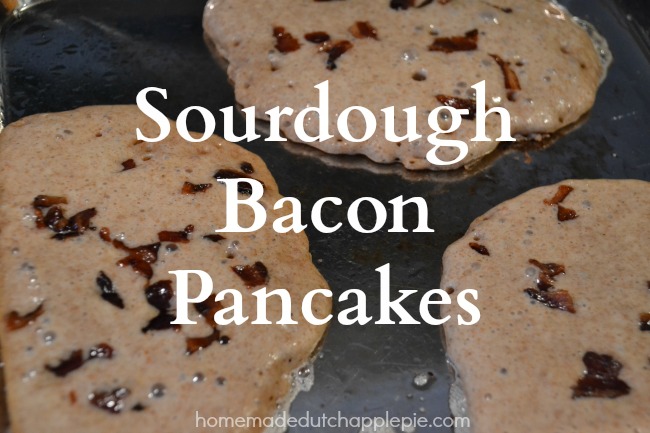
Friday night is breakfast for dinner night. I can never go wrong if it includes pancakes!

Most of the time I do soaked gluten free pancakes. But once in a while it’s nice to change it up. These sourdough pancakes are perfect for variety.

There is no extra flour added to the sourdough starter. So you don’t have to worry about extra soaking/fermenting time.

One batch makes about ten pancakes. If you double it you can stock your freezer for easy week day breakfasts.Sourdough Bacon Pancakes | Homemade Dutch Apple Pie

Sourdough pancakes are thinner than regular pancakes. But they are still delicious. They also work well as wraps for sandwiches.  You can make them thicker by adding extra flour to the batter. I make them both ways…and they are equally delicious!

This version of sourdough pancakes includes bacon. It’s the perfect paring. Slightly sour pancakes combined with salty bacon and sweet maple syrup make a delicious breakfast treat.

If you don’t want bacon you can add chocolate chips, dried, fresh or frozen fruit or nuts to the pancakes. You really can’t go wrong.

Does  your family enjoy pancakes? Try sourdough bacon pancakes for a new twist on a classic breakfast.

Sourdough Bacon Pancakes | Homemade Dutch Apple Pie

Sourdough Bacon Pancakes {nut free, dairy free, corn free}
Yields 10
A sweet and salty pancake made with sourdough and bacon.
Write a review
Print
Ingredients
  1. 2 cups sourdough starter
  2. 2 Tbsp. coconut sugar or cane sugar
  3. 1 egg
  4. 2 Tbsp. bacon grease, melted (or butter or coconut oil)
  5. 1/2 tsp. sea salt
  6. 1 tsp. baking soda
  7. 1/2 cup cooked, crumbled bacon
Instructions
  1. Feed your sourdough starter the day before making the pancakes so you have at least 3 cups of starter.
  2. Combine the starter, sugar, egg, grease and salt.
  3. Sprinkle the baking soda on top. Gently stir.
  4. Pour 1/3 cup portions of batter onto a hot, greased skillet.
  5. Add crumbled bacon to each pancake.
  6. Cook until the edges get dry and the bubbles pop. Flip pancakes.
  7. Cook another minute.
  8. Serve warm with extra bacon, butter or coconut oil and maple syrup.
Notes
  1. These pancakes are quite flat. If you want more rise you can try adding 1/2 tsp. cream of tartar to the batter with the soda water.
  2. To make thicker pancakes add 1/2 cup all purpose flour or white spelt to the batter.
Just Take A Bite https://justtakeabite.com/