Home » dessert » Page 8

Tag: dessert

Red White and Blue Swirl Ice Cream

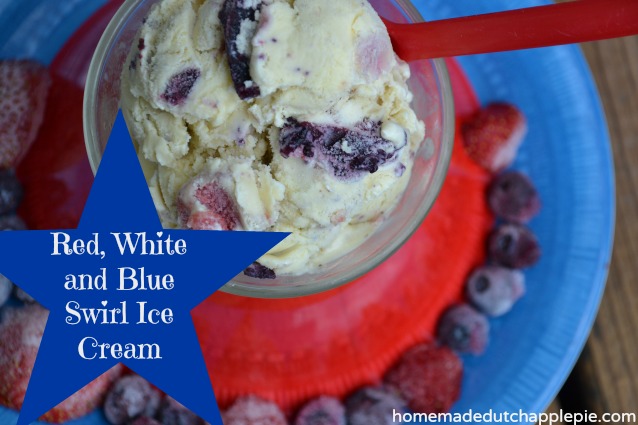
Red white and blue swirl ice cream is a colorful and festive ice cream made with raw cream, fresh fruit and grass-fed gelatin. The perfect summer treat!red white and blue swirl ice cream
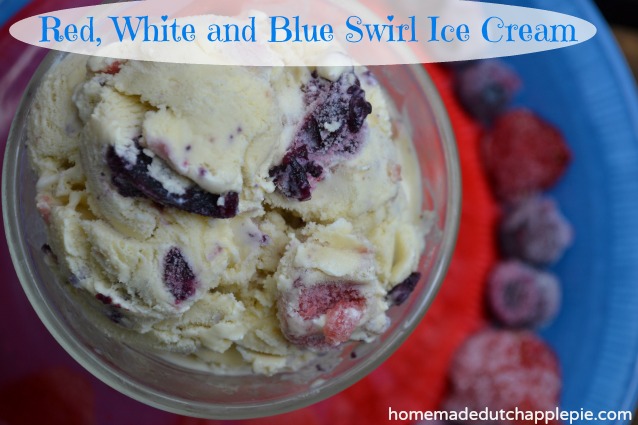
Red, white, and blue in your ice cream too? YES!

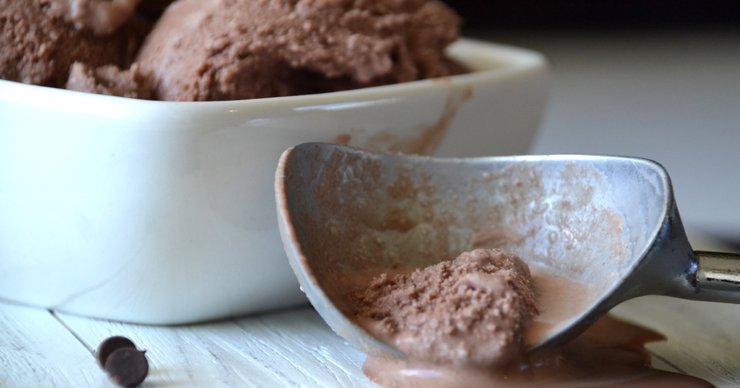
As I was planning my weekly ice cream flavor recently I decided to make something for Independence Day.

There are plenty of red, white, and blue foods you can buy at the store. But it’s hard to find one without food coloring.

This red, white, and blue swirl ice cream uses only real ingredients to create a colorful treat.

Raw cream, egg yolks, and natural sweeteners are used as the ice cream base. Then as an added bonus it has grass-fed gelatin (use code TAKE10 for 10% off) to bump up the nutrition.red white and blue swirl ice cream 3

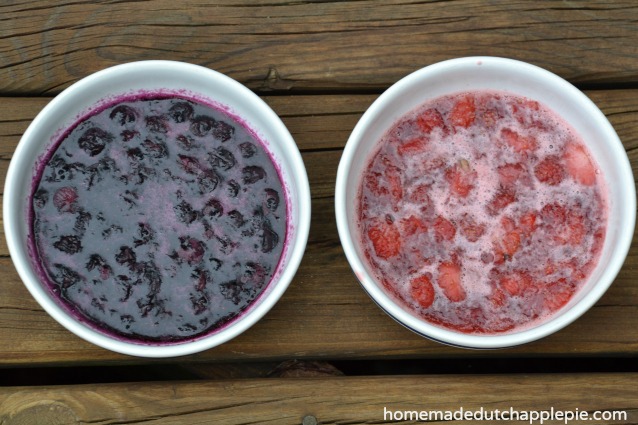
You can make it with dairy or without. We made a batch of each so the whole family could enjoy it!

My kids love this fun, festive ice cream. Not to mention the swirl is great plain!

There is no need to resort to junk food to celebrate a holiday with bright colors. Real food is good food. And it can be just as colorful and flavorful.

This Independence Day enjoy a big dish of red, white, and blue swirl ice cream.

red white and blue swirl ice cream 2

Red, White and Blue Swirl Ice Cream
A colorful and festive ice cream made with real ingredients.
Write a review
Print
Red Swirl
  1. 1 cup strawberries (or raspberries) (fresh or frozen)
  2. 1 tsp. gelatin
  3. 1/3 cup sweetener (cane sugar, coconut sugar, honey)
Blue Swirl
  1. 1 cup blueberries (fresh or frozen)
  2. 1 tsp. gelatin
  3. 1/3 cup sweetener (cane sugar, coconut sugar, honey)
Ice Cream
  1. 2 1/2 cups cream (preferably raw) (can be replaced with coconut milk)
  2. 1/2 cup whole milk (preferably raw) (can be replaced with coconut milk)
  3. 1/2 cup sweetener (any combination of cane sugar, coconut sugar, honey or maple syrup)
  4. 1 Tbsp. organic vanilla
  5. 1 - 3 egg yolks (optional)
  6. 1 Tbsp. tapioca flour or arrowroot (optional, helps thicken, especially if not using yolks)
  7. 1/4 tsp. sea salt
Red and Blue Swirls
  1. In a small saucepan combine the strawberries and gelatin.
  2. Let sit one minute.
  3. Add the sweetener.
  4. Cook over med-low heat until mixture begins to bubble.
  5. simmer for two minutes.
  6. Pour strawberry mixture into a bowl.
  7. Refrigerate until fully gelled, about 30 minutes.
  8. Repeat this process with the blueberries.
  9. Set aside half of the mixtures for later use.
Ice Cream
  1. Cut the strawberry and blueberry jellies into small chunks if really firm. Set aside.
  2. In a blender combine the cream, milk, sweetener, vanilla, egg yolks, flour and salt. Blend until smooth.
  3. Process the ice cream in an ice cream mixer according to manufacturer's directions.
  4. During the last 2 minutes of processing add the strawberry and blueberry jelly.
  5. Transfer the ice cream to a freezer-safe container.
  6. Freeze until firm.
Notes
  1. This recipes makes enough strawberry and blueberry swirl for two batches of ice cream. You can also use the leftover swirl to eat plain or use as jelly.
Just Take A Bite https://justtakeabite.com/

Homemade Chocolate Covered Toffee

chocolate covered toffee

Did you grow up eating candy bars like Heath and Skor? I did. They were two of my favorites!!

I recently made a homemade version of chocolate covered toffee. It reminds me of my childhood favorites. Milk chocolate outside. Buttery toffee inside.

Homemade Chocolate Covered Toffee

The best part is that these chocolates only contain real ingredients and are super easy to make!

I made them for a Father’s Day treat. They would also be perfect for Valentine’s Day. I wouldn’t mind having them on hand any time for a sweet treat.

Easy Grain-Free Dessert

I used candy molds to make them into individual chocolates. You could also make a batch in a large pan and break it into pieces to be more like a candy bar. Either way you can’t go wrong.

These chocolates are gluten, grain, nut and egg free. So they are a perfect treat for someone with allergies.

chocolate covered toffee 2

Homemade Chocolate Covered Toffee
Yields 30
Homemade buttery toffee topped with milk chocolate.
Write a review
Print
Ingredients
  1. 3 Tbsp. honey
  2. 1/4 cup butter
  3. 1/2 cup brown cane sugar, sucanat or coconut sugar
  4. 1/4 - 1 tsp. salt (to taste)
  5. 12 oz. chocolate chips
Instructions
  1. In a small sauce pan combine the honey, butter, sugar and salt.
  2. Cook over medium heat until the mixture begins to bubble, stirring frequently.
  3. Continue to simmer the mixture for about 5 minutes.
  4. Remove from heat and pour the toffee into a parchment lined 8" baking dish.
  5. Allow to cool in the refrigerator for about 20 minutes.
  6. While the toffee is cooling melt the chocolate chips over a double boiler.
  7. Fill the bottom of candy molds with chocolate (1/4 - 1/3 full) or pour 1/3 of chocolate into a parchment lined 8" baking dish.
  8. Allow the chocolate to firm in the fridge.
  9. When the toffee is cool enough to handle, break or cut it into small pieces (if using molds).
  10. Place a piece of toffee on top of the chocolate layer in each mold or lay the entire toffee piece on the layer of chocolate in a baking pan.
  11. Top the toffee with the remaining melted chocolate.
  12. Allow to cool in the refrigerator until completely firm (at least 30 minutes).
  13. Remove chocolates from mold or break chocolate into bars/large chunks.
  14. Store in a closed container in the refrigerator.
Notes
  1. If you are making individual chocolates, there will be leftover toffee. This makes enough toffee for about two batches of chocolates (use 24 oz. chocolate chips to use up all of the toffee).
  2. The toffee is great on its own.
  3. If you add extra honey the toffee will be more like chewy caramel for chocolate covered caramels.
Just Take A Bite https://justtakeabite.com/
This salted dark chocolate ice cream has the perfect balance of salty and sweet in creamy, rich chocolate.

Salted Dark Chocolate Ice Cream

This salted dark chocolate ice cream has the perfect balance of salty and sweet in creamy, rich chocolate.This salted dark chocolate ice cream has the perfect balance of salty and sweet in creamy, rich chocolate.

In the summer I make ice cream a LOT. Usually it’s once or twice a week. I make some of our favorites quite often – mint chocolate chip, vanilla paired with hot fudge, chocolate and candy bar.

In addition to the standards I love to experiment with new flavors! I’ve made blueberry cheesecake, rhubarb pecan, sea salt caramel and even blue moon (plus many others).This salted dark chocolate ice cream has the perfect balance of salty and sweet in creamy, rich chocolate.

For my latest ice cream creation I made something dear to my heart…salted dark chocolate ice cream.

I love putting salt on my ice cream (crazy pregnancy hormones make me crave salty and sweet together…now I’m hooked). It really brings out the sweetness. I especially love adding salt to chocolate ice cream.This salted dark chocolate ice cream has the perfect balance of salty and sweet in creamy, rich chocolate.

I figured I might as well put salt IN my ice cream instead of adding it every time I scoop a dish.

I combined cocoa powder and carob powder to get a really rich, dark chocolate flavor. Then I added plenty of unrefined sea salt to give a good contrast.

salted dark chocolate ice cream collage

If you tolerate nuts, chopped almonds would be great in this ice cream. If you don’t tolerate dairy you can make it with coconut milk. It still tastes wonderful!This salted dark chocolate ice cream has the perfect balance of salty and sweet in creamy, rich chocolate.

Are you like me and grew up eating a Wendy’s Frosty along side french fries? That’s what this salted chocolate ice cream reminded me of as I was eating it.  YUM! Chocolate plus salt…what could be better?!

Even my daughter LOVES it. So it is very kid friendly. It’s a perfect summer treat.

If you like chocolate ice cream you’ll love this salted dark chocolate ice cream. It’s like chocolate ice cream kicked up a notch.

This post is linked to Allergy Free Wednesday.This salted dark chocolate ice cream has the perfect balance of salty and sweet in creamy, rich chocolate.

Salted Dark Chocolate Ice Cream
A rich chocolate ice cream with a hint of sea salt to bring out the sweetness.
Write a review
Print
Ingredients
  1. 21/2 cups cream (preferably raw) (can be replaced with full fat coconut milk)
  2. 1/2 cup whole milk (preferably raw) (can be replaced with full fat coconut milk)
  3. 1 - 3 egg yolks (optional)
  4. 3/4 cup sweetener - honey, maple syrup, cane sugar, coconut sugar
  5. 1/3 cup organic cocoa powder
  6. 1/4 cup carob powder (can be replaced with cocoa powder)
  7. 1 Tbsp. vanilla
  8. 1 Tbsp. tapioca flour or arrowroot (optional)
  9. 1/2 - 1 tsp. unrefined sea salt (to taste)
Optional add-ins
  1. 1/2 cup mini chocolate chips
  2. 1/2 cup chopped almonds
  3. 1/2 cup dried cherries
Instructions
  1. In a blender combine the cream, milk, egg yolks, sweetener, cocoa powder, carob, vanilla and flour. Blend until smooth.
  2. Add salt, starting with 1/2 tsp. Blend. Taste and adjust to liking.
  3. Process the ice cream according to manufacturer's directions (mine takes about 20 minutes in a Kitchen Aid attachment).
  4. Transfer the ice cream to a freezer-safe dish. Stir in add-ins.
  5. Freeze until firm.
Just Take A Bite https://justtakeabite.com/

Gluten Free Strawberry Rhubarb Cheesecake


Strawberry rhubarb cheesecake is a a rich and creamy dessert that is gluten and nut free and combines the flavors of spring and summer.This Gluten Free strawberry rhubarb cheesecake is perfect for any summer celebration.
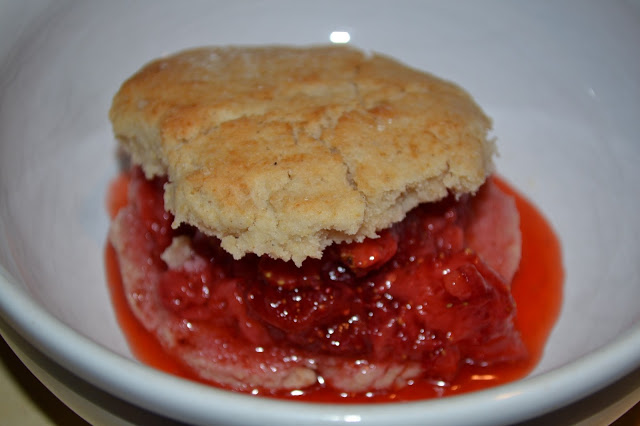
For Father’s Day this year I decided to spoil my husband with a special dessert. He’s always interested in new recipes that utilize the rhubarb from our garden. So I combined that with one of our favorite treats – cheesecake!

This cheesecake is packed with flavor. The rhubarb is slightly tart, the strawberries are sweet, and the cheesecake is slightly tangy. Combined you get a perfect balance.gf strawberry rhubarb cheesecake 3

One of the best parts about this dessert is that you can make it 100% from scratch, right down to the graham cracker crumbs and cream cheese. All of the components of the cheesecake can be made in advance. Then the assembly is quite simple.

gf strawberry rhubarb cheesecake collage

I also love that you can make this cheesecake gluten and nut free. I use my homemade gluten free graham crackers for the crust. If you want to soak your grains I have a soaked version as well. If you don’t need it to be gluten free you could also make whole wheat, soaked whole wheat or sourdough grahams. I make homemade cream cheese from yogurt and sour cream from raw cream.

Strawberry rhubarb cheesecake does take a little planning and preparation. But each component requires very little hands on time. You just have to start a day or two (or even a week if that works best for your schedule) in advance of when you want the cheesecake to be ready. It makes a wonderful treat for a special occasion. Even kids will love it!

The next time you want an extra special spring confection try strawberry rhubarb cheesecake. You can spoil one (or all!) of the special dads in your life with this delicious dessert.

gf strawberry rhubarb cheesecake 4

Gluten Free Strawberry Rhubarb Cheesecake
A rich and creamy cheesecake that is gluten free, totally from scratch and perfect for spring.
Write a review
Print
Cheesecake
  1. 1/2 recipe graham crackers (about 2 cups crushed, see links in post for recipes)
  2. 3 Tbsp. organic cane sugar, sucanat or coconut sugar
  3. 6 Tbsp. butter, melted
  4. 2 cups cream cheese at room temp (preferably homemade - see link in post for recipe)
  5. 1 cup sour cream (preferably homemade - see link in post for recipe)
  6. 1 1/4 cups organic cane sugar, sucanat or coconut sugar
  7. 3 eggs
  8. 1 tsp. vanilla
  9. 1 Tbsp. organic lemon juice (optional)
Strawberry Rhubarb Filling/Topping
  1. 3 cups total of strawberries and rhubarb, diced
  2. 2 Tbsp. butter
  3. 1/4 cup organic brown cane sugar, sucanat or coconut sugar
Instructions
  1. Prepare the graham crackers, cream cheese and sour cream.
  2. Pulse the graham crackers in a food processor or blender to make crumbs.
  3. Cook the strawberries and rhubarb in 2 Tbsp. butter and 1/4 cup sugar in a small pan for about 10 minutes, until soft.
  4. Divide the strawberry rhubarb mixture - 1/3 for the filling and 2/3 for topping. Let cool.
When ready to prepare the cheesecake
  1. Heat oven to 350*F.
  2. Combine the graham cracker crumbs, 6 Tbsp. butter and 3 Tbsp. sugar. Press mixture into the bottom of an 8" or 9" spring form pan.
  3. Bake the crust for 10 minutes.
  4. Gently spread 1/3 of the strawberry rhubarb mixture onto the crust.
  5. In a large bowl beat the cream cheese, sour cream, vanilla and 1 1/4 cups sugar until smooth.
  6. Add the eggs one at a time, blending well after each addition.
  7. Add lemon juice if desired.
  8. Pour the cheesecake batter over the strawberry rhubarb filling.
  9. Place the spring form pan in a large pan.
  10. Fill the bottom pan half way with water.
  11. Bake the cheesecake for 90 minutes.
  12. Turn the oven off and allow the cheesecake to set in the oven for 30 minutes.
  13. Remove the cheesecake from the oven and chill in the refrigerator for at least 4 hours before serving.
  14. Top slices with the remaining strawberry rhubarb mixture when serving.
Notes
  1. The graham crackers can be prepared up to 3 weeks before making the cheesecake.
  2. The cream cheese and sour cream can be prepared up to 1 week before making the cheesecake.
  3. Any ratio of strawberries and rhubarb will work. I used 2:1 rhubarb to strawberries to let the rhubarb flavor stand out.
  4. The strawberry rhubarb filling is optional. You can make the cheesecake without the filling and just use the topping.
  5. The topping can be served cold, room temperature or warm.
  6. If you like a very firm cheesecake chill it in the freezer for about an hour before serving.
Just Take A Bite https://justtakeabite.com/
 This post is shared on Allergy Free Wednesday.

Gluten Free Dairy Free Chocolate Chunk Cookies

gf df chocolate chunk cookies

 Who doesn’t love chocolate chip cookies? I know I do! I grew up in a house that always had fresh chocolate chip cookies on hand. My mom is known for her cookies. There is no special recipe. But she knows how to make them just right.

Last week I decided to bake a batch of cookies for one of our Father’s Day goodies. But I wanted to make them so the whole family could enjoy them – allergies and all.

This is my version of chocolate chip cookies that is gluten, dairy, rice and nut free. They are light and crunchy. A perfect treat for everyone.

The next time you have a craving for cookies try a batch of these chocolate chunk cookies. 

This post is shared on Allergy-Free Wednesday.

gf df chocolate chunk cookies 2

Gluten Free Dairy Free Chocolate Chunk Cookies
Yields 3
A light and crispy chocolate chip cookie that is very allergen-friendly.
Write a review
Print
Ingredients
  1. 2 cups any combination of gluten free flours (i.e. white rice, brown rice, amaranth, tapioca, sorghum)*
  2. 1 tsp. baking soda
  3. 1/2 tsp. sea salt
  4. 3/4 cup organic palm shortening
  5. 1 1/2 cups coconut sugar, sucanat, cane sugar or brown cane sugar (using half each of two kinds of sugar gives great flavor)
  6. 1 tsp. organic vanilla
  7. 3 eggs
  8. 1 -2 cups gf df chocolate chunks (or any chip you like)
Instructions
  1. Heat the oven to 350*F.
  2. Cream the shortening and sugars.
  3. Add the vanilla and eggs. Beat well.
  4. Add the dry ingredients. Mix well.
  5. Stir in the chocolate chunks.
  6. Place on an ungreased baking sheet in 1-2 tablespoon scoops.
  7. Bake 15 - 18 minutes (shorter for softer cookies, longer for crispier cookies).
  8. Allow to cool for 5 minutes on the baking sheets before moving the cookies to a cooling rack.
Notes
  1. *The cookies will turn out best if at least 1/3 of the flour mix is a "white" flour like white rice or tapioca.
Just Take A Bite https://justtakeabite.com/
 

In order for me to support my blogging activities, I may receive monetary compensation or other types of remuneration for my endorsement, recommendation, testimonial and/or link to any products or services from this blog.

Rhubarb Pecan Ice Cream

Rhubarb isn’t just for cakes and cobblers. You can also use it to make an amazing rhubarb pecan ice cream! Wow all of your friends and family.

Rhubarb pecan ice cream | Just Take A Bite

As soon as the weather gets warmer and our milk share volume goes up I’m anxious to make ice cream.  It’s definitely a family favorite.

Recently I combined my love of creating ice cream with my need to use rhubarb. I came up with rhubarb pecan ice cream.

The result is delicious!!! Even my six-year old LOVES it. The ice cream is plenty sweet. But it has a hint of tartness from the rhubarb and a nice crunch from the crispy pecans.

If you can’t eat nuts you can absolutely leave them out. The rhubarb alone gives a wonderful flavor.

Are you dairy free? Swap coconut milk for the cream. This ice cream is a unique spring treat no matter what way you make it.
Rhubarb pecan ice cream | Just Take A Bite

Rhubarb Pecan Ice Cream
A fruity ice cream with crunchy pecans.
Write a review
Print
Ingredients
  1. 1 1/2 cups rhubarb, diced
  2. 3 Tbsp. honey, maple syrup, coconut sugar or cane sugar
  3. 2 tsp. butter or coconut oil
  4. 2 cups cream (or coconut milk)
  5. 1/2 cup whole milk (or coconut milk)
  6. 1/3 - 1/2 cup honey, maple syrup, coconut sugar and/or cane sugar*
  7. 1 Tbsp. vanilla
  8. 1/2 tsp. sea salt
  9. 1 Tbsp. tapioca flour or arrowroot (optional)
  10. 1-3 egg yolks (optional)
  11. 1/4 - 1/2 cup liquid reserved from cooked rhubarb
  12. 1/2 cup chopped crispy pecans
Instructions
  1. In a small pan sautee the rhubarb in 2 tsp. fat and 3 Tbsp. sweetener over medium heat. Cook until the rhubarb is soft and released liquid (about 10 minutes).
  2. Allow the rhubarb mixture to cool. Drain up to 1/2 cup liquid off the rhubarb to use in the ice cream batter.
  3. Combine the cream, milk, sweetener, vanilla, salt, flour, egg yolks and rhubarb liquid in a blender.
  4. Blend until well mixed. Taste and adjust sweetness and rhubarb liquid to taste.
  5. Process the ice cream batter in an ice cream maker (I use a Kitchen Aid attachment - it takes 15 - 20 minutes).
  6. During the last 1-2 minutes of processing add the cooked rhubarb.
  7. Transfer the ice cream to a freezer-safe container. Stir in the pecans.
  8. Freeze the ice cream until solid.
Notes
  1. *Using a combination of sweeteners for the ice cream gives a more neutral flavor.
  2. *The batter should be slightly sweeter than how you want the final product to taste. The sweetness will go down as the ice cream freezes.
Just Take A Bite https://justtakeabite.com/
 

In order for me to support my blogging activities, I may receive monetary compensation or other types of remuneration for my endorsement, recommendation, testimonial and/or link to any products or services from this blog.

Decadent Dairy-Free Chocolate Fudge Pudding | Easy and Kid-Friendly!

DF pudding

Now that our milk share is back to the full three gallons a week I’ve been able to make some extra treats with it like ice cream, yogurt and pudding. It has been fun and delicious.

But making all of these tasty dairy treats makes my little guy feel left out.

Yesterday I ate some chocolate pudding. He kept asking if he could have a bite. So I promised him I’d try to make a dairy-free version just for him.

Now that my son can have eggs pudding is very doable. So I set to work right away experimenting. And I love the results!

I’ll be honest – I think the dairy-free version I made is even better than the dairy version! It’s that good. I was also very surprised that even though I used coconut milk it does not taste like it. So even if you don’t have to be dairy-free this is a great dessert. You won’t know the difference.

df pudding collage

When my son got up from his nap I told him I had made pudding for him. His eyes lit up like it was Christmas. When he took his first bite he exclaimed, “This is my favorite I so wanted!” After a few bites he kept saying, “It’s ‘dewitus’!” (delicious)  He definitely approved. Though now he wants to eat pudding for every meal.

If you are looking for an easy and decadent gluten and dairy-free dessert this is it. It only takes about ten minutes to prepare. Plus it’s got good stuff in it. Maybe I’ll freeze my next batch for dairy-free pudding pops. Yum!

DSC_1953

Decadent Dairy Free Chocolate Fudge Pudding
Serves 4
A rich, chocolate pudding that is both gluten and dairy free.
Write a review
Print
Ingredients
  1. 2 egg yolks
  2. 1 cup coconut milk
  3. 3/4 cup oat milk (or any milk substitute)*
  4. 1/2 cup coconut sugar or sucanat
  5. 1/4 cup organic cocoa powder (or carob)
  6. 2 1/2 Tbsp. tapioca flour (or corn starch or arrowroot)
  7. 1/4 tsp. sea salt
  8. 1 tsp. vanilla
Instructions
  1. Combine all of the ingredients except vanilla in a small saucepan and whisk until combined.
  2. Cook the pudding over medium heat, stirring frequently, until it begins to thicken (about 10 minutes).
  3. Continue stirring until the pudding is quite thick.
  4. Remove from heat and add vanilla.
  5. Whisk until combined.
  6. Poor pudding into serving dishes. Serve immediately or cover and refrigerate.
Notes
  1. *Using two kinds of "milk" will give a more neutral flavor. If you use all coconut milk there will be a stronger coconut flavor.
Just Take A Bite https://justtakeabite.com/
Chocolate Zucchini Cupcakes | Homemade Dutch Apple Pie

Chocolate Zucchini Cupcakes…Or Muffins (Whichever Makes You Feel Better)

Use up your abundance of zucchini with chocolate zucchini cupcakes. Enjoy them for breakfast, with a bowl of soup or as a dessert. No matter when you eat them chocolate zucchini cupcakes are delicious!
Chocolate Zucchini Cupcakes | Homemade Dutch Apple Pie
Anyone who’s ever grown zucchini knows that it just keeps coming! To me that means one thing – time to bake!
 
Chocolate and zucchini pair beautifully.
 
I added cocoa powder to a zucchini muffin batter. What I had intended to be muffins turned out a bit more like cupcakes.
 
To give you an idea of how they went over with the family…we ate twelve in the first day. Yes, twelve!
 
Since they taste like cupcakes my daughter asked for frosting on hers. So far we’ve tried vanilla and strawberry frosting. Chocolate would be great too!
Chocolate Zucchini Cupcakes | Homemade Dutch Apple Pie
Not just a dessert.
 
Personally I like to eat chocolate zucchini cupcakes like muffins. They taste amazing when they are warm and topped with butter.
 
I have even cut one up and put in my yogurt for cookies ‘n’ cream yogurt. Basically they are all around delicious.
 
Some now. Some later.
 
I’ve made two batches now. And they don’t last long. If you can keep yourself from eating them all in one day they freeze well for a special treat or a fun breakfast when you don’t have time to bake.
Chocolate Zucchini Cupcakes | Homemade Dutch Apple Pie
 
Chocolate zucchini cupcakes can be made with or without eggs. They are soaked for better nutrient absorption. And they would be perfect for an allergen-friendly birthday treat. Nobody will even know there is zucchini in them!
 
The next time you are looking for a sweet treat that is also healthy try chocolate zucchini cupcakes. Everyone will love them.
Chocolate Zucchini Cupcakes | Homemade Dutch Apple Pie
 
Gluten Free Chocolate Zucchini Cupcakes {dairy free, nut free, corn free, coconut free, soy free, egg free}
Yields 20
A simple chocolate cupcake that uses fresh summer produce to add moisture and nutrition. Chocolate zucchini cupcakes are also free of most allergens.
Write a review
Print
Ingredients
  1. 1/2 cup tapioca flour (or potato starch or arrowroot)
  2. 1/2 cup amaranth flour (or brown rice)
  3. 1/2 cup white rice flour (or sorghum)
  4. 1/3 cup cocoa powder
  5. 6 Tbsp. butter, coconut oil, lard, tallow or olive oil
  6. 1/3 cup soaking liquid (kefir, buttermilk, milk + vinegar or water + lemon juice)
  7. 1/2 tsp. cream of tartar (if using eggs) OR 1 1/2 tsp. cream of tartar (if egg free)
  8. 2 egg whites
  9. 2 egg yolks
  10. 2 Tbsp. honey (omit if using eggs)
  11. 3/4 cup organic cane sugar, sucanat or coconut sugar
  12. 1 tsp. baking soda
  13. 1/2 tsp. sea salt
  14. 1/2 tsp. organic vanilla extract
  15. 1 cup shredded zucchini
  16. 1/2 cup mini chocolate chips, nuts, dried fruit (optional)
Instructions
  1. Mix the flours, cocoa powder, fat and soaking liquid. Cover and let sit 7-24 hours.
  2. Heat oven to 350 degrees F. Grease muffin tins or fill tin with paper liners.
  3. Beat egg whites and cream of tartar until stiff peaks form. Set aside.
  4. Add the remaining ingredients (except nuts/chips/fruit) to the soaked flour.
  5. Beat until well combined and lumps are removed (about 2 minutes).
  6. Fold in egg whites.
  7. Stir in nuts/chips/fruit.
  8. Pour the batter into the muffin cups, about 3/4 full.
  9. Bake until golden and toothpick inserted in center comes out clean, about 25 minutes. Allow to cool. Top with frosting if desired.
  10. To make the muffins egg free follow the same soaking directions. Then add the cream of tartar, honey and remaining ingredients. Mix well until lumps are removed. Stir in nuts/chips/fruit. Bake as directed above. They may take a few extra minutes to bake.
Notes
  1. Any 1 1/2 cup combination of gluten free flour will work. All purpose, whole wheat or spelt flour will also work.
Just Take A Bite https://justtakeabite.com/


In order for me to support my blogging activities, I may receive monetary compensation or other types of remuneration for my endorsement, recommendation, testimonial and/or link to any products or services from this blog.

Gluten Free Strawberry Shortcake

Summer is here! That means one thing – strawberries. Gluten free strawberry shortcake is the perfect way to enjoy this amazing early summer berry.

Gluten Free Strawberry Shortcake | Homemade Dutch Apple Pie
Do you love strawberry shortcake in the summer? I’ll confess…I’ve never liked it.  Whenever we had it growing up I opted for just vanilla ice cream with the sweetened strawberries on top.
 
I’ve tried it with a variety of cakes. Shortcake, spongecake, angel food cake, etc. Just not my thing.
 
But my family enjoys it. So yesterday the kids and I made this gluten free version of shortcake to eat with our fresh strawberries.

This gluten free strawberry shortcake is so easy to make!

 The dough comes together in minutes and bakes quickly too.  You could have fresh, warm strawberry shortcake in front of you in about twenty minutes, start to finish.
 
I’ve never been a shortcake fan, but I found myself repeatedly “taste testing” this gluten free strawberry shortcake. I think I’m a convert now. Better yet, my whole family really enjoyed this!
 
Top the shortcake with slightly sweetened strawberries. Add fresh vanilla ice cream to complete the perfect summer treat.
 
 
Are you a strawberry shortcake lover? If not this gluten free strawberry shortcake might change your mind.
Gluten Free Strawberry Shortcake
makes 6-9 shortcakes
 
Ingredients:
1 cup white rice flour or brown rice flour
1/2 cup amaranth flour or brown rice flour
1/4 tapioca flour
1/4 cup sorghum flour
1/3 cup organic palm shortening or butter
2 Tbsp. organic cane sugar, sucanat or coconut sugar
3 tsp. baking powder
1 tsp. salt
3/4 cup milk or milk substitute
 
sweetened strawberries (hull and chop strawberries; add sweetener to taste; let sit for 10 minutes; mash)
 
Directions: 
1. Heat oven to 450 degrees F. Line a baking sheet with parchment paper.
2. Cut the shortening into the flour, sugar, baking powder and salt (I do this in my food processor) until it looks like fine crumbs.
3. Add milk. Mix until just blended.
4. Place dough on a lightly floured surface. Knead a few times to make sure the dough is mixed well.
5. Pat dough into a disk 1/2″ thick. Cut into rounds (I used a drinking glass with about a 3″ diameter). Repeat until dough is used up.
6. Place rounds about 1″ apart on the baking sheet. Bake 12 minutes, until golden.
7. Serve fresh out of the oven or reheat for a few minutes before serving.
8. Slice warm shortcake in half. Spread butter on both sides if desired. Top the bottom half with sweetened strawberries. Place remaining half on top. Top with more strawberries and whipped cream or ice cream if desired.


In order for me to support my blogging activities, I may receive monetary compensation or other types of remuneration for my endorsement, recommendation, testimonial and/or link to any products or services from this blog.

Homemade gluten free oreos | Just Take A Bite

Gluten Free Homemade "Oreos" (egg free, dairy free, nut free, corn free)

No need to miss out on treats just because you have allergies! These homemade Oreos® are free of gluten, dairy, nuts, eggs and corn.

Homemade gluten free oreos | Just Take A Bite

Last year I made a homemade version of Oreos®. They were great! But now that I’m eating gluten free I can’t have them…or can’t I?

I’ve been brainstorming ideas for a safe birthday treat for myself. And these came to mind. So I tried a gluten free version yesterday. Delicious!!

The recipe isn’t all that different from the original. But I decided to do a separate post so nobody misses out. I don’t want it to get overlooked if you’re gluten free. You can have a healthy, homemade treat too!

I made some of the cookies round and some square (I was short on time, and the square are easier). I also made two batches of filling. The first one ended up a little looser than I wanted (I had two kids running around begging for breakfast). So I filled the round ones with that. Then I did a quick re-do and made a much better version. I filled the squares with that. They all taste great. One just has a little better consistency and looks better. A good filling needs plenty of flour. Lesson learned.

I hope you enjoy this very allergy friendly homemade treat. These can be gluten free, dairy free, egg free, nut free, corn free and soy free.

Gluten-Free Oreos®

Homemade gluten free oreos | Just Take A Bite

Gluten Free Homemade Oreos®
makes 15 – 20 cookies

1/4 cup organic palm shortening*
6-8 Tbsp. tapioca flour*
1/4 cup maple syrup

2 cups gluten free flour (this is the mix I use)
1/2 cup cocoa powder*
3-4 tsp. chocolate extract (optional…makes it a deeper chocolate flavor, but not necessary)
1/2 cup organic cane sugar
1 tsp. baking soda
1/2 tsp. salt
1/2 cup butter, room temp (you can substitute coconut oil or palm shortening)
6 Tbsp. honey
water

To make the cookies:

Cream butter and sugar in a large bowl. Add cocoa and chocolate extract. Blend well (a hand mixer works well). Taste. Add more chocolate extract until strong enough. Add flour, baking soda, salt and honey. Blend well. If dough is still crumbly slowly add water, 1 Tbsp. at a time until dough will hold together when squeezed with your hand (do not get it too wet or the dough will stick to the parchment paper when you try to transfer the cookies).

Place 1/3 of dough onto parchment paper. Place another layer of parchment paper over top. Roll dough between parchment paper until it is 1/8 – 1/4″ thick. Remove top paper. Cut circles and place onto parchment lined baking sheet. Repeat this process until you have used all of the dough. You can also simply roll the dough and use a cookie cutter to make squares. Then transfer the whole sheet to a baking pan.

Bake cookies at 350 for about 13 minutes. Allow to cool completely. You can do this step well in advance of making the filling.

To make the filling:

Cream shortening, flour and maple syrup in a small bowl. Add more flour for a stiffer cream (note that it will firm up/become solid when chilled). Add more maple syrup for a sweeter cream. You can prep the filling ahead and store it in the refrigerator. Let it come to room temperature before filling cookies.

To assemble the cookies:

Place the cream filling in a small plastic bag. Cut off one of the corners of the bag for a pastry bag. Pipe some cream onto the center of one cookie, leaving space at the edge . Top with another cookie. Press together just until the cream reaches the edge. Repeat this process until all of the cookies are filled. Store in an airtight container in the refrigerator. You can also freeze the cookies.

*These are affiliate links. It will not change the cost for you if you buy through the link, but I will get a small commission. It helps me earn a small amount to keep putting in the time and effort to do what I do 🙂