Home » Kid-friendly Recipes » snack » Page 8

Category: snack

Einkorn Pumpkin Scones | Just Take A Bite

Einkorn Pumpkin Scones

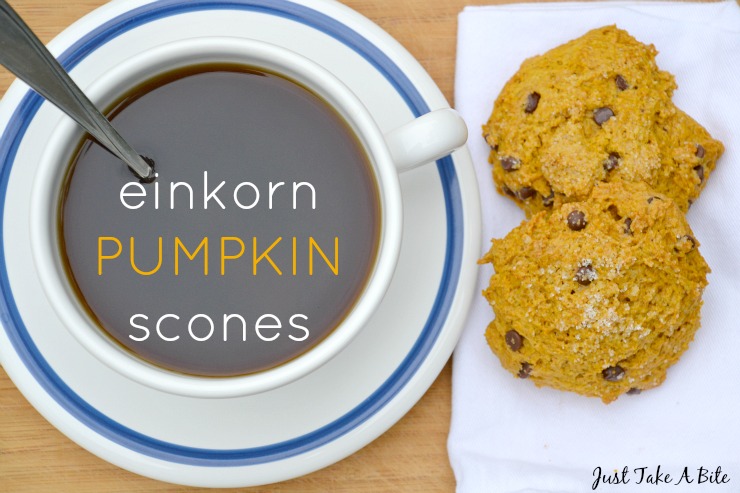
Einkorn pumpkin scones are the perfect fall breakfast. They are easy to make and free of dairy, eggs, nuts, soy, rice, corn and coconut.

Einkorn Pumpkin Scones | Just Take A Bite

Have you ever tried einkorn flour? It is quite new to me.

If you haven’t heard of it, einkorn is an ancient variety of wheat that has not been modified or processed like most modern wheat. So it is easier on the gut. Even some people that are sensitive to gluten can tolerate einkorn!

Baking with einkorn.

Einkorn absorbs liquid differently than regular wheat. So you can’t just swap it one for one in your recipes. You will likely need more einkorn.

Since I love to experiment I set to work right away when I got my first bag of einkorn flour. I created einkorn pumpkin scones.

I LOVE scones. Not only are they delicious, but they are easy to make and easy to adapt to an allergen free diet. There are no eggs required and you can use whatever flour and fat you tolerate. You just have to get the ratios right.

Einkorn Pumpkin Scones | Just Take A Bite

Start simple.

I make these even easier by mixing the dough in the food processor. Then you can chill the dough to bake later in the day, freeze the dough for freshly baked scones another day or bake them immediately.

Einkorn pumpkin scones are perfect for fall. Serve them for breakfast, brunch or alongside a hot bowl of soup (my favorite!). Who doesn’t love a warm, pumpkin and cinnamon scone fresh from the oven?!

The thing that stands out to me about einkorn flour is how soft it is. Most wheat has sort of a hard texture. But einkorn is so soft…which makes your baked goods soft! It really takes them to a whole new level.

Einkorn Pumpkin Scones | Just Take A Bite

I also love that you don’t have to soak these scones because they use all purpose einkorn flour. Many baked goods work really well with soaked flour. A scone is not one of them. I’ve tried. They just don’t quite turn out the same. Scones aren’t meant to have much liquid added. Just fat and flour.

Not a huge scone fan? Add an egg to the dough and turn einkorn pumpkin scones into cookies!

If you have never had einkorn flour I encourage you to give it a try. It is much gentler on the tummy than modern varieties of wheat. Plus it makes amazing baked goods.

Start with a batch of einkorn pumpkin scones to see how you like it and how it behaves. Then start your own experimenting.

Do you like scones as much as I do? What is your favorite flavor?

Einkorn Pumpkin Scones | Just Take A Bite

Einkorn Pumpkin Scones
Yields 12
A simple scone made with pumpkin and einkorn flour.
Write a review
Print
Prep Time
10 min
Cook Time
25 min
Total Time
35 min
Prep Time
10 min
Cook Time
25 min
Total Time
35 min
Ingredients
  1. 2 cups all purpose einkorn flour
  2. 1/2 cup cane sugar
  3. 1 tsp. cinnamon
  4. 1 tsp. baking soda
  5. 1/2 tsp. unrefined sea salt
  6. 1/2 cup solid fat (lard, tallow, butter, coconut oil)
  7. 2/3 cup pureed pumpkin
  8. 1 tsp. vanilla
  9. optional: 1/2 cup mini chocolate chips, chopped crispy pecans, dried cranberries
Instructions
  1. Heat the oven to 350*F. Line a baking sheet with parchment paper.
  2. Combine the flour, sugar, cinnamon, soda and salt in a food processor (or bowl). Pulse to combine.
  3. Add the fat. Pulse until the mixture is crumbly (or combine by hand).
  4. Add the pumpkin and vanilla. Process until well combined.
  5. Transfer the dough to a bowl. Mix the chocolate chips/nuts/dried fruit in by hand.
  6. Divide the dough into 12 equal portions. Roll into a ball and flatten on prepared parchment paper.
  7. Sprinkle cane sugar on top if desired.
  8. At this point you can freeze the scones or chill them in the refrigerator until ready to bake.
  9. Bake for 25 minutes.
Notes
  1. To make these into cookies add one egg along with the pumpkin and vanilla. Scoop mounds of dough onto the baking sheet. Reduce baking time to 10 - 15 minutes.
  2. Squash can be used in place of the pumpkin. Butternut works best.
Just Take A Bite https://justtakeabite.com/


In order for me to support my blogging activities, I may receive monetary compensation or other types of remuneration for my endorsement, recommendation, testimonial and/or link to any products or services from this blog. It will not change the cost of any products or services for  you.

This post is linked to Savoring Saturdays.

Spiced Apple Ice Cream | Just Take a Bite

Spiced Apple Ice Cream

It is fall!! That means apple season is definitely here! Celebrate with a dish of spiced apple ice cream. Warm spices, cooked apples, cold cream. Perfection.

Spiced Apple Ice Cream | Just Take a Bite

Fall is a special time in Michigan. There are orchards all around and apples of every variety.

If you have a child in school they will likely have a field trip to an orchard. Facebook is full of family apple picking photos.

Apple goodies abound. Apple cider. Apple donuts. Apple crisp. Apple pie (the Dutch variety too!). Applesauce. Apple pie parfaits. Apple pie cake. The list goes on.

Something new.

This year I created a new way to enjoy apples – in ice cream!

Spiced Apple Ice Cream | Just Take a Bite

Spiced apple ice cream is a mix of sauteed, sweetened apples (think apple pie filling), warm spices and thick raw cream.

Start by sauteing chunks of apples in butter, honey and your favorite blend of spices. Then make a rich cinnamon ice cream. Mix in the apples and let it freeze.

For the spice you can go simple with just cinnamon. Or you can add nutmeg and cloves. I actually used a cinnamon spice blend from Ground 2 Table. It worked really well.

Enjoyment all around.

Spiced apple ice cream was definitely a winner with my family. Even my in-laws got to sample some and thoroughly enjoyed it!

Of course it tastes great plain. But spiced apple ice cream is really good served on vanilla cake or apple crisp!

Spiced Apple Ice Cream | Just Take a Bite

Maybe you’re like me and need a little crunch? Crumble some homemade pumpkin spice graham crackers over the ice cream. It’ll taste like crust so you get the full apple pie effect.

You can also add crunch with chopped crispy pecans. Sprinkle them on top or mix them right in the ice cream. You’ll really bump up the flavor by using sugar coated pecans!

If you want to add to the creaminess and nutrition you can use pastured egg yolks. But if you don’t have access to quality eggs or you don’t tolerate eggs you can leave them out.

For sweetener cane sugar, maple syrup and honey all work. I like to use a combination of two or all three of them to create a more neutral flavor.

No guilt.

Does this sound too indulgent for you? Check out this amazing resource to learn how to Stop Fighting Food and enjoy what you eat. Then dig in!

Now that apple season is in full swing it’s time to create some fall treats. Grab your favorite variety of apple and fresh cream. You’re well on your way to a dish of rich spiced apple ice cream.

What is your favorite way to enjoy fall and the abundance of apples?

Spiced Apple Ice Cream | Just Take a Bite

Spiced Apple Ice Cream
Serves 12
Write a review
Print
Ingredients
  1. 2 medium apples, peeled and diced
  2. 2 tsp. butter (or coconut oil)
  3. 1 tsp. cinnamon
  4. optional: nutmeg, cloves or a cinnamon spice blend
  5. 1 Tbsp. honey
  6. 2 1/2 cups cream (raw if possible) (or coconut milk)
  7. 1/2 cp whole milk (raw if possible) (or coconut milk)
  8. 2 egg yolks (optional)
  9. 1/2 cup cane sugar, maple syrup and/or honey
  10. 1 Tbsp. vanilla or vodka
  11. 1 Tbsp. tapioca flour or arrowroot
  12. 1/4 tsp. unrefined sea salt
  13. 2 tsp. cinnamon
Instructions
  1. Sautee apples in butter, spices and honey over medium heat about 5 minutes, until tender but not mushy. Set aside to cool.
  2. In a blender combine the remaining ingredients. Blend until well mixed.
  3. Process the ice cream in an ice cream mixer according to manufacturer's directions (it takes 15 - 20 minutes in my Kitchen Aid ice cream maker attachment).
  4. Transfer the ice cream to a freezer safe container.
  5. Stir in the apples.
  6. Freeze until firm.
Notes
  1. You can add 1/4 cup chopped crispy pecans or sugar coated pecans when you stir in the apples.
Just Take A Bite https://justtakeabite.com/

In order for me to support my blogging activities, I may receive monetary compensation or other types of remuneration for my endorsement, recommendation, testimonial and/or link to any products or services from this blog. It will not change the cost of any products or services for you.

This post is linked to Savoring Saturdays.

Sourdough Pumpkin Pie Cereal | Just Take A Bite

Sourdough Pumpkin Pie Cereal

Pumpkin isn’t just for fall desserts. Try it in your breakfast! Sourdough pumpkin pie cereal is crunchy, sweet and easy to make. Eat it for breakfast covered in milk or sprinkled on yogurt.

Sourdough Pumpkin Pie Cereal | Just Take A Bite

Are you getting excited for all things pumpkin?

I know I am. It’s crazy to think that just a few years ago I wanted nothing to do with anything pumpkin.

I hated it.

I hated it as a child and as an adult. I just didn’t understand why everyone loved pumpkin pie, pumpkin cheesecake, pumpkin everything.

Until I started roasting fresh pumpkin.

What you get in a can doesn’t even compare to freshly roasted pumpkin.

Sourdough Pumpkin Pie Cereal | Just Take A Bite

Pumpkin, pumpkin everywhere!

Now I love to use pumpkin year round!

Not only is it packed with nutrients, but it tastes great. I use it in soups, breads, muffins, pasta, crackers, pie, ice cream, cheesecake. Pretty much any way you can think of.

I even love it plain with a touch of honey and sea salt.

And yes, I can even handle canned pumpkin now.

Pumpkin for breakfast.

One of my favorite ways to use pumpkin is in sourdough pumpkin pie cereal. It’s like pumpkin pie in your breakfast bowl.

Combine sourdough with pumpkin, sugar and spice and you’ve got an amazing start to your day.

Sourdough pumpkin pie cereal is great with milk. But you can also sprinkle it on yogurt. I like to add it to my salted caramel custard. It is my replacement for granola.

Sourdough Pumpkin Pie Cereal | Just Take A Bite

Pumpkin for snacks.

Most of the time I find myself just munching on it plain! Sourdough pumpkin pie cereal makes a great snack.

Better yet mix it with crispy nuts and dried apples for the perfect fall trail mix.

Any way you serve it this cereal is a delicious fall treat.

Sourdough pumpkin pie cereal is made with traditional sourdough for easier digestion and nutrient absorption. It is also dairy, egg, nut, corn, soy, coconut and rice free.

Are you in need of something different for breakfast this fall?

Grab some pumpkin (fresh or canned) and get a batch of sourdough pumpkin pie cereal started. The whole family will love it!
Sourdough Pumpkin Pie Cereal | Just Take A Bite

Sourdough Pumpkin Pie Cereal
Serves 12
Simple sourdough cereal with pumpkin and spice.
Write a review
Print
Ingredients
  1. 1 cup sourdough starter
  2. 1 cup wheat, spelt or rye flour
  3. 1/4 cup water
  4. 1 cup pureed pumpkin
  5. 3/4 cups organic cane sugar
  6. 1/2 tsp. baking soda
  7. 1/2 tsp. unrefined sea salt
  8. 1 tsp. cinnamon
Instructions
  1. Combine the starter, flour and water. Cover and let soak 6 - 24 hours.
  2. Line a large baking sheet with parchment paper. Heat oven to 350*F.
  3. Add the remaining ingredients to the flour mixture. Mix well.
  4. Spread on the parchment lined baking sheet.
  5. Bake for 1 hour.
  6. Let cool 10 minutes.
  7. Flip the whole "cake" (leaving the parchment paper on the baking sheet.
  8. Cut into small squares (using a pizza cutter or sharp knife).
  9. Bake another 45 minutes.
  10. Allow to cool completely.
  11. Store in a sealed container at room temperature for up to a month or in the freezer for up to a year.
Just Take A Bite https://justtakeabite.com/

In order for me to support my blogging activities, I may receive monetary compensation or other types of remuneration for my endorsement, recommendation, testimonial and/or link to any products or services from this blog. It will not change the cost of any products or services for you.

This post is linked to Savoring Saturdays.

Honey Sweetened Pumpkin Butter Three Ways | | Homemade Dutch Apple Pie

Honey Sweetened Pumpkin Butter Three Ways: SHK Post

Now that fall is here it’s time for pumpkin everything! Use this nutrient packed vegetable to create three variations on pumpkin butter. It is so easy and delicious. Your kids will love it.

Honey Sweetened Pumpkin Butter Three Ways | | Homemade Dutch Apple Pie

Coming up with healthy snacks can be a challenge. Kids want sweet and tasty. You want quick and nutritious.

Honey sweetened pumpkin butter is the perfect solution!

Pumpkin is not a vegetable most people eat very often. But it really is packed with nutrients. Pumpkin contains vitamin A (a lot of it!), vitamin C, potassium, copper and iron in addition to lots of phyto-nutrients. So it makes the perfect component to a healthy snack like pumpkin butter.

There are three variations of pumpkin butter – original, chocolate and sunflower. They each have a unique flavor that your kids are sure to love. And with only three or four ingredients they are all easy to make.

Honey Sweetened Pumpkin Butter Three Ways | | Homemade Dutch Apple Pie

It only takes about ten minutes to make all three pumpkin butters! It is that easy. After a few minutes in the refrigerator they are ready to eat. I like to prepare them in advance. Then snack time is easy. The pumpkin butter will last up to a week in the refrigerator.

Are you ready to whip up one or all three of these tasty fall treats? Head on over to Super Healthy Kids where I show you just how easy it is. Then surprise your kids with a delicious after school treat.

Don’t forget to really add to the fun by making a batch of pumpkin spice graham crackers to go along with the pumpkin butter. Maybe homework time will go a bit smoother with a fun snack. At the very least your kids will have their mouths and bellies full of good stuff.

In order for me to support my blogging activities, I may receive monetary compensation or other types of remuneration for my endorsement, recommendation, testimonial and/or link to any products or services from this blog. It will not change the cost of any products or services for you.

This post is linked to Savoring Saturdays.

Gluten Free Squash Cookies | Homemade Dutch Apple Pie

Gluten Free Squash Cookies: KS Post

If you are in need of a healthy breakfast, lunch or dessert gluten free squash cookies are just the thing. Easy to make. Properly prepared grains. And vegetables!

Gluten Free Squash Cookies | Homemade Dutch Apple Pie

All summer long you are in control of what your kids eat and when they eat.

There is an abundance of fresh fruit to serve IF they need a little snack (not when snack time is a mandatory part of their day). Breakfasts don’t have to be made AND consumed in ten minutes in order to catch the bus. Lunches can be cooked and served warm.

Then school starts.

Mornings are chaotic getting everyone dressed and fed and out the door.

Lunches have to be simplified and packed.

It is a challenge to maintain the nutrient dense status of your kids’ food. Not to mention they are bombarded with special treats for everything from birthdays to good behavior as soon as they step foot in the door.

So as the new school year gets under way why not combine the need for nourishment with the desire for something sweet? Did I mention it is also easy?

These super simple gluten free squash cookies are portable and work for breakfast or lunch. Vegetables in your breakfast and dessert? Yes, please!

Head over to Kitchen Stewardship to find out how I make these easy and delicious cookies.

Gluten Free Squash Cookies | Homemade Dutch Apple Pie

Grain Free Sunbutter and Jelly Bars | Homemade Dutch Apple Pie

Grain Free Sunbutter and Jelly Bars

No time to make a sandwich? No problem. Grab some grain free sunbutter and jelly bars from the freezer and an allergen friendly lunch is ready in no time.

Grain Free Sunbutter and Jelly Bars | Homemade Dutch Apple Pie

We’ve been back to school for exactly one week. And I’m already sick of packing lunches. Anybody else?

In all honesty I don’t mind it *too* much. But it sure is nice when I have some easy things to pack that are filling and nutritious.

Skip the nuts.

Of course I’m always conscious of allergies too. So while peanut butter and jelly sandwiches are about the easiest thing to make I don’t pack them in my daughter’s lunch (even though she is not allergic to nuts).

Recently I started using sunbutter in place of nut butters. My kids love it! I love that I don’t have to worry about them getting nuts on their baby sister when they eat it. Plus I can send it to school without potentially causing another child harm.

That means my daughter does get sunbutter sandwiches once in a while. They are easy and delicious.

Grain Free Sunbutter and Jelly Bars | Homemade Dutch Apple Pie

Skip the bread.

But there is something even easier!

Grain free sunbutter and jelly bars are easy to make, easy to pack and easy to eat. You get the added bonus that you don’t have to worry about making or finding decent bread! This is especially key if you are gluten, grain or anything else free.

To make the dough simply dump all of the ingredients in a bowl and mix. The “jelly” filling is just three ingredients pureed in the blender for thirty seconds.

Then pour, bake and eat.

Grain Free Sunbutter and Jelly Bars | Homemade Dutch Apple Pie

Skip the long lunch prep.

I like to make a big batch so I can keep a bunch in the freezer. Then packing lunch is easy and has virtually no preparation. In fact kids can pack it themselves!

A sunbutter and jelly bar paired with veggies and dip and some fresh fruit is a great lunch. Or you can really boost the nutrition factor by pairing it with a thermos of your favorite soup. My daughter loves split pea!

Grain Free Sunbutter and Jelly Bars | Homemade Dutch Apple Pie

Change the flavor.

Let your kids pick the jelly flavor. Strawberry is a favorite here. But raspberry, cherry and blueberry all work well.

If your kids don’t like jelly then you can make the bars without the filling. It will be like a sunbutter and honey sandwich.

Are you in need of another easy lunch component to add to your rotation? Skip the sandwich. Go for grain free sunbutter and jelly bars. They are sure to be a hit!

Don’t need to pack a lunch? Serve them for breakfast. Kids love them any time of day.

Grain Free Sunbutter and Jelly Bars | Homemade Dutch Apple Pie

Grain Free Sunbutter and Jelly Bars
Serves 12
A nut free bar that is easy to pack and takes the place of a sandwich.
Write a review
Print
Bar
  1. 1/2 cup sunbutter
  2. 1/2 cup tapioca flour
  3. 2 eggs (or flax or gelatin eggs)
  4. 1/4 cup honey
  5. 1/4 cane sugar
  6. 1/2 tsp. unrefined sea salt
  7. 1/4 tsp. baking soda
Filling
  1. 1 cup fruit (strawberry, blueberry, cherry, raspberry), thawed and drained if using frozen
  2. 1 1/2 tsp. grass-fed gelatin
  3. 1 Tbsp. honey
Bar
  1. Heat oven to 350*F. Grease a 7x11 baking pan.
  2. In a large bowl combine all of the bar ingredients. Beat until well mixed.
  3. Spread half of the dough into the greased pan.
  4. Blend the filling ingredients in a blender until pureed. Pour the filling over the dough in the pan. Spread.
  5. Pour the remaining half of the dough on top of the filling.
  6. Bake for 40 minutes.
  7. Allow to cool. Cut into bars.
  8. Store in the refrigerator for up to two weeks or in the freezer for up to one year.
Notes
  1. White rice flour can be substituted for tapioca. It will no longer be grain free.
  2. The eggs can be replaced with ground flax seeds.
  3. You can also assemble the bars by pouring all of the batter into the pan and pouring the filling on top.
  4. Any nut or seed butter will work in place of the sunbutter.
Just Take A Bite https://justtakeabite.com/
This post is linked to Savoring Saturdays.

Brain Booster Milkshake | Homemade Dutch Apple Pie

Brain Booster Milkshake

Get the school morning started right with a brain booster milkshake. Full of protein, vitamins and minerals it will keep your kids going all day.

Brain Booster Milkshake - Nutrient-dense drink kids love!

School mornings can be hard. Get breakfast on the table. Feed the baby. Brush everyone’s teeth. Find shoes and backpacks.

You do your best to prepare and have things go smoothly. But even with good planning it is tough to always give your kids the nourishment they need before heading out the door.

Especially if you have a child like mine that eats very slowly and ends up often only managing a few bites of breakfast.

To make sure she starts her day the right way I created my brain booster milkshake.

Brain Booster Milkshake - Nutrient-dense drink kids love!

Are Milkshakes Healthy?

This milkshake is packed with some nutritional powerhouses.

  • raw milk – easy to digest protein, calcium and vitamins
  • raw pastured egg yolks – B vitamins that are critical for brain function and concentration
  • probiotics – for gut health and boosting the immune system
  • grass-fed collagen – easy to digest protein and important amino acids
  • maple syrup – carbohydrates for energy and trace minerals
  • unrefined sea salt – trace minerals

I usually serve the milkshake with something else like a homemade granola bar or even dinner leftovers! But even if she doesn’t take a single bite of her breakfast I know she’s going to be fueled for the morning as long as she drinks her brain booster milkshake.

This is a really good option for kids with oral SPD and chewing problems. A milkshake goes down pretty quickly. It is also easy on the digestive system. The nutrients are very easy to absorb and utilize.

Brain Booster Milkshake - Nutrient-dense drink kids love!

One of the key components is the raw, pastured egg yolk. Have you ever read about them? Though often deemed as unhealthy or bad for your heart the opposite is actually true. And eaten raw (as long as they are pastured) the nutrients are not damaged and are easy to absorb.

Egg yolks are amazing little packages of nutrients, specifically B vitamins that are essential for your child’s brain development and ability to focus. They contain other nutrients such as choline (necessary for methylation), selenium (great for the thyroid) and biotin (helps with blood sugar regulation – perfect for breakfast!).

Milkshake for Breakfast or Lunch

I sometimes put milkshakes in my daughter’s lunch too. She struggles to eat much lunch at school. There just isn’t enough time for her, and she’s busy talking. But she usually comes home with an empty cup!

This is also great for kids going through orthodontic work. The day after adjustments their mouth can be very sore and chewing can be a challenge. A milkshake is always in my daughter’s lunch the day after her expander gets adjusted. I tell her that even if she can’t eat anything she should be sure to drink her brain booster milkshake.

Brain Booster Milkshake - Nutrient-dense drink kids love!

Healthy Chocolate Milkshake

The base milkshake recipe is vanilla. But you can create other flavors too. My kids love when I add a bit of cocoa powder or carob powder for a chocolate shake.

Add some strawberries from your freezer stash for a strawberry shake. Any berry or even cherries will work.

Sometimes we really get creative and add mint extract. It tastes like mint ice cream (my kids’ favorite!).

If you can’t have dairy, coconut milk is a great substitute! Any milk alternative will work.

Serve it in a fun cup with a straw or in a sealed cup to pack in a lunch box.

Whether you serve it for breakfast, lunch or both you’ll know your child is getting essential nutrients with a brain booster milkshake. All they have to know is they get something delicious to drink!

Get your kids excited about breakfast. What flavor do you think they’ll like best?

Brain Booster Milkshake - Nutrient-dense drink kids love!

Brain Booster Milkshake
Serves 1
A delicious shake perfect for breakfast or lunch that will give your kids the nutrients they need to perform their best.
Write a review
Print
Ingredients
  1. 1 cup raw milk or coconut milk
  2. 1 - 2 raw pastured egg yolks
  3. 1 Tbsp. grade B maple syrup
  4. 1/4 tsp. unrefined sea salt
  5. 2 tsp. grass-fed collagen
  6. 1/2 capsule preferred probiotics
  7. 1/2 capsule preferred multi-vitamin
  8. optional: 2 tsp. carob powder or cocoa powder OR 1/4 cup berries or cherries
  9. optional: 1/2 tsp. organic vanilla OR 1/4 tsp. organic mint extract
Instructions
  1. Combine all of the ingredients in a blender or a cup with a lid.
  2. Blend or shake until well combined.
  3. Serve immediately or refrigerate until ready to serve.
Just Take A Bite https://justtakeabite.com/
In order for me to support my blogging activities, I may receive monetary compensation or other types of remuneration for my endorsement, recommendation, testimonial and/or link to any products or services from this blog.

This post is linked to Savoring Saturdays.

Lemon Elderberry Gummies | Homemade Dutch Apple Pie

Lemon Elderberry Gummies

Help ward off the back-to-school illnesses with a fun, fruity treat. Lemon elderberry gummies not only taste great, they are good for you!

Lemon Elderberry Gummies | Homemade Dutch Apple Pie

For many school is already back in session. For others it is only a week away. Either way there is one thing on every parent’s mind when school starts.

How long until the kids start getting sick?

As kids start spending more time inside and around their friends it is inevitable that germs will spread. There are many natural remedies to help your child’s immune system stay strong and avoid some illness.

One simple remedy is elderberry syrup. It helps ward off viruses and minimizes their severity. My kids love taking it right off the spoon.

Lemon Elderberry Gummies | Homemade Dutch Apple Pie

Make it fun.

Another great way to add elderberry syrup into your diet is adding it to gummies. Kids don’t even know they are doing something good for themselves by eating these fun, fruity candies.

The lemon adds some vitamin C along with the elderberry for even more immune support.

These gummies are also packed with grass-fed gelatin that is helpful for healing the gut and supporting the whole body. Plus it provides easy-to-digest pure protein.

Great for everyone.

I like to serve lemon elderberry gummies for breakfast and snacks or pack them in lunches for my oldest. They are great to have around for the younger kids as well. Even toddlers love to munch on gummies!

No need to buy fruit snacks. Most of them are filled with artificial flavors and colors.

Even if you buy the ogranic/natural varieties they still contain “natural flavor” which is actually almost the same thing as artificial flavor. And for kids like mine it has the same effect on their mental clarity and behavior.

Lemon Elderberry Gummies | Homemade Dutch Apple Pie

Fast food.

Although homemade gummies may sound like a daunting snack to make it is actually very simple. Lemon elderberry gummies go from the pan to the fridge in about five minutes.

Simply mix the ingredients, heat and pour. That’s all there is to it.

You can get the kids involved with this project by letting them pick the shapes. See what candy molds your grocery store carries or buy some online. I like to use silicon molds so I don’t have to worry about putting hot liquid in plastic. Plus gummies are much easier to remove from the silicon molds.

If you don’t have any molds you can simply pour the warm liquid into a glass pan. When the lemon elderberry gummies are gelled you can cut them into squares or any shape you like.

No lemon juice on hand? You can use blueberry, cherry or lime juice instead. Try all four varieties and see what your kids like best.

Are you looking for easy, healthy snacks for school lunches? Are you looking for easy ways to help keep your kids healthy?

Lemon elderberry gummies are just what you’re looking for! Fruity, fun and healthy. Whip up a batch to start the school year right.

Lemon Elderberry Gummies | Homemade Dutch Apple Pie

Lemon Elderberry Gummies
Yields 25
A fun, fruity treat to help ward off colds.
Write a review
Print
Ingredients
  1. 1 cup organic lemon juice
  2. 2 Tbsp. elderberry syrup
  3. 1/2 cup honey
  4. 4 Tbsp. grass-fed gelatin (NOT collagen)
  5. 1/4 tsp. unrefined sea salt
Instructions
  1. In a small saucepan combine the lemon juice, elderberry syrup, honey and salt. Whisk to combine.
  2. Add the gelatin and whisk to combine.
  3. Let sit one minute.
  4. Heat over low-medium heat, stirring frequently, until mixture is warm and has become liquid again.
  5. Pour mixture into molds or a glass pan (smaller pan for thicker gummies, larger pan for thinner).
  6. Refrigerate until firm, about thirty minutes.
  7. Remove from molds or cut into shapes.
  8. Store in a sealed container in the refrigerator for up to two weeks.
Just Take A Bite https://justtakeabite.com/

In order for me to support my blogging activities, I may receive monetary compensation or other types of remuneration for my endorsement, recommendation, testimonial and/or link to any products or services from this blog.

This post is linked to Savoring Saturdays.

Salted Caramel Cupcakes with Maple Bacon Glaze | Homemade Dutch Apple Pie

Salted Caramel Cupcakes with Maple Bacon Glaze

Looking for a unique treat that is both salty and sweet? Salted caramel cupcakes with maple bacon glaze are the perfect solution. They are free of gluten, dairy, corn and nut but full of flavor.

Salted Caramel Cupcakes with Maple Bacon Glaze | Homemade Dutch Apple Pie

When it comes to dessert cupcakes top the list for fun, portable and easy to eat. No need to fuss with cutting or plating.

Simple. Just the way I like it.

There are so many cupcake flavors to choose from. Chocolate, vanilla and yellow are traditional flavors. Or you can add some fun with strawberry and coconut.

But if you really want to kick your cupcakes up a notch try a salted caramel cupcake base with maple bacon glaze.

The cake is properly prepared with soaked gluten free grains. The glaze is made with only four simple ingredients, including bacon grease and urefined sea salt!

Salted Caramel Cupcakes with Maple Bacon Glaze | Homemade Dutch Apple Pie

The family consensus.

I thought these salted caramel cupcakes were amazing! I am a sucker for anything sweet with a pop of saltiness. Add bacon on top? You’ve got a winner. I would have gladly eaten the whole batch myself.

And I may have eaten a few for breakfast!

My husband enjoyed them, but wasn’t sure he liked quite so much bacon flavor in his cupcake.

The kids felt the same – good cupcakes, pretty strong on bacon.

You can adjust the bacon flavor to your liking by adjusting the amount of bacon grease used in the glaze. It will also depend on your bacon. Ours is quite smokey and has a very strong flavor.

Salted Caramel Cupcakes with Maple Bacon Glaze | Homemade Dutch Apple Pie

The cake.

Salted caramel cupcakes have a great balance of salty and sweet. They are actually good without adding any frosting or glaze.

You could go for a simple vanilla buttercream on top too if you like more sweet. Chocolate frosting would also pair well with the salty base.

The cake itself is soft and moist from soaking the gluten free grains. Not too dense but also not crumbly. It holds up well in little hands.

Allergen friendly.

These cupcakes are gluten, dairy, nut, corn, rice, soy and coconut free. If you can’t have eggs you could use an egg replacement.

In other words they are safe for just about everyone!

Bring on the birthday parties. Salted caramel and bacon are the perfect combination for a celebration.

Are you a salty and sweet fan? Looking for a confection that’s unique and allergen friendly?

Salted caramel cupcakes with maple bacon glaze give a whole new meaning to dessert. Easy, fun, salty, sweet goodness.

Salted Caramel Cupcakes with Maple Bacon Glaze | Homemade Dutch Apple Pie

Salted Caramel Cupcakes with Maple Bacon Glaze
Yields 12
An allergen friendly salty and sweet cupcake perfect for birthdays and holidays.
Write a review
Print
Cupcake
  1. 1/4 cup amaranth or brown rice flour
  2. 1 cup sorghum or white rice flour
  3. 1/2 cup tapioca flour
  4. 1 cup warm water
  5. 1 Tbsp. lemon juice
  6. 1/4 cup maple syrup
  7. 1 tsp. organic vanilla (use corn free if allergic to corn)
  8. 1 1/2 tsp. unrefined sea salt
  9. 1 tsp. baking soda
  10. 1 egg or egg substitute
  11. 1 1/2 Tbsp. extra virgin olive oil
  12. 1/4 cup organic cane sugar or coconut sugar
Glaze
  1. 2 Tbsp. melted bacon grease
  2. 2 Tbsp. maple syrup
  3. 4 Tbsp. organic cane sugar
  4. pinch sea salt (optional)
Cupcake
  1. Combine the amaranth, sorghum and tapioca flour. Whisk to remove any lumps.
  2. Add the water and lemon juice. Mix and work out any lumps.
  3. Cover and let sit 7-24 hours.
  4. Heat the oven to 325*F. Line a muffin pan with muffin cups.
  5. Add the syrup, vanilla, salt, soda, egg, oil and sugar to the soaked mixture.
  6. Beat until well combined.
  7. Fill muffin cups almost full.
  8. Bake for 45 minutes.
  9. Allow to cool completely before glazing.
Glaze
  1. Combine the melted bacon grease, syrup, sugar and salt. Mix well.
  2. Top the cupcakes with glaze.
  3. Refrigerate to solidify the glaze.
  4. Serve at room temp or straight from the refrigerator.
  5. Store in a covered container in the refrigerator.
Notes
  1. Some or all of the bacon grease can be replaced with melted lard, butter or coconut oil to reduce the bacon flavor.
  2. The cupcakes freeze well. Freeze without glaze.
Just Take A Bite https://justtakeabite.com/
In order for me to support my blogging activities, I may receive monetary compensation or other types of remuneration for my endorsement, recommendation, testimonial and/or link to any products or services from this blog.

This post is linked to Savoring Saturdays.

Nectarine Squash Pops | Homemade Dutch Apple Pie

Nectarine Squash Pops: Sugar Free First Birthday Popsicles!!

When your summer baby turns one you need a safe, sugar free treat. Nectarine squash pops are the perfect solution! Two ingredients, lots of flavor and no allergens.

Nectarine Squash Pops | Homemade Dutch Apple Pie

First birthdays definitely require a celebration.

You made it! You made it through the first year.

The first year of sleepless nights, crying and dirty diapers.

The first year full of firsts! Smiles, coos, laughs, rolling, crawling and maybe even walking. First foods, first teeth, first words.

Nectarine Squash Pops | Homemade Dutch Apple Pie

Let them eat cake.

A birthday celebration requires a special birthday treat. Usually that means cake.

I LOVE decorating cakes. I look forward to our family birthdays each year because I get to create new cakes.

I’ve done Dora, monkeys, dinosaurs, cars, arts and crafts, Legos, cows, Frozen, bulldozers, April showers and princesses for my kids. I’ve even done airplanes, sports and Cat in the Hat for my nephew, basketball and Calvin Knights for my dad, a fall cake for other family members and a neat recital cake for my sister-in-law.

I wanted to continue that tradition with my third child. With the challenges we’ve faced over the last year we are all certainly ready to celebrate.

Of course I set to work experimenting with new recipes that were free of her allergens.

I made a couple batches of cupcakes (that she loved!)…only to find out more foods that bother her.

Nectarine Squash Pops | Homemade Dutch Apple Pie

Who needs cake?

My daughter’s allergies combined with my preference to keep her at least gluten free for now (she’s been grain free up to this point) make birthday cake almost impossible. We can’t use:

  • wheat
  • rye
  • barley
  • oats
  • rice
  • sorghum
  • amaranth
  • buckwheat
  • tapioca
  • potato
  • arrowroot
  • coconut
  • almond
  • nuts
  • quinoa
  • millet
  • beans

Add to that no coconut oil, palm shortening, butter or egg whites and you’re not left with much.

Birthday Pops.

I gave up on the idea of birthday cake and opted to do popsicles! They make a perfect summer treat.

Since these popsicles are for a one year old I made them without any added sweetener. I even added some vegetables to keep them mild and nutritious.

Nectarine squash pops make a birthday dessert you can really feel good about serving to the whole family.

Nectarine Squash Pops | Homemade Dutch Apple Pie

Eat in season.

I chose fruit that is in season here in Michigan in late August. Nectarines are so sweet and have such a bright color. They make a great base for a popsicle.

You can use peaches instead if you prefer the flavor.

I ended up making a second batch since we ate the first batch before the birthday! I added some watermelon to the second batch for extra color and sweetness. Watermelon is another late summer fruit that almost everyone enjoys.

Nectarine Squash Pops | Homemade Dutch Apple Pie

Fun and Fast.

Nectarine squash pops are the easiest birthday dessert you’ll ever make. Puree cooked squash and cut up nectarine with an immersion blender or in a regular blender and pour the puree into the popsicle molds. Done!

They are also easy to serve. Simply take them out of the molds a few minutes before serving to take the chill off. Pass them out and enjoy.

For older kids you can add chunks of fruit like cut up strawberries, whole blueberries or raspberries to the puree before filling the molds. Then you’ll really have a fruity, colorful treat.

You can also add a tablespoon or two of honey for big kids. It really covers up any hint of squash flavor. My oldest is pretty picky about flavors and textures. She said she couldn’t taste the squash at all when I added a bit of honey.

I was very disappointed that I couldn’t make a cake for my baby’s first birthday. But I’m so happy with how these nectarine squash pops turned out! I’m even happier that my daughter likes them…and that they are so healthy and free of allergens.

Do you celebrate any summer birthdays?

Instead of cake try nectarine squash pops. They make summer celebrations delicious and healthy.

Nectarine Squash Pops | Homemade Dutch Apple Pie

Nectarine Squash Pops
Serves 4
A fruity, sugar free summer birthday treat.
Write a review
Print
Ingredients
  1. 3 medium nectarines, peeled and pitted
  2. 3/4 cups cooked butternut squash
  3. optional: 1/2 cup watermelon (seeds removed)
  4. optional: 1 - 2 Tbsp. honey
Instructions
  1. Puree the nectarines and squash (and watermelon and honey) with an immersion blender or in a blender.
  2. Fill popsicle molds and freeze until firm.
Notes
  1. You can replace the nectarines with peaches.
  2. For little ones let the popsicles sit out for a few minutes to soften before serving.
Just Take A Bite https://justtakeabite.com/
In order for me to support my blogging activities, I may receive monetary compensation or other types of remuneration for my endorsement, recommendation, testimonial and/or link to any products or services from this blog.

This post is linked to Savoring Saturdays.